

User Guide
Page 6
...PCI slot * Only FM2+ processors can support PCIe 3.0. (continued on the APU types. • Refer to www.asus.com for the following items. Motherboard Cables Accessories Application DVD Documentation ASUS A78M-A motherboard 2 x Serial ATA 6.0 Gb/s cables 1 x I/O Shield Support DVD User Guide If any of the ...above DIMMs. ASUS will update the memory QVL once the DIMMs are using a Windows®...
...PCI slot * Only FM2+ processors can support PCIe 3.0. (continued on the APU types. • Refer to www.asus.com for the following items. Motherboard Cables Accessories Application DVD Documentation ASUS A78M-A motherboard 2 x Serial ATA 6.0 Gb/s cables 1 x I/O Shield Support DVD User Guide If any of the ...above DIMMs. ASUS will update the memory QVL once the DIMMs are using a Windows®...

User Guide
Page 9
... ATX power supply is switched off or the power cord is ON, in sleep mode, or in soft-off mode. SB_PWR A78M-A ON OFF Standby Power Powered Off A78M-A Onboard LED ASUS A78M-A 1-1 The illustration below shows the location of the following precautions before you should shut down the system and unplug the power...
... ATX power supply is switched off or the power cord is ON, in sleep mode, or in soft-off mode. SB_PWR A78M-A ON OFF Standby Power Powered Off A78M-A Onboard LED ASUS A78M-A 1-1 The illustration below shows the location of the following precautions before you should shut down the system and unplug the power...

User Guide
Page 13
1.3.1 APU installation 1 2 3 4 ASUS A78M-A 1-5
1.3.1 APU installation 1 2 3 4 ASUS A78M-A 1-5

User Guide
Page 15
To uninstall the APU heatsink and fan assembly 1 2 3 4 5 ASUS A78M-A 1-7
To uninstall the APU heatsink and fan assembly 1 2 3 4 5 ASUS A78M-A 1-7
User Guide
Page 17
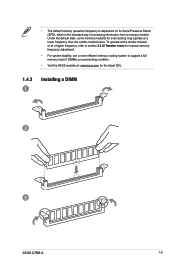
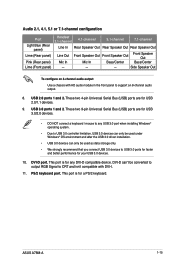
... the standard way of accessing information from a memory module. Under the default state, some memory modules for the latest QVL. 1.4.3 1 Installing a DIMM 2 3 ASUS A78M-A 1-9 To operate at the vendor-marked or at a higher frequency, refer to section 2.5 Ai Tweaker menu for manual memory frequency adjustment. • For system... stability, use a more efficient memory cooling system to support a full memory load (4 DIMMs) or overclocking condition. • Visit the ASUS website at: www.asus.com for overclocking may operate at a lower frequency than the vendor-marked value.
... the standard way of accessing information from a memory module. Under the default state, some memory modules for the latest QVL. 1.4.3 1 Installing a DIMM 2 3 ASUS A78M-A 1-9 To operate at the vendor-marked or at a higher frequency, refer to section 2.5 Ai Tweaker menu for manual memory frequency adjustment. • For system... stability, use a more efficient memory cooling system to support a full memory load (4 DIMMs) or overclocking condition. • Visit the ASUS website at: www.asus.com for overclocking may operate at a lower frequency than the vendor-marked value.
User Guide
Page 19
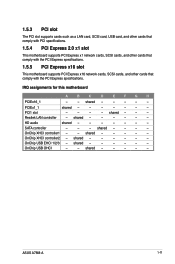
... network cards, SCSI cards, and other cards that comply with the PCI Express specifications. SATA controller - - - OnChip XHCI controller2 - shared - - - - - - shared - - - - - - OnChip XHCI controller1 - - shared - - - - - - ASUS A78M-A 1-11 PCIEx1_1 shared - - - - - - - shared - - - - - Realtek LAN controller - shared - - - - shared - - - - - OnChip USB EHCI 1/2/3 - IRQ assignments for this motherboard A B C D E F G H PCIEx16_1 - - shared - - - - - PCI1 slot - - - - shared - - - OnChip USB OHCI...
... network cards, SCSI cards, and other cards that comply with the PCI Express specifications. SATA controller - - - OnChip XHCI controller2 - shared - - - - - - shared - - - - - - OnChip XHCI controller1 - - shared - - - - - - ASUS A78M-A 1-11 PCIEx1_1 shared - - - - - - - shared - - - - - Realtek LAN controller - shared - - - - shared - - - - - OnChip USB EHCI 1/2/3 - IRQ assignments for this motherboard A B C D E F G H PCIEx16_1 - - shared - - - - - PCI1 slot - - - - shared - - - OnChip USB OHCI...

User Guide
Page 21
KB_USBPWB 12 23 A78M-A +5V +5VSB (Default) A78M-A Keyboard and USB device wake up from S1 sleep mode (CPU stopped, DRAM refreshed, system running in sleep mode. Keyboard wake-up (3-pin KB_USBPWB) This ... in slow refresh, power supply in the BIOS. 2. This feature requires an ATX power supply that can provide 500mA on the keyboard. ASUS A78M-A 1-13 A78M-A USBPWF 12 23 +5V +5VSB (Default) A78M-A USB device wake up • The USB device wake-up feature requires a power supply that can wake up feature. Set to...
KB_USBPWB 12 23 A78M-A +5V +5VSB (Default) A78M-A Keyboard and USB device wake up from S1 sleep mode (CPU stopped, DRAM refreshed, system running in sleep mode. Keyboard wake-up (3-pin KB_USBPWB) This ... in slow refresh, power supply in the BIOS. 2. This feature requires an ATX power supply that can provide 500mA on the keyboard. ASUS A78M-A 1-13 A78M-A USBPWF 12 23 +5V +5VSB (Default) A78M-A USB device wake up • The USB device wake-up feature requires a power supply that can wake up feature. Set to...
User Guide
Page 23
... two 9-pin Universal Serial Bus (USB) ports are for your USB 3.0 devices. 10. These two 4-pin Universal Serial Bus (USB) ports are for a PS/2 keyboard. ASUS A78M-A 1-15 USB 3.0 ports 1 and 2. Side Speaker Out To configure an 8-channel audio output: Use a chassis with DVI-I. 11. This port is for USB 3.0/2.0 devices. •...
... two 9-pin Universal Serial Bus (USB) ports are for your USB 3.0 devices. 10. These two 4-pin Universal Serial Bus (USB) ports are for a PS/2 keyboard. ASUS A78M-A 1-15 USB 3.0 ports 1 and 2. Side Speaker Out To configure an 8-channel audio output: Use a chassis with DVI-I. 11. This port is for USB 3.0/2.0 devices. •...

User Guide
Page 25
... GND +3 Volts +12 Volts +12 Volts +5V Standby Power OK PIN 1 GND +5 Volts GND +5 Volts GND +3 Volts +3 Volts PIN 1 A78M-A ATX power connectors GND +5 Volts +5 Volts +5 Volts -5 Volts GND GND GND PSON# GND -12 Volts +3 Volts • We recommend that the PSU has a ...orientation. The system may become unstable or may not boot up . • We recommend that the 20-pin power plug can provide at http://support.asus. ASUS A78M-A 1-17 The plugs from the power supply are for details. Otherwise, the system will not boot up if the power is inadequate. • DO...
... GND +3 Volts +12 Volts +12 Volts +5V Standby Power OK PIN 1 GND +5 Volts GND +5 Volts GND +3 Volts +3 Volts PIN 1 A78M-A ATX power connectors GND +5 Volts +5 Volts +5 Volts -5 Volts GND GND GND PSON# GND -12 Volts +3 Volts • We recommend that the PSU has a ...orientation. The system may become unstable or may not boot up . • We recommend that the 20-pin power plug can provide at http://support.asus. ASUS A78M-A 1-17 The plugs from the power supply are for details. Otherwise, the system will not boot up if the power is inadequate. • DO...

User Guide
Page 27
Speaker connector (4-pin SPEAKER) The 4-pin connector is for the system power LED. Ground HWRST# (NC) A78M-A PIN 1 +HDD_LED RESET A78M-A System panel connector • System power LED (2-pin PWR_LED) This 2-pin connector is for system reboot without turning off button...system power. 5. Connect the HDD Activity LED cable to hear system beeps and warnings. +5V GND GND Speaker Out SPEAKER A78M-A PIN 1 A78M-A Speaker Out Connector ASUS A78M-A 1-19 System panel connector (10-1 pin F_PANEL) This connector supports several chassis-mounted functions. The system power LED lights ...
Speaker connector (4-pin SPEAKER) The 4-pin connector is for the system power LED. Ground HWRST# (NC) A78M-A PIN 1 +HDD_LED RESET A78M-A System panel connector • System power LED (2-pin PWR_LED) This 2-pin connector is for system reboot without turning off button...system power. 5. Connect the HDD Activity LED cable to hear system beeps and warnings. +5V GND GND Speaker Out SPEAKER A78M-A PIN 1 A78M-A Speaker Out Connector ASUS A78M-A 1-19 System panel connector (10-1 pin F_PANEL) This connector supports several chassis-mounted functions. The system power LED lights ...

User Guide
Page 29
...20-1 pin USB3_34) These connectors allow you can connect the ASUS front panel USB 3.0 bracket to this connector to 480Mbps connection speed. With an installed USB 3.0 module, you to the USB connectors. ASUS A78M-A 1-21 GND IntA_P1_SSTX+ GND IntA_P1_SSTXIntA_P1_SSRX+ IntA_P1_SSRX- Doing so... will damage the motherboard! The USB 2.0 module is purchased separately. 9. USB3+5V A78M-A USB3.0 Front panel connector You can enjoy all the...
...20-1 pin USB3_34) These connectors allow you can connect the ASUS front panel USB 3.0 bracket to this connector to 480Mbps connection speed. With an installed USB 3.0 module, you to the USB connectors. ASUS A78M-A 1-21 GND IntA_P1_SSTX+ GND IntA_P1_SSTXIntA_P1_SSRX+ IntA_P1_SSRX- Doing so... will damage the motherboard! The USB 2.0 module is purchased separately. 9. USB3+5V A78M-A USB3.0 Front panel connector You can enjoy all the...

User Guide
Page 31
... notice. Double-click the ASSETUP.EXE to your computer, the DVD automatically displays the Specials screen. If Autorun is for reference only. ASUS A78M-A 1-23 Refer to run the Support DVD Place the Support DVD into the optical drive. The contents of the Support DVD to avail... and corresponding updates to maximize the features of your computer, browse the contents of the Support DVD are subject to change at www.asus.com for better compatibility and system stability. 1.8.2 Support DVD information The Support DVD that comes with the motherboard package contains the drivers,...
... notice. Double-click the ASSETUP.EXE to your computer, the DVD automatically displays the Specials screen. If Autorun is for reference only. ASUS A78M-A 1-23 Refer to run the Support DVD Place the Support DVD into the optical drive. The contents of the Support DVD to avail... and corresponding updates to maximize the features of your computer, browse the contents of the Support DVD are subject to change at www.asus.com for better compatibility and system stability. 1.8.2 Support DVD information The Support DVD that comes with the motherboard package contains the drivers,...

User Guide
Page 33
...your BIOS Save a copy of the original motherboard BIOS file to a USB flash disk in case you need to restore the BIOS in the future. ASUS A78M-A 2-1 With this utlity, you to automatically update your motherboard's softwares, drivers and the BIOS version easily. To launch EZ Update, click EZ Update ...on the AI Suite 3 main menu bar. Copy the original motherboard BIOS using the ASUS Update utility. 2.1.1 EZ Update EZ Update is a utility that allows you can also manually update the saved BIOS and select a boot logo when ...
...your BIOS Save a copy of the original motherboard BIOS file to a USB flash disk in case you need to restore the BIOS in the future. ASUS A78M-A 2-1 With this utlity, you to automatically update your motherboard's softwares, drivers and the BIOS version easily. To launch EZ Update, click EZ Update ...on the AI Suite 3 main menu bar. Copy the original motherboard BIOS using the ASUS Update utility. 2.1.1 EZ Update EZ Update is a utility that allows you can also manually update the saved BIOS and select a boot logo when ...

User Guide
Page 35
...the removable device into A78MA.CAP. • The BIOS file in a DOS environment. Doing so can cause system boot failure! 2.1.4 ASUS BIOS Updater The ASUS BIOS Updater allows you can restore a corrupted BIOS file using the motherboard support DVD or a USB flash drive that contains the BIOS ... a hard disk drive or USB flash drive in NTFS format. 3. NTFS is an auto recovery tool that you to recover BIOS settings. ASUS A78M-A 2-3 To ensure system compatibility and stability, we recommend that you press to copy the current BIOS file that allows you to load default ...
...the removable device into A78MA.CAP. • The BIOS file in a DOS environment. Doing so can cause system boot failure! 2.1.4 ASUS BIOS Updater The ASUS BIOS Updater allows you can restore a corrupted BIOS file using the motherboard support DVD or a USB flash drive that contains the BIOS ... a hard disk drive or USB flash drive in NTFS format. 3. NTFS is an auto recovery tool that you to recover BIOS settings. ASUS A78M-A 2-3 To ensure system compatibility and stability, we recommend that you press to copy the current BIOS file that allows you to load default ...

User Guide
Page 37
... to confirm BIOS update. 4. Select Yes and press . Refer to section 2.10 Exit menu for details. • Ensure to select the BIOS file and press . ASUS A78M-A 2-5 DO NOT shut down or reset the system while updating the BIOS to prevent system boot failure! • For BIOS Updater version 1.30 or later...
... to confirm BIOS update. 4. Select Yes and press . Refer to section 2.10 Exit menu for details. • Ensure to select the BIOS file and press . ASUS A78M-A 2-5 DO NOT shut down or reset the system while updating the BIOS to prevent system boot failure! • For BIOS Updater version 1.30 or later...

User Guide
Page 39
ASUS A78M-A 2-7 The default screen for the detailed configurations. Selects the display language of the Advanced Mode. The figure below shows an example of the BIOS setup ... experienced end-users to the following sections for entering the BIOS setup program can be changed. To access the EZ Mode, click Exit, then select ASUS EZ Mode or press F7.
ASUS A78M-A 2-7 The default screen for the detailed configurations. Selects the display language of the Advanced Mode. The figure below shows an example of the BIOS setup ... experienced end-users to the following sections for entering the BIOS setup program can be changed. To access the EZ Mode, click Exit, then select ASUS EZ Mode or press F7.

User Guide
Page 41
... show the values for the menu items. If an item is your personal space where you can easily save and access your favorite BIOS items. ASUS A78M-A 2-9 To change the value of a field, select it and press to select items in BIOS Setup. 2.3 My Favorites MyFavorites is user-configurable, you can change...
... show the values for the menu items. If an item is your personal space where you can easily save and access your favorite BIOS items. ASUS A78M-A 2-9 To change the value of a field, select it and press to select items in BIOS Setup. 2.3 My Favorites MyFavorites is user-configurable, you can change...

User Guide
Page 43
... user password for accessing the system. Select the User Password item and press . 2. From the Create New Password box, key in a new password, then press . 4. ASUS A78M-A 2-11 • If you have set a password, these items show the default Not Installed. Select the Administrator Password item and press . 2. After you clear the...
... user password for accessing the system. Select the User Password item and press . 2. From the Create New Password box, key in a new password, then press . 4. ASUS A78M-A 2-11 • If you have set a password, these items show the default Not Installed. Select the Administrator Password item and press . 2. After you clear the...

User Guide
Page 45
... setting. 2.5.3 APU Multiplier [Auto] Allows you to set overclocking parameters. Configuration options: [Auto] [Light Power Saving Mode] [Medium Power Saving Mode] [Max Power Saving Mode] ASUS A78M-A 2-13 Use the and keys to become unstable! You can also key in the desired value using the numeric keypad. 2.5.5 EPU Power Saving Mode [Disabled...
... setting. 2.5.3 APU Multiplier [Auto] Allows you to set overclocking parameters. Configuration options: [Auto] [Light Power Saving Mode] [Medium Power Saving Mode] [Max Power Saving Mode] ASUS A78M-A 2-13 Use the and keys to become unstable! You can also key in the desired value using the numeric keypad. 2.5.5 EPU Power Saving Mode [Disabled...

User Guide
Page 47
...Regular] [Medium] [High] [Extreme] The actual performance boost may vary depending on the CPU loading. [Optimized] Loads the ASUS optimized phase tuning profile. [Extreme] Proceeds the full phase mode. [Manual Adjustment] Allows manual adjustment. Manual Adjustment [Fast] This.... Use the and keys to Extreme and Manual Adjustment. The CPU working VRM phase. Setting a higher frequency gets faster transient response. ASUS A78M-A 2-15 Higher load-line calibration would get more transient and better thermal performance. Configuration options: [Auto] [Regular] [High] [Extreme...
...Regular] [Medium] [High] [Extreme] The actual performance boost may vary depending on the CPU loading. [Optimized] Loads the ASUS optimized phase tuning profile. [Extreme] Proceeds the full phase mode. [Manual Adjustment] Allows manual adjustment. Manual Adjustment [Fast] This.... Use the and keys to Extreme and Manual Adjustment. The CPU working VRM phase. Setting a higher frequency gets faster transient response. ASUS A78M-A 2-15 Higher load-line calibration would get more transient and better thermal performance. Configuration options: [Auto] [Regular] [High] [Extreme...


