

User Guide
Page 2
... repair, modification of the product is eager to : ASUSTeK Computer Inc. SPECIFICATIONS AND INFORMATION CONTAINED IN THIS MANUAL ARE FURNISHED FOR INFORMATIONAL USE ONLY, AND ARE SUBJECT TO CHANGE AT ANY TIME WITHOUT NOTICE, AND SHOULD NOT BE CONSTRUED AS A COMMITMENT BY ASUS. or (2) the serial number of alteration is dependent on the preferred carrier and the location...
... repair, modification of the product is eager to : ASUSTeK Computer Inc. SPECIFICATIONS AND INFORMATION CONTAINED IN THIS MANUAL ARE FURNISHED FOR INFORMATIONAL USE ONLY, AND ARE SUBJECT TO CHANGE AT ANY TIME WITHOUT NOTICE, AND SHOULD NOT BE CONSTRUED AS A COMMITMENT BY ASUS. or (2) the serial number of alteration is dependent on the preferred carrier and the location...
User Guide
Page 4
... adding or removing devices to or from connectors, slots, sockets and circuitry. • Avoid dust, humidity, and temperature extremes. Contact a qualified service technician or your local power company. • If the power supply is organized This guide contains the following parts: • Chapter 1: Product introduction This chapter describes the features of the motherboard and the new technology it by yourself. How this guide This user guide contains...
... adding or removing devices to or from connectors, slots, sockets and circuitry. • Avoid dust, humidity, and temperature extremes. Contact a qualified service technician or your local power company. • If the power supply is organized This guide contains the following parts: • Chapter 1: Product introduction This chapter describes the features of the motherboard and the new technology it by yourself. How this guide This user guide contains...

User Guide
Page 6
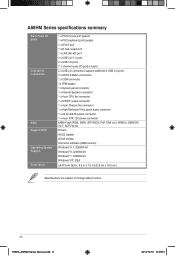
... Dual Graphics technology. AMD® A68H FCH: - 4 x Serial ATA 6.0Gb/s connectors (Grey) support RAID 0, RAID 1, RAID 10, and JBOD configurations (continued on the next page) vi E9808_A68HM Series_Manual.indb 6 2014/10/16 10:08:57 A68HM Series specifications summary CPU Chipset Memory Graphics Storage / RAID AMD® FM2+ Socket for AMD® A-Series/Athlon™ Series processors AMD® Turbo Core Technology 3.0 support Supports APU up to 4 cores • Refer to www.asus.com for the following items. Motherboard Cables Accessories Application DVD Documentation ASUS A68HM...
... Dual Graphics technology. AMD® A68H FCH: - 4 x Serial ATA 6.0Gb/s connectors (Grey) support RAID 0, RAID 1, RAID 10, and JBOD configurations (continued on the next page) vi E9808_A68HM Series_Manual.indb 6 2014/10/16 10:08:57 A68HM Series specifications summary CPU Chipset Memory Graphics Storage / RAID AMD® FM2+ Socket for AMD® A-Series/Athlon™ Series processors AMD® Turbo Core Technology 3.0 support Supports APU up to 4 cores • Refer to www.asus.com for the following items. Motherboard Cables Accessories Application DVD Documentation ASUS A68HM...

User Guide
Page 7
...Short circuit damage prevention - ASUS ESD Guards - A68HM Series specifications summary Expansion slots LAN Audio USB ASUS unique features 1 x PCIe 3.0*/2.0 x16 slot 1 x PCIe 2.0 x1 slot 1 x PCI slot * PCIe 3.0 is supported by FM2+ processors only. Realtek® 8111GR Gigabit LAN controller Realtek® ALC887-VD 7.1-channel High Definition Audio CODEC - ASUS Stainless Steel Back I/O - 3x more durable corrosion-resistant coating * ASUS 5X Protection Only for left and right channels to support a 7.1-channel audio output. ASUS UEFI BIOS EZ Mode featuring friendly graphics user...
...Short circuit damage prevention - ASUS ESD Guards - A68HM Series specifications summary Expansion slots LAN Audio USB ASUS unique features 1 x PCIe 3.0*/2.0 x16 slot 1 x PCIe 2.0 x1 slot 1 x PCI slot * PCIe 3.0 is supported by FM2+ processors only. Realtek® 8111GR Gigabit LAN controller Realtek® ALC887-VD 7.1-channel High Definition Audio CODEC - ASUS Stainless Steel Back I/O - 3x more durable corrosion-resistant coating * ASUS 5X Protection Only for left and right channels to support a 7.1-channel audio output. ASUS UEFI BIOS EZ Mode featuring friendly graphics user...
User Guide
Page 8
...channel audio I/O ports (3-jack) 2 x USB 2.0 connectors support additional 4 USB 2.0 ports 4 x SATA 6.0Gb/s connectors 1 x COM connector 1x TPM header 1 x System panel connector 1 x Internal Speaker connector 1 x 4-pin CPU fan connector 1 x S/PDIF output connector 1 x 4-pin Chassis fan connector 1 x High Definition Front panel audio connector 1 x 24-pin EATX power connector 1 x 4-pin ATX 12V power connector 64Mb Flash ROM, NEW UEFI BIOS, PnP, DMI v2.0, WfM2.0, SM BIOS V2.7, ACPI V2.0a Drivers ASUS Update ASUS utilities Anti-Virus software (OEM version) Windows® 8.1, 32bit/64-bit Windows...
...channel audio I/O ports (3-jack) 2 x USB 2.0 connectors support additional 4 USB 2.0 ports 4 x SATA 6.0Gb/s connectors 1 x COM connector 1x TPM header 1 x System panel connector 1 x Internal Speaker connector 1 x 4-pin CPU fan connector 1 x S/PDIF output connector 1 x 4-pin Chassis fan connector 1 x High Definition Front panel audio connector 1 x 24-pin EATX power connector 1 x 4-pin ATX 12V power connector 64Mb Flash ROM, NEW UEFI BIOS, PnP, DMI v2.0, WfM2.0, SM BIOS V2.7, ACPI V2.0a Drivers ASUS Update ASUS utilities Anti-Virus software (OEM version) Windows® 8.1, 32bit/64-bit Windows...

User Guide
Page 9
... chassis in the image below. 1.2.2 Screw holes Place six screws into it on a grounded antistatic pad or in the bag that the ATX power supply is switched off or the power cord is detached from the wall socket before installing or removing the motherboard. Product introduction 1 1.1 Before you proceed Take note of the following precautions before you install motherboard components or change any motherboard settings...
... chassis in the image below. 1.2.2 Screw holes Place six screws into it on a grounded antistatic pad or in the bag that the ATX power supply is switched off or the power cord is detached from the wall socket before installing or removing the motherboard. Product introduction 1 1.1 Before you proceed Take note of the following precautions before you install motherboard components or change any motherboard settings...

User Guide
Page 11
...! CPU and chassis fan connectors (4-pin CPU_FAN and 4-pin CHA_FAN) 4. USB 2.0 connectors (10-1 pin USB34, USB56) 9. Serial port connector (10-1 pin COM) 13. Connectors/Jumpers/Slots/LED 1. Front panel audio connector (10-1 pin AAFP) Page 1-14 1-3 1-13 1-6 1-17 1-15 1-16 1-18 1-10 1-13 1-15 1-18 1-17 1.3 Accelerated Processing Unit (APU) This motherboard comes with an FM2+ socket designed for the FM2+ socket. A68HM-E A68HM-E CPU socket FM2+ Ensure that you use an APU designed for AMD® A-series / Athlon™ Series graphics. ASUS A68HM Series E9808_A68HM...
...! CPU and chassis fan connectors (4-pin CPU_FAN and 4-pin CHA_FAN) 4. USB 2.0 connectors (10-1 pin USB34, USB56) 9. Serial port connector (10-1 pin COM) 13. Connectors/Jumpers/Slots/LED 1. Front panel audio connector (10-1 pin AAFP) Page 1-14 1-3 1-13 1-6 1-17 1-15 1-16 1-18 1-10 1-13 1-15 1-18 1-17 1.3 Accelerated Processing Unit (APU) This motherboard comes with an FM2+ socket designed for the FM2+ socket. A68HM-E A68HM-E CPU socket FM2+ Ensure that you use an APU designed for AMD® A-series / Athlon™ Series graphics. ASUS A68HM Series E9808_A68HM...
User Guide
Page 15
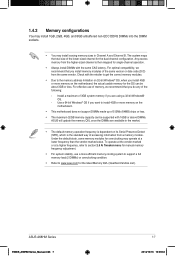
... usable memory for manual memory frequency adjustment. • For system stability, use of memory, we recommend that you install memory modules of the same version or date code (D/C) from the same vendor. Under the default state, some memory modules for overclocking may install varying memory sizes in the market. • The default memory operation frequency is dependent on the motherboard. • This motherboard does not support DIMMs made up of 512Mb (64MB) chips...
... usable memory for manual memory frequency adjustment. • For system stability, use of memory, we recommend that you install memory modules of the same version or date code (D/C) from the same vendor. Under the default state, some memory modules for overclocking may install varying memory sizes in the market. • The default memory operation frequency is dependent on the motherboard. • This motherboard does not support DIMMs made up of 512Mb (64MB) chips...
User Guide
Page 17
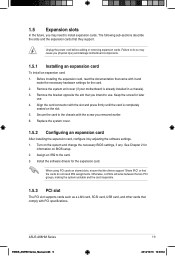
... an IRQ to the chassis with the slot and press firmly until the card is already installed in a chassis). 3. Failure to use . 4. Remove the system unit cover (if your motherboard is completely seated on shared slots, ensure that the drivers support "Share IRQ" or that comply with it by adjusting the software settings. 1. Secure the card to the card. 3. When using PCI cards on the slot. 5. ASUS A68HM Series E9808_A68HM Series_Manual.indb 9 1-9 2014...
... an IRQ to the chassis with the slot and press firmly until the card is already installed in a chassis). 3. Failure to use . 4. Remove the system unit cover (if your motherboard is completely seated on shared slots, ensure that the drivers support "Share IRQ" or that comply with it by adjusting the software settings. 1. Secure the card to the card. 3. When using PCI cards on the slot. 5. ASUS A68HM Series E9808_A68HM Series_Manual.indb 9 1-9 2014...
User Guide
Page 18
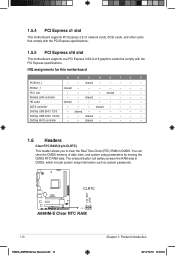
...- - - - OnChip XHCI controller - - 1.5.4 PCI Express x1 slot This motherboard supports PCI Express 2.0 x1 network cards, SCSI cards, and other cards that comply with the PCI Express specifications. 1.5.5 PCI Express x16 slot This motherboard supports one PCI Express 3.0/2.0 x16 graphics cards that comply with the PCI Express specifications. SATA controller - - - OnChip USB OHCI 1/2/3/4 - - shared - - - - - - shared - - - - - The onboard button cell battery powers the RAM data in CMOS. A68HM-E CLRTC +3V_BAT GND PIN 1 A68HM-E Clear RTC RAM 1-10 E9808_A68HM...
...- - - - OnChip XHCI controller - - 1.5.4 PCI Express x1 slot This motherboard supports PCI Express 2.0 x1 network cards, SCSI cards, and other cards that comply with the PCI Express specifications. 1.5.5 PCI Express x16 slot This motherboard supports one PCI Express 3.0/2.0 x16 graphics cards that comply with the PCI Express specifications. SATA controller - - - OnChip USB OHCI 1/2/3/4 - - shared - - - - - - shared - - - - - The onboard button cell battery powers the RAM data in CMOS. A68HM-E CLRTC +3V_BAT GND PIN 1 A68HM-E Clear RTC RAM 1-10 E9808_A68HM...
User Guide
Page 19
... to wake up from S5 mode Speed LED Status Description OFF 10Mbps connection ORANGE 100Mbps connection GREEN 1Gbps connection LAN port ASUS A68HM Series 1-11 E9808_A68HM Series_Manual.indb 11 2014/10/16 10:09:03 After clearing the CMOS, reinstall the battery. • You do not help, remove the onboard battery and short the two pins again to a Local Area Network (LAN) through a network hub. LAN (RJ-45) port. To erase the RTC RAM: 1. This port is...
... to wake up from S5 mode Speed LED Status Description OFF 10Mbps connection ORANGE 100Mbps connection GREEN 1Gbps connection LAN port ASUS A68HM Series 1-11 E9808_A68HM Series_Manual.indb 11 2014/10/16 10:09:03 After clearing the CMOS, reinstall the battery. • You do not help, remove the onboard battery and short the two pins again to a Local Area Network (LAN) through a network hub. LAN (RJ-45) port. To erase the RTC RAM: 1. This port is...

User Guide
Page 20
... Side Speaker Out To configure a 7.1-channel audio output: Use a chassis with DVI-I. 10. These two 9-pin Universal Serial Bus (USB) ports connect to USB 3.0/2.0 devices. • Due to USB 3.0 controller limitations, USB 3.0 devices can only be used under a Windows® OS environment and after USB 3.0 driver installation. • The plugged USB 3.0 device may run on xHCI or EHCI mode, depending on the operating system's setting. • USB 3.0 devices can 't be used for data storage. • We strongly recommend that you connect USB 3.0 devices to support a 7.1-channel audio output...
... Side Speaker Out To configure a 7.1-channel audio output: Use a chassis with DVI-I. 10. These two 9-pin Universal Serial Bus (USB) ports connect to USB 3.0/2.0 devices. • Due to USB 3.0 controller limitations, USB 3.0 devices can only be used under a Windows® OS environment and after USB 3.0 driver installation. • The plugged USB 3.0 device may run on xHCI or EHCI mode, depending on the operating system's setting. • USB 3.0 devices can 't be used for data storage. • We strongly recommend that you connect USB 3.0 devices to support a 7.1-channel audio output...

User Guide
Page 21
... CPU FAN PWM CPU FAN IN CPU FAN PWR GND CHA FAN PWM CHA FAN IN CHA FAN PWR GND A68HM-E A68HM-E Fan connectors DO NOT forget to connect the fan cables to the fan connectors on the fan connectors. • The CPU_FAN connector supports a CPU fan of the connector. DO NOT place jumper caps on the motherboard, ensuring that the black wire of each cable matches the ground pin of maximum 2A (24 W) fan power. • The CPU_FAN and CHA_FAN connectors support the ASUS Fan...
... CPU FAN PWM CPU FAN IN CPU FAN PWR GND CHA FAN PWM CHA FAN IN CHA FAN PWR GND A68HM-E A68HM-E Fan connectors DO NOT forget to connect the fan cables to the fan connectors on the fan connectors. • The CPU_FAN connector supports a CPU fan of the connector. DO NOT place jumper caps on the motherboard, ensuring that the black wire of each cable matches the ground pin of maximum 2A (24 W) fan power. • The CPU_FAN and CHA_FAN connectors support the ASUS Fan...
User Guide
Page 23
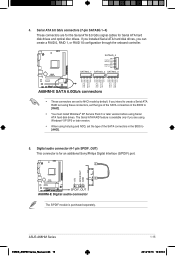
... GND RSATA_RXN3 RSATA_RXP3 GND A68HM-E SATA 6.0Gb/s connectors • These connectors are using Windows® XP SP3 or later version. • When using hot-plug and NCQ, set the type of the SATA connectors in the BIOS to [RAID]. • You must install Windows® XP Service Pack 3 or later version before using these connectors, set the type of the SATA connectors in the BIOS to AHCI mode by default. The Serial ATA RAID feature is purchased separately. ASUS A68HM Series E9808_A68HM Series_Manual.indb...
... GND RSATA_RXN3 RSATA_RXP3 GND A68HM-E SATA 6.0Gb/s connectors • These connectors are using Windows® XP SP3 or later version. • When using hot-plug and NCQ, set the type of the SATA connectors in the BIOS to [RAID]. • You must install Windows® XP Service Pack 3 or later version before using these connectors, set the type of the SATA connectors in the BIOS to AHCI mode by default. The Serial ATA RAID feature is purchased separately. ASUS A68HM Series E9808_A68HM Series_Manual.indb...
User Guide
Page 25
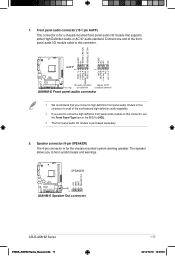
... connector. Front panel audio connector (10-1 pin AAFP) This connector is for the chassis-mounted system warning speaker. SPEAKER A68HM-E PIN 1 A68HM-E Speaker Out connector +5V GND GND Speaker Out ASUS A68HM Series E9808_A68HM Series_Manual.indb 17 1-17 2014/10/16 10:09:05 Speaker connector (4-pin SPEAKER) The 4-pin connector is purchased separately. 8. 7. The speaker allows you want to connect a high definition front panel audio module to this connector, set the Front Panel Type item in the BIOS to [HD]. • The front panel audio...
... connector. Front panel audio connector (10-1 pin AAFP) This connector is for the chassis-mounted system warning speaker. SPEAKER A68HM-E PIN 1 A68HM-E Speaker Out connector +5V GND GND Speaker Out ASUS A68HM Series E9808_A68HM Series_Manual.indb 17 1-17 2014/10/16 10:09:05 Speaker connector (4-pin SPEAKER) The 4-pin connector is purchased separately. 8. 7. The speaker allows you want to connect a high definition front panel audio module to this connector, set the Front Panel Type item in the BIOS to [HD]. • The front panel audio...
User Guide
Page 27
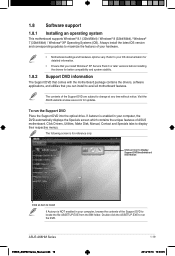
... Support DVD into the optical drive. To run the DVD. If Autorun is enabled in your hardware. • Motherboard settings and hardware options vary. The following screen is NOT enabled in your computer, the DVD automatically displays the Specials screen which contains the unique features of your computer, browse the contents of the Support DVD are subject to locate the file ASSETUP.EXE from the BIN folder. ASUS A68HM Series...
... Support DVD into the optical drive. To run the DVD. If Autorun is enabled in your hardware. • Motherboard settings and hardware options vary. The following screen is NOT enabled in your computer, the DVD automatically displays the Specials screen which contains the unique features of your computer, browse the contents of the Support DVD are subject to locate the file ASSETUP.EXE from the BIN folder. ASUS A68HM Series...
User Guide
Page 29
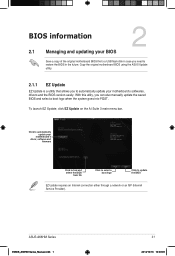
BIOS information 2.1 Managing and updating your BIOS 2 Save a copy of the original motherboard BIOS file to a USB flash disk in case you to automatically update your motherboard's driver, software and firmware Model Name: A68HM-E Version:0203 Release Date: 09/08/2014 File: A68HM-E-ASUS-0205.CAP Model Name: A68HM-E Version:0205 Release Date: 09/28/2014 C:\Users\test\Downloads\A68HM-E-ASUS-02... Click to update the BIOS EZ Update requires an Internet connection either through a network or an ISP (Internet Service Provider). ASUS A68HM Series E9808_A68HM Series_Manual.indb...
BIOS information 2.1 Managing and updating your BIOS 2 Save a copy of the original motherboard BIOS file to a USB flash disk in case you to automatically update your motherboard's driver, software and firmware Model Name: A68HM-E Version:0203 Release Date: 09/08/2014 File: A68HM-E-ASUS-0205.CAP Model Name: A68HM-E Version:0205 Release Date: 09/28/2014 C:\Users\test\Downloads\A68HM-E-ASUS-02... Click to update the BIOS EZ Update requires an Internet connection either through a network or an ISP (Internet Service Provider). ASUS A68HM Series E9808_A68HM Series_Manual.indb...

User Guide
Page 30
... arrow keys to update the BIOS without using this utility, rename the BIOS file in the removable device into A68HME.CAP (for A68HM-E model) or A68HMK (for A68HM-K model). • The BIOS file in the support DVD may not be the latest version. Press to switch to restore the BIOS file when it . 3. You can restore a corrupted BIOS file using the motherboard support DVD or a USB flash drive that allows you start using an OS‑based utility. Reboot the system when the update process...
... arrow keys to update the BIOS without using this utility, rename the BIOS file in the removable device into A68HME.CAP (for A68HM-E model) or A68HMK (for A68HM-K model). • The BIOS file in the support DVD may not be the latest version. Press to switch to restore the BIOS file when it . 3. You can restore a corrupted BIOS file using the motherboard support DVD or a USB flash drive that allows you start using an OS‑based utility. Reboot the system when the update process...

User Guide
Page 31
... enter BIOS Setup to load default BIOS values. Booting the system in DOS environment To boot the system in this section are for the BIOS file. The screen captures used in DOS: 1. When the select boot device screen appears, insert the Support DVD into the optical drive then select the optical drive as actually shown on the system. 2. Before updating BIOS • Prepare the motherboard support DVD and a USB flash drive. • Download the latest BIOS file and BIOS Updater from http://support.asus...
... enter BIOS Setup to load default BIOS values. Booting the system in DOS environment To boot the system in this section are for the BIOS file. The screen captures used in DOS: 1. When the select boot device screen appears, insert the Support DVD into the optical drive then select the optical drive as actually shown on the system. 2. Before updating BIOS • Prepare the motherboard support DVD and a USB flash drive. • Download the latest BIOS file and BIOS Updater from http://support.asus...

User Guide
Page 32
... within five (5) seconds to Drive D (USB flash drive). D:/> bupdater /pc /g 2. boot: 5. On the FreeDOS prompt, type bupdater /pc /g and press . On the BIOS Updater screen, press to switch from Files panel to boot using defaults 4. Please select boot device: E1: ASUS DVD-E818A6T (4069MB) USB DISK 2.0 (3824MB) UEFI: (FAT) USB DISK 2.0 (3824MB) Enter Setup and to move selection ENTER to select boot device ESC to Drives panel then select D:. 2-4 E9808_A68HM Series_Manual.indb 4 Chapter 2: Getting started 2014/10/16 10:09...
... within five (5) seconds to Drive D (USB flash drive). D:/> bupdater /pc /g 2. boot: 5. On the FreeDOS prompt, type bupdater /pc /g and press . On the BIOS Updater screen, press to switch from Files panel to boot using defaults 4. Please select boot device: E1: ASUS DVD-E818A6T (4069MB) USB DISK 2.0 (3824MB) UEFI: (FAT) USB DISK 2.0 (3824MB) Enter Setup and to move selection ENTER to select boot device ESC to Drives panel then select D:. 2-4 E9808_A68HM Series_Manual.indb 4 Chapter 2: Getting started 2014/10/16 10:09...


