User Manual
Page 3
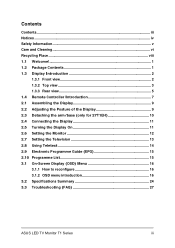
... Front view 2 1.3.2 Top view 3 1.3.3 Rear view 5 1.4 Remote Controller Introduction 7 2.1 Assembling the Display 9 2.2 Adjusting the Posture of the Display 9 2.3 Detaching the arm/base (only for 27T1EH 10 2.4 Connecting the Display 11 2.5 Turning the Display On 11 2.6 Setting the Monitor 12 2.7 Setting the Television 13 2.8 Using Teletext 14 2.9 Electronic Programme Guide (EPG... List 15 3.1 On-Screen Display (OSD) Menu 16 3.1.1 How to reconfigure 16 3.1.2 OSD menu introduction 16 3.2 Specifications Summary 24 3.3 Troubleshooting (FAQ 27 ASUS LED TV Monitor T1 Series iii
... Front view 2 1.3.2 Top view 3 1.3.3 Rear view 5 1.4 Remote Controller Introduction 7 2.1 Assembling the Display 9 2.2 Adjusting the Posture of the Display 9 2.3 Detaching the arm/base (only for 27T1EH 10 2.4 Connecting the Display 11 2.5 Turning the Display On 11 2.6 Setting the Monitor 12 2.7 Setting the Television 13 2.8 Using Teletext 14 2.9 Electronic Programme Guide (EPG... List 15 3.1 On-Screen Display (OSD) Menu 16 3.1.1 How to reconfigure 16 3.1.2 OSD menu introduction 16 3.2 Specifications Summary 24 3.3 Troubleshooting (FAQ 27 ASUS LED TV Monitor T1 Series iii
User Manual
Page 20
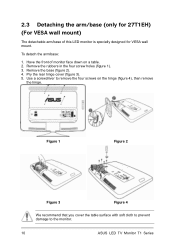
... with soft cloth to prevent damage to remove the four screws on a table. 2. Use a screwdriver to the monitor. 10 ASUS LED TV Monitor T1 Series 2.3 Detaching the arm/base (only for 27T1EH) (For VESA wall mount) The detachable arm/base of monitor face down on the hinge (figure 4), then remove the hinge...
... with soft cloth to prevent damage to remove the four screws on a table. 2. Use a screwdriver to the monitor. 10 ASUS LED TV Monitor T1 Series 2.3 Detaching the arm/base (only for 27T1EH) (For VESA wall mount) The detachable arm/base of monitor face down on the hinge (figure 4), then remove the hinge...

User Manual
Page 21
When more than one signal sources are switched off or the power cord is ON. ASUS LED TV Monitor T1 Series 11 See section 1.3 Display Introduction for the location of the power button. The power indicator lights up in blue to ... of the display to the audio-in port of external speakers. 2.5 Turning the Display On Press the power button. 2.4 Connecting the Display For 22T1EH, 24T1EH & 27T1EH PC SCART, S-Video, Composite, & Component D-Sub, HDMI, & Audio-in HDMI & Audio-in S/PDIF TV Signal (Antenna, Cable, etc) AC Power DVD Player, etc External Stereo...
When more than one signal sources are switched off or the power cord is ON. ASUS LED TV Monitor T1 Series 11 See section 1.3 Display Introduction for the location of the power button. The power indicator lights up in blue to ... of the display to the audio-in port of external speakers. 2.5 Turning the Display On Press the power button. 2.4 Connecting the Display For 22T1EH, 24T1EH & 27T1EH PC SCART, S-Video, Composite, & Component D-Sub, HDMI, & Audio-in HDMI & Audio-in S/PDIF TV Signal (Antenna, Cable, etc) AC Power DVD Player, etc External Stereo...
User Manual
Page 36
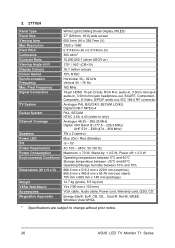
..., QSG, CD Energy Star®, EuP, CB, CE, , Gost-R, RoHS, WEEE, Windows Vista WHQL * Specifications are subject to change without prior notice. 26 ASUS LED TV Monitor T1 Series 3. 27T1EH Panel Type Panel Size Viewing Area Max Resolution Pixel Pitch Luminance Contrast Ratio Viewing Angle (H/V) Display Colours Colour Gamut Synchronization Frequency Max.
..., QSG, CD Energy Star®, EuP, CB, CE, , Gost-R, RoHS, WEEE, Windows Vista WHQL * Specifications are subject to change without prior notice. 26 ASUS LED TV Monitor T1 Series 3. 27T1EH Panel Type Panel Size Viewing Area Max Resolution Pixel Pitch Luminance Contrast Ratio Viewing Angle (H/V) Display Colours Colour Gamut Synchronization Frequency Max.


