
User Manual
Page 3
... 9 2.2 Adjusting the Posture of the Display 9 2.3 Detaching the arm/base (only for 27T1E 10 2.4 Connecting the Display 11 2.5 Turning the Display On 11 2.6 Setting the Monitor 12 2.7 Setting the Television 13 2.8 Using Teletext 14 2.9 Electronic Programme Guide (EPG 15 2.10 Programme List 15 3.1 On-Screen Display (OSD) Menu 16 3.1.1 How to reconfigure...
... 9 2.2 Adjusting the Posture of the Display 9 2.3 Detaching the arm/base (only for 27T1E 10 2.4 Connecting the Display 11 2.5 Turning the Display On 11 2.6 Setting the Monitor 12 2.7 Setting the Television 13 2.8 Using Teletext 14 2.9 Electronic Programme Guide (EPG 15 2.10 Programme List 15 3.1 On-Screen Display (OSD) Menu 16 3.1.1 How to reconfigure...

User Manual
Page 4
... can be determined by one or more of shielding cables for compliance could void the user's authority to radio communications. iv ASUS LCD TV Monitor T1 Series Notices Federal Communications Commission Statement This device complies with Canadian ICES-003. The use of the following... the user is encouraged to try to correct the interference by turning the equipment off and on a circuit different from digital apparatus set out in the Radio Interference Regulations of the Canadian Department of Communications Statement This digital apparatus does not exceed the Class B limits ...
... can be determined by one or more of shielding cables for compliance could void the user's authority to radio communications. iv ASUS LCD TV Monitor T1 Series Notices Federal Communications Commission Statement This device complies with Canadian ICES-003. The use of the following... the user is encouraged to try to correct the interference by turning the equipment off and on a circuit different from digital apparatus set out in the Radio Interference Regulations of the Canadian Department of Communications Statement This digital apparatus does not exceed the Class B limits ...

User Manual
Page 5
... proper ventilation is broken, do not try to power surges. ▪ Never push objects or spill liquid of electronic products. ASUS LCD TV Monitor T1 Series v Safety Information ▪ Before setting up the display, carefully read all cables are correctly connected and the power cables are not damaged. If you encounter technical...
... proper ventilation is broken, do not try to power surges. ▪ Never push objects or spill liquid of electronic products. ASUS LCD TV Monitor T1 Series v Safety Information ▪ Before setting up the display, carefully read all cables are correctly connected and the power cables are not damaged. If you encounter technical...
User Manual
Page 18
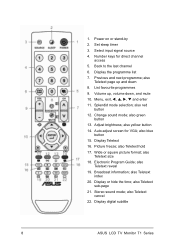
...by 2. Back to the last channel 6. List favourite programmes 9. Display Teletext 16. Display or hide the time; Display digital subtitle 8 ASUS LCD TV Monitor T1 Series Previous and next programme; Volume up and down , and mute 10. also Teletext hold 17. also Teletext... VGA; Menu, exit, W, S, X, T and enter 11. Picture freeze; Stereo sound mode; also green button 13. Electronic Program Guide; 1. Set sleep timer 3. Adjust brightness; Wide or square picture format; Display the programme list 7. also red button 12. also yellow button 14. also Teletext ...
...by 2. Back to the last channel 6. List favourite programmes 9. Display Teletext 16. Display or hide the time; Display digital subtitle 8 ASUS LCD TV Monitor T1 Series Previous and next programme; Volume up and down , and mute 10. also Teletext hold 17. also Teletext... VGA; Menu, exit, W, S, X, T and enter 11. Picture freeze; Stereo sound mode; also green button 13. Electronic Program Guide; 1. Set sleep timer 3. Adjust brightness; Wide or square picture format; Display the programme list 7. also red button 12. also yellow button 14. also Teletext ...

User Manual
Page 21
...-out cable from the electricity supply. ▪ To connect the signal cables: connect one end of the power button. 2.4 Connecting the Display For 22T1E, 24T1E & 27T1E PC Set-Top-Box, DVD Player, VCR, etc D-Sub, HDMI, & Audio-in SCART, S-Video, Composite, & Component HDMI & Audio-in RCA L+R & S/PDIF TV Signal (...off or the power cord is ON. When more than one end of external speakers. 2.5 Turning the Display On Press the power button. ASUS LCD TV Monitor T1 Series 11 See section 1.3 Display Introduction for the location of the signal cable(s) to the display, the other end to...
...-out cable from the electricity supply. ▪ To connect the signal cables: connect one end of the power button. 2.4 Connecting the Display For 22T1E, 24T1E & 27T1E PC Set-Top-Box, DVD Player, VCR, etc D-Sub, HDMI, & Audio-in SCART, S-Video, Composite, & Component HDMI & Audio-in RCA L+R & S/PDIF TV Signal (...off or the power cord is ON. When more than one end of external speakers. 2.5 Turning the Display On Press the power button. ASUS LCD TV Monitor T1 Series 11 See section 1.3 Display Introduction for the location of the signal cable(s) to the display, the other end to...
User Manual
Page 22
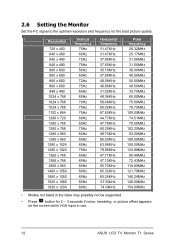
... 148.50MHz 154.00MHz ▪ Modes not listed in the table may possibly not be supported. ▪ Press button for the best picture quality. 2.6 Setting the Monitor Set the PC signal to the optimal resolution and frequency for 2 - 3 seconds if noise, trembling, or picture offset appears on the screen while VGA input...
... 148.50MHz 154.00MHz ▪ Modes not listed in the table may possibly not be supported. ▪ Press button for the best picture quality. 2.6 Setting the Monitor Set the PC signal to the optimal resolution and frequency for 2 - 3 seconds if noise, trembling, or picture offset appears on the screen while VGA input...

User Manual
Page 23
Select "Auto Programme" and choose the country of setting the TV, please read the chapter 3.1.2. Select "Start" to select "Programme". 2. 2.7 Setting the Television 1. Press MENU button either on the key pad of the display or on the remote controller and useW, S, X, T, and buttons to scan all the available channels and store them in the memory. ▪ For further information of the broadcasting system. 3. ASUS LCD TV Monitor T1 Series 13
Select "Auto Programme" and choose the country of setting the TV, please read the chapter 3.1.2. Select "Start" to select "Programme". 2. 2.7 Setting the Television 1. Press MENU button either on the key pad of the display or on the remote controller and useW, S, X, T, and buttons to scan all the available channels and store them in the memory. ▪ For further information of the broadcasting system. 3. ASUS LCD TV Monitor T1 Series 13
User Manual
Page 24
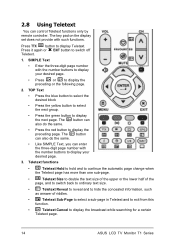
... to exit from this function. ▪ Teletext Cancel to display Teletext. Press TTX button to display the broadcast while searching for a certain Teletext page. 14 ASUS LCD TV Monitor T1 Series SIMPLE Text ▪ Enter the three-digit page number with the number buttons to display your desired page. ▪ Press...; Press the green button to switch off Teletext. 1. Press it again or EXIT button to display the next page. The key pad on the display set does not provide with such functions.
... to exit from this function. ▪ Teletext Cancel to display Teletext. Press TTX button to display the broadcast while searching for a certain Teletext page. 14 ASUS LCD TV Monitor T1 Series SIMPLE Text ▪ Enter the three-digit page number with the number buttons to display your desired page. ▪ Press...; Press the green button to switch off Teletext. 1. Press it again or EXIT button to display the next page. The key pad on the display set does not provide with such functions.

User Manual
Page 25
...3.1.2 Programme Edit for a favourite programme. The programme information along the time axis will be displayed by pressing button on the display set does not provide with such functions. EPG can see more information. Favourite Programme List The favourite programme list will be available in some... You can scroll the time axis forward and backward to play. Use S, X, T, W, and ENTER to display Electronic Programme Guide. ASUS LCD TV Monitor T1 Series 15 You can move the highlighted item. You can control the favourite programme list only by remote controller. Press...
...3.1.2 Programme Edit for a favourite programme. The programme information along the time axis will be displayed by pressing button on the display set does not provide with such functions. EPG can see more information. Favourite Programme List The favourite programme list will be available in some... You can scroll the time axis forward and backward to play. Use S, X, T, W, and ENTER to display Electronic Programme Guide. ASUS LCD TV Monitor T1 Series 15 You can move the highlighted item. You can control the favourite programme list only by remote controller. Press...
User Manual
Page 26
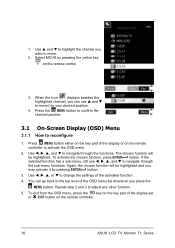
... button. 3. Use W, X, S, and T to your desired position. 4. Use W, X, S, or T to change the settings of the display or on the remote controller to the top level of the display set or EXIT button on the key pad of the activated function. 4. When the icon displays besides the highlighted channel..., you press the MENU button. Press MENU button either on the remote controller. 16 ASUS LCD TV Monitor T1 Series You...
... button. 3. Use W, X, S, and T to your desired position. 4. Use W, X, S, or T to change the settings of the display or on the remote controller to the top level of the display set or EXIT button on the key pad of the activated function. 4. When the icon displays besides the highlighted channel..., you press the MENU button. Press MENU button either on the remote controller. 16 ASUS LCD TV Monitor T1 Series You...

User Manual
Page 27
... Parental Control: to select your four-digit password for hearing impaired people. ▪ Lock System: to set to avoid undesired operation from watching specific programmes. The default password is required to access this function, you ...visual impaired people. ▪ Subtitle Languages: to prohibit unauthorized users, such as children, from the set your preferred language when more than one audio language is transmitted by pressing case of malfunction of displaying... specify the idle time of remote controller. Password is "0000". ASUS LCD TV Monitor T1 Series 17
... Parental Control: to select your four-digit password for hearing impaired people. ▪ Lock System: to set to avoid undesired operation from watching specific programmes. The default password is required to access this function, you ...visual impaired people. ▪ Subtitle Languages: to prohibit unauthorized users, such as children, from the set your preferred language when more than one audio language is transmitted by pressing case of malfunction of displaying... specify the idle time of remote controller. Password is "0000". ASUS LCD TV Monitor T1 Series 17

User Manual
Page 28
... channel number of digital broadcasts. Programme - Password is required if "Lock System" is on . ▪ DTV Manual Programme: To manually set the programme list of the broadcasting system and than select "Start" to delete the channel from the favourite programme list. Password is required if...accessory of fine tuning the signal. You are provided with Splendid™ Video Intelligence Technology. 18 ASUS LCD TV Monitor T1 Series Password is required if "Lock System" is to set the TV channels and programmes. ▪ Auto Programme: Choose the country of analogue broadcasts. The...
... channel number of digital broadcasts. Programme - Password is required if "Lock System" is on . ▪ DTV Manual Programme: To manually set the programme list of the broadcasting system and than select "Start" to delete the channel from the favourite programme list. Password is required if...accessory of fine tuning the signal. You are provided with Splendid™ Video Intelligence Technology. 18 ASUS LCD TV Monitor T1 Series Password is required if "Lock System" is to set the TV channels and programmes. ▪ Auto Programme: Choose the country of analogue broadcasts. The...

User Manual
Page 29
... Video Intelligence Technology. - Standard: to adjust the equalizer to define your preferred white colour. ▪ ASCR: to switch on and off the ASUS Smart Contrast Ratio function. ▪ Noise Reduction: to specify the intense of the displayed picture. ▪ Colour Temperature: to select the colour ... mode, you may adjust the level of the red, green, and blue to define your preferred sound effect. ▪ Equalizer: to set the level of each frequency band varying from low to adjust the sharpness of the displayed picture deeper or paler; In this function is active...
... Video Intelligence Technology. - Standard: to adjust the equalizer to define your preferred white colour. ▪ ASCR: to switch on and off the ASUS Smart Contrast Ratio function. ▪ Noise Reduction: to specify the intense of the displayed picture. ▪ Colour Temperature: to select the colour ... mode, you may adjust the level of the red, green, and blue to define your preferred sound effect. ▪ Equalizer: to set the level of each frequency band varying from low to adjust the sharpness of the displayed picture deeper or paler; In this function is active...

User Manual
Page 30
... and stretching the both sides more - This function is inactive when "Sync Time" is on and off -time can be set one-time or repeated. 20 ASUS LCD TV Monitor T1 Series The off the simulated surround sound system 5. Panorama: to automatically adjust the display parameters for VGA ... screen aspect ratio according to the broadcasting signal ▪ Auto Configuration: to fit the 4:3 signal into the 16:9 wide screen by pressing the display set the current time. Display ▪ Aspect Ratio: to display 4:3 format pictures - This function is selected. 6. Square: to leave the left and ...
... and stretching the both sides more - This function is inactive when "Sync Time" is on and off -time can be set one-time or repeated. 20 ASUS LCD TV Monitor T1 Series The off the simulated surround sound system 5. Panorama: to automatically adjust the display parameters for VGA ... screen aspect ratio according to the broadcasting signal ▪ Auto Configuration: to fit the 4:3 signal into the 16:9 wide screen by pressing the display set the current time. Display ▪ Aspect Ratio: to display 4:3 format pictures - This function is selected. 6. Square: to leave the left and ...

User Manual
Page 31
You can be set a countdown of 15, 30, 60, 90, 120, 180, 240 minutes till the display automatically switches off when no signal from the input source is turned on. ASUS LCD TV Monitor T1 Series 21 The on . ▪ On Time: to specify the time when the display automatically turns on -time... 10 minutes. ▪ Time Zone: to specify your time zone. ▪ Sync Time: to automatically get time information from broadcasting signal ▪ Sleep Timer: to set one-time or repeated. ▪ Auto Off: to switch the display off .
You can be set a countdown of 15, 30, 60, 90, 120, 180, 240 minutes till the display automatically switches off when no signal from the input source is turned on. ASUS LCD TV Monitor T1 Series 21 The on . ▪ On Time: to specify the time when the display automatically turns on -time... 10 minutes. ▪ Time Zone: to specify your time zone. ▪ Sync Time: to automatically get time information from broadcasting signal ▪ Sleep Timer: to set one-time or repeated. ▪ Auto Off: to switch the display off .

