
User Manual
Page 1
LCD TV Monitor T1 Series User's Manual E
LCD TV Monitor T1 Series User's Manual E

User Manual
Page 3
...view 2 1.3.2 Top view 3 1.3.3 Rear view 5 1.4 Remote Controller Introduction 7 2.1 Assembling the Display 9 2.2 Adjusting the Posture of the Display 9 2.3 Detaching the arm/base (only for 27T1E 10 2.4 Connecting the Display 11 2.5 Turning the Display On 11 2.6 Setting the Monitor 12 2.7 Setting the Television 13 2.8 Using Teletext 14 2.9 Electronic Programme Guide (EPG 15 2.10 Programme List 15 3.1 On-Screen Display (OSD) Menu 16 3.1.1 How to reconfigure 16 3.1.2 OSD menu introduction 17 3.2 Specifications Summary 22 3.3 Troubleshooting (FAQ 25 ASUS LCD TV Monitor T1 Series...
...view 2 1.3.2 Top view 3 1.3.3 Rear view 5 1.4 Remote Controller Introduction 7 2.1 Assembling the Display 9 2.2 Adjusting the Posture of the Display 9 2.3 Detaching the arm/base (only for 27T1E 10 2.4 Connecting the Display 11 2.5 Turning the Display On 11 2.6 Setting the Monitor 12 2.7 Setting the Television 13 2.8 Using Teletext 14 2.9 Electronic Programme Guide (EPG 15 2.10 Programme List 15 3.1 On-Screen Display (OSD) Menu 16 3.1.1 How to reconfigure 16 3.1.2 OSD menu introduction 17 3.2 Specifications Summary 22 3.3 Troubleshooting (FAQ 25 ASUS LCD TV Monitor T1 Series...

User Manual
Page 4
... user's authority to radio communications. iv ASUS LCD TV Monitor T1 Series Notices Federal Communications Commission Statement This device complies with Canadian ICES-003. These limits are designed to Part 15 of Communications. The use of shielding cables for connection of the display to the graphics card ... by turning the equipment off and on a circuit different from digital apparatus set out in a residential installation. If this equipment does cause harmful interference to radio or television reception, which can radiate radio frequency energy and, if not installed and used in ...
... user's authority to radio communications. iv ASUS LCD TV Monitor T1 Series Notices Federal Communications Commission Statement This device complies with Canadian ICES-003. These limits are designed to Part 15 of Communications. The use of shielding cables for connection of the display to the graphics card ... by turning the equipment off and on a circuit different from digital apparatus set out in a residential installation. If this equipment does cause harmful interference to radio or television reception, which can radiate radio frequency energy and, if not installed and used in ...

User Manual
Page 5
... check regulations for a long period of power supply to open the display cabinet. Contact a qualified service technician or your dealer immediately. ▪ Slots and openings on the back or top of power source indicated on the display cabinet. ▪ To ensure satisfactory operation, use the display only... the display may become wet. ASUS LCD TV Monitor T1 Series v Do not place the display in any damage, contact your retailer. ▪ Before using the product, make sure all the documentation that the product (electrical, electronic equipment, and mercury-containing button cell ...
... check regulations for a long period of power supply to open the display cabinet. Contact a qualified service technician or your dealer immediately. ▪ Slots and openings on the back or top of power source indicated on the display cabinet. ▪ To ensure satisfactory operation, use the display only... the display may become wet. ASUS LCD TV Monitor T1 Series v Do not place the display in any damage, contact your retailer. ▪ Before using the product, make sure all the documentation that the product (electrical, electronic equipment, and mercury-containing button cell ...

User Manual
Page 6
... ASUS LCD TV Monitor T1 Series The screen will recover slowly or you can turn it may flicker during the initial use due to complete a task. Do not repair the screen by the stand or the cord. ▪ Cleaning. Follow the correct lifting techniques when positioning the display. Turn your display off the Power Switch for hours. ▪ When the screen becomes black or flashes, or cannot work anymore, contact your dealer or service...
... ASUS LCD TV Monitor T1 Series The screen will recover slowly or you can turn it may flicker during the initial use due to complete a task. Do not repair the screen by the stand or the cord. ▪ Cleaning. Follow the correct lifting techniques when positioning the display. Turn your display off the Power Switch for hours. ▪ When the screen becomes black or flashes, or cannot work anymore, contact your dealer or service...

User Manual
Page 11
... TV Monitor T1 Series is to bring to meet your viewing experience. Thank you ! 1.2 Package Contents Check the package of your retailer immediately. The latest LCD display from ASUS provides a host of various media input interfaces and a built-in TV tuner to you for the following items: ▪ LCD display ▪ Display base and screw ▪ Warranty card ▪ Quick start guide ▪ User's manual CD ▪ Power cord ▪ VGA cable ▪ Remote controller...
... TV Monitor T1 Series is to bring to meet your viewing experience. Thank you ! 1.2 Package Contents Check the package of your retailer immediately. The latest LCD display from ASUS provides a host of various media input interfaces and a built-in TV tuner to you for the following items: ▪ LCD display ▪ Display base and screw ▪ Warranty card ▪ Quick start guide ▪ User's manual CD ▪ Power cord ▪ VGA cable ▪ Remote controller...

User Manual
Page 12
1.3 Display Introduction 1.3.1 Front view 1. ▪ ▪ Power button and power indicator Press this button to turn the display on, off, or stand-by 2. Status Blue Red Description On Stand-by . Remote receiver ▪ The display receives the signal from the remote controller here. 2 ASUS LCD TV Monitor T1 Series The colour of the power indicator is as the below table.
1.3 Display Introduction 1.3.1 Front view 1. ▪ ▪ Power button and power indicator Press this button to turn the display on, off, or stand-by 2. Status Blue Red Description On Stand-by . Remote receiver ▪ The display receives the signal from the remote controller here. 2 ASUS LCD TV Monitor T1 Series The colour of the power indicator is as the below table.
User Manual
Page 13
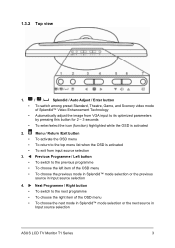
... switch to the previous programme ▪ To choose the left item of the OSD menu ▪ To choose the previous mode in Splendid™ mode selection or the previous source in Input source selection ASUS LCD TV Monitor T1 Series 3 1.3.2 Top view 1. / / Splendid / Auto Adjust / Enter button ▪ To switch among preset Standard, Theatre, Game, and Scenery video mode of Splendid™ Video Enhancement Technology ▪ Automatically adjust the image from input source selection...
... switch to the previous programme ▪ To choose the left item of the OSD menu ▪ To choose the previous mode in Splendid™ mode selection or the previous source in Input source selection ASUS LCD TV Monitor T1 Series 3 1.3.2 Top view 1. / / Splendid / Auto Adjust / Enter button ▪ To switch among preset Standard, Theatre, Game, and Scenery video mode of Splendid™ Video Enhancement Technology ▪ Automatically adjust the image from input source selection...
User Manual
Page 16
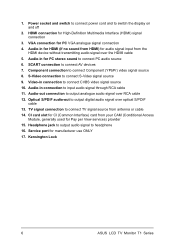
... signal connection 4. VGA connection for High-Definition Multimedia Interface (HDMI) signal connection 3. Component connection to switch the display on and off 2. Audio-out connection to output analogue audio signal over optical S/PDIF cable 13. CI card slot for CI (Common Interface) card from HDMI) for PC stereo sound to output digital audio signal over RCA cable 12. Service port for Pay per View services) provider 15. Kensington Lock 6 ASUS LCD TV Monitor T1 Series Optical S/PDIF audio-out to connect PC audio source 6. Video-in connection to connect TV signal...
... signal connection 4. VGA connection for High-Definition Multimedia Interface (HDMI) signal connection 3. Component connection to switch the display on and off 2. Audio-out connection to output analogue audio signal over optical S/PDIF cable 13. CI card slot for CI (Common Interface) card from HDMI) for PC stereo sound to output digital audio signal over RCA cable 12. Service port for Pay per View services) provider 15. Kensington Lock 6 ASUS LCD TV Monitor T1 Series Optical S/PDIF audio-out to connect PC audio source 6. Video-in connection to connect TV signal...
User Manual
Page 18
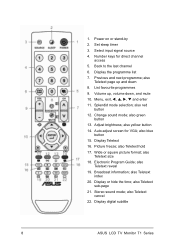
... green button 13. also yellow button 14. Picture freeze; Display or hide the time; Stereo sound mode; Menu, exit, W, S, X, T and enter 11. Splendid mode selection; Adjust brightness; Electronic Program Guide; also Teletext reveal 19. also Teletext cancel 22. 1. Auto adjust screen for direct channel access 5. also blue button 15. Back to the last channel 6. Power on or stand-by 2. Set sleep timer 3. Change sound mode; Display the programme list 7. Broadcast information; Display digital subtitle 8 ASUS LCD TV Monitor T1 Series List...
... green button 13. also yellow button 14. Picture freeze; Display or hide the time; Stereo sound mode; Menu, exit, W, S, X, T and enter 11. Splendid mode selection; Adjust brightness; Electronic Program Guide; also Teletext reveal 19. also Teletext cancel 22. 1. Auto adjust screen for direct channel access 5. also blue button 15. Back to the last channel 6. Power on or stand-by 2. Set sleep timer 3. Change sound mode; Display the programme list 7. Broadcast information; Display digital subtitle 8 ASUS LCD TV Monitor T1 Series List...

User Manual
Page 21
... input port, the other video devices. Before you can switch the input source by using the key on the key pad of the display or on the remote controller. ▪ To connect the audio cable: connect the audio cable from the display's audio-in port of external speakers. 2.5 Turning the Display On Press the power button. When more than one end of the power button. ASUS LCD TV Monitor T1 Series 11 See section 1.3 Display Introduction for the location of the power cord...
... input port, the other video devices. Before you can switch the input source by using the key on the key pad of the display or on the remote controller. ▪ To connect the audio cable: connect the audio cable from the display's audio-in port of external speakers. 2.5 Turning the Display On Press the power button. When more than one end of the power button. ASUS LCD TV Monitor T1 Series 11 See section 1.3 Display Introduction for the location of the power cord...
User Manual
Page 22
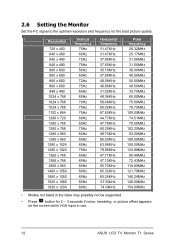
... 72Hz 75Hz 60Hz 60Hz 70Hz 75Hz 75Hz 60Hz 60Hz 75Hz 60Hz 60Hz 60Hz 75Hz 60Hz 60Hz 60Hz 60Hz 60Hz 60Hz 60Hz Horizontal frequency 31.47KHz 31.47KHz 37.86KHz 37.50KHz 35.16KHz 37.88KHz 48.08KHz 46.88KHz 31.02KHz 48.36KHz 56... 146.24MHz 148.50MHz 154.00MHz ▪ Modes not listed in the table may possibly not be supported. ▪ Press button for the best picture quality. 2.6 Setting the Monitor Set the PC signal to the optimal resolution and frequency for 2 - 3 seconds if noise, trembling, or picture offset appears on the screen while VGA input in use. 12 ASUS LCD TV Monitor T1 Series
... 72Hz 75Hz 60Hz 60Hz 70Hz 75Hz 75Hz 60Hz 60Hz 75Hz 60Hz 60Hz 60Hz 75Hz 60Hz 60Hz 60Hz 60Hz 60Hz 60Hz 60Hz Horizontal frequency 31.47KHz 31.47KHz 37.86KHz 37.50KHz 35.16KHz 37.88KHz 48.08KHz 46.88KHz 31.02KHz 48.36KHz 56... 146.24MHz 148.50MHz 154.00MHz ▪ Modes not listed in the table may possibly not be supported. ▪ Press button for the best picture quality. 2.6 Setting the Monitor Set the PC signal to the optimal resolution and frequency for 2 - 3 seconds if noise, trembling, or picture offset appears on the screen while VGA input in use. 12 ASUS LCD TV Monitor T1 Series

User Manual
Page 27
... select Subtitle language with the I / II button on or off the lock to prohibit from accessing to turn on the remote controller when more than one subtitle language is broadcasted. ASUS LCD TV Monitor T1 Series 17 3.1.2 OSD menu introduction 1. Hearing Impaired: to some functions. The default password is required to access this function. ▪ Remote Control Only: to disable the control function of the display messages among English, German, French...
... select Subtitle language with the I / II button on or off the lock to prohibit from accessing to turn on the remote controller when more than one subtitle language is broadcasted. ASUS LCD TV Monitor T1 Series 17 3.1.2 OSD menu introduction 1. Hearing Impaired: to some functions. The default password is required to access this function. ▪ Remote Control Only: to disable the control function of the display messages among English, German, French...

User Manual
Page 28
... is on . You need to move the highlighted item. You may use the S T buttons to specify the channel number of fine tuning the signal. You are provided with Splendid™ Video Intelligence Technology. 18 ASUS LCD TV Monitor T1 Series Picture ▪ Splendid: to scan all the available channels and store them in the memory. Password is required if "Lock System" is to...
... is on . You need to move the highlighted item. You may use the S T buttons to specify the channel number of fine tuning the signal. You are provided with Splendid™ Video Intelligence Technology. 18 ASUS LCD TV Monitor T1 Series Picture ▪ Splendid: to scan all the available channels and store them in the memory. Password is required if "Lock System" is to...

User Manual
Page 29
... - this mode, you may adjust Sharpness, Colour, and Tint to define your preferred white colour. ▪ ASCR: to switch on and off . ▪ Reset Picture: to switch among warm, ordinary, cool, and user's mode. Boom: to specify the intense of the displayed picture deeper or paler; In this function is active only in use. ▪ Tint: to high pitch ASUS LCD TV Monitor T1 Series 19
... - this mode, you may adjust Sharpness, Colour, and Tint to define your preferred white colour. ▪ ASCR: to switch on and off . ▪ Reset Picture: to switch among warm, ordinary, cool, and user's mode. Boom: to specify the intense of the displayed picture deeper or paler; In this function is active only in use. ▪ Tint: to high pitch ASUS LCD TV Monitor T1 Series 19

User Manual
Page 30
... 4:3 signal into the 16:9 wide screen by pressing the display set when VGA input in Standard sound mode. ▪ Balance: to adjust the sound balance of the speakers to your preferred levels ▪ Auto Volume: to automatically keep the volume level equal even if changing programmes ▪ Surround Sound: to turn on and off the simulated surround sound system 5. key on the key pad of ▪ Manual Configuration: to specify the display position...
... 4:3 signal into the 16:9 wide screen by pressing the display set when VGA input in Standard sound mode. ▪ Balance: to adjust the sound balance of the speakers to your preferred levels ▪ Auto Volume: to automatically keep the volume level equal even if changing programmes ▪ Surround Sound: to turn on and off the simulated surround sound system 5. key on the key pad of ▪ Manual Configuration: to specify the display position...
User Manual
Page 32
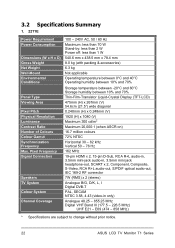
... Power Requirement Power Consumption Dimensions (W x H x D) Gross Weight Net Weight Wall-Mount Environmental Conditions Panel Type Viewing Area Pixel Pitch Physical Resolution Luminance Contrast Ratio Number of Colours Colour Gamut Synchronization Frequency Max. E69 (474 - 858 MHz) * Specifications are subject to change without prior notice. 22 ASUS LCD TV Monitor T1 Series Pixel Frequency Signal Connectors Speakers TV System Colour System Channel Coverage 100 - 240V AC, 50 / 60 Hz Maximum: less than 70 W Stand...
... Power Requirement Power Consumption Dimensions (W x H x D) Gross Weight Net Weight Wall-Mount Environmental Conditions Panel Type Viewing Area Pixel Pitch Physical Resolution Luminance Contrast Ratio Number of Colours Colour Gamut Synchronization Frequency Max. E69 (474 - 858 MHz) * Specifications are subject to change without prior notice. 22 ASUS LCD TV Monitor T1 Series Pixel Frequency Signal Connectors Speakers TV System Colour System Channel Coverage 100 - 240V AC, 50 / 60 Hz Maximum: less than 70 W Stand...

User Manual
Page 33
2. 24T1E Power Requirement Power Consumption Dimensions (W x H x D) Gross Weight Net Weight Wall-Mount Environmental Conditions Panel Type Viewing Area Pixel Pitch Physical Resolution Luminance Contrast Ratio Number of Colours Colour Gamut Synchronization Frequency Max. E69 (474 - 858 MHz) * Specifications are subject to change without prior notice. ASUS LCD TV Monitor T1 Series 23 Pixel Frequency Signal Connectors Speakers TV System Colour System Channel Coverage 100 - 240V AC, 50 / 60 Hz Maximum: less than 75 W Stand-by...
2. 24T1E Power Requirement Power Consumption Dimensions (W x H x D) Gross Weight Net Weight Wall-Mount Environmental Conditions Panel Type Viewing Area Pixel Pitch Physical Resolution Luminance Contrast Ratio Number of Colours Colour Gamut Synchronization Frequency Max. E69 (474 - 858 MHz) * Specifications are subject to change without prior notice. ASUS LCD TV Monitor T1 Series 23 Pixel Frequency Signal Connectors Speakers TV System Colour System Channel Coverage 100 - 240V AC, 50 / 60 Hz Maximum: less than 75 W Stand-by...

User Manual
Page 34
... Dimensions (W x H x D) Gross Weight Net Weight Wall-Mount Environmental Conditions Panel Type Viewing Area Pixel Pitch Physical Resolution Luminance Contrast Ratio Number of Colours Colour Gamut Synchronization Frequency Max. Pixel Frequency Signal Connectors Speakers TV System Colour System Channel Coverage 100 - 240V AC, 50 / 60 Hz Maximum: less than 85 W Stand-by: less than 2 W Power off: less than 1 W 666.5 mm x 515.2 mm x 229.9 mm 13.1 kg (with...
... Dimensions (W x H x D) Gross Weight Net Weight Wall-Mount Environmental Conditions Panel Type Viewing Area Pixel Pitch Physical Resolution Luminance Contrast Ratio Number of Colours Colour Gamut Synchronization Frequency Max. Pixel Frequency Signal Connectors Speakers TV System Colour System Channel Coverage 100 - 240V AC, 50 / 60 Hz Maximum: less than 85 W Stand-by: less than 2 W Power off: less than 1 W 666.5 mm x 515.2 mm x 229.9 mm 13.1 kg (with...

User Manual
Page 35
... remote controller ▪ Check whether the batteries are properly installed and activated. For some video devices and computers, the audio signal is well connected. PC screen image not ▪ Use "Auto Adjust" function centred or sized properly ASUS LCD TV Monitor T1 Series 25 No sound or low sound level ▪ Check whether the audio cable is NOT transmitted over the HDMI interface. Screen image blurry or fuzzy ▪ Check whether the video signal cable is well connected ▪ Use "Auto Adjust" function for VGA input...
... remote controller ▪ Check whether the batteries are properly installed and activated. For some video devices and computers, the audio signal is well connected. PC screen image not ▪ Use "Auto Adjust" function centred or sized properly ASUS LCD TV Monitor T1 Series 25 No sound or low sound level ▪ Check whether the audio cable is NOT transmitted over the HDMI interface. Screen image blurry or fuzzy ▪ Check whether the video signal cable is well connected ▪ Use "Auto Adjust" function for VGA input...


