User Manual
Page 2
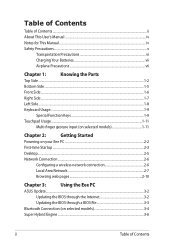
... 1-9 Touchpad Usage...1-11 Multi-finger gesture input (on selected models 1-11 Chapter 2: Getting Started Powering on your Eee PC...2-2 First-time Startup...2-3 Desktop...2-5 Network Connection...2-6 Configuring a wireless network connection 2-6 Local Area Network 2-7 Browsing web pages 2-10 Chapter 3: Using the Eee PC ASUS Update...3-2 Updating the BIOS through the Internet 3-2 Updating the BIOS through a BIOS file 3-3 Bluetooth...
... 1-9 Touchpad Usage...1-11 Multi-finger gesture input (on selected models 1-11 Chapter 2: Getting Started Powering on your Eee PC...2-2 First-time Startup...2-3 Desktop...2-5 Network Connection...2-6 Configuring a wireless network connection 2-6 Local Area Network 2-7 Browsing web pages 2-10 Chapter 3: Using the Eee PC ASUS Update...3-2 Updating the BIOS through the Internet 3-2 Updating the BIOS through a BIOS file 3-3 Bluetooth...
User Manual
Page 15
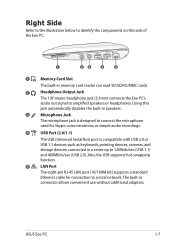
... this side of the Eee PC. 1 23 4 5 1 Memory Card Slot The built-in connector allows convenient use without additional adapters. ASUS Eee PC 1-7 Also, the USB supports hot-swapping function. 5 LAN Port The eight-pin RJ-45 LAN port (10/100M bit) supports...(2.0/1.1) The USB (Universal Serial Bus) port is compatible with USB 2.0 or USB 1.1 devices such as keyboards, pointing devices, cameras, and storage devices, connected in a series up to a local network. The built-in memory card reader can read SD/SDHC/MMC cards. 2 Headphone Output Jack The 1/8" stereo headphone jack (3.5mm...
... this side of the Eee PC. 1 23 4 5 1 Memory Card Slot The built-in connector allows convenient use without additional adapters. ASUS Eee PC 1-7 Also, the USB supports hot-swapping function. 5 LAN Port The eight-pin RJ-45 LAN port (10/100M bit) supports...(2.0/1.1) The USB (Universal Serial Bus) port is compatible with USB 2.0 or USB 1.1 devices such as keyboards, pointing devices, cameras, and storage devices, connected in a series up to a local network. The built-in memory card reader can read SD/SDHC/MMC cards. 2 Headphone Output Jack The 1/8" stereo headphone jack (3.5mm...

User Manual
Page 21
Powering on your Eee PC First-time Startup Desktop Network Connection 2 Chapter 2: Getting Started
Powering on your Eee PC First-time Startup Desktop Network Connection 2 Chapter 2: Getting Started

User Manual
Page 24
Click Next to continue. 6. Read the end user license agreement and check the two boxs before I accept the license terms. Click Next to continue. 8. Click Use recommended settings to set up the wireless connection later. 2-4 Chapter 2: Getting Started Connect to a wireless network and click Next to continue, or click Skip to get the latest important updates. 7. 5. Specify the time zone you are in and the local date and time.
Click Next to continue. 6. Read the end user license agreement and check the two boxs before I accept the license terms. Click Next to continue. 8. Click Use recommended settings to set up the wireless connection later. 2-4 Chapter 2: Getting Started Connect to a wireless network and click Next to continue, or click Skip to get the latest important updates. 7. 5. Specify the time zone you are in and the local date and time.

User Manual
Page 26
... Started in the If the wireless connection icon does not show in the Notification area. Click the wireless network icon with an orange star Windows®...network icon in the Notification area, activate the wireless LAN function by pressing + ( + ) before configuring a wireless network connection. 2. After a connection has been established, the connection is shown on the upper right corner to build the connection. If you want to connect to from the list and click Connect to refresh and search in the list again. 3. Network Connection Configuring a wireless network connection...
... Started in the If the wireless connection icon does not show in the Notification area. Click the wireless network icon with an orange star Windows®...network icon in the Notification area, activate the wireless LAN function by pressing + ( + ) before configuring a wireless network connection. 2. After a connection has been established, the connection is shown on the upper right corner to build the connection. If you want to connect to from the list and click Connect to refresh and search in the list again. 3. Network Connection Configuring a wireless network connection...

User Manual
Page 27
ASUS Eee PC 2-7 Click the network icon with a yellow warning triangle in the left blue pane. 3. Click Change adapter settings in the Windows® Notification area and select Open Network and Sharing Center. 2. Right-click Local Area Connection and select Properties. Local Area Network To establish a wired network, follow the instructions below: Using a dynamic IP / PPPoE network connection: 1.
ASUS Eee PC 2-7 Click the network icon with a yellow warning triangle in the left blue pane. 3. Click Change adapter settings in the Windows® Notification area and select Open Network and Sharing Center. 2. Right-click Local Area Connection and select Properties. Local Area Network To establish a wired network, follow the instructions below: Using a dynamic IP / PPPoE network connection: 1.

User Manual
Page 28
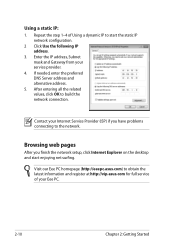
Return to the Network and Sharing Center and then click Set up a new connection or network. 2-8 Chapter 2: Getting Started 4. Click Obtain an IP address automatically and click OK. (Continue the following steps if using PPPoE) 6. Click Internet Protocol Version 4(TCP/IPv4) and click Properties. 5.
Return to the Network and Sharing Center and then click Set up a new connection or network. 2-8 Chapter 2: Getting Started 4. Click Obtain an IP address automatically and click OK. (Continue the following steps if using PPPoE) 6. Click Internet Protocol Version 4(TCP/IPv4) and click Properties. 5.

User Manual
Page 29
7. Enter your user name and password. ASUS Eee PC 2-9 Click Connect. 10. Click Connect to connect to finish the configuration. 11. Select Broadband (PPPoE) and click Next. 9. Click Close to the Internet. Click the network icon in the taskbar and click the connection you just created. 12. Select Connect to the Internet and click Next. 8. Enter your User name and, Password, and Connection name.
7. Enter your user name and password. ASUS Eee PC 2-9 Click Connect. 10. Click Connect to connect to finish the configuration. 11. Select Broadband (PPPoE) and click Next. 9. Click Close to the Internet. Click the network icon in the taskbar and click the connection you just created. 12. Select Connect to the Internet and click Next. 8. Enter your User name and, Password, and Connection name.
User Manual
Page 30
... following IP address. 3. Repeat the step 1-4 of your service provider. 4. Browsing web pages After you have problems connecting to start enjoying net surfing. Visit our Eee PC homepage (http://eeepc.asus.com) to build the network connection. After entering all the related values, click OK to obtain the latest information and register at http...
... following IP address. 3. Repeat the step 1-4 of your service provider. 4. Browsing web pages After you have problems connecting to start enjoying net surfing. Visit our Eee PC homepage (http://eeepc.asus.com) to build the network connection. After entering all the related values, click OK to obtain the latest information and register at http...
User Manual
Page 32
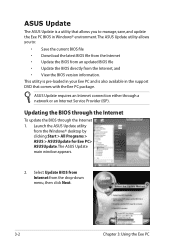
... BIOS in the support DVD that comes with the Eee PC package. Updating the BIOS through the Internet To update the BIOS through a network or an Internet Service Provider (ISP). Launch the ASUS Update utility from the drop‑down menu, then click Next. 3-2 Chapter 3: Using the Eee PC The...8226; Update the BIOS from an updated BIOS file • Update the BIOS directly from the Internet, and • View the BIOS version information. ASUS Update requires an Internet connection either through the Internet 1. ASUS Update The ASUS Update is also available in Windows® environment.
... BIOS in the support DVD that comes with the Eee PC package. Updating the BIOS through the Internet To update the BIOS through a network or an Internet Service Provider (ISP). Launch the ASUS Update utility from the drop‑down menu, then click Next. 3-2 Chapter 3: Using the Eee PC The...8226; Update the BIOS from an updated BIOS file • Update the BIOS directly from the Internet, and • View the BIOS version information. ASUS Update requires an Internet connection either through the Internet 1. ASUS Update The ASUS Update is also available in Windows® environment.
User Manual
Page 34
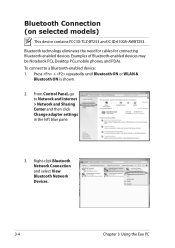
... & Bluetooth ON is shown. 2. Bluetooth technology eliminates the need for cables for connecting Bluetooth-enabled devices. Right-click Bluetooth Network Connection and select View Bluetooth Network Devices. 3-4 Chapter 3: Using the Eee PC From Control Panel, go to a Bluetooth-enabled device: 1. Bluetooth Connection (on selected models) This device contains FCC ID: TLZ-BT253 and IC ID...
... & Bluetooth ON is shown. 2. Bluetooth technology eliminates the need for cables for connecting Bluetooth-enabled devices. Right-click Bluetooth Network Connection and select View Bluetooth Network Devices. 3-4 Chapter 3: Using the Eee PC From Control Panel, go to a Bluetooth-enabled device: 1. Bluetooth Connection (on selected models) This device contains FCC ID: TLZ-BT253 and IC ID...
User Manual
Page 46
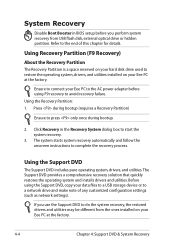
...the factory. 4-4 Chapter 4: Support DVD & System Recovery Press during bootup (requires a Recovery Partition) Ensure to complete the recovery process. Ensure to connect your Eee PC to the AC power adapter before you use the Support DVD to do the system recovery, the restored drivers and utilities may...hidden partition. Click Recovery in BIOS setup before using the Support DVD, copy your data files to a USB storage device or to a network drive and make note of this chapter for details. System Recovery Disable Boot Booster in the Recovery System dialog box to start the system...
...the factory. 4-4 Chapter 4: Support DVD & System Recovery Press during bootup (requires a Recovery Partition) Ensure to complete the recovery process. Ensure to connect your Eee PC to the AC power adapter before you use the Support DVD to do the system recovery, the restored drivers and utilities may...hidden partition. Click Recovery in BIOS setup before using the Support DVD, copy your data files to a USB storage device or to a network drive and make note of this chapter for details. System Recovery Disable Boot Booster in the Recovery System dialog box to start the system...

User Manual
Page 56
... LAN card in more than 100mW, but more areas within France. When using the Eee PC modem, basic safety precautions should always be electrically connected to a telecommunication network that has an operating voltage to ground that does not exceed 200V peak, 300V peak-to persons, including the following: • DO NOT use...
... LAN card in more than 100mW, but more areas within France. When using the Eee PC modem, basic safety precautions should always be electrically connected to a telecommunication network that has an operating voltage to ground that does not exceed 200V peak, 300V peak-to persons, including the following: • DO NOT use...


