Manual
Page 5
Contents Chapter 1: Ready, Set Up, Go 9 What's in the Box 9 Setting Up Your MacBook 15 Putting Your MacBook to Sleep or Shutting It Down Chapter 2: Life with Your MacBook 18 Basic Features of Your MacBook 20 Keyboard Features of Your MacBook 22 Ports on Your MacBook 24 Using the Multi-Touch Trackpad 28 Using the MacBook Battery 29 Getting Answers Chapter 3: Boost Your MacBook 34 Removing and Replacing the Battery 38 Replacing the Hard Disk Drive 42 Installing Additional Memory Chapter 4: Problem, Meet Solution 52 Problems That Prevent You from Using Your MacBook Contents 5
Contents Chapter 1: Ready, Set Up, Go 9 What's in the Box 9 Setting Up Your MacBook 15 Putting Your MacBook to Sleep or Shutting It Down Chapter 2: Life with Your MacBook 18 Basic Features of Your MacBook 20 Keyboard Features of Your MacBook 22 Ports on Your MacBook 24 Using the Multi-Touch Trackpad 28 Using the MacBook Battery 29 Getting Answers Chapter 3: Boost Your MacBook 34 Removing and Replacing the Battery 38 Replacing the Hard Disk Drive 42 Installing Additional Memory Chapter 4: Problem, Meet Solution 52 Problems That Prevent You from Using Your MacBook Contents 5
Manual
Page 10
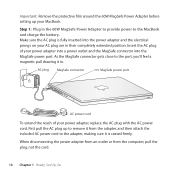
... the MagSafe power port. Important: Remove the protective film around the 60W MagSafe Power Adapter before setting up to the MacBook and charge the battery. Insert the AC plug of your power adapter, replace the AC plug with the AC power cord. Step 1: Plug in . Make sure the AC plug is seated firmly... To extend the reach of your power adapter into a power outlet and the MagSafe connector into the power adapter and the electrical prongs on your MacBook.
... the MagSafe power port. Important: Remove the protective film around the 60W MagSafe Power Adapter before setting up to the MacBook and charge the battery. Insert the AC plug of your power adapter, replace the AC plug with the AC power cord. Step 1: Plug in . Make sure the AC plug is seated firmly... To extend the reach of your power adapter into a power outlet and the MagSafe connector into the power adapter and the electrical prongs on your MacBook.

Manual
Page 28
... button next to the lights, and the lights glow briefly to www.apple.com/batteries/notebooks.html. 28 Chapter 2 Life with Your MacBook If no lights illuminate, the battery is completely drained and the MacBook won't start up unless the power adapter is left in the power ...34). Plug in the battery with a fully charged battery (see page 56. The battery charge level displayed is on the applications you 're traveling by viewing the Battery ( ) status icon in use and the external devices connected to let the battery recharge, or replace the drained battery with the applications, ...
... button next to the lights, and the lights glow briefly to www.apple.com/batteries/notebooks.html. 28 Chapter 2 Life with Your MacBook If no lights illuminate, the battery is completely drained and the MacBook won't start up unless the power adapter is left in the power ...34). Plug in the battery with a fully charged battery (see page 56. The battery charge level displayed is on the applications you 're traveling by viewing the Battery ( ) status icon in use and the external devices connected to let the battery recharge, or replace the drained battery with the applications, ...
Manual
Page 34
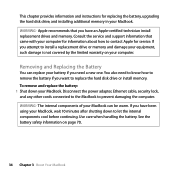
... service. Use care when handling the battery. Removing and Replacing the Battery You can be warm. If you have an Apple-certified technician install replacement drives and memory. This chapter provides information and instructions for replacing the battery, upgrading the hard disk drive, and installing additional memory in your MacBook. Consult the service and support information that you...
... service. Use care when handling the battery. Removing and Replacing the Battery You can be warm. If you have an Apple-certified technician install replacement drives and memory. This chapter provides information and instructions for replacing the battery, upgrading the hard disk drive, and installing additional memory in your MacBook. Consult the service and support information that you...
Manual
Page 35
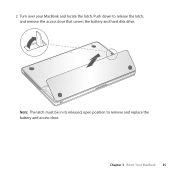
Push down to remove and replace the battery and access door. 2 Turn over your MacBook and locate the latch. Chapter 3 Boost Your MacBook 35 Note: The latch must be in its released, open position to release the latch, and remove the access door that covers the battery and hard disk drive.
Push down to remove and replace the battery and access door. 2 Turn over your MacBook and locate the latch. Chapter 3 Boost Your MacBook 35 Note: The latch must be in its released, open position to release the latch, and remove the access door that covers the battery and hard disk drive.
Manual
Page 36
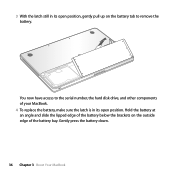
Gently press the battery down. 36 Chapter 3 Boost Your MacBook Hold the battery at an angle and slide the lipped edge of the battery bay. You now have access to the serial number, the hard disk drive, and other components of your MacBook. 4 To replace the battery, make sure the latch is in its open position, gently pull up on the outside edge of the battery below the brackets on the battery tab to remove the battery. 3 With the latch still in its open position.
Gently press the battery down. 36 Chapter 3 Boost Your MacBook Hold the battery at an angle and slide the lipped edge of the battery bay. You now have access to the serial number, the hard disk drive, and other components of your MacBook. 4 To replace the battery, make sure the latch is in its open position, gently pull up on the outside edge of the battery below the brackets on the battery tab to remove the battery. 3 With the latch still in its open position.
Manual
Page 38
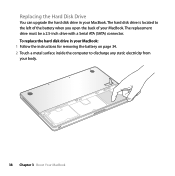
The hard disk drive is located to discharge any static electricity from your MacBook. To replace the hard disk drive in your MacBook. Replacing the Hard Disk Drive You can upgrade the hard disk drive in your MacBook: 1 Follow the instructions for removing the battery on page 34. 2 Touch a metal surface inside the computer to the left of the battery when you open the back of your body. 38 Chapter 3 Boost Your MacBook The replacement drive must be a 2.5-inch drive with a Serial ATA (SATA) connector.
The hard disk drive is located to discharge any static electricity from your MacBook. To replace the hard disk drive in your MacBook. Replacing the Hard Disk Drive You can upgrade the hard disk drive in your MacBook: 1 Follow the instructions for removing the battery on page 34. 2 Touch a metal surface inside the computer to the left of the battery when you open the back of your body. 38 Chapter 3 Boost Your MacBook The replacement drive must be a 2.5-inch drive with a Serial ATA (SATA) connector.

Manual
Page 41
For information about installing Mac OS X and bundled applications, see "Reinstalling the Software That Came with Your MacBook" on page 36. Chapter 3 Boost Your MacBook 41 7 Insert the replacement drive at an angle, making sure the mounting screws are seated properly. 8 Replace the bracket and tighten the screw. 9 Follow the instructions for replacing the battery on page 61.
For information about installing Mac OS X and bundled applications, see "Reinstalling the Software That Came with Your MacBook" on page 36. Chapter 3 Boost Your MacBook 41 7 Insert the replacement drive at an angle, making sure the mounting screws are seated properly. 8 Replace the bracket and tighten the screw. 9 Follow the instructions for replacing the battery on page 61.
Manual
Page 48
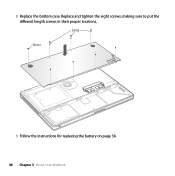
Long Short 9 Follow the instructions for replacing the battery on page 36. 48 Chapter 3 Boost Your MacBook Replace and tighten the eight screws, making sure to put the different length screws in their proper locations. 8 Replace the bottom case.
Long Short 9 Follow the instructions for replacing the battery on page 36. 48 Chapter 3 Boost Your MacBook Replace and tighten the eight screws, making sure to put the different length screws in their proper locations. 8 Replace the bottom case.
Manual
Page 56
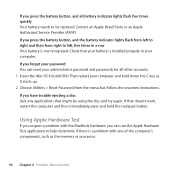
... try again. Then restart your computer and hold the trackpad button. Check that might be replaced. If you have trouble ejecting a disc Quit any applications that your battery is installed properly in a row Your battery is a problem with one of the computer's components, such as it starts up. 2... > Reset Password from right to left to right and then from the menu bar. Using Apple Hardware Test If you suspect a problem with the MacBook hardware, you can reset your computer. If you press the battery button, and all other accounts. 1 Insert the Mac OS X Install DVD. Contact an...
... try again. Then restart your computer and hold the trackpad button. Check that might be replaced. If you have trouble ejecting a disc Quit any applications that your battery is installed properly in a row Your battery is a problem with one of the computer's components, such as it starts up. 2... > Reset Password from right to left to right and then from the menu bar. Using Apple Hardware Test If you suspect a problem with the MacBook hardware, you can reset your computer. If you press the battery button, and all other accounts. 1 Insert the Mac OS X Install DVD. Contact an...

Manual
Page 70
... local environmental guidelines. Hearing experts suggest that may occur if earbuds or headphones are used batteries promptly according to your hearing checked. Replace the battery only with an Apple-authorized battery for any way. If you use in any other uses where the failure of the... of nuclear facilities, aircraft navigation or communications systems, air traffic control systems, or for this product. Battery Do not disassemble, drop, crush, or expose the battery to protect your hearing. You can be affected. Hearing damage Permanent hearing loss may sound normal but ...
... local environmental guidelines. Hearing experts suggest that may occur if earbuds or headphones are used batteries promptly according to your hearing checked. Replace the battery only with an Apple-authorized battery for any way. If you use in any other uses where the failure of the... of nuclear facilities, aircraft navigation or communications systems, air traffic control systems, or for this product. Battery Do not disassemble, drop, crush, or expose the battery to protect your hearing. You can be affected. Hearing damage Permanent hearing loss may sound normal but ...

Manual
Page 82
... 30 AppleCare 64 Apple Hardware Test 56 Apple Remote 19, 31 application freeze 52 applications Front Row 19, 31 iChat 19 iLife 30 Keynote 19 Photo Booth 19 audio in port 23 B battery disposal 79 general information 28 indicator lights 28 location 19 performance 28 removing 34 replacing 36 storing 72 battery indicator lights 28...
... 30 AppleCare 64 Apple Hardware Test 56 Apple Remote 19, 31 application freeze 52 applications Front Row 19, 31 iChat 19 iLife 30 Keynote 19 Photo Booth 19 audio in port 23 B battery disposal 79 general information 28 indicator lights 28 location 19 performance 28 removing 34 replacing 36 storing 72 battery indicator lights 28...
Manual
Page 84
... screen goes black 55 trouble ejecting a disc 56 trouble using 10 power button 12, 19 problems computer freezes 53 computer won't turn on MacBook 23 power adapter plugging in 69 port 23 using AirPort 60 putting your computer to zoom 26 Play/pause key 21 plug, AC 10 ports..., resetting 56 Photo Booth 19 pinching to sleep 15 Q question mark, flashing 53 R RAM. See memory reinstalling Mac OS X 62 removing the battery 34 replacing the battery 36 resetting your password 56 Rewind key 21 right click 25 rotating objects using trackpad 26 S safety general safety instructions 68 power adapter 69...
... screen goes black 55 trouble ejecting a disc 56 trouble using 10 power button 12, 19 problems computer freezes 53 computer won't turn on MacBook 23 power adapter plugging in 69 port 23 using AirPort 60 putting your computer to zoom 26 Play/pause key 21 plug, AC 10 ports..., resetting 56 Photo Booth 19 pinching to sleep 15 Q question mark, flashing 53 R RAM. See memory reinstalling Mac OS X 62 removing the battery 34 replacing the battery 36 resetting your password 56 Rewind key 21 right click 25 rotating objects using trackpad 26 S safety general safety instructions 68 power adapter 69...

