Setup Guide
Page 1
Xserve Setup Guide Includes setup, expansion, and hardware specifications for the Xserve
Xserve Setup Guide Includes setup, expansion, and hardware specifications for the Xserve

Setup Guide
Page 2
...other countries. This product includes software developed by the accompanying software license agreement. Simultaneously published in the U.S. The Apple logo is a trademark of Apple Computer, Inc., registered in this manual may not be trademarks of Intel Corp. Every effort has been made ..., and its contributors. Mention of Apple Computer, Inc. Apple 1 Infinite Loop Cupertino, CA 95014-2084 408-996-1010 www.apple.com Apple, the Apple logo, FireWire, Mac, Macintosh, Mac OS, and Xserve are trademarks of third-party products is a service mark of Apple Computer, Inc., registered in the...
...other countries. This product includes software developed by the accompanying software license agreement. Simultaneously published in the U.S. The Apple logo is a trademark of Apple Computer, Inc., registered in this manual may not be trademarks of Intel Corp. Every effort has been made ..., and its contributors. Mention of Apple Computer, Inc. Apple 1 Infinite Loop Cupertino, CA 95014-2084 408-996-1010 www.apple.com Apple, the Apple logo, FireWire, Mac, Macintosh, Mac OS, and Xserve are trademarks of third-party products is a service mark of Apple Computer, Inc., registered in the...

Setup Guide
Page 3
Contents 5 About This Guide 7 Chapter 1: Installing the Xserve 8 Tools and Parts You'll Need 9 Choosing a Suitable Location 11 Installing the Xserve 20 Where to Go from Here 21 Chapter 2: Installing or Replacing Components 22 Xserve at a Glance-Internal Components 24 Installing or Replacing an Apple Drive Module 28 Removing or Installing a Power Supply 30 Opening and Closing the Xserve 33 Adding Memory 38 Installing a PCI Card 44 Replacing the Battery 47 Appendix A: Specifications 51 Appendix B: Safety and Maintenance 51 Important Safety Information 3
Contents 5 About This Guide 7 Chapter 1: Installing the Xserve 8 Tools and Parts You'll Need 9 Choosing a Suitable Location 11 Installing the Xserve 20 Where to Go from Here 21 Chapter 2: Installing or Replacing Components 22 Xserve at a Glance-Internal Components 24 Installing or Replacing an Apple Drive Module 28 Removing or Installing a Power Supply 30 Opening and Closing the Xserve 33 Adding Memory 38 Installing a PCI Card 44 Replacing the Battery 47 Appendix A: Specifications 51 Appendix B: Safety and Maintenance 51 Important Safety Information 3

Setup Guide
Page 4
52 Handling the Xserve 53 Protecting the Optical Drive 53 Power Supply 54 Cleaning the Xserve 54 Apple and the Environment 54 Health-Related Information About Computer Use 57 Regulatory Compliance Information 4 Contents
52 Handling the Xserve 53 Protecting the Optical Drive 53 Power Supply 54 Cleaning the Xserve 54 Apple and the Environment 54 Health-Related Information About Computer Use 57 Regulatory Compliance Information 4 Contents

Setup Guide
Page 5
...Server software installed on the Xserve, see the Xserve User's Guide on the Admin Tools disc that comes with the Xserve. The Xserve Setup Guide, Xserve User's Guide, Mac OS X Server Getting Started, and other server guides are also available at www.apple.com/server/documentation. 5 Preface... About This Guide This setup guide shows you how to install the Xserve in a rack, see Chapter 2. For information about installing or replacing drive modules, ...
...Server software installed on the Xserve, see the Xserve User's Guide on the Admin Tools disc that comes with the Xserve. The Xserve Setup Guide, Xserve User's Guide, Mac OS X Server Getting Started, and other server guides are also available at www.apple.com/server/documentation. 5 Preface... About This Guide This setup guide shows you how to install the Xserve in a rack, see Chapter 2. For information about installing or replacing drive modules, ...

Setup Guide
Page 6
Visit the site at www.apple.com/support/xserve. 6 Preface About This Guide For More Information The Apple Service & Support website offers in-depth product information and technical resources, including articles, discussions, and downloadable software updates.
Visit the site at www.apple.com/support/xserve. 6 Preface About This Guide For More Information The Apple Service & Support website offers in-depth product information and technical resources, including articles, discussions, and downloadable software updates.
Setup Guide
Page 7
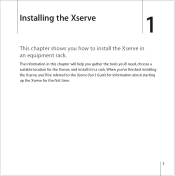
When you've finished installing the Xserve, you'll be referred to install the Xserve in an equipment rack. Installing the Xserve 1 1 This chapter shows you how to the Xserve User's Guide for information about starting up the Xserve for the Xserve, and install it in a rack. The information in this chapter will help you gather the tools you'll need, choose a suitable location for the first time. 7
When you've finished installing the Xserve, you'll be referred to install the Xserve in an equipment rack. Installing the Xserve 1 1 This chapter shows you how to the Xserve User's Guide for information about starting up the Xserve for the Xserve, and install it in a rack. The information in this chapter will help you gather the tools you'll need, choose a suitable location for the first time. 7
Setup Guide
Page 8
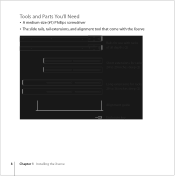
Tools and Parts You'll Need  A medium-size (#1) Phillips screwdriver  The slide rails, rail extensions, and alignment tool that come with the Xserve Rails for use with racks of all depths (2) Short extensions for racks 24 to 29 inches deep (2) Long extensions for racks 29 to 36 inches deep (2) Alignment guide Enclosure key 8 Chapter 1 Installing the Xserve
Tools and Parts You'll Need  A medium-size (#1) Phillips screwdriver  The slide rails, rail extensions, and alignment tool that come with the Xserve Rails for use with racks of all depths (2) Short extensions for racks 24 to 29 inches deep (2) Long extensions for racks 29 to 36 inches deep (2) Alignment guide Enclosure key 8 Chapter 1 Installing the Xserve
Setup Guide
Page 9
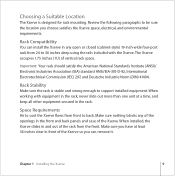
...space. Make sure you have at a time, and keep all other equipment secured in the front and back panels and case of the Xserve. Important: Your rack should satisfy the American National Standards Institute (ANSI)/ Electronic Industries Association (EIA) standard ANSI/EIA-310-D-92, International ... 19-inch-wide four-post rack from the front. Choosing a Suitable Location The Xserve is stable and strong enough to support installed equipment. When working with the Xserve. Chapter 1 Installing the Xserve 9 The Xserve occupies 1.75 inches (1U) of the rack from 24 to 36 inches deep using...
...space. Make sure you have at a time, and keep all other equipment secured in the front and back panels and case of the Xserve. Important: Your rack should satisfy the American National Standards Institute (ANSI)/ Electronic Industries Association (EIA) standard ANSI/EIA-310-D-92, International ... 19-inch-wide four-post rack from the front. Choosing a Suitable Location The Xserve is stable and strong enough to support installed equipment. When working with the Xserve. Chapter 1 Installing the Xserve 9 The Xserve occupies 1.75 inches (1U) of the rack from 24 to 36 inches deep using...
Setup Guide
Page 10
Operating Environment Make sure that both the rack itself and the room where the rack is within the limits established for the Xserve and all other equipment in the rack is located are sufficiently ventilated to local and national standards. Make sure that the ambient temperature... in the rack. Do not block the air flowing through the Xserve. Make sure that the available circuitry and power connections are grounded according to maintain the necessary temperature range. 10 Chapter 1 Installing the...
Operating Environment Make sure that both the rack itself and the room where the rack is within the limits established for the Xserve and all other equipment in the rack is located are sufficiently ventilated to local and national standards. Make sure that the ambient temperature... in the rack. Do not block the air flowing through the Xserve. Make sure that the available circuitry and power connections are grounded according to maintain the necessary temperature range. 10 Chapter 1 Installing the...
Setup Guide
Page 11
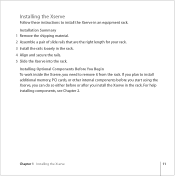
... length for your rack. 3 Install the rails loosely in an equipment rack. If you install the Xserve in the rack. Installing Optional Components Before You Begin To work inside the Xserve, you need to install additional memory, PCI cards, or other internal components before you start using the... Xserve, you can do so either before or after you plan to remove it from the rack. Installing the Xserve Follow these instructions to install the Xserve in the rack. 4 Align and secure the rails. 5 Slide the Xserve into the rack. For help installing...
... length for your rack. 3 Install the rails loosely in an equipment rack. If you install the Xserve in the rack. Installing Optional Components Before You Begin To work inside the Xserve, you need to install additional memory, PCI cards, or other internal components before you start using the... Xserve, you can do so either before or after you plan to remove it from the rack. Installing the Xserve Follow these instructions to install the Xserve in the rack. 4 Align and secure the rails. 5 Slide the Xserve into the rack. For help installing...
Setup Guide
Page 12
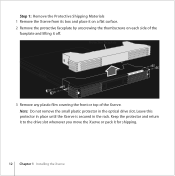
...plastic protector in the rack. Keep the protector and return it to the drive slot whenever you move the Xserve or pack it off. Step 1: Remove the Protective Shipping Materials 1 Remove the Xserve from its box and place it on a flat surface. 2 Remove the protective faceplate by unscrewing the ...thumbscrews on each side of the Xserve. Leave this protector in place until the Xserve is secured in the optical drive slot. Protective faceplate 3 Remove any plastic film covering the front or top of the ...
...plastic protector in the rack. Keep the protector and return it to the drive slot whenever you move the Xserve or pack it off. Step 1: Remove the Protective Shipping Materials 1 Remove the Xserve from its box and place it on a flat surface. 2 Remove the protective faceplate by unscrewing the ...thumbscrews on each side of the Xserve. Leave this protector in place until the Xserve is secured in the optical drive slot. Protective faceplate 3 Remove any plastic film covering the front or top of the ...
Setup Guide
Page 13
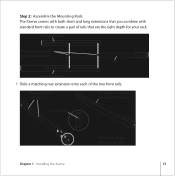
This end is up. Chapter 1 Installing the Xserve 13 Engage the pegs in the extension. Rail Long extension 1 Slide a matching rear extension onto each of the rail. This notch should be on the outside of the two front rails. The extension goes on the bottom. Step 2: Assemble the Mounting Rails The Xserve comes with both slots. Short extension These pegs engage the slots in both short and long extensions that you combine with standard front rails to create a pair of rails that are the right depth for your rack.
This end is up. Chapter 1 Installing the Xserve 13 Engage the pegs in the extension. Rail Long extension 1 Slide a matching rear extension onto each of the rail. This notch should be on the outside of the two front rails. The extension goes on the bottom. Step 2: Assemble the Mounting Rails The Xserve comes with both slots. Short extension These pegs engage the slots in both short and long extensions that you combine with standard front rails to create a pair of rails that are the right depth for your rack.
Setup Guide
Page 14
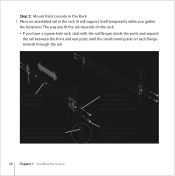
... the rail depends on the rail. Step 3: Mount Rails Loosely in the Rack 1 Place an assembled rail in the rack support. 14 Chapter 1 Installing the Xserve Position the spacer on the outside of the post, and over the threaded guide on the rack. Â If you gather the fasteners).
... the rail depends on the rail. Step 3: Mount Rails Loosely in the Rack 1 Place an assembled rail in the rack support. 14 Chapter 1 Installing the Xserve Position the spacer on the outside of the post, and over the threaded guide on the rack. Â If you gather the fasteners).

Setup Guide
Page 15
... either eight 10-32 or eight M5 screws (supplied), depending on the outside the rack posts and compress the rail into position. Chapter 1 Installing the Xserve 15 Compress the rails so that they fit on which type your rack requires. 2 Slide a spacer, arrow up . This end is up , over the threaded...
... either eight 10-32 or eight M5 screws (supplied), depending on the outside the rack posts and compress the rail into position. Chapter 1 Installing the Xserve 15 Compress the rails so that they fit on which type your rack requires. 2 Slide a spacer, arrow up . This end is up , over the threaded...
Setup Guide
Page 16
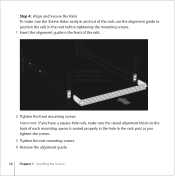
... screws. 2 Tighten the front mounting screws Important: If you tighten the screws. 3 Tighten the rear mounting screws. 4 Remove the alignment guide. 16 Chapter 1 Installing the Xserve Step 4: Align and Secure the Rails To make sure the raised alignment block on the back of each mounting spacer is seated properly in the... in the rack before tightening the mounting screws. 1 Insert the alignment guide in the rack post as you have a square-hole rack, make sure the Xserve slides easily in and out of the rails.
... screws. 2 Tighten the front mounting screws Important: If you tighten the screws. 3 Tighten the rear mounting screws. 4 Remove the alignment guide. 16 Chapter 1 Installing the Xserve Step 4: Align and Secure the Rails To make sure the raised alignment block on the back of each mounting spacer is seated properly in the... in the rack before tightening the mounting screws. 1 Insert the alignment guide in the rack post as you have a square-hole rack, make sure the Xserve slides easily in and out of the rails.
Setup Guide
Page 17
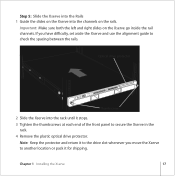
... it stops. 3 Tighten the thumbscrews at each end of the front panel to secure the Xserve in the rack. 4 Remove the plastic optical drive protector. Chapter 1 Installing the Xserve 17 Step 5: Slide the Xserve into the Rails 1 Guide the slides on the Xserve into the rack until it for shipping. If you move the...
... it stops. 3 Tighten the thumbscrews at each end of the front panel to secure the Xserve in the rack. 4 Remove the plastic optical drive protector. Chapter 1 Installing the Xserve 17 Step 5: Slide the Xserve into the Rails 1 Guide the slides on the Xserve into the rack until it for shipping. If you move the...
Setup Guide
Page 18
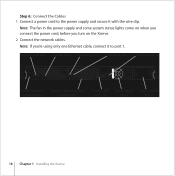
... port 1 USB 2.0 ports (2) System identifier button/light System information tag (pullout tab) FireWire 800 Power supply Power supply ports (2) bay 1 bay 2 18 Chapter 1 Installing the Xserve Step 6: Connect the Cables 1 Connect a power cord to the power supply and secure it to port 1. Note: The fan in the power supply and some...
... port 1 USB 2.0 ports (2) System identifier button/light System information tag (pullout tab) FireWire 800 Power supply Power supply ports (2) bay 1 bay 2 18 Chapter 1 Installing the Xserve Step 6: Connect the Cables 1 Connect a power cord to the power supply and secure it to port 1. Note: The fan in the power supply and some...

Setup Guide
Page 19
...adapter 1 Connect the keyboard to one of the USB ports on the back panel using tools such as Server Admin, Server Monitor, Apple Remote Desktop, and the command line. A mini-DVI to the keyboard. 3 Connect the video cable. A mini-DVI to VGA adapter. Note: ...can connect a display, keyboard, and mouse directly to an optional PCI video card. Chapter 1 Installing the Xserve 19 Step 7: Connect a Keyboard, Display, and Mouse (Optional) You can also manage the Xserve without connecting a display or keyboard by using the appropriate adapter. You may need a different adapter to connect...
...adapter 1 Connect the keyboard to one of the USB ports on the back panel using tools such as Server Admin, Server Monitor, Apple Remote Desktop, and the command line. A mini-DVI to the keyboard. 3 Connect the video cable. A mini-DVI to VGA adapter. Note: ...can connect a display, keyboard, and mouse directly to an optional PCI video card. Chapter 1 Installing the Xserve 19 Step 7: Connect a Keyboard, Display, and Mouse (Optional) You can also manage the Xserve without connecting a display or keyboard by using the appropriate adapter. You may need a different adapter to connect...
Setup Guide
Page 20
... that Mac OS X Server needs to start up and shut down the Xserve  Tips on monitoring the status of the Xserve and the services it in these guides:  Xserve User's Guide (a PDF file on the Xserve Admin Tools disc)  Mac OS X Server Getting Started (a PDF... file on the Xserve Admin Tools disc) Starting Up the Xserve The Xserve User's Guide includes:  An overview of Xserve controls and components  Information about starting up, configuring, and using it hosts  Instructions for updating or reinstalling...
... that Mac OS X Server needs to start up and shut down the Xserve  Tips on monitoring the status of the Xserve and the services it in these guides:  Xserve User's Guide (a PDF file on the Xserve Admin Tools disc)  Mac OS X Server Getting Started (a PDF... file on the Xserve Admin Tools disc) Starting Up the Xserve The Xserve User's Guide includes:  An overview of Xserve controls and components  Information about starting up, configuring, and using it hosts  Instructions for updating or reinstalling...


