Getting Started
Page 3
... 6 Basic Features of Your PowerBook 8 Additional Features of Your PowerBook 10 Setting Up 16 How Do I Turn My PowerBook Off? 17 Calibrating Your Battery 18 What's Next? 19 The Basics 19 Getting to Know Your New PowerBook 20 Adjusting Your Display 21 Using Your Power Adapter 22 Using the Trackpad 23 ...Using the Keyboard 24 Using a Mouse 24 Learning About Mac OS X 24 Customizing Your Desktop and Setting Your Preferences 25 Connecting to a Printer 26 Monitoring Printing ...
... 6 Basic Features of Your PowerBook 8 Additional Features of Your PowerBook 10 Setting Up 16 How Do I Turn My PowerBook Off? 17 Calibrating Your Battery 18 What's Next? 19 The Basics 19 Getting to Know Your New PowerBook 20 Adjusting Your Display 21 Using Your Power Adapter 22 Using the Trackpad 23 ...Using the Keyboard 24 Using a Mouse 24 Learning About Mac OS X 24 Customizing Your Desktop and Setting Your Preferences 25 Connecting to a Printer 26 Monitoring Printing ...
Getting Started
Page 5
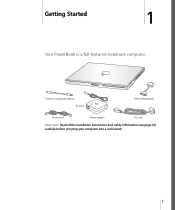
Getting Started 1 1 Your PowerBook is a full-featured notebook computer. ® S-video-to-composite adapter AC plug DVI-to-VGA adapter Phone cord Power adapter AC cord Important: Read all the installation instructions and safety information (see page 67) carefully before you plug your computer into a wall socket. 5
Getting Started 1 1 Your PowerBook is a full-featured notebook computer. ® S-video-to-composite adapter AC plug DVI-to-VGA adapter Phone cord Power adapter AC cord Important: Read all the installation instructions and safety information (see page 67) carefully before you plug your computer into a wall socket. 5
Getting Started
Page 8
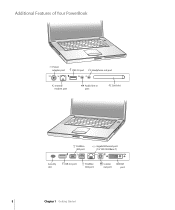
® ® Additional Features of Your PowerBook ¯ Power adapter port USB 2.0 port f Headphone out port W Internal modem port Audio line in port PC Card slot FireWire 400 port G Gigabit Ethernet port (10/100/1000Base-T) Security USB 2.0 port FireWire Æ S-video DVI slot 800 port out port port 8 Chapter 1 Getting Started
® ® Additional Features of Your PowerBook ¯ Power adapter port USB 2.0 port f Headphone out port W Internal modem port Audio line in port PC Card slot FireWire 400 port G Gigabit Ethernet port (10/100/1000Base-T) Security USB 2.0 port FireWire Æ S-video DVI slot 800 port out port port 8 Chapter 1 Getting Started
Getting Started
Page 9
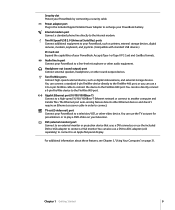
... PC Card and CardBus formats. Security slot Protect your PowerBook by connecting a security cable. ¯ Power adapter port Plug in the included Apple Portable Power Adapter to recharge your PowerBook. You can use the included DVI-to-VGA adapter to an Apple flat-panel display. You can use a DVI-to-ADC adapter (sold separately) to connect to connect a VGA monitor...
... PC Card and CardBus formats. Security slot Protect your PowerBook by connecting a security cable. ¯ Power adapter port Plug in the included Apple Portable Power Adapter to recharge your PowerBook. You can use the included DVI-to-VGA adapter to an Apple flat-panel display. You can use a DVI-to-ADC adapter (sold separately) to connect to connect a VGA monitor...

Getting Started
Page 10
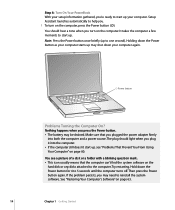
... set it up quickly and start using it right away. See "Using Your Power Adapter" on your AC plug into the outlet. Step 1: Plug In the Power Adapter m Plug the AC plug of your power adapter into an outlet and the power adapter plug into the PowerBook power adapter port. AC plug Important: Be sure to snap the electrical prongs on...
... set it up quickly and start using it right away. See "Using Your Power Adapter" on your AC plug into the outlet. Step 1: Plug In the Power Adapter m Plug the AC plug of your power adapter into an outlet and the power adapter plug into the PowerBook power adapter port. AC plug Important: Be sure to snap the electrical prongs on...
Getting Started
Page 14
Step 4: Turn On Your PowerBook With your setup information gathered, you're ready to the computer. Make sure that the computer can't find the system software on the hard disk ... computer starts up to one second). You see "Problems That Prevent You From Using Your Computer" on the computer, press the Power button (®). If the problem persists, you plugged the power adapter firmly into the computer. • If the computer still doesn't start up . Hold down your computer. You should light when...
Step 4: Turn On Your PowerBook With your setup information gathered, you're ready to the computer. Make sure that the computer can't find the system software on the hard disk ... computer starts up to one second). You see "Problems That Prevent You From Using Your Computer" on the computer, press the Power button (®). If the problem persists, you plugged the power adapter firmly into the computer. • If the computer still doesn't start up . Hold down your computer. You should light when...
Getting Started
Page 17
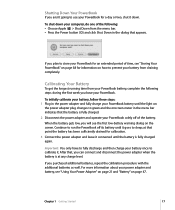
... the dialog that appears. Calibrating Your Battery To get the longest running time from your PowerBook battery, complete the following : • Choose Apple (K) > Shut Down from draining completely. When the battery gets low, you will see "Using Your Power Adapter" on page 21 and "Battery" on the screen. After that, you can connect and...
... the dialog that appears. Calibrating Your Battery To get the longest running time from your PowerBook battery, complete the following : • Choose Apple (K) > Shut Down from draining completely. When the battery gets low, you will see "Using Your Power Adapter" on page 21 and "Battery" on the screen. After that, you can connect and...

Getting Started
Page 21
... page 47). A green light indicates that the battery is being charged. Your PowerBook has a 15.2-inch TFT WXGA display with your computer, or purchase an additional 65W Apple Portable Power Adapter. Open the Displays pane of System Preferences. To control your display: m Choose Apple (K) > System Preferences from the standard resolution to a scaled resolution. To adjust...
... page 47). A green light indicates that the battery is being charged. Your PowerBook has a 15.2-inch TFT WXGA display with your computer, or purchase an additional 65W Apple Portable Power Adapter. Open the Displays pane of System Preferences. To control your display: m Choose Apple (K) > System Preferences from the standard resolution to a scaled resolution. To adjust...

Getting Started
Page 22
... included AC cord to the computer. AC cord AC plug Warning: Make sure the power adapter is sensitive to how quickly you 're using your power adapter, make sure the two prongs are snapped into the power adapter port on page 67. Using more information on the screen. If the trackpad becomes ... bar at the top of the screen. 22 Chapter 2 The Basics For safety instructions about using the AC plug with your power adapter, see "Plugging In the Power Adapter" on the computer to ensure it with your finger slowly across the screen, move your finger, the farther the pointer moves ...
... included AC cord to the computer. AC cord AC plug Warning: Make sure the power adapter is sensitive to how quickly you 're using your power adapter, make sure the two prongs are snapped into the power adapter port on page 67. Using more information on the screen. If the trackpad becomes ... bar at the top of the screen. 22 Chapter 2 The Basics For safety instructions about using the AC plug with your power adapter, see "Plugging In the Power Adapter" on the computer to ensure it with your finger slowly across the screen, move your finger, the farther the pointer moves ...

Getting Started
Page 32
Note: Apple has already included software to work with many types of external devices, including printers, scanners, digital cameras, game pads, joysticks, keyboards, and floppy disk drives. ... USB 2.0 ports are using the device for an extended period, it is a good idea to connect the PowerBook power adapter. 32 Chapter 3 Using Your Computer However, these types of a separate power adapter can be used with your PowerBook. You don't need to restart or reconfigure your computer. ® Using USB Devices To use to connect many...
Note: Apple has already included software to work with many types of external devices, including printers, scanners, digital cameras, game pads, joysticks, keyboards, and floppy disk drives. ... USB 2.0 ports are using the device for an extended period, it is a good idea to connect the PowerBook power adapter. 32 Chapter 3 Using Your Computer However, these types of a separate power adapter can be used with your PowerBook. You don't need to restart or reconfigure your computer. ® Using USB Devices To use to connect many...

Getting Started
Page 33
... information on your computer, check the Macintosh Products Guide at www.apple.com/usb. Using Multiple USB Devices at the Same Time If you want to an open USB port on USB devices available for "USB." Most USB hubs also have a power adapter and should be plugged into an outlet. ® USB hub...
... information on your computer, check the Macintosh Products Guide at www.apple.com/usb. Using Multiple USB Devices at the Same Time If you want to an open USB port on USB devices available for "USB." Most USB hubs also have a power adapter and should be plugged into an outlet. ® USB hub...

Getting Started
Page 35
... of FireWire devices will be powered by separate power adapters. The rest of the devices in FireWire Target Disk Mode: 1 Make sure that your PowerBook is shut down. 2 Use a FireWire cable to connect your PowerBook to the Trash. 5 Press the Power button on the Apple FireWire website at www.apple.com/firewire. Your PowerBook display shows the FireWire logo...
... of FireWire devices will be powered by separate power adapters. The rest of the devices in FireWire Target Disk Mode: 1 Make sure that your PowerBook is shut down. 2 Use a FireWire cable to connect your PowerBook to the Trash. 5 Press the Power button on the Apple FireWire website at www.apple.com/firewire. Your PowerBook display shows the FireWire logo...

Getting Started
Page 42
...display or projector, be sure the DVI-to your PowerBook. To operate your computer with an external monitor attached and the display closed: 1 Connect a USB keyboard and mouse to that came with the display closed , the power adapter must be of lower quality than those on the ...external display by using the Displays pane of most televisions, images displayed on the television screen will be plugged into the PowerBook and an outlet. Your PowerBook automatically detects the external display. 4...
...display or projector, be sure the DVI-to your PowerBook. To operate your computer with an external monitor attached and the display closed: 1 Connect a USB keyboard and mouse to that came with the display closed , the power adapter must be of lower quality than those on the ...external display by using the Displays pane of most televisions, images displayed on the television screen will be plugged into the PowerBook and an outlet. Your PowerBook automatically detects the external display. 4...

Getting Started
Page 43
...You can also record information on the device, use the S-video-to-composite adapter to connect a composite video cable) and connect the other end to your device. 2 If you can connect your PowerBook to an Apple flat-panel display using and configuring an external monitor is available in Mac ...external device, hold down the Command (x) key and press the F2 key. 5 To adjust how the images are not supported. 2 Connect the power adapter to the PowerBook and an outlet. 3 Close the PowerBook display to put the computer to sleep. 4 Follow the steps in the previous section to connect your...
...You can also record information on the device, use the S-video-to-composite adapter to connect a composite video cable) and connect the other end to your device. 2 If you can connect your PowerBook to an Apple flat-panel display using and configuring an external monitor is available in Mac ...external device, hold down the Command (x) key and press the F2 key. 5 To adjust how the images are not supported. 2 Connect the power adapter to the PowerBook and an outlet. 3 Close the PowerBook display to put the computer to sleep. 4 Follow the steps in the previous section to connect your...

Getting Started
Page 46
... a blank recordable disc, and play it . 4 Click the Burn Disc icon beside the disc name in the Dock. 2 Select the playlist you can create your power adapter when burning a DVD. 46 Chapter 3 Using Your Computer With applications like iDVD, you want to it on using DVD Player, open DVD Player and choose...
... a blank recordable disc, and play it . 4 Click the Burn Disc icon beside the disc name in the Dock. 2 Select the playlist you can create your power adapter when burning a DVD. 46 Chapter 3 Using Your Computer With applications like iDVD, you want to it on using DVD Player, open DVD Player and choose...

Getting Started
Page 47
...47 Battery When the external power adapter is on the applications you use and external devices connected to your PowerBook, you may provide power for up unless the power adapter is left in the power adapter to maintain the contents of...Tips" on the battery itself. Also, changing batteries several times in a short period can run your PowerBook off certain features such as AirPort Extreme or Bluetooth® wireless technology can determine the charge left in...page 48). For more information about using your PowerBook. Plug in your computer draws power from its battery.
...47 Battery When the external power adapter is on the applications you use and external devices connected to your PowerBook, you may provide power for up unless the power adapter is left in the power adapter to maintain the contents of...Tips" on the battery itself. Also, changing batteries several times in a short period can run your PowerBook off certain features such as AirPort Extreme or Bluetooth® wireless technology can determine the charge left in...page 48). For more information about using your PowerBook. Plug in your computer draws power from its battery.

Getting Started
Page 48
... bar is set to show the percentage of charge, you may sometimes notice that the battery does not maintain a full charge of 100% when the power adapter is not continuously cycled on and off. Turn it . Gently press the left side of the battery into place. 48 Chapter 3 Using Your Computer ...Latch To replace the battery: • Place the right side of the battery down your PowerBook. When the battery level eventually drops below 95 percent, it will charge all the way to 100 percent. This saves battery life as charging is...
... bar is set to show the percentage of charge, you may sometimes notice that the battery does not maintain a full charge of 100% when the power adapter is not continuously cycled on and off. Turn it . Gently press the left side of the battery into place. 48 Chapter 3 Using Your Computer ...Latch To replace the battery: • Place the right side of the battery down your PowerBook. When the battery level eventually drops below 95 percent, it will charge all the way to 100 percent. This saves battery life as charging is...

Getting Started
Page 49
... 96. In the Energy Saver pane of System Preferences, select the "Put the hard disk to sleep when possible" option. • Set your PowerBook to conserve power while you are currently using the Battery status icon in sleep. For more quickly if the computer is based on the amount of... not in the battery with your Energy Saver settings (see "Battery Disposal Information" on , or in the menu bar. Charging a Battery When the power adapter that you are not using. • Remove CD and DVD discs when they are not in sleep. Battery-Conservation Tips The amount of work . ...
... 96. In the Energy Saver pane of System Preferences, select the "Put the hard disk to sleep when possible" option. • Set your PowerBook to conserve power while you are currently using the Battery status icon in sleep. For more quickly if the computer is based on the amount of... not in the battery with your Energy Saver settings (see "Battery Disposal Information" on , or in the menu bar. Charging a Battery When the power adapter that you are not using. • Remove CD and DVD discs when they are not in sleep. Battery-Conservation Tips The amount of work . ...

Getting Started
Page 54
Latch Warning: The internal components of your computer. 54 Chapter 4 Adding Memory to Your Computer Disconnect the power adapter, phone cord, and any other cables connected to the computer. If you have been using your PowerBook, wait 10 minutes after shutting down your PowerBook may be hot. Turn the computer over and remove the battery by giving the latch a quarter turn. To install additional memory: 1 Shut down to let the internal components cool before continuing. 2 Using a Phillips size 00 screwdriver, unscrew the memory door and remove it from the bottom of your computer.
Latch Warning: The internal components of your computer. 54 Chapter 4 Adding Memory to Your Computer Disconnect the power adapter, phone cord, and any other cables connected to the computer. If you have been using your PowerBook, wait 10 minutes after shutting down your PowerBook may be hot. Turn the computer over and remove the battery by giving the latch a quarter turn. To install additional memory: 1 Shut down to let the internal components cool before continuing. 2 Using a Phillips size 00 screwdriver, unscrew the memory door and remove it from the bottom of your computer.

Getting Started
Page 57
... Adding Memory to make sure that the memory you still have problems, remove the memory and consult the support information that came with this PowerBook and that it is installed correctly. 8 Replace the battery. A dialog appears that were attached. If you installed is not recognized or ...the battery compartment. For a more detailed breakdown of the amount of the battery into place. 9 Reconnect the power adapter and any new memory you see the Mac OS desktop, choose Apple (K) > About This Mac from the menu bar. Place the left side of memory installed in your computer,...
... Adding Memory to make sure that the memory you still have problems, remove the memory and consult the support information that came with this PowerBook and that it is installed correctly. 8 Replace the battery. A dialog appears that were attached. If you installed is not recognized or ...the battery compartment. For a more detailed breakdown of the amount of the battery into place. 9 Reconnect the power adapter and any new memory you see the Mac OS desktop, choose Apple (K) > About This Mac from the menu bar. Place the left side of memory installed in your computer,...


