
Service Guide
Page 4
...stick tape • Kapton® tape (922-1731) • Voltmeter (for troubleshooting) • Small low-power magnet (for troubleshooting) • Apple Pro keyboard and mouse (for the take apart procedures. • ESD wrist strap and mat • Soft cloth • #0 Phillips screwdriver (magnetized...8226; Dental pick (with up to the logic board. PowerBook G4 (15-inch FW800) Take Apart General Information Important Note • Memory from the previous 15-inch PowerBook is secured with screws accessible from under the top case. • Memory cards are a few critical differences: &#...
...stick tape • Kapton® tape (922-1731) • Voltmeter (for troubleshooting) • Small low-power magnet (for troubleshooting) • Apple Pro keyboard and mouse (for the take apart procedures. • ESD wrist strap and mat • Soft cloth • #0 Phillips screwdriver (magnetized...8226; Dental pick (with up to the logic board. PowerBook G4 (15-inch FW800) Take Apart General Information Important Note • Memory from the previous 15-inch PowerBook is secured with screws accessible from under the top case. • Memory cards are a few critical differences: &#...
Service Guide
Page 6
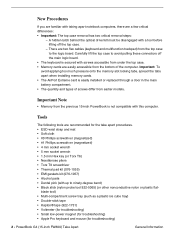
...; Soft cloth Preliminary Step Before you begin, identify the foot that needs replacement. PowerBook G4 (15-inch FW800) Take Apart Foot Check the bottom case of the computer and compare it with the procedure, matching the foot to Apple Repair Center. Case plug Case foot Continue with the images in this table: Plug Area on Bottom...
...; Soft cloth Preliminary Step Before you begin, identify the foot that needs replacement. PowerBook G4 (15-inch FW800) Take Apart Foot Check the bottom case of the computer and compare it with the procedure, matching the foot to Apple Repair Center. Case plug Case foot Continue with the images in this table: Plug Area on Bottom...
Service Guide
Page 7
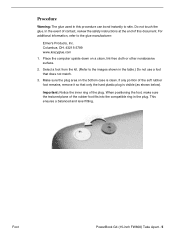
... shown in the table.) Do not use a foot that only the hard plastic plug is clean. Place the computer upside down on the bottom case is visible (as shown below). In the event of contact, review the safety instructions at the end of the soft rubber foot remains, remove...the plug. Procedure Warning: The glue used in this document. Make sure the plug area on a clean, lint-free cloth or other nonabrasive surface. 2. Foot PowerBook G4 (15-inch FW800) Take Apart - 5 If any portion of this procedure can bond instantly to skin. Columbus, OH. 43215-3799 www.krazyglue.com 1. Do...
... shown in the table.) Do not use a foot that only the hard plastic plug is clean. Place the computer upside down on the bottom case is visible (as shown below). In the event of contact, review the safety instructions at the end of the soft rubber foot remains, remove...the plug. Procedure Warning: The glue used in this document. Make sure the plug area on a clean, lint-free cloth or other nonabrasive surface. 2. Foot PowerBook G4 (15-inch FW800) Take Apart - 5 If any portion of this procedure can bond instantly to skin. Columbus, OH. 43215-3799 www.krazyglue.com 1. Do...

Service Guide
Page 8
Place the hollow nozzle cap on the bottom case. Do not spread the glue. 6. Discard the tube of the plug. 7. Contains ethyl cyanoacrylate. Liquid glue will sting eye temporarily. PowerBook G4 (15-inch FW800) Take Apart Foot Before opening the glue, review the safety instructions at any time. To break the seal, hold the...
Place the hollow nozzle cap on the bottom case. Do not spread the glue. 6. Discard the tube of the plug. 7. Contains ethyl cyanoacrylate. Liquid glue will sting eye temporarily. PowerBook G4 (15-inch FW800) Take Apart Foot Before opening the glue, review the safety instructions at any time. To break the seal, hold the...

Service Guide
Page 24
Top Case Tools This procedure requires the following tools: • #0 Phillips screwdriver (magnetized) • 1.5 mm Hex key (or Torx T6) • Dental pick (with up to a ninety-degree bend) • Black stick (or other nonconductive nylon or plastic flat-blade tool) • Soft cloth • Multi-compartment screw tray Part Location 22 - PowerBook G4 (15-inch FW800) Take Apart Top Case
Top Case Tools This procedure requires the following tools: • #0 Phillips screwdriver (magnetized) • 1.5 mm Hex key (or Torx T6) • Dental pick (with up to a ninety-degree bend) • Black stick (or other nonconductive nylon or plastic flat-blade tool) • Soft cloth • Multi-compartment screw tray Part Location 22 - PowerBook G4 (15-inch FW800) Take Apart Top Case
Service Guide
Page 25
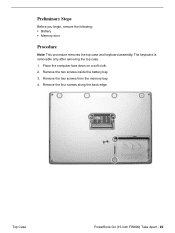
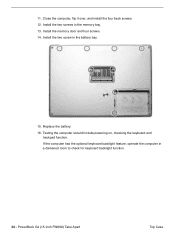
Remove the two screws inside the battery bay. 3. Remove the four screws along the back edge. Top Case PowerBook G4 (15-inch FW800) Take Apart - 23 Place the computer face down on a soft cloth. 2. Remove the two screws from the memory bay. 4. Preliminary Steps Before you begin, remove the following: • Battery • Memory door Procedure Note: This procedure removes the top case and keyboard assembly. The keyboard is removable only after removing the top case. 1.
Remove the two screws inside the battery bay. 3. Remove the four screws along the back edge. Top Case PowerBook G4 (15-inch FW800) Take Apart - 23 Place the computer face down on a soft cloth. 2. Remove the two screws from the memory bay. 4. Preliminary Steps Before you begin, remove the following: • Battery • Memory door Procedure Note: This procedure removes the top case and keyboard assembly. The keyboard is removable only after removing the top case. 1.

Service Guide
Page 26
Remove the three screws. 6. Turn over the computer and remove the three screws on one side. PowerBook G4 (15-inch FW800) Take Apart Top Case With the display open, rest the computer on the other side. 24 - 5.
Remove the three screws. 6. Turn over the computer and remove the three screws on one side. PowerBook G4 (15-inch FW800) Take Apart Top Case With the display open, rest the computer on the other side. 24 - 5.

Service Guide
Page 27
Lay the computer right side up . Top Case PowerBook G4 (15-inch FW800) Take Apart - 25 7. Remove the two top screws along the back. Note: Do not remove the bottom screws. 8. Remove the two hex screws at the back corners of the top case (a Torx T6 can also be used). Open the computer slightly and rest it with the back facing up and open the display slightly past 90-degrees. 9.
Lay the computer right side up . Top Case PowerBook G4 (15-inch FW800) Take Apart - 25 7. Remove the two top screws along the back. Note: Do not remove the bottom screws. 8. Remove the two hex screws at the back corners of the top case (a Torx T6 can also be used). Open the computer slightly and rest it with the back facing up and open the display slightly past 90-degrees. 9.

Service Guide
Page 28
PowerBook G4 (15-inch FW800) Take Apart Top Case Use a black stick along the seam of the top and bottom case to help release the top case at the back sides (gently twisting the black stick may help). 26 - 10.
PowerBook G4 (15-inch FW800) Take Apart Top Case Use a black stick along the seam of the top and bottom case to help release the top case at the back sides (gently twisting the black stick may help). 26 - 10.

Service Guide
Page 29
... behind the clip and pull out slightly to add slight upward pressure so that secures the front of the top and bottom case to release the clip and the top case. The clip can be seen behind the optical drive felt, on the left . Then insert a dental pick behind the first... slit from the left side. Use a black stick along the seam of the top case. Also, there are small slits in the top felt. Top Case PowerBook G4 (15-inch FW800) Take Apart - 27 The clip is released. This clip must be released before the top...
... behind the clip and pull out slightly to add slight upward pressure so that secures the front of the top and bottom case to release the clip and the top case. The clip can be seen behind the optical drive felt, on the left . Then insert a dental pick behind the first... slit from the left side. Use a black stick along the seam of the top case. Also, there are small slits in the top felt. Top Case PowerBook G4 (15-inch FW800) Take Apart - 27 The clip is released. This clip must be released before the top...

Service Guide
Page 30
PowerBook G4 (15-inch FW800) Take Apart Top Case 12. Important: Adjust the display so that it does not touch the bottom case, lift the front of the top case, pivoting along the back, to the logic board. Do not strain the cables connected to rest the top case against the display. With the top case released from the bottom case and lifted slightly so that there is no strain on the top case cables and so the top case will not fall forward. 28 -
PowerBook G4 (15-inch FW800) Take Apart Top Case 12. Important: Adjust the display so that it does not touch the bottom case, lift the front of the top case, pivoting along the back, to the logic board. Do not strain the cables connected to rest the top case against the display. With the top case released from the bottom case and lifted slightly so that there is no strain on the top case cables and so the top case will not fall forward. 28 -

Service Guide
Page 31
..., use extreme care and a restrained light pressure to replace the logic board. Warning: If the flex cable is a Zero insertion force (ZIF) connector. Top Case PowerBook G4 (15-inch FW800) Take Apart - 29 13. Disconnect the trackpad flex cable. 14. Important: The keyboard flex cable is inserted crooked, some signals may... not intended to secure. Hold the cable in place, then slide the locking bar into the connector, above the locking bar. Lift off the top case. Carefully disconnect the keyboard flex cable.
..., use extreme care and a restrained light pressure to replace the logic board. Warning: If the flex cable is a Zero insertion force (ZIF) connector. Top Case PowerBook G4 (15-inch FW800) Take Apart - 29 13. Disconnect the trackpad flex cable. 14. Important: The keyboard flex cable is inserted crooked, some signals may... not intended to secure. Hold the cable in place, then slide the locking bar into the connector, above the locking bar. Lift off the top case. Carefully disconnect the keyboard flex cable.

Service Guide
Page 32
Replacement Procedure Note: If replacing the top case, remove the keyboard and transfer it will not be caught or pinched by the top case during replacement. 3. PowerBook G4 (15-inch FW800) Take Apart Top Case Visually check to the replacement top case. 1. Verify that it to verify that all cables are connected and routed correctly with Kapton tape and lays flat. 30 - Check perimeter wiring, where shown, to verify that the LVDS cable is secured with nothing raised up or incorrectly over a component. 2.
Replacement Procedure Note: If replacing the top case, remove the keyboard and transfer it will not be caught or pinched by the top case during replacement. 3. PowerBook G4 (15-inch FW800) Take Apart Top Case Visually check to the replacement top case. 1. Verify that it to verify that all cables are connected and routed correctly with Kapton tape and lays flat. 30 - Check perimeter wiring, where shown, to verify that the LVDS cable is secured with nothing raised up or incorrectly over a component. 2.

Service Guide
Page 33
Check that the perimeter metal tabs are not bent. Top Case PowerBook G4 (15-inch FW800) Take Apart - 31 Note: The top case below has the wires and connector for the fiber optics for the optional backlit keyboard (right side). Be extremely careful to gently straighten tabs, if needed. This will not be present on some configurations. 5. 4. On the top case, check cable connections and routing. Note: The metal quickly fatigues and can break off easily.
Check that the perimeter metal tabs are not bent. Top Case PowerBook G4 (15-inch FW800) Take Apart - 31 Note: The top case below has the wires and connector for the fiber optics for the optional backlit keyboard (right side). Be extremely careful to gently straighten tabs, if needed. This will not be present on some configurations. 5. 4. On the top case, check cable connections and routing. Note: The metal quickly fatigues and can break off easily.

Service Guide
Page 34
...right corner and guide the top case onto the bottom case. Important: The top case should lay flat along the sides and top, if not, make sure that the cables are fragile. Do not apply too much pressure or bend them. PowerBook G4 (15-inch FW800) Take Apart Top Case Use a black stick to carefully... pull or push tabs slightly, if needed. Lay the top case against the open display, as shown. 7.
...right corner and guide the top case onto the bottom case. Important: The top case should lay flat along the sides and top, if not, make sure that the cables are fragile. Do not apply too much pressure or bend them. PowerBook G4 (15-inch FW800) Take Apart Top Case Use a black stick to carefully... pull or push tabs slightly, if needed. Lay the top case against the open display, as shown. 7.

Service Guide
Page 35
Top Case PowerBook G4 (15-inch FW800) Take Apart - 33 Replacement Note: Do NOT insert side screws into the DVI port screw holes. The screws can jam in the order shown, below. Important: Screw order is vital for the proper attachment of the top case. 10. Reinstall the side screws in the holes, requiring removing the logic board to remove.
Top Case PowerBook G4 (15-inch FW800) Take Apart - 33 Replacement Note: Do NOT insert side screws into the DVI port screw holes. The screws can jam in the order shown, below. Important: Screw order is vital for the proper attachment of the top case. 10. Reinstall the side screws in the holes, requiring removing the logic board to remove.
Service Guide
Page 36
Install the two screws in a darkened room to check for keyboard backlight function. 34 - Install the memory door and four screws. 14. If the computer has the optional keyboard backlight feature, operate the computer in the memory bay. 13. Install the two screw in the battery bay. 15. Testing the computer should include powering on, checking the keyboard and trackpad function. Replace the battery. 16. PowerBook G4 (15-inch FW800) Take Apart Top Case Close the computer, flip it over, and install the four back screws. 12. 11.
Install the two screws in a darkened room to check for keyboard backlight function. 34 - Install the memory door and four screws. 14. If the computer has the optional keyboard backlight feature, operate the computer in the memory bay. 13. Install the two screw in the battery bay. 15. Testing the computer should include powering on, checking the keyboard and trackpad function. Replace the battery. 16. PowerBook G4 (15-inch FW800) Take Apart Top Case Close the computer, flip it over, and install the four back screws. 12. 11.

Service Guide
Page 37
Keyboard Tools This procedure requires the following tools: • #0 Phillips screwdriver • Black stick (or other nonconductive nylon or plastic flat-blade tool) Part Location Preliminary Steps Before you begin, remove the following: • Battery • Top case Keyboard PowerBook G4 (15-inch FW800) Take Apart - 35
Keyboard Tools This procedure requires the following tools: • #0 Phillips screwdriver • Black stick (or other nonconductive nylon or plastic flat-blade tool) Part Location Preliminary Steps Before you begin, remove the following: • Battery • Top case Keyboard PowerBook G4 (15-inch FW800) Take Apart - 35

Service Guide
Page 38
...non-backlit keyboard does not have icons on the F8 to F10 keys for the non-backlit top case does not have the fiber optics and connector. The keyboard for the backlit top case has icons on the F8 to F10 keys. 36 - The keyboards are two different keyboards and ...top cases used with this computer, depending upon the configuration, either backlit or non-backlit. The keyboard for the backlighting feature. PowerBook G4 (15-inch FW800) Take Apart ...
...non-backlit keyboard does not have icons on the F8 to F10 keys for the non-backlit top case does not have the fiber optics and connector. The keyboard for the backlit top case has icons on the F8 to F10 keys. 36 - The keyboards are two different keyboards and ...top cases used with this computer, depending upon the configuration, either backlit or non-backlit. The keyboard for the backlighting feature. PowerBook G4 (15-inch FW800) Take Apart ...

Service Guide
Page 39
Keyboard PowerBook G4 (15-inch FW800) Take Apart - 37 If new film was not provided with the replacement part, reserve the film for the optional backlit keyboard, do not remove the black insulator around the optics and cables. Important: If the computer has the fiber optics for reinstallation. Important: If the computer has the fiber optics for the optional backlit keyboard, do not remove the black insulator around the optics and cables. Turn the top case over and carefully remove the black insulator film. 1.
Keyboard PowerBook G4 (15-inch FW800) Take Apart - 37 If new film was not provided with the replacement part, reserve the film for the optional backlit keyboard, do not remove the black insulator around the optics and cables. Important: If the computer has the fiber optics for reinstallation. Important: If the computer has the fiber optics for the optional backlit keyboard, do not remove the black insulator around the optics and cables. Turn the top case over and carefully remove the black insulator film. 1.