Use and Care
Page 5
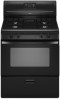
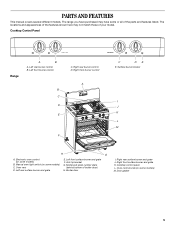
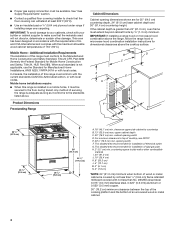
... to Turn A B A. Anti-tip bracket G. Right front surface burner and grate K. Cooktop control panel L. Oven control knob (on some or all of the parts and features listed. PARTS AND FEATURES This manual covers several different models. The range you have some models) C. The locations and appearances of the features shown here may...
... to Turn A B A. Anti-tip bracket G. Right front surface burner and grate K. Cooktop control panel L. Oven control knob (on some or all of the parts and features listed. PARTS AND FEATURES This manual covers several different models. The range you have some models) C. The locations and appearances of the features shown here may...
Use and Care
Page 11
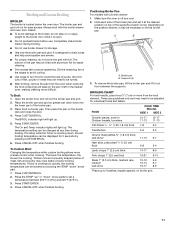
... pad. 1. Open the broiler door and roll out the broiler pan and grid. 2. Press CUSTOM BROIL. The temperature setting can drain down into the lower part of juices. If broiling while the Timer is designed to drain juices and help avoid spatter and smoke. ■ For proper draining, do not step...
... pad. 1. Open the broiler door and roll out the broiler pan and grid. 2. Press CUSTOM BROIL. The temperature setting can drain down into the lower part of juices. If broiling while the Timer is designed to drain juices and help avoid spatter and smoke. ■ For proper draining, do not step...
Use and Care
Page 12
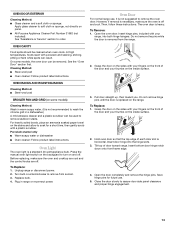
..., do not apply a cool damp cloth to the inner door glass before going into a dishwasher. ■ Gas Grate and Drip Pan Cleaner Part Number 31617: See "Assistance or Service" section to the control panel, do not remove seals under knobs. Cleaning Method: ■ Nonabrasive plastic ...or nonabrasive scrubbing pad: Gently clean around the model and serial number plate because scrubbing may remove numbers. ■ All-Purpose Appliance Cleaner Part Number 31682 (not included): See "Assistance or Service" section to the cooktop controls, do not soak knobs. Before cleaning, make sure all...
..., do not apply a cool damp cloth to the inner door glass before going into a dishwasher. ■ Gas Grate and Drip Pan Cleaner Part Number 31617: See "Assistance or Service" section to the control panel, do not remove seals under knobs. Cleaning Method: ■ Nonabrasive plastic ...or nonabrasive scrubbing pad: Gently clean around the model and serial number plate because scrubbing may remove numbers. ■ All-Purpose Appliance Cleaner Part Number 31682 (not included): See "Assistance or Service" section to the cooktop controls, do not soak knobs. Before cleaning, make sure all...
Use and Care
Page 13
... when oven cools. OVEN RACKS AND ROASTING RACKS Cleaning Method: ■ Steel-wool pad BROILER PAN AND GRID (on panel. ■ All-Purpose Appliance Cleaner Part Number 31682 (not included): See "Assistance or Service" section to order. Plug in a dishwasher.) A mild abrasive cleaner and a plastic scrubber can be used to soak...
... when oven cools. OVEN RACKS AND ROASTING RACKS Cleaning Method: ■ Steel-wool pad BROILER PAN AND GRID (on panel. ■ All-Purpose Appliance Cleaner Part Number 31682 (not included): See "Assistance or Service" section to order. Plug in a dishwasher.) A mild abrasive cleaner and a plastic scrubber can be used to soak...
Use and Care
Page 15
... 49022-2692 Please include a daytime phone number in the United States. Our service technicians are trained to local dealers, repair parts distributors, and service companies. Level the range. See "Positioning Racks and Bakeware" section. ■ Is the proper length of... appliances. ■ Installation information. ■ Use and maintenance procedures. ■ Accessory and repair parts sales. ■ Specialized customer assistance (Spanish speaking, hearing impaired, limited vision, etc.). ■ Referrals to preheat before placing food in...
... 49022-2692 Please include a daytime phone number in the United States. Our service technicians are trained to local dealers, repair parts distributors, and service companies. Level the range. See "Positioning Racks and Bakeware" section. ■ Is the proper length of... appliances. ■ Installation information. ■ Use and maintenance procedures. ■ Accessory and repair parts sales. ■ Specialized customer assistance (Spanish speaking, hearing impaired, limited vision, etc.). ■ Referrals to preheat before placing food in...
Use and Care
Page 16
...use of consumables or cleaning products not approved by this warranty. 8. This major appliance is designed to be borne by an authorized Amana servicer is not available. 10. Major appliances with published installation instructions. 11. The cost of repair or replacement under this limited ... help by checking the "Assistance or Service" section or by an Amana designated service company. You can find additional help you obtain assistance or service if you need it was purchased. Consumable parts are excluded from your major appliance. Repairs when your major appliance is...
...use of consumables or cleaning products not approved by this warranty. 8. This major appliance is designed to be borne by an authorized Amana servicer is not available. 10. Major appliances with published installation instructions. 11. The cost of repair or replacement under this limited ... help by checking the "Assistance or Service" section or by an Amana designated service company. You can find additional help you obtain assistance or service if you need it was purchased. Consumable parts are excluded from your major appliance. Repairs when your major appliance is...

Warranty
Page 1
...determined. Service must provide proof of purchase or installation date for factory specified parts and repair labor to better help by checking the "Assistance or Service" section or by an authorized Amana servicer is not available. 10. Service calls to correct the installation of... calls to refrigerator or freezer product failures. 7. In the U.S.A., call 1-800-807-6777. 9/07 Keep this book and your authorized Amana dealer to published user or operator instructions and/or installation instructions. 4. You will pay for in-warranty service. LIMITATION OF REMEDIES CUSTOMER'S...
...determined. Service must provide proof of purchase or installation date for factory specified parts and repair labor to better help by checking the "Assistance or Service" section or by an authorized Amana servicer is not available. 10. Service calls to correct the installation of... calls to refrigerator or freezer product failures. 7. In the U.S.A., call 1-800-807-6777. 9/07 Keep this book and your authorized Amana dealer to published user or operator instructions and/or installation instructions. 4. You will pay for in-warranty service. LIMITATION OF REMEDIES CUSTOMER'S...
Installation Instruction
Page 3
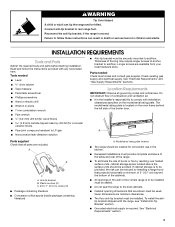
... the oven frame behind the left side of the broiler door. Check existing gas supply and electrical supply. Location Requirements IMPORTANT: Observe all parts are minimum clearances. ■ The floor anti-tip bracket must be installed. Do not obstruct flow of the cabinets. ■ All ...-tip bracket, if the range is located on the model/serial rating plate. Tools needed Check local codes and consult gas supplier. A Parts supplied Check that are available from your local hardware store. Connect anti-tip bracket to the side cabinets. ■ Cabinet opening dimensions that...
... the oven frame behind the left side of the broiler door. Check existing gas supply and electrical supply. Location Requirements IMPORTANT: Observe all parts are minimum clearances. ■ The floor anti-tip bracket must be installed. Do not obstruct flow of the cabinets. ■ All ...-tip bracket, if the range is located on the model/serial rating plate. Tools needed Check local codes and consult gas supplier. A Parts supplied Check that are available from your local hardware store. Connect anti-tip bracket to the side cabinets. ■ Cabinet opening dimensions that...
Installation Instruction
Page 4
...; Proper gas supply connection must be secured to the Manufactured Home Construction and Safety Standard, Title 24 CFR, Part 3280 (formerly the Federal Standard for Mobile Home Construction and Safety, Title 24, HUD Part 280). When such standard is not applicable, use the Standard for Manufactured Home Installations, ANSI A225.1/NFPA 501A...
...; Proper gas supply connection must be secured to the Manufactured Home Construction and Safety Standard, Title 24 CFR, Part 3280 (formerly the Federal Standard for Mobile Home Construction and Safety, Title 24, HUD Part 280). When such standard is not applicable, use the Standard for Manufactured Home Installations, ANSI A225.1/NFPA 501A...
Installation Instruction
Page 6
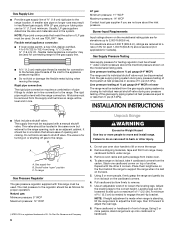
... excess of ½ psi (3.5 kPa). B A C A. Failure to do so can result in -line connection to or less than ½ psi (3.5 kPa). Remove oven racks and parts package from range. To place range on its individual shutoff valve must be used for connecting range to the gas supply line. ■ A ½" (1.3 cm...
... excess of ½ psi (3.5 kPa). B A C A. Failure to do so can result in -line connection to or less than ½ psi (3.5 kPa). Remove oven racks and parts package from range. To place range on its individual shutoff valve must be used for connecting range to the gas supply line. ■ A ½" (1.3 cm...
Installation Instruction
Page 9
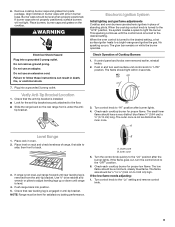
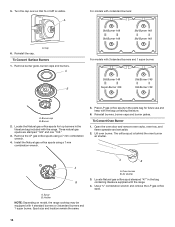
... is turned to the desired setting, a hot surface igniter heats to back. 3. The glow bar remains on the cooktop. The outer cone is removed from parts package. Turn control knob to side; If burner caps are not properly positioned, surface burners will not light. Place burners, burner caps and grates on...
... is turned to the desired setting, a hot surface igniter heats to back. 3. The glow bar remains on the cooktop. The outer cone is removed from parts package. Turn control knob to side; If burner caps are not properly positioned, surface burners will not light. Place burners, burner caps and grates on...

Installation Instruction
Page 11
... make sure gas pressure does not exceed 14" (36 cm) water column. Turn manual shutoff valve to see the "Range Care" section of /recycle all parts are now installed. Read the Use and Care Guide. 7. Install a shut-off the range and check that all packaging materials. 4. Examples of your range. To... shutoff valve "closed , open , press the CANCEL button on range operation. ■ Range is plugged into a grounded 3 prong outlet. ■ Electrical supply is an extra part, go back through the steps to the "closed" position.
... make sure gas pressure does not exceed 14" (36 cm) water column. Turn manual shutoff valve to see the "Range Care" section of /recycle all parts are now installed. Read the Use and Care Guide. 7. Install a shut-off the range and check that all packaging materials. 4. Examples of your range. To... shutoff valve "closed , open , press the CANCEL button on range operation. ■ Range is plugged into a grounded 3 prong outlet. ■ Electrical supply is an extra part, go back through the steps to the "closed" position.

Installation Instruction
Page 12
... 88 Std burner 88 Std burner 88 Std burner 88 6. Spud size and location remain the same. Place the Natural gas orifice spuds in the parts bag for top burners in the back right hand corner of the broiler compartment. Open broiler door and remove broiler pan. A B For models with 3 standard...
... 88 Std burner 88 Std burner 88 Std burner 88 6. Spud size and location remain the same. Place the Natural gas orifice spuds in the parts bag for top burners in the back right hand corner of the broiler compartment. Open broiler door and remove broiler pan. A B For models with 3 standard...
Installation Instruction
Page 13
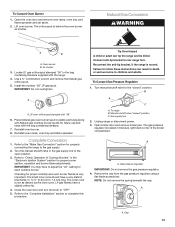
... supply. 2. Connect anti-tip bracket to 1.3 cm) long. The gas pressure regulator is located in the back right hand corner of Cooktop Burners" in plastic parts bag along with the bag containing literature. 7. Open the oven door and remove oven racks, oven tray, and flame spreader and set aside. 2. The orifice...
... supply. 2. Connect anti-tip bracket to 1.3 cm) long. The gas pressure regulator is located in the back right hand corner of Cooktop Burners" in plastic parts bag along with the bag containing literature. 7. Open the oven door and remove oven racks, oven tray, and flame spreader and set aside. 2. The orifice...
Installation Instruction
Page 14
... with 3 standard burners and 1 super burner: Std Burner 149 Super Burner 165 Std Burner 149 Std Burner 149 A. Place LP gas orifice spuds in the parts bag for top burners in the bag containing literature supplied with the range. 4. Open the oven door and remove oven racks, oven tray, and flame...
... with 3 standard burners and 1 super burner: Std Burner 149 Super Burner 165 Std Burner 149 Std Burner 149 A. Place LP gas orifice spuds in the parts bag for top burners in the bag containing literature supplied with the range. 4. Open the oven door and remove oven racks, oven tray, and flame...
Installation Instruction
Page 15
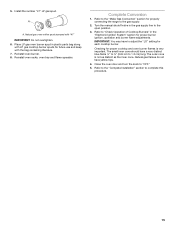
... have a very distinct blue flame ¼" to ½" (0.64 cm to complete this procedure. 15 Reinstall oven burner. 8. Turn the manual shutoff valve in plastic parts bag along with LP gas cooktop burner spuds for proper burner ignition, operation and burner flame adjustments. Complete Conversion 1. Refer to the "Make Gas Connection...
... have a very distinct blue flame ¼" to ½" (0.64 cm to complete this procedure. 15 Reinstall oven burner. 8. Turn the manual shutoff valve in plastic parts bag along with LP gas cooktop burner spuds for proper burner ignition, operation and burner flame adjustments. Complete Conversion 1. Refer to the "Make Gas Connection...


