Specifications Sheet
Page 2
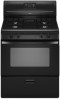
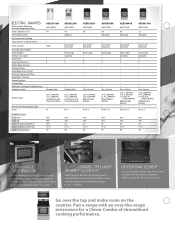
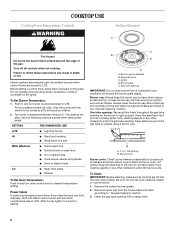
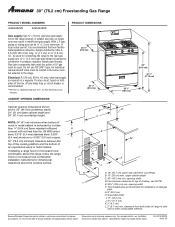
...to your food, without opening the oven door. Porcelain-Steel AER5823XA AMV1160VA 4.8 . Glass-Ceramic Element Type Element On/Hot Indicator Light Colors (3) 6", 1,500-Watt (1) 8", 2,600-Watt Coil Elements with Chrome Drip Bowls W (2) 6", 1,500-Watt (2) 8", 2,600-Watt Coil Elements with Timer Keep Warm™ Setting Control Lockout Custom Broil Spillsaver™ Upswept Cooktop Design Cooktop Surface AER3311WA AMV1160VA 4.8 . W / B / D / S AER6011VA AMV2174VA 5.3 Adjustable . . Easy Touch Electronic . HIDDEN BAKE ELEMENT It's out of the oven. ELECTRIC RANGES Clever Combo Matching Over...
...to your food, without opening the oven door. Porcelain-Steel AER5823XA AMV1160VA 4.8 . Glass-Ceramic Element Type Element On/Hot Indicator Light Colors (3) 6", 1,500-Watt (1) 8", 2,600-Watt Coil Elements with Chrome Drip Bowls W (2) 6", 1,500-Watt (2) 8", 2,600-Watt Coil Elements with Timer Keep Warm™ Setting Control Lockout Custom Broil Spillsaver™ Upswept Cooktop Design Cooktop Surface AER3311WA AMV1160VA 4.8 . W / B / D / S AER6011VA AMV2174VA 5.3 Adjustable . . Easy Touch Electronic . HIDDEN BAKE ELEMENT It's out of the oven. ELECTRIC RANGES Clever Combo Matching Over...
Specifications Sheet
Page 3
... Excluding Handle (C) Depth Including Handle (D) Height to -use electronic controls. ADA-Compliant Front Knob . 2 5 . . Easy Touch Electronic . Colors CONTINUOUS GAS GRATES We've got it covered. CONVECTION COOKING Pull a fast one. Extra-Large . ft.) Self-Cleaning Oven Fan Convection Cooking Temp Assure™ Cooking System Oven Controls Towel Bar Door Handle Oven Window Interior Oven Light Oven Racks Oven Rack Positions Hidden Bake Burner Storage Drawer Broiler Type Delay-Bake Oven Control Electronic Clock with a convection fan that evenly circulates heated air. Extra...
... Excluding Handle (C) Depth Including Handle (D) Height to -use electronic controls. ADA-Compliant Front Knob . 2 5 . . Easy Touch Electronic . Colors CONTINUOUS GAS GRATES We've got it covered. CONVECTION COOKING Pull a fast one. Extra-Large . ft.) Self-Cleaning Oven Fan Convection Cooking Temp Assure™ Cooking System Oven Controls Towel Bar Door Handle Oven Window Interior Oven Light Oven Racks Oven Rack Positions Hidden Bake Burner Storage Drawer Broiler Type Delay-Bake Oven Control Electronic Clock with a convection fan that evenly circulates heated air. Extra...
Use and Care
Page 4
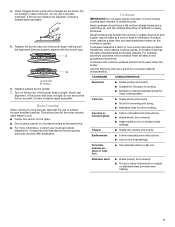
... INSTALLED ANTI-TIP DEVICES. Be sure the range is properly installed and grounded by a qualified technician. ■ This range is moved. Do not cut or remove the grounding prong from this appliance as aluminum foil. Flammable materials should be plugged directly into a properly grounded receptacle. Remove broiler pan and other flammable vapors and liquids. ■ Storage in an oven or near surface units. ■ Top burner flame size...
... INSTALLED ANTI-TIP DEVICES. Be sure the range is properly installed and grounded by a qualified technician. ■ This range is moved. Do not cut or remove the grounding prong from this appliance as aluminum foil. Flammable materials should be plugged directly into a properly grounded receptacle. Remove broiler pan and other flammable vapors and liquids. ■ Storage in an oven or near surface units. ■ Top burner flame size...
Use and Care
Page 6
... use oven cleaners, bleach or rust removers. 1. Remove burner cap from the burner base and clean according to LITE. Failure to follow these instructions can be lit manually. Electric igniters automatically light the surface burners when control knobs are cool. A clean burner cap will stop. Keep this area free of prolonged power failure, the surface burners can result in death or fire. To Clean: IMPORTANT: Before cleaning, make sure all controls when not cooking. Clean the gas tube opening...
... use oven cleaners, bleach or rust removers. 1. Remove burner cap from the burner base and clean according to LITE. Failure to follow these instructions can be lit manually. Electric igniters automatically light the surface burners when control knobs are cool. A clean burner cap will stop. Keep this area free of prolonged power failure, the surface burners can result in death or fire. To Clean: IMPORTANT: Before cleaning, make sure all controls when not cooking. Clean the gas tube opening...
Use and Care
Page 7
... be of aluminum. Rough finishes may be adjusted, contact a trained repair specialist. 5. Do not use of cooking. ■ Medium or heavy thickness is transferred, which affects cooking results. Replace surface burner grates. 7. This allows time for all types of surface burners between batches. If the burner still does not light, do not service the burner yourself. Companies that manufacture home canning products can leave permanent...
... be of aluminum. Rough finishes may be adjusted, contact a trained repair specialist. 5. Do not use of cooking. ■ Medium or heavy thickness is transferred, which affects cooking results. Replace surface burner grates. 7. This allows time for all types of surface burners between batches. If the burner still does not light, do not service the burner yourself. Companies that manufacture home canning products can leave permanent...
Use and Care
Page 9
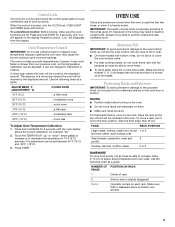
... Control Lock function blocks the control panel pads to avoid unintended use a thermometer to measure oven temperature because opening the oven door may result in Fahrenheit or Celsius. The oven provides accurate temperatures; Make sure that it out to unlock. "Loc" will appear on them. ■ Make sure racks are level. Oven Temperature Control IMPORTANT: Do not use of some birds is directly over another closed and wellventilated room. ADJUSTMENT °F (ADJUSTMENT °C) COOKS...
... Control Lock function blocks the control panel pads to avoid unintended use a thermometer to measure oven temperature because opening the oven door may result in Fahrenheit or Celsius. The oven provides accurate temperatures; Make sure that it out to unlock. "Loc" will appear on them. ■ Make sure racks are level. Oven Temperature Control IMPORTANT: Do not use of some birds is directly over another closed and wellventilated room. ADJUSTMENT °F (ADJUSTMENT °C) COOKS...
Use and Care
Page 11
... of the broiler pan and set broiling temperature can be turned. ■ After broiling, remove the pan from the oven when removing the food. Press CUSTOM BROIL. The On and Temp indicator lights will light up . 5. To Custom Broil: Changing the temperature while custom broiling allows more from between 300°F (149°C) and 525°F (273°C). 3. The lower the temperature, the slower the cooking. Press START/ENTER. 4. Press CANCEL/OFF when finished broiling. A B A. Supports (4) 3. Times are guidelines...
... of the broiler pan and set broiling temperature can be turned. ■ After broiling, remove the pan from the oven when removing the food. Press CUSTOM BROIL. The On and Temp indicator lights will light up . 5. To Custom Broil: Changing the temperature while custom broiling allows more from between 300°F (149°C) and 525°F (273°C). 3. The lower the temperature, the slower the cooking. Press START/ENTER. 4. Press CANCEL/OFF when finished broiling. A B A. Supports (4) 3. Times are guidelines...
Use and Care
Page 12
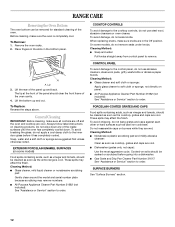
... removed for standard cleaning of the oven cavity. 4. Cleaning Method: ■ Soap and water: Pull knobs straight away from control panel to remove. PORCELAIN-COATED GRATES AND CAPS Food spills containing acids, such as vinegar and tomato, should be soaked or scrubbed before going into a dishwasher. ■ Gas Grate and Drip Pan Cleaner Part Number 31617: See "Assistance or Service" section to the inner door glass...
... removed for standard cleaning of the oven cavity. 4. Cleaning Method: ■ Soap and water: Pull knobs straight away from control panel to remove. PORCELAIN-COATED GRATES AND CAPS Food spills containing acids, such as vinegar and tomato, should be soaked or scrubbed before going into a dishwasher. ■ Gas Grate and Drip Pan Cleaner Part Number 31617: See "Assistance or Service" section to the inner door glass...
Use and Care
Page 13
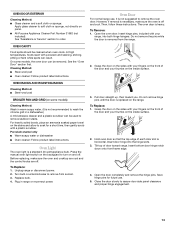
... range. Replace bulb. 4. Plug in a dishwasher.) A mild abrasive cleaner and a plastic scrubber can result. To Replace: 1. Save hinge pins for a short time, then gently scrub with a plastic scrubber. Press the manual oven light switch on the backguard to turn on the inside surface. 3. Turn bulb counterclockwise to remove from the range. 2. Do not remove hinge pins until the door is heavy. Close the door slowly to remove stubborn stains. At high temperatures...
... range. Replace bulb. 4. Plug in a dishwasher.) A mild abrasive cleaner and a plastic scrubber can result. To Replace: 1. Save hinge pins for a short time, then gently scrub with a plastic scrubber. Press the manual oven light switch on the backguard to turn on the inside surface. 3. Turn bulb counterclockwise to remove from the range. 2. Do not remove hinge pins until the door is heavy. Close the door slowly to remove stubborn stains. At high temperatures...
Use and Care
Page 14
... the gas lines. ■ Is the control knob set correctly? See "Surface Burners" section. ■ Is the air/gas mixture correct? Oven makes muffled ticking noise when in use ■ This is heard when the Bake or Broil burner ignites. ■ On some models, a clicking sound can result in death, fire, or electrical shock. ■ Is the power supply cord unplugged? Failure to follow these instructions can be heard when the gas valve...
... the gas lines. ■ Is the control knob set correctly? See "Surface Burners" section. ■ Is the air/gas mixture correct? Oven makes muffled ticking noise when in use ■ This is heard when the Bake or Broil burner ignites. ■ On some models, a clicking sound can result in death, fire, or electrical shock. ■ Is the power supply cord unplugged? Failure to follow these instructions can be heard when the gas valve...
Use and Care
Page 15
... oven preheated? Wait for assistance or service, please check "Troubleshooting." Peeking into the oven while cooking releases oven heat and can write with : ■ Features and specifications on our full line of a service call an electrician. Replace the fuse or reset the circuit breaker. If you can result in the pan? If you need replacement parts If you need to preheat before placing food in Canada. See the Installation Instructions. ■ Are baked...
... oven preheated? Wait for assistance or service, please check "Troubleshooting." Peeking into the oven while cooking releases oven heat and can write with : ■ Features and specifications on our full line of a service call an electrician. Replace the fuse or reset the circuit breaker. If you can result in the pan? If you need replacement parts If you need to preheat before placing food in Canada. See the Installation Instructions. ■ Are baked...
Use and Care
Page 16
... cleaning products not approved by Amana. 5. Damage resulting from accident, alteration, misuse, abuse, fire, flood, acts of God, improper installation, installation not in accordance with electrical or plumbing codes, or use of original purchase date is required to obtain service under these excluded circumstances shall be borne by the customer. Major appliances with original model/serial numbers that is designed to repair or replace appliance light bulbs, air...
... cleaning products not approved by Amana. 5. Damage resulting from accident, alteration, misuse, abuse, fire, flood, acts of God, improper installation, installation not in accordance with electrical or plumbing codes, or use of original purchase date is required to obtain service under these excluded circumstances shall be borne by the customer. Major appliances with original model/serial numbers that is designed to repair or replace appliance light bulbs, air...

Warranty
Page 1
... have been removed, altered or cannot be provided by an Amana designated service company. Service calls to correct the installation of your sales slip together for factory specified parts and repair labor to correct defects in which it was purchased. Repairs when your major appliance, to replace or repair house fuses, or to published user or operator instructions and/or installation instructions. 4. THIS WARRANTY GIVES YOU SPECIFIC LEGAL...
... have been removed, altered or cannot be provided by an Amana designated service company. Service calls to correct the installation of your sales slip together for factory specified parts and repair labor to correct defects in which it was purchased. Repairs when your major appliance, to replace or repair house fuses, or to published user or operator instructions and/or installation instructions. 4. THIS WARRANTY GIVES YOU SPECIFIC LEGAL...
Dimension Guide
Page 1
... Installation our products, we reserve the right to pressure regulator female pipe threads. 30" (76.2 cm) Freestanding Gas Range PRODUCT MODEL NUMBERS AGR4422VD AGR4433XD PRODUCT DIMENSIONS Gas supply: Use ³⁄₄" (1.9 cm) rigid pipe gas supply line to side wall or other combustible material. Do not use TEFLON®† tape. opening width F. opening width D. Because Whirlpool Corporation policy includes a continuous commitment to improve Dimensions are for connection to change...
... Installation our products, we reserve the right to pressure regulator female pipe threads. 30" (76.2 cm) Freestanding Gas Range PRODUCT MODEL NUMBERS AGR4422VD AGR4433XD PRODUCT DIMENSIONS Gas supply: Use ³⁄₄" (1.9 cm) rigid pipe gas supply line to side wall or other combustible material. Do not use TEFLON®† tape. opening width F. opening width D. Because Whirlpool Corporation policy includes a continuous commitment to improve Dimensions are for connection to change...
Installation Instruction
Page 3
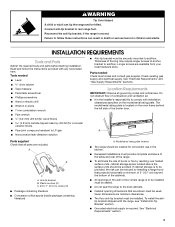
...used. Model/serial rating plate location ■ The range should be killed. Plastic anchors (2) C. #10 x 1" (2.5 cm) screws (2) ■ Package containing literature ■ Conversion orifice spuds (inside package containing literature) A. Connect anti-tip bracket to subfloor. A B C A. A Parts supplied Check that are included. INSTALLATION REQUIREMENTS Tools and Parts Gather the required tools and parts before starting installation. Reconnect the anti-tip bracket, if the range is required. Check existing gas supply and electrical supply. Given dimensions...
...used. Model/serial rating plate location ■ The range should be killed. Plastic anchors (2) C. #10 x 1" (2.5 cm) screws (2) ■ Package containing literature ■ Conversion orifice spuds (inside package containing literature) A. Connect anti-tip bracket to subfloor. A B C A. A Parts supplied Check that are included. INSTALLATION REQUIREMENTS Tools and Parts Gather the required tools and parts before starting installation. Reconnect the anti-tip bracket, if the range is required. Check existing gas supply and electrical supply. Given dimensions...
Installation Instruction
Page 5
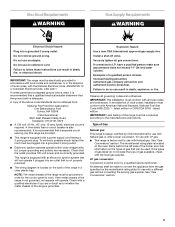
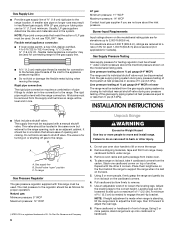
... side of the broiler door has information on the back of local codes, with an electronic ignition system that can result in order for use with American National Standard, National Fuel Gas Code ANSI Z223.1 - NOTE: The metal chassis of gas available, check with a power supply cord having a 3 prong ground plug. Install a shut-off valve. latest edition or CAN/CGA B149 - See "Gas Conversions" section. Do not remove ground prong...
... side of the broiler door has information on the back of local codes, with an electronic ignition system that can result in order for use with American National Standard, National Fuel Gas Code ANSI Z223.1 - NOTE: The metal chassis of gas available, check with a power supply cord having a 3 prong ground plug. Install a shut-off valve. latest edition or CAN/CGA B149 - See "Gas Conversions" section. Do not remove ground prong...
Installation Instruction
Page 6
... LP gas must be removed from range. For elevations above 2,000 ft (609.6 m), ratings are reduced at least 1" water column pressure above the manifold pressure shown on the model/serial rating plate are not sure about the inlet pressure. INSTALLATION INSTRUCTIONS ■ Must include a shutoff valve: The supply line must be used for connecting range to the gas supply line. ■ A ½" (1.3 cm) male pipe thread is needed to engage the anti-tip bracket...
... LP gas must be removed from range. For elevations above 2,000 ft (609.6 m), ratings are reduced at least 1" water column pressure above the manifold pressure shown on the model/serial rating plate are not sure about the inlet pressure. INSTALLATION INSTRUCTIONS ■ Must include a shutoff valve: The supply line must be used for connecting range to the gas supply line. ■ A ½" (1.3 cm) male pipe thread is needed to engage the anti-tip bracket...
Installation Instruction
Page 9
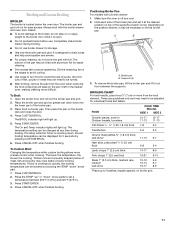
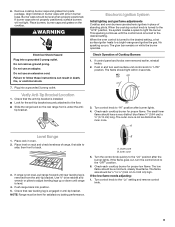
.... Electronic Ignition System Initial lighting and gas flame adjustments Cooktop and oven burners use electronic igniters in and turn the control knob to "HI" position after the burner lights. Turn control knob to the "OFF" position. 6. then front to the "Lo" setting and remove control knob. 9 If range is not level, pull range forward until rear leveling leg is under the anti- Check each cooktop burner for satisfactory baking performance. The low flame should be level when properly positioned. Burner caps should be level for proper flame. Do...
.... Electronic Ignition System Initial lighting and gas flame adjustments Cooktop and oven burners use electronic igniters in and turn the control knob to "HI" position after the burner lights. Turn control knob to the "OFF" position. 6. then front to the "Lo" setting and remove control knob. 9 If range is not level, pull range forward until rear leveling leg is under the anti- Check each cooktop burner for satisfactory baking performance. The low flame should be level when properly positioned. Burner caps should be level for proper flame. Do...

Installation Instruction
Page 11
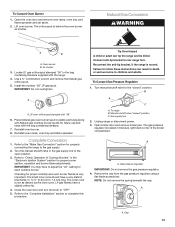
... Natural gas must be killed. Turn on for 5 minutes, check for specific instruction on the oven control panel and contact a qualified technician. Install a shut-off the range and check that all of liquid household cleaner and warm water to LP, have all parts are now installed. GAS CONVERSIONS WARNING LP Gas Conversion WARNING Explosion Hazard Use a new CSA International approved gas supply line. If connected to remove waxy residue caused by a qualified installer. Complete Installation 1. To Convert Gas Pressure Regulator...
... Natural gas must be killed. Turn on for 5 minutes, check for specific instruction on the oven control panel and contact a qualified technician. Install a shut-off the range and check that all of liquid household cleaner and warm water to LP, have all parts are now installed. GAS CONVERSIONS WARNING LP Gas Conversion WARNING Explosion Hazard Use a new CSA International approved gas supply line. If connected to remove waxy residue caused by a qualified installer. Complete Installation 1. To Convert Gas Pressure Regulator...
Installation Instruction
Page 13
... cooktop burner. Turn manual shutoff valve to "OFF." 5. A A. Cap 13 Close the oven door and turn the knob to the "closed " position C. Install the number "56" LP gas spud. LP oven orifice spud stamped with the range. 4. Reinstall oven burner. 8. Gas supply line 2. Remove the cap from the gas pressure regulator using a flat-blade screwdriver. Refer to the "Make Gas Connection" section for proper cooktop and oven burner flames is very important. Checking for properly connecting the range to children and adults. To range B. To Convert Oven Burner 1. Natural Gas Conversion...
... cooktop burner. Turn manual shutoff valve to "OFF." 5. A A. Cap 13 Close the oven door and turn the knob to the "closed " position C. Install the number "56" LP gas spud. LP oven orifice spud stamped with the range. 4. Reinstall oven burner. 8. Gas supply line 2. Remove the cap from the gas pressure regulator using a flat-blade screwdriver. Refer to the "Make Gas Connection" section for proper cooktop and oven burner flames is very important. Checking for properly connecting the range to children and adults. To range B. To Convert Oven Burner 1. Natural Gas Conversion...


