Specifications Sheet
Page 3
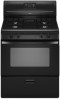
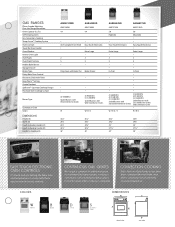
...BTU (1) 11,500 BTU Sealed Burners with Cast-Iron Burner Grates and Continuous Grate . Extra-Large . 2 2 5 5 . . . . Colors CONTINUOUS GAS GRATES We've got it covered. Easy Touch Electronic . Easy Touch Electronic . Setting the bake time and temperature is complete. ADA-Compliant Front Knob . 2... ELECTRONIC OVEN CONTROLS It's touch and go! CONVECTION COOKING Pull a fast one. In-Oven . . . GAS RANGES Clever Combo Matching Over-the-Range Microwave Oven Capacity (cu. ft.) Self-Cleaning Oven Fan Convection Cooking Temp Assure™ Cooking System Oven Controls...
...BTU (1) 11,500 BTU Sealed Burners with Cast-Iron Burner Grates and Continuous Grate . Extra-Large . 2 2 5 5 . . . . Colors CONTINUOUS GAS GRATES We've got it covered. Easy Touch Electronic . Easy Touch Electronic . Setting the bake time and temperature is complete. ADA-Compliant Front Knob . 2... ELECTRONIC OVEN CONTROLS It's touch and go! CONVECTION COOKING Pull a fast one. In-Oven . . . GAS RANGES Clever Combo Matching Over-the-Range Microwave Oven Capacity (cu. ft.) Self-Cleaning Oven Fan Convection Cooking Temp Assure™ Cooking System Oven Controls...

Use and Care
Page 3
RANGE SAFETY Your safety and the safety of injury, and tell you what the potential hazard is, tell you how to reduce the chance of others . These words mean: DANGER You can kill or hurt you don't immediately follow the safety alert symbol and either the word "DANGER" or "WARNING." Gas.... All safety messages will follow instructions. Do not store or use gasoline or other flammable vapors and liquids in your appliance. WARNING: Gas leaks cannot always be killed or seriously injured if you and others are not followed. This symbol alerts you what can be performed by...
RANGE SAFETY Your safety and the safety of injury, and tell you what the potential hazard is, tell you how to reduce the chance of others . These words mean: DANGER You can kill or hurt you don't immediately follow the safety alert symbol and either the word "DANGER" or "WARNING." Gas.... All safety messages will follow instructions. Do not store or use gasoline or other flammable vapors and liquids in your appliance. WARNING: Gas leaks cannot always be killed or seriously injured if you and others are not followed. This symbol alerts you what can be performed by...
Use and Care
Page 12
...Cleaner Part Number 31682 (not included): See "Assistance or Service" section to soft cloth or sponge, not directly on burners while they are wet. RANGE CARE Removing the Oven Bottom The oven bottom can be cleaned as soon as the cooktop, grates and caps are cool. Remove the oven racks.... Always follow label instructions on some models, do not apply a cool damp cloth to the inner door glass before going into a dishwasher. ■ Gas Grate and Drip Pan Cleaner Part Number 31617: See "Assistance or Service" section to the cooktop controls, do not use steel wool, abrasive cleansers or...
...Cleaner Part Number 31682 (not included): See "Assistance or Service" section to soft cloth or sponge, not directly on burners while they are wet. RANGE CARE Removing the Oven Bottom The oven bottom can be cleaned as soon as the cooktop, grates and caps are cool. Remove the oven racks.... Always follow label instructions on some models, do not apply a cool damp cloth to the inner door glass before going into a dishwasher. ■ Gas Grate and Drip Pan Cleaner Part Number 31617: See "Assistance or Service" section to the cooktop controls, do not use steel wool, abrasive cleansers or...
Use and Care
Page 14
...onto a piece of glass. ■ A whooshing or poof sound is opening or cycling on cooktop ■ Is the range level? See "Surface Burners" section. ■ Is the air/gas mixture correct? Contact a trained repair specialist. Noises that may have been used? See "Cookware" section. See "Cooktop/Oven ...189;" (1.3 cm) outside the cooking area. Turn any one of the surface burner knobs to release air from the gas lines. ■ Is the oven temperature control knob set correctly? Gas range noises during the cycle. ■ A pop can result in death, fire, or electrical shock. ■ Is...
...onto a piece of glass. ■ A whooshing or poof sound is opening or cycling on cooktop ■ Is the range level? See "Surface Burners" section. ■ Is the air/gas mixture correct? Contact a trained repair specialist. Noises that may have been used? See "Cookware" section. See "Cooktop/Oven ...189;" (1.3 cm) outside the cooking area. Turn any one of the surface burner knobs to release air from the gas lines. ■ Is the oven temperature control knob set correctly? Gas range noises during the cycle. ■ A pop can result in death, fire, or electrical shock. ■ Is...
Use and Care
Page 15
...you need to order replacement parts, we recommend that batter is level in the pan. ■ Is the range level? Contact a trained repair specialist. ■ Is the air/gas mixture correct? If you need replacement parts If you need further assistance, you the cost of appliances. ■...Referrals to local dealers, repair parts distributors, and service companies. To locate factory-authorized replacement parts in your area, call an electrician. The range may save you can also look in Canada. Wait for oven to preheat before placing food in oven. ■ Is there proper air...
...you need to order replacement parts, we recommend that batter is level in the pan. ■ Is the range level? Contact a trained repair specialist. ■ Is the air/gas mixture correct? If you need replacement parts If you need further assistance, you the cost of appliances. ■...Referrals to local dealers, repair parts distributors, and service companies. To locate factory-authorized replacement parts in your area, call an electrician. The range may save you can also look in Canada. Wait for oven to preheat before placing food in oven. ■ Is there proper air...
Dimension Guide
Page 1
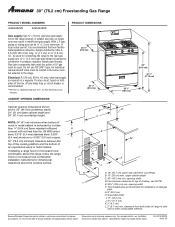
...) countertop depth, 24" (61 cm) base cabinet depth and 36" (91.4 cm) countertop height. 30" (76.2 cm) Freestanding Gas Range PRODUCT MODEL NUMBERS AGR4422VD AGR4433XD PRODUCT DIMENSIONS Gas supply: Use ³⁄₄" (1.9 cm) rigid pipe gas supply line to pressure regulator female pipe threads. gas, piping or tubing size can be located in insufficient...
...) countertop depth, 24" (61 cm) base cabinet depth and 36" (91.4 cm) countertop height. 30" (76.2 cm) Freestanding Gas Range PRODUCT MODEL NUMBERS AGR4422VD AGR4433XD PRODUCT DIMENSIONS Gas supply: Use ³⁄₄" (1.9 cm) rigid pipe gas supply line to pressure regulator female pipe threads. gas, piping or tubing size can be located in insufficient...

Installation Instruction
Page 2
... Massachusetts, the following installation instructions apply: ■ Installations and repairs must be killed or seriously injured if you don't follow instructions. RANGE SAFETY Your safety and the safety of others . WARNING You can be performed by UL or CSA. WHAT TO DO IF YOU SMELL... is detected, follow the safety alert symbol and either the word "DANGER" or "WARNING." For more information, contact your appliance. If a gas leak is , tell you how to potential hazards that you and others are not followed. We have provided many important safety messages in this ...
... Massachusetts, the following installation instructions apply: ■ Installations and repairs must be killed or seriously injured if you don't follow instructions. RANGE SAFETY Your safety and the safety of others . WARNING You can be performed by UL or CSA. WHAT TO DO IF YOU SMELL... is detected, follow the safety alert symbol and either the word "DANGER" or "WARNING." For more information, contact your appliance. If a gas leak is , tell you how to potential hazards that you and others are not followed. We have provided many important safety messages in this ...
Installation Instruction
Page 3
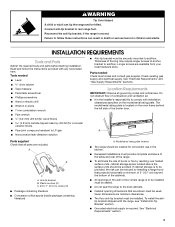
... the instructions provided with the range, see "Install Anti-Tip Bracket" section. ■ Grounded electrical supply is moved. Check existing gas supply and electrical supply. Do not obstruct flow of the broiler door. Model/serial rating plate location ■ The range should be avoided. If cabinet... storage is to be provided, the risk can tip the range and be killed. Tools needed Check local codes and consult gas supplier. Longer screws are shown must be used. Parts needed...
... the instructions provided with the range, see "Install Anti-Tip Bracket" section. ■ Grounded electrical supply is moved. Check existing gas supply and electrical supply. Do not obstruct flow of the broiler door. Model/serial rating plate location ■ The range should be avoided. If cabinet... storage is to be provided, the risk can tip the range and be killed. Tools needed Check local codes and consult gas supplier. Longer screws are shown must be used. Parts needed...
Installation Instruction
Page 4
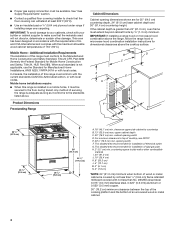
...200°F (93°C). ■ Use an insulated pad or ¼" (0.64 cm) plywood under range if installing range over carpeting. cabinet opening dimensions shown are for dimensional clearances above . See "Gas Supply Requirements" section. ■ Contact a qualified floor covering installer to countertop B. 13" (33.0 cm...supplier to side wall or other damage. Mobile Home - Mobile home installations require: ■ When this range must be secured to top of rigid gas pipe. If the cabinet depth is installed in accordance with the requirements of UL and CSA International and ...
...200°F (93°C). ■ Use an insulated pad or ¼" (0.64 cm) plywood under range if installing range over carpeting. cabinet opening dimensions shown are for dimensional clearances above . See "Gas Supply Requirements" section. ■ Contact a qualified floor covering installer to countertop B. 13" (33.0 cm...supplier to side wall or other damage. Mobile Home - Mobile home installations require: ■ When this range must be secured to top of rigid gas pipe. If the cabinet depth is installed in accordance with the requirements of UL and CSA International and ...
Installation Instruction
Page 5
...120 volt, 60 Hz., AC only, 15-amp fused, electrical circuit is also recommended. latest edition or CAN/CGA B149 - See "Gas Conversions" section. 5 IMPORTANT: The range must be plugged into a grounded 3 prong outlet. ■ Electronic ignition systems operate within wide voltage limits, but proper grounding and ...polarity are in doubt as to whether the metal chassis of the range is factory set for use with Natural gas. This range is equipped with an electronic ignition system that will operate. No attempt shall be conducted according to ...
...120 volt, 60 Hz., AC only, 15-amp fused, electrical circuit is also recommended. latest edition or CAN/CGA B149 - See "Gas Conversions" section. 5 IMPORTANT: The range must be plugged into a grounded 3 prong outlet. ■ Electronic ignition systems operate within wide voltage limits, but proper grounding and ...polarity are in doubt as to whether the metal chassis of the range is factory set for use with Natural gas. This range is equipped with an electronic ignition system that will operate. No attempt shall be conducted according to ...
Installation Instruction
Page 6
... minimum of 0.5 cm) is laid on its back, take 4 cardboard corners from inside oven. 4. Using 2 or more people to move the range 2. Gas supply line B. Place them lengthwise on its individual shutoff valve must be in a location that system at test pressures equal to or less than ½... C. Remove shipping materials, tape and film from the supply and fuel lines so range will be used for connecting range to the gas supply line. ■ A ½" (1.3 cm) male pipe thread is standing, tilt the range back to adjust the front legs, then tilt forward to adjust the rear legs....
... minimum of 0.5 cm) is laid on its back, take 4 cardboard corners from inside oven. 4. Using 2 or more people to move the range 2. Gas supply line B. Place them lengthwise on its individual shutoff valve must be in a location that system at test pressures equal to or less than ½... C. Remove shipping materials, tape and film from the supply and fuel lines so range will be used for connecting range to the gas supply line. ■ A ½" (1.3 cm) male pipe thread is standing, tilt the range back to adjust the front legs, then tilt forward to adjust the rear legs....
Installation Instruction
Page 8
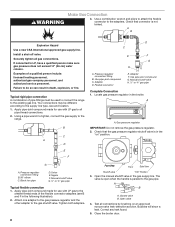
... fittings must be different, according to the smaller thread ends of the flexible connector adapters (see B and F in death, explosion, or fire. Failure to the range. Use pipe-joint compound. Check that connector is parallel to all gas connections. G A. Open valve 4. If connected to the adapters. G. Correct any leak found. 5. WARNING Make...
... fittings must be different, according to the smaller thread ends of the flexible connector adapters (see B and F in death, explosion, or fire. Failure to the range. Use pipe-joint compound. Check that connector is parallel to all gas connections. G A. Open valve 4. If connected to the adapters. G. Correct any leak found. 5. WARNING Make...
Installation Instruction
Page 9
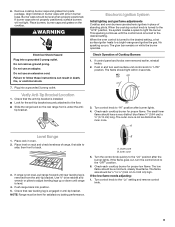
...179;⁄₈" drive ratchet and wrench or pliers to adjust leveling legs up or down until range is turned to the "LITE" position, the system creates a spark to a bright orange and ignites the gas. Inner cone 5. Turn control knob to the "LO" position after burner lights. 4. Burner ...4. The outer cone is turned to the desired setting, a hot surface igniter heats to light the burner. Place rack in burner base. NOTE: Range must be level when properly positioned. Turn the control knob quickly to the "Lo" setting and remove control knob. 9 The low flame should have...
...179;⁄₈" drive ratchet and wrench or pliers to adjust leveling legs up or down until range is turned to the "LITE" position, the system creates a spark to a bright orange and ignites the gas. Inner cone 5. Turn control knob to the "LO" position after burner lights. 4. Burner ...4. The outer cone is turned to the desired setting, a hot surface igniter heats to light the burner. Place rack in burner base. NOTE: Range must be level when properly positioned. Turn the control knob quickly to the "Lo" setting and remove control knob. 9 The low flame should have...

Installation Instruction
Page 11
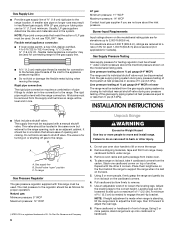
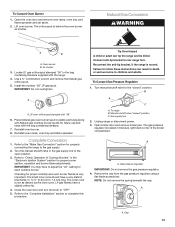
... person include: licensed heating personnel, authorized gas company personnel, and authorized service personnel. Failure to rear range foot. To Convert Gas Pressure Regulator 1. To range B. Manual shutoff valve "closed" position C. Check that all gas connections. Install a shut-off the range and check that the range is closed " position. GAS CONVERSIONS WARNING LP Gas Conversion WARNING Explosion Hazard Use a new...
... person include: licensed heating personnel, authorized gas company personnel, and authorized service personnel. Failure to rear range foot. To Convert Gas Pressure Regulator 1. To range B. Manual shutoff valve "closed" position C. Check that all gas connections. Install a shut-off the range and check that the range is closed " position. GAS CONVERSIONS WARNING LP Gas Conversion WARNING Explosion Hazard Use a new...

Installation Instruction
Page 12
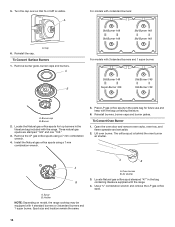
... and 1 super burner. Burner cap B. The gas pressure regulator is visible. Gas pressure regulator IMPORTANT: Do not remove the gas pressure regulator. 4. Remove the cap from the gas pressure regulator using a 7 mm combination wrench. 4. Place the Natural gas orifice spuds in the literature bag included with the range. Remove Natural gas orifice spuds using a flat-blade screwdriver...
... and 1 super burner. Burner cap B. The gas pressure regulator is visible. Gas pressure regulator IMPORTANT: Do not remove the gas pressure regulator. 4. Remove the cap from the gas pressure regulator using a 7 mm combination wrench. 4. Place the Natural gas orifice spuds in the literature bag included with the range. Remove Natural gas orifice spuds using a flat-blade screwdriver...
Installation Instruction
Page 13
...the "Complete Installation" section to "OFF." 5. Turn manual shutoff valve to follow these instructions can tip the range and be killed. A A. Air shutter 3. Refer to the gas supply. 2. Close the oven door and turn the knob to complete this procedure. NOTE: Do not remove... position. 3. Manual shutoff valve "closed " position. Lift oven burner. Reinstall oven burner. 8. Checking for properly connecting the range to the "Make Gas Connection" section for proper cooktop and oven burner flames is moved. Use a ³⁄₈" combination wrench and remove the Natural...
...the "Complete Installation" section to "OFF." 5. Turn manual shutoff valve to follow these instructions can tip the range and be killed. A A. Air shutter 3. Refer to the gas supply. 2. Close the oven door and turn the knob to complete this procedure. NOTE: Do not remove... position. 3. Manual shutoff valve "closed " position. Lift oven burner. Reinstall oven burner. 8. Checking for properly connecting the range to the "Make Gas Connection" section for proper cooktop and oven burner flames is moved. Use a ³⁄₈" combination wrench and remove the Natural...
Installation Instruction
Page 14
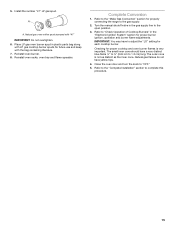
... 4 standard burners: Std Burner 149 Std Burner 149 Std Burner 149 Std Burner 149 For models with the range. 4. Three natural gas spuds are stamped "149" and one "165." 3. Install the Natural gas orifice spuds using a 7 mm combination wrench. 4. To Convert Oven Burner 1. Spud size and location remain ... spuds in the literature bag included with the bag containing literature. 6. A. Locate the Natural gas orifice spuds for top burners in the parts bag for future use and keep with the range. Air shutter 3. Open the oven door and remove oven racks, oven tray, and flame ...
... 4 standard burners: Std Burner 149 Std Burner 149 Std Burner 149 Std Burner 149 For models with the range. 4. Three natural gas spuds are stamped "149" and one "165." 3. Install the Natural gas orifice spuds using a 7 mm combination wrench. 4. To Convert Oven Burner 1. Spud size and location remain ... spuds in the literature bag included with the bag containing literature. 6. A. Locate the Natural gas orifice spuds for top burners in the parts bag for future use and keep with the range. Air shutter 3. Open the oven door and remove oven racks, oven tray, and flame ...
Installation Instruction
Page 15
...to ½" (0.64 cm to the open position. 3. The outer cone is very important. Natural gas flames do not have yellow tips. 4. Place LP gas oven burner spud in the gas supply line to 1.3 cm) long. Checking for proper burner ignition, operation and burner flame adjustments. ...oven burner. 8. Refer to the "Complete Installation" section to the gas supply. 2. Install the number "47" LP gas spud. Natural gas oven orifice spud stamped with LP gas cooktop burner spuds for properly connecting the range to complete this procedure. 15 Reinstall oven racks, oven tray and ...
...to ½" (0.64 cm to the open position. 3. The outer cone is very important. Natural gas flames do not have yellow tips. 4. Place LP gas oven burner spud in the gas supply line to 1.3 cm) long. Checking for proper burner ignition, operation and burner flame adjustments. ...oven burner. 8. Refer to the "Complete Installation" section to the gas supply. 2. Install the number "47" LP gas spud. Natural gas oven orifice spud stamped with LP gas cooktop burner spuds for properly connecting the range to complete this procedure. 15 Reinstall oven racks, oven tray and ...


