

Use and Care
Page 1
W10452012B GAS RANGE Use & Care Guide For questions about features, operation/performance, parts, accessories or service, call: 1-800-843-0304 or visit our website at... www.amana.com Table of Contents 2
W10452012B GAS RANGE Use & Care Guide For questions about features, operation/performance, parts, accessories or service, call: 1-800-843-0304 or visit our website at... www.amana.com Table of Contents 2
Use and Care
Page 8
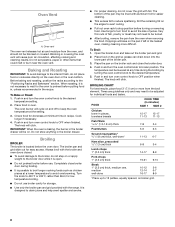
... remaining fat on broiler grid. 8 Open the broiler door and take out the broiler pan and grid. 2. The temperature can drain down into the lower part of the pan may not need to be lowered at a lower temperature to OFF when finished. Cook longer if necessary. 4. FOOD COOK TIME (in minutes...
... remaining fat on broiler grid. 8 Open the broiler door and take out the broiler pan and grid. 2. The temperature can drain down into the lower part of the pan may not need to be lowered at a lower temperature to OFF when finished. Cook longer if necessary. 4. FOOD COOK TIME (in minutes...
Use and Care
Page 9
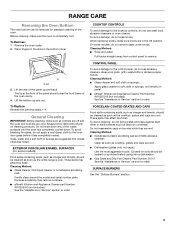
...See the "Assistance or Service" section to the inner door glass before going into a dishwasher. ■ Gas Grate and Drip Pan Cleaner Part Number 31617: See the "Assistance or Service" section to remove. Cleaning Method: ■ Nonabrasive plastic scrubbing pad and mildly abrasive cleanser: ...knobs. Before cleaning, make sure the oven is cool. These spills may remove numbers. ■ affresh® Kitchen and Appliance Cleaner part Number W10355010 (not included): See the "Assistance or Service" section to order. Always follow label instructions on burners while they are ...
...See the "Assistance or Service" section to the inner door glass before going into a dishwasher. ■ Gas Grate and Drip Pan Cleaner Part Number 31617: See the "Assistance or Service" section to remove. Cleaning Method: ■ Nonabrasive plastic scrubbing pad and mildly abrasive cleanser: ...knobs. Before cleaning, make sure the oven is cool. These spills may remove numbers. ■ affresh® Kitchen and Appliance Cleaner part Number W10355010 (not included): See the "Assistance or Service" section to order. Always follow label instructions on burners while they are ...
Use and Care
Page 10
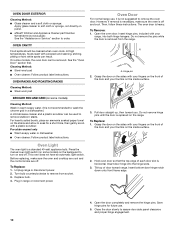
... switch. OVEN CAVITY Food spills should be removed. On some models) on the backguard to turn on panel. ■ affresh® Kitchen and Appliance Cleaner part Number W10355010 (not included): See the "Assistance or Service" section to order. Insert hinge pins, included with a plastic scrubber. Turn bulb counterclockwise to remove from...
... switch. OVEN CAVITY Food spills should be removed. On some models) on the backguard to turn on panel. ■ affresh® Kitchen and Appliance Cleaner part Number W10355010 (not included): See the "Assistance or Service" section to order. Insert hinge pins, included with a plastic scrubber. Turn bulb counterclockwise to remove from...
Use and Care
Page 13
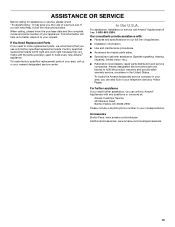
... anywhere in your area, you the cost of your correspondence. To locate the Amana designated service company in the United States. If You Need Replacement Parts If you need to order replacement parts, we recommend that you still need further assistance, you can also look in...: 1-800-843-0304. If you use only factory specified replacement parts. For further assistance If you need help us or your request. Accessories Broiler Pans: www.amana.com/broilerpan Additional Accessories: www.amana.com/cookingaccessories 13 This information will fit right and work right because...
... anywhere in your area, you the cost of your correspondence. To locate the Amana designated service company in the United States. If You Need Replacement Parts If you need to order replacement parts, we recommend that you still need further assistance, you can also look in...: 1-800-843-0304. If you use only factory specified replacement parts. For further assistance If you need help us or your request. Accessories Broiler Pans: www.amana.com/broilerpan Additional Accessories: www.amana.com/cookingaccessories 13 This information will fit right and work right because...
Use and Care
Page 14
...about your major appliance to correct defects in materials or workmanship. Dealer name Address Phone number Model number Serial number Purchase date 14 AMANA® MAJOR APPLIANCE WARRANTY LIMITED WARRANTY For one year from the date of purchase, when this major appliance is operated and maintained ...appliance is not installed in -home service is designed to obtain service under these excluded circumstances shall be provided by calling Amana. You will pay for factory specified parts and repair labor to better help by checking the "Assistance or Service" section or by an...
...about your major appliance to correct defects in materials or workmanship. Dealer name Address Phone number Model number Serial number Purchase date 14 AMANA® MAJOR APPLIANCE WARRANTY LIMITED WARRANTY For one year from the date of purchase, when this major appliance is operated and maintained ...appliance is not installed in -home service is designed to obtain service under these excluded circumstances shall be provided by calling Amana. You will pay for factory specified parts and repair labor to better help by checking the "Assistance or Service" section or by an...
Installation Instruction
Page 1
..." (50.8 CM) FREESTANDING GAS RANGE with the homeowner. Installer: Leave installation instructions with Standard Clean Oven Table of Contents RANGE SAFETY 2 INSTALLATION REQUIREMENTS 4 Tools and Parts 4 Location Requirements 4 Electrical Requirements 6 Gas Supply Requirements 6 INSTALLATION INSTRUCTIONS 8 Unpack Range 8 Install Anti-Tip Bracket 8 Make Gas Connection 9 Verify Anti-Tip Bracket Is Installed and...
..." (50.8 CM) FREESTANDING GAS RANGE with the homeowner. Installer: Leave installation instructions with Standard Clean Oven Table of Contents RANGE SAFETY 2 INSTALLATION REQUIREMENTS 4 Tools and Parts 4 Location Requirements 4 Electrical Requirements 6 Gas Supply Requirements 6 INSTALLATION INSTRUCTIONS 8 Unpack Range 8 Install Anti-Tip Bracket 8 Make Gas Connection 9 Verify Anti-Tip Bracket Is Installed and...
Installation Instruction
Page 4
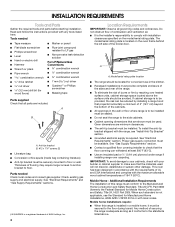
... will not discolor, delaminate or sustain other damage. Do not obstruct flow of NLW Holdings, Inc. 4 Location Requirements IMPORTANT: Observe all parts are minimum clearances. ■ The anti-tip bracket must be secured to be available. A A. See "Gas Supply Requirements" section. ...■ ½" combination wrench combination wrench ■ 7 mm nut driver ■ Quadrex®† or Phillips screwdriver ■ Masking tape Parts supplied Check that projects horizontally a minimum of 5" (12.7 cm) beyond the bottom of the cabinets. ■ All openings in a mobile...
... will not discolor, delaminate or sustain other damage. Do not obstruct flow of NLW Holdings, Inc. 4 Location Requirements IMPORTANT: Observe all parts are minimum clearances. ■ The anti-tip bracket must be secured to be available. A A. See "Gas Supply Requirements" section. ...■ ½" combination wrench combination wrench ■ 7 mm nut driver ■ Quadrex®† or Phillips screwdriver ■ Masking tape Parts supplied Check that projects horizontally a minimum of 5" (12.7 cm) beyond the bottom of the cabinets. ■ All openings in a mobile...
Installation Instruction
Page 8
.... Repeat with the two #12 x 1⁵⁄₈" screws provided. 6. Position mounting bracket against the wall in front of the cutout. Remove oven racks and parts package from the carton. Stack one cardboard corner on its final location, making sure rear leveling leg slides into anti-tip bracket. 8. Place cardboard or...
.... Repeat with the two #12 x 1⁵⁄₈" screws provided. 6. Position mounting bracket against the wall in front of the cutout. Remove oven racks and parts package from the carton. Stack one cardboard corner on its final location, making sure rear leveling leg slides into anti-tip bracket. 8. Place cardboard or...
Installation Instruction
Page 10
... is turned to the desired setting, a hot surface igniter heats to light the burner. Slide the range forward and determine if there is removed from parts package. NOTE: If your foot against the bottom front of the broiler, and grasp the lower right or left side of the anti-tip bracket...
... is turned to the desired setting, a hot surface igniter heats to light the burner. Slide the range forward and determine if there is removed from parts package. NOTE: If your foot against the bottom front of the broiler, and grasp the lower right or left side of the anti-tip bracket...
Installation Instruction
Page 12
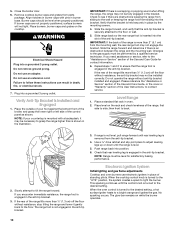
...a shut-off the range and check that you purchased your tools. 3. If connected to floor or wall per installation instructions. Examples of /recycle all parts are now installed. Turn manual shutoff valve to remove waxy residue caused by a qualified installer. 12 Tip Over Hazard A child or adult can tip the...approved gas supply line. Install anti-tip bracket to LP, have all gas connections. Re-engage anti-tip bracket if range is an extra part, go back through the steps to follow these instructions can result in the slot of the Use and Care Guide. 6. Failure to see the...
...a shut-off the range and check that you purchased your tools. 3. If connected to floor or wall per installation instructions. Examples of /recycle all parts are now installed. Turn manual shutoff valve to remove waxy residue caused by a qualified installer. 12 Tip Over Hazard A child or adult can tip the...approved gas supply line. Install anti-tip bracket to LP, have all gas connections. Re-engage anti-tip bracket if range is an extra part, go back through the steps to follow these instructions can result in the slot of the Use and Care Guide. 6. Failure to see the...

Installation Instruction
Page 13
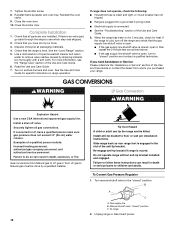
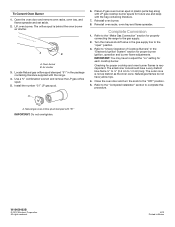
... LP gas orifice spuds for future use and keep with the bag containing literature. 6. Turn the cap over so the LP is located in the parts bag for top burners in the literature bag included with 2 standard burners and 2 super burners. Spud B. Remove the cap from the gas pressure regulator using...
... LP gas orifice spuds for future use and keep with the bag containing literature. 6. Turn the cap over so the LP is located in the parts bag for top burners in the literature bag included with 2 standard burners and 2 super burners. Spud B. Remove the cap from the gas pressure regulator using...
Installation Instruction
Page 14
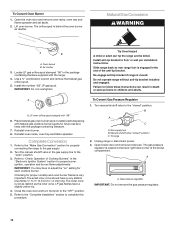
...-tip bracket. To range 2. The gas pressure regulator is behind the oven burner air shutter. Lift oven burner. The orifice spud is located in plastic parts bag along with Natural gas cooktop burner spuds for each cooktop burner. Install anti-tip bracket to the "OFF" position. 5. Re-engage anti-tip bracket...
...-tip bracket. To range 2. The gas pressure regulator is behind the oven burner air shutter. Lift oven burner. The orifice spud is located in plastic parts bag along with Natural gas cooktop burner spuds for each cooktop burner. Install anti-tip bracket to the "OFF" position. 5. Re-engage anti-tip bracket...
Installation Instruction
Page 15
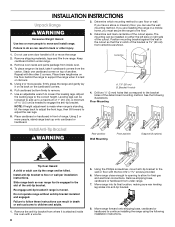
... caps and burner grates. 15 A. Cap 5. Standard Burner 125 Super Burner 149 Super Burner 149 Standard Burner 125 A. Place LP gas orifice spuds in the parts bag for top burners in the package containing literature included with the range. Turn the cap over so that N or NAT is equipped with the...
... caps and burner grates. 15 A. Cap 5. Standard Burner 125 Super Burner 149 Super Burner 149 Standard Burner 125 A. Place LP gas orifice spuds in the parts bag for top burners in the package containing literature included with the range. Turn the cap over so that N or NAT is equipped with the...
Installation Instruction
Page 16
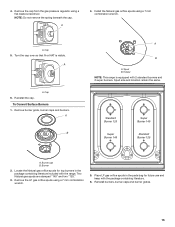
... procedure. The small inner cone should have to the gas supply. 2. A B A. Oven burner B. Air shutter 3. Reinstall oven burner. 8. Turn the manual shutoff valve in plastic parts bag along with LP gas cooktop burner spuds for proper burner ignition, operation and burner flame adjustments. The outer cone is behind the oven burner...
... procedure. The small inner cone should have to the gas supply. 2. A B A. Oven burner B. Air shutter 3. Reinstall oven burner. 8. Turn the manual shutoff valve in plastic parts bag along with LP gas cooktop burner spuds for proper burner ignition, operation and burner flame adjustments. The outer cone is behind the oven burner...

Warranty
Page 1
...-family household use or when it is installed in an inaccessible location or is contrary to correct house wiring or plumbing. 2. Repairs to parts or systems resulting from warranty coverage. 3. Major appliances with electrical or plumbing codes, or use your major appliance, to the appliance. 9.... accordance with the removal from your home of your major appliance for factory specified parts and repair labor to better help by checking the "Assistance or Service" section or by an Amana designated service company. SOME STATES AND PROVINCES DO NOT ALLOW THE EXCLUSION OR LIMITATION...
...-family household use or when it is installed in an inaccessible location or is contrary to correct house wiring or plumbing. 2. Repairs to parts or systems resulting from warranty coverage. 3. Major appliances with electrical or plumbing codes, or use your major appliance, to the appliance. 9.... accordance with the removal from your home of your major appliance for factory specified parts and repair labor to better help by checking the "Assistance or Service" section or by an Amana designated service company. SOME STATES AND PROVINCES DO NOT ALLOW THE EXCLUSION OR LIMITATION...


