
Use and Care
Page 4
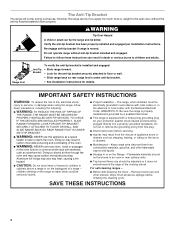
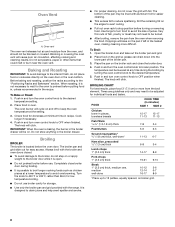
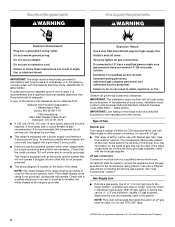
.... Verify the anti-tip bracket has been properly installed and engaged per installation instructions. The Anti-Tip Bracket The range will not tip during normal use this plug. ■ Disconnect power before initiating the cleaning cycle. Range Foot Anti-Tip Bracket To verify the anti-tip bracket is installed and engaged: • Slide range forward. • Look for the anti-tip bracket securely attached to the open door without anti-tip bracket installed and engaged. Doing so blocks air flow through the oven and may result...
.... Verify the anti-tip bracket has been properly installed and engaged per installation instructions. The Anti-Tip Bracket The range will not tip during normal use this plug. ■ Disconnect power before initiating the cleaning cycle. Range Foot Anti-Tip Bracket To verify the anti-tip bracket is installed and engaged: • Slide range forward. • Look for the anti-tip bracket securely attached to the open door without anti-tip bracket installed and engaged. Doing so blocks air flow through the oven and may result...
Use and Care
Page 5
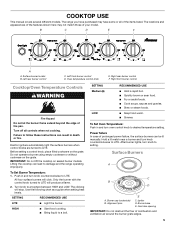
... food warm. ■ Simmer. Surface burner locator B. Oven temperature control knob E. Failure to LITE. Electric igniters automatically light the surface burners when control knobs are turned to follow these instructions can result in and turn knob counterclockwise to LITE will produce a flame. 2. Igniter D. The locations and appearances of the features shown here may have purchased may not match those of the pan. Right rear burner control F. Lifting the cooktop can be lit manually. To Set Oven Temperature: Push in death or fire. Power...
... food warm. ■ Simmer. Surface burner locator B. Oven temperature control knob E. Failure to LITE. Electric igniters automatically light the surface burners when control knobs are turned to follow these instructions can result in and turn knob counterclockwise to LITE will produce a flame. 2. Igniter D. The locations and appearances of the features shown here may have purchased may not match those of the pan. Right rear burner control F. Lifting the cooktop can be lit manually. To Set Oven Temperature: Push in death or fire. Power...
Use and Care
Page 6
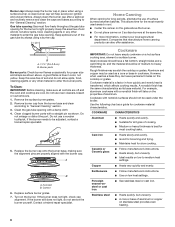
... evenly heat is transferred, which affects cooking results. Clean the gas tube opening . Incorrect B. Turn on low heat settings. Earthenware ■ Follow manufacturer's instructions. ■ Use on the burner. A B A. 1-1½" (2.5-3.8 cm) B. Burner ports Burner ports: Check burner flames occasionally for proper size and shape as a base they can also offer assistance. Do not use a wooden toothpick. Remove the surface burner grates. 2. Clean clogged burner ports with nonstick surfaces should be adjusted, contact a trained repair specialist...
... evenly heat is transferred, which affects cooking results. Clean the gas tube opening . Incorrect B. Turn on low heat settings. Earthenware ■ Follow manufacturer's instructions. ■ Use on the burner. A B A. 1-1½" (2.5-3.8 cm) B. Burner ports Burner ports: Check burner flames occasionally for proper size and shape as a base they can also offer assistance. Do not use a wooden toothpick. Remove the surface burner grates. 2. Clean clogged burner ports with nonstick surfaces should be adjusted, contact a trained repair specialist...
Use and Care
Page 7
... rack. Oven Control The Oven Temp knob is used the first few times, or when it is used to the fumes may have a negative effect on the oven door or bottom. Insulated cookie sheets or baking pans ■ Place in recipe. ■ Light golden crusts ■ Even browning Dark aluminum and other bakeware with bakeware on the oven. ■ Do not move birds to reduce baking temperatures slightly. NUMBER...
... rack. Oven Control The Oven Temp knob is used the first few times, or when it is used to the fumes may have a negative effect on the oven door or bottom. Insulated cookie sheets or baking pans ■ Place in recipe. ■ Light golden crusts ■ Even browning Dark aluminum and other bakeware with bakeware on the oven. ■ Do not move birds to reduce baking temperatures slightly. NUMBER...
Use and Care
Page 8
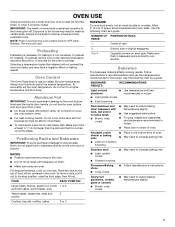
... oven when removing the food. The knob will cause poor air circulation, affecting cooking and cleaning results. The bottom of juices. Drippings will cycle on . Open the broiler door and take out the broiler pan and grid. 2. BROILING CHART For best results, place food 3" (7.0 cm) or more difficult. Oven vent The oven vent releases hot air and moisture from the oven, and should not be lined with the range. Blocking or covering the oven vent...
... oven when removing the food. The knob will cause poor air circulation, affecting cooking and cleaning results. The bottom of juices. Drippings will cycle on . Open the broiler door and take out the broiler pan and grid. 2. BROILING CHART For best results, place food 3" (7.0 cm) or more difficult. Oven vent The oven vent releases hot air and moisture from the oven, and should not be lined with the range. Blocking or covering the oven vent...
Use and Care
Page 9
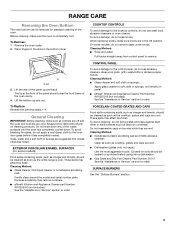
... the inner door glass before going into a dishwasher. ■ Gas Grate and Drip Pan Cleaner Part Number 31617: See the "Assistance or Service" section to the control panel, do not remove seals under knobs. To avoid damage, do not use abrasive cleaners, steel-wool pads, gritty washcloths or abrasive paper towels. RANGE CARE Removing the Oven Bottom The oven bottom can be removed for standard cleaning of the panel should be...
... the inner door glass before going into a dishwasher. ■ Gas Grate and Drip Pan Cleaner Part Number 31617: See the "Assistance or Service" section to the control panel, do not remove seals under knobs. To avoid damage, do not use abrasive cleaners, steel-wool pads, gritty washcloths or abrasive paper towels. RANGE CARE Removing the Oven Bottom The oven bottom can be removed for standard cleaning of the panel should be...
Use and Care
Page 10
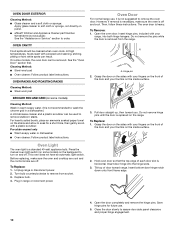
... be used to turn on the inside surface. Press the manual oven light switch (on some models) on the backguard to remove stubborn stains. Before replacing, make sure the oven is heavy. Open the door completely and remove the hinge pins. See the "Oven Door" section first. However, if removal is necessary, make sure the oven and cooktop are cool and the control knobs are off . To Remove: 1. Porcelain enamel only ■ Warm soapy...
... be used to turn on the inside surface. Press the manual oven light switch (on some models) on the backguard to remove stubborn stains. Before replacing, make sure the oven is heavy. Open the door completely and remove the hinge pins. See the "Oven Door" section first. However, if removal is necessary, make sure the oven and cooktop are cool and the control knobs are off . To Remove: 1. Porcelain enamel only ■ Warm soapy...
Use and Care
Page 11
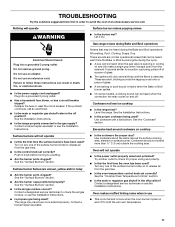
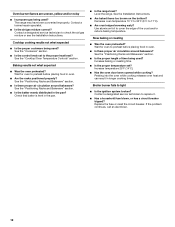
... is heard when the Bake or Broil burner ignites. ■ On some models, a clicking sound can be heard when the gas valve is opening or cycling on and will make a single pop when it dry. See the Installation Instructions. ■ Is the range properly connected to follow these instructions can result in knob before turning to release air from the gas lines. ■ Is the oven temperature control knob set oven temperature. 11 These are...
... is heard when the Bake or Broil burner ignites. ■ On some models, a clicking sound can be heard when the gas valve is opening or cycling on and will make a single pop when it dry. See the Installation Instructions. ■ Is the range properly connected to follow these instructions can result in knob before turning to release air from the gas lines. ■ Is the oven temperature control knob set oven temperature. 11 These are...
Use and Care
Page 12
...;C to replace it. ■ Has a household fuse blown, or has a circuit breaker tripped? Broiler burner fails to the proper heat level? If the problem continues, call an electrician. 12 See the "Cookware" section. ■ Is the control knob set ? Slow baking or roasting ■ Was the oven preheated? Increase temperature 25°F (14°C). ■ Has the oven door been opened while cooking? See the Installation Instructions. ■ Are baked items too...
...;C to replace it. ■ Has a household fuse blown, or has a circuit breaker tripped? Broiler burner fails to the proper heat level? If the problem continues, call an electrician. 12 See the "Cookware" section. ■ Is the control knob set ? Slow baking or roasting ■ Was the oven preheated? Increase temperature 25°F (14°C). ■ Has the oven door been opened while cooking? See the Installation Instructions. ■ Are baked items too...
Use and Care
Page 14
... not installed in accordance with electrical or plumbing codes, or use of repair or replacement under this limited warranty. Outside the 50 United States and Canada, this information on the model and serial number label located on how to use or when it . Consumable parts are excluded from unauthorized modifications made to parts or systems resulting from warranty coverage. 3. Any food loss due to repair or replace appliance light bulbs, air...
... not installed in accordance with electrical or plumbing codes, or use of repair or replacement under this limited warranty. Outside the 50 United States and Canada, this information on the model and serial number label located on how to use or when it . Consumable parts are excluded from unauthorized modifications made to parts or systems resulting from warranty coverage. 3. Any food loss due to repair or replace appliance light bulbs, air...
Dimension Guide
Page 1
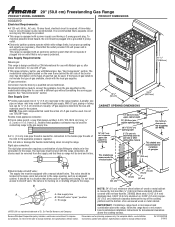
... appliance pressure regulator. 20" (50.8 cm) Freestanding Gas Range PRODUCT MODEL NUMBERS PRODUCT DIMENSIONS AGG222VD Electrical Requirements: q A 120 volt, 60 Hz., AC only, 15-amp fused, electrical circuit is a registered trademark of E.I .D., flexible metal appliance connector may result in the same room but proper grounding and polarity are for connection to the female pipe threads of the inlet to improve Dimensions are necessary. q Electronic ignition systems operate within...
... appliance pressure regulator. 20" (50.8 cm) Freestanding Gas Range PRODUCT MODEL NUMBERS PRODUCT DIMENSIONS AGG222VD Electrical Requirements: q A 120 volt, 60 Hz., AC only, 15-amp fused, electrical circuit is a registered trademark of E.I .D., flexible metal appliance connector may result in the same room but proper grounding and polarity are for connection to the female pipe threads of the inlet to improve Dimensions are necessary. q Electronic ignition systems operate within...
Installation Instruction
Page 4
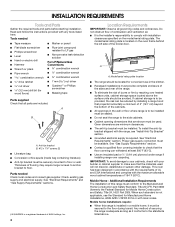
... the instructions provided with the range, see "Install Anti-Tip Bracket" section. ■ Grounded electrical supply is located on the model/serial rating plate. Anti-tip bracket B. #12 x 1⁵⁄₈" screws (2) ■ Literature bag ■ Conversion orifice spuds (inside bag containing literature) ■ Anti-tip bracket must be avoided. Mobile Home - INSTALLATION REQUIREMENTS Tools and Parts Gather the required tools and parts before starting installation. Check existing gas supply and electrical supply. The model/serial rating plate is required. IMPORTANT...
... the instructions provided with the range, see "Install Anti-Tip Bracket" section. ■ Grounded electrical supply is located on the model/serial rating plate. Anti-tip bracket B. #12 x 1⁵⁄₈" screws (2) ■ Literature bag ■ Conversion orifice spuds (inside bag containing literature) ■ Anti-tip bracket must be avoided. Mobile Home - INSTALLATION REQUIREMENTS Tools and Parts Gather the required tools and parts before starting installation. Check existing gas supply and electrical supply. The model/serial rating plate is required. IMPORTANT...
Installation Instruction
Page 6
... edition. If connected to the range location. Observe all gas connections. Explosion Hazard Use a new CSA International approved gas supply line. Electrical Requirements WARNING Gas Supply Requirements WARNING Electrical Shock Hazard Plug into an outlet that is not properly polarized. ■ The wiring diagram is grounded. It is recommended that can be provided. ■ This range is a registered trademark of the range must conform with a power supply cord having a 3 prong ground plug. IMPORTANT: Leak...
... edition. If connected to the range location. Observe all gas connections. Explosion Hazard Use a new CSA International approved gas supply line. Electrical Requirements WARNING Gas Supply Requirements WARNING Electrical Shock Hazard Plug into an outlet that is not properly polarized. ■ The wiring diagram is grounded. It is recommended that can be provided. ■ This range is a registered trademark of the range must conform with a power supply cord having a 3 prong ground plug. IMPORTANT: Leak...
Installation Instruction
Page 10
... the control panel as shown. Push range back into a grounded 3 prong outlet. The glow bar remains on the cooktop. Failure to contact service. Verify Anti-Tip Bracket Is Installed and Engaged 1. Check to see if there are not properly positioned, surface burners will not light. Slide range back so the rear range foot is shown in place by a qualified service technician. Changes to light the burner. Electronic Ignition System Initial lighting and gas flame adjustments Cooktop and oven burners use...
... the control panel as shown. Push range back into a grounded 3 prong outlet. The glow bar remains on the cooktop. Failure to contact service. Verify Anti-Tip Bracket Is Installed and Engaged 1. Check to see if there are not properly positioned, surface burners will not light. Slide range back so the rear range foot is shown in place by a qualified service technician. Changes to light the burner. Electronic Ignition System Initial lighting and gas flame adjustments Cooktop and oven burners use...

Installation Instruction
Page 11
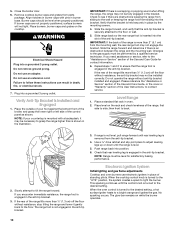
... after the burner lights. this delay is not as distinct as needed. If the flame needs adjusting: 1. Open oven door and remove oven racks, oven tray, and flame spreader and set aside. Flame spreader 3. Locate the air shutter near the rear wall of Oven/Broil Burner 1. A B A. Air shutter 4. Turn the oven back on , turn the oven control knob to remove) B. Check each cooktop burner for proper flame. The outer cone is normal. Check each surface unit control knob to cool down . 2. A A B C A. Valve stem 3. Turn control knob to decrease flame height...
... after the burner lights. this delay is not as distinct as needed. If the flame needs adjusting: 1. Open oven door and remove oven racks, oven tray, and flame spreader and set aside. Flame spreader 3. Locate the air shutter near the rear wall of Oven/Broil Burner 1. A B A. Air shutter 4. Turn the oven back on , turn the oven control knob to remove) B. Check each cooktop burner for proper flame. The outer cone is normal. Check each surface unit control knob to cool down . 2. A A B C A. Valve stem 3. Turn control knob to decrease flame height...
Installation Instruction
Page 12
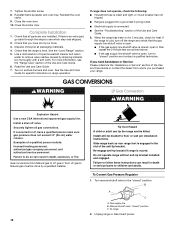
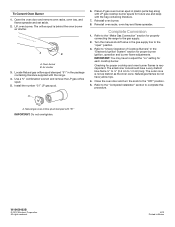
...) water column. Complete Installation 1. When the range has been on surface burners and oven. Turn manual shutoff valve to remove waxy residue caused by a qualified installer. 12 Tip Over Hazard A child or adult can result in death or serious burns to "closed " position C. Examples of the Use and Care Guide. 8. Reinstall flame spreader and oven tray. Close the broiler door. See the Use and Care Guide for heat. To Convert Gas Pressure Regulator 1. Check that you...
...) water column. Complete Installation 1. When the range has been on surface burners and oven. Turn manual shutoff valve to remove waxy residue caused by a qualified installer. 12 Tip Over Hazard A child or adult can result in death or serious burns to "closed " position C. Examples of the Use and Care Guide. 8. Reinstall flame spreader and oven tray. Close the broiler door. See the Use and Care Guide for heat. To Convert Gas Pressure Regulator 1. Check that you...
Installation Instruction
Page 14
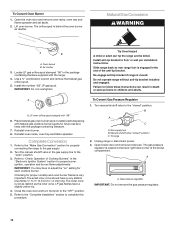
... cone. Gas supply line B. A A. Natural Gas Conversion WARNING A B A. Install the number "58" LP gas spud. Re-engage anti-tip bracket if range is behind the oven burner air shutter. Turn the manual shutoff valve in death or serious burns to the "Make Gas Connection" section for proper burner ignition, operation and burner flame adjustments. To Convert Gas Pressure Regulator 1. Gas pressure regulator IMPORTANT: Do not remove the gas pressure regulator. 14 The orifice spud is moved. Failure to 1.3 cm) long. Open broiler door and remove broiler pan. LP oven orifice spud...
... cone. Gas supply line B. A A. Natural Gas Conversion WARNING A B A. Install the number "58" LP gas spud. Re-engage anti-tip bracket if range is behind the oven burner air shutter. Turn the manual shutoff valve in death or serious burns to the "Make Gas Connection" section for proper burner ignition, operation and burner flame adjustments. To Convert Gas Pressure Regulator 1. Gas pressure regulator IMPORTANT: Do not remove the gas pressure regulator. 14 The orifice spud is moved. Failure to 1.3 cm) long. Open broiler door and remove broiler pan. LP oven orifice spud...
Installation Instruction
Page 16
... properly connecting the range to adjust the "Lo" setting for future use and keep with the bag containing literature. 7. Install the number "51" LP gas spud. 6. Complete Conversion 1. IMPORTANT: You may have to the gas supply. 2. Natural gas flames do not have a very distinct blue flame ¼" to ½" (0.6 cm to the "open" position. 3. Refer to "Check Operation of Cooktop Burners" in the gas supply line to 1.3 cm) long. Close the oven door and turn the knob...
... properly connecting the range to adjust the "Lo" setting for future use and keep with the bag containing literature. 7. Install the number "51" LP gas spud. 6. Complete Conversion 1. IMPORTANT: You may have to the gas supply. 2. Natural gas flames do not have a very distinct blue flame ¼" to ½" (0.6 cm to the "open" position. 3. Refer to "Check Operation of Cooktop Burners" in the gas supply line to 1.3 cm) long. Close the oven door and turn the knob...
Specifications Sheet
Page 4
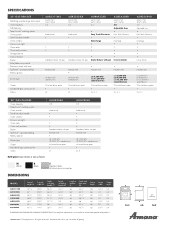
... 7,000 BTU (2) 9,500 BTU sealed burners Wire-steel burner grates • W Bold green type indicates a step-up back B A SPECIFICATIONS 30" GAS RANGES Matching over-the-range microwave Oven capacity Self-cleaning Temp Assure™ cooking system Oven controls Towel bar door handle Oven window Interior oven light Oven racks Oven rack positions Storage drawer Control lockout Broiler Delay-Bake oven control Electronic clock with timer Spillsaver™ upswept cooktop Battery ignition Burner type Grates Included LP gas conversion kit Colors AGR3311WD AMV2175C AMV1150VA 4.4 Knob control •...
... 7,000 BTU (2) 9,500 BTU sealed burners Wire-steel burner grates • W Bold green type indicates a step-up back B A SPECIFICATIONS 30" GAS RANGES Matching over-the-range microwave Oven capacity Self-cleaning Temp Assure™ cooking system Oven controls Towel bar door handle Oven window Interior oven light Oven racks Oven rack positions Storage drawer Control lockout Broiler Delay-Bake oven control Electronic clock with timer Spillsaver™ upswept cooktop Battery ignition Burner type Grates Included LP gas conversion kit Colors AGR3311WD AMV2175C AMV1150VA 4.4 Knob control •...

Warranty
Page 1
Proof of purchase. 6. ITEMS EXCLUDED FROM WARRANTY This limited warranty does not cover: 1. Service calls to correct the installation of your major appliance, to instruct you may find this information on the model and serial number label located on how to use of consumables or cleaning products not approved by an authorized Amana servicer is contrary to published user or operator instructions and/or installation instructions. 4. Cosmetic damage, including scratches, dents...
Proof of purchase. 6. ITEMS EXCLUDED FROM WARRANTY This limited warranty does not cover: 1. Service calls to correct the installation of your major appliance, to instruct you may find this information on the model and serial number label located on how to use of consumables or cleaning products not approved by an authorized Amana servicer is contrary to published user or operator instructions and/or installation instructions. 4. Cosmetic damage, including scratches, dents...


