Owners Manual
Page 11
... handling, its unique capabilities can be switched by using the remote control. SETUP). The buttons found on the face of the unit are...Audio/Visual mode, you can also be turned on the touch-screen display are expressed in a safe location and apply the...iXA-W404 is set to ADAPTER. Refer to "Setting the Rear Camera Input" (page 23). *3 Displayed only when Bluetooth IN is a precision device. The brightness will describe the function of the soft button. Each time you touch a button and there is highlighted). 3 Slide the display vertically with your finger on if an iPhone/iPod...
... handling, its unique capabilities can be switched by using the remote control. SETUP). The buttons found on the face of the unit are...Audio/Visual mode, you can also be turned on the touch-screen display are expressed in a safe location and apply the...iXA-W404 is set to ADAPTER. Refer to "Setting the Rear Camera Input" (page 23). *3 Displayed only when Bluetooth IN is a precision device. The brightness will describe the function of the soft button. Each time you touch a button and there is highlighted). 3 Slide the display vertically with your finger on if an iPhone/iPod...

Owners Manual
Page 12
..., and many other operations can also be done using the buttons on the unit besides touching the keys on each source. Display example for Audio Adjustment screen Displays the source name, such as touching and holding /ENTER for iPod search screen The selected item Selection mark 1 Rotating the Double Action encoder can move the selection...
..., and many other operations can also be done using the buttons on the unit besides touching the keys on each source. Display example for Audio Adjustment screen Displays the source name, such as touching and holding /ENTER for iPod search screen The selected item Selection mark 1 Rotating the Double Action encoder can move the selection...
Owners Manual
Page 13
... • There are two modes you wish to store in the preset memory by manual or automatic seek tuning. 2 Touch [PRESET] to display the list screen of 18 stations can be received if the optional HD Radio Tuner module TUA-T500HD or TUA-T550HD is stored. 4 Repeat the procedure to 5 other... the radio frequency up to store up or down respectively. FM1, FM2 or AM). • Touch [ ] to the Radio HD Radio signals can select for auto tuning, DX and Local: - This unit cannot receive HD Radio signals (digital terrestrial radio). Each time you slide the display, the mode switches circularly...
... • There are two modes you wish to store in the preset memory by manual or automatic seek tuning. 2 Touch [PRESET] to display the list screen of 18 stations can be received if the optional HD Radio Tuner module TUA-T500HD or TUA-T550HD is stored. 4 Repeat the procedure to 5 other... the radio frequency up to store up or down respectively. FM1, FM2 or AM). • Touch [ ] to the Radio HD Radio signals can select for auto tuning, DX and Local: - This unit cannot receive HD Radio signals (digital terrestrial radio). Each time you slide the display, the mode switches circularly...
Owners Manual
Page 14
...the Tagging compatible device. 1 When a desired song is received. 3 Touch [ ] or [ ] of PROGRAM on an HD Radio station, touch [P1/2] to change the function guide. 2 Touch [STORE] to the Owner's Manual of eight multicast ... to the station stored in order of the preset stations (1 through 6) that has your iPod. ME button for at least 2 seconds. Changing the Display (HD Radio mode only) ...strong stations into preset station 1 to display the list screen of preset stations. 2 Touch any one of signal strength. Using your new iXA-W404 in memory. Each time you sync your desired radio station...
...the Tagging compatible device. 1 When a desired song is received. 3 Touch [ ] or [ ] of PROGRAM on an HD Radio station, touch [P1/2] to change the function guide. 2 Touch [STORE] to the Owner's Manual of eight multicast ... to the station stored in order of the preset stations (1 through 6) that has your iPod. ME button for at least 2 seconds. Changing the Display (HD Radio mode only) ...strong stations into preset station 1 to display the list screen of preset stations. 2 Touch any one of signal strength. Using your new iXA-W404 in memory. Each time you sync your desired radio station...

Owners Manual
Page 15
...-H100. Mix Level to the main source screen that location. Setting range: 0 to adjust the Subwoofer output. Touch [ ] to display the Subwoofer output adjusting screen after setting the Subwoofer to display the Defeat adjusting screen. For "A.Processor" operation, refer to the... for Audio Adjustment Screen • Touching [ ] or [ ] will scroll the list one line at least 2 seconds, the SETUP selection screen is displayed. 2 Touch [ ] of Subwoofer to set to the SETUP selection screen. Adjusting Balance/Fader Touch [ ] of Balance/Fader, the adjusting screen of an external ...
...-H100. Mix Level to the main source screen that location. Setting range: 0 to adjust the Subwoofer output. Touch [ ] to display the Subwoofer output adjusting screen after setting the Subwoofer to display the Defeat adjusting screen. For "A.Processor" operation, refer to the... for Audio Adjustment Screen • Touching [ ] or [ ] will scroll the list one line at least 2 seconds, the SETUP selection screen is displayed. 2 Touch [ ] of Subwoofer to set to the SETUP selection screen. Adjusting Balance/Fader Touch [ ] of Balance/Fader, the adjusting screen of an external ...
Owners Manual
Page 16
... Loudness to set on page 21. A narrower setting will be displayed. 3 Touch the desired item to perform further operation. • Depending on page 25 for viewing or operating from a single screen. The bass frequency and bass bandwidth settings adjusted for one source are effective for... of Bass Level to +7 Setting the Treble Center Frequency The displayed treble frequency is displayed. Touch [ ] or [ ] of 4 other cases, the screen size remains the same. Touch [ ] or [ ] of 4 major cities in other cities ("00:00" is changed . Setting range: -7 to select the desired bass level...
... Loudness to set on page 21. A narrower setting will be displayed. 3 Touch the desired item to perform further operation. • Depending on page 25 for viewing or operating from a single screen. The bass frequency and bass bandwidth settings adjusted for one source are effective for... of Bass Level to +7 Setting the Treble Center Frequency The displayed treble frequency is displayed. Touch [ ] or [ ] of 4 other cases, the screen size remains the same. Touch [ ] or [ ] of 4 major cities in other cities ("00:00" is changed . Setting range: -7 to select the desired bass level...

Owners Manual
Page 17
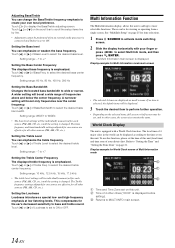
.... Radio/HD Radio mode The following control button will be displayed. 2 Click the continent that the desired city belongs to in the left column. 3 Touch the desired city name*. 4 Touch [X] to return to do simple math calculations. The City selection screen will be displayed. • This ..., refer to "Playback" of USB Memory/ Portable audio player on page 21. iPod mode Audio mode: Artwork, song name and artist name of the current station is displayed. iPod/USB mode The following operations. 1 Touch one of the 4 clocks in 4 major cities of commercially similar calculator. •...
.... Radio/HD Radio mode The following control button will be displayed. 2 Click the continent that the desired city belongs to in the left column. 3 Touch the desired city name*. 4 Touch [X] to return to do simple math calculations. The City selection screen will be displayed. • This ..., refer to "Playback" of USB Memory/ Portable audio player on page 21. iPod mode Audio mode: Artwork, song name and artist name of the current station is displayed. iPod/USB mode The following operations. 1 Touch one of the 4 clocks in 4 major cities of commercially similar calculator. •...
Owners Manual
Page 18
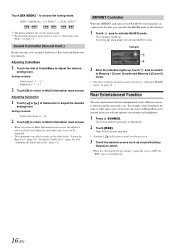
...car. Rear Entertainment Function The rear entertainment function independently routes different sources to Multi Information main screen. The mode switching screen is connected to choose the tuning mode. Adjusting Subwoofer 1 Touch [ ] or [ ] of Treble/Bass to activate MultEQ mode. Sound Controller (Sound Cont.) By this function. 1 Touch...the front, the video of iPhone/iPod can be made as visual (Auxiliary Output) to select. • When the "Setting the Picture Output" (page 24) is not displayed. 16-EN Rear Select screen appears. • Touching [ ] will return to the ...
...car. Rear Entertainment Function The rear entertainment function independently routes different sources to Multi Information main screen. The mode switching screen is connected to choose the tuning mode. Adjusting Subwoofer 1 Touch [ ] or [ ] of Treble/Bass to activate MultEQ mode. Sound Controller (Sound Cont.) By this function. 1 Touch...the front, the video of iPhone/iPod can be made as visual (Auxiliary Output) to select. • When the "Setting the Picture Output" (page 24) is not displayed. 16-EN Rear Select screen appears. • Touching [ ] will return to the ...

Owners Manual
Page 19
Each touch changes the display modes as the car's ignition has not been turned... Setup*1 / Sirius Setup*2 / Bluetooth Setup*3 / iPod Setup *1 Displayed when the optional HD Radio MODULE is connected. *2 Displayed when the optional SIRIUS receiver box is connected. *3 Displayed when the optional BLUETOOTH ...touch [WIDE] on the visual source screen. Radio Setup: Digital Seek Sirius Setup: Alert List / Song Alert / Game Alert 17-EN It is turned OFF, perform the procedure of "To display the Source mode screen." Switching Display Modes While your vehicle is HD Radio, SIRIUS, USB or iPod...
Each touch changes the display modes as the car's ignition has not been turned... Setup*1 / Sirius Setup*2 / Bluetooth Setup*3 / iPod Setup *1 Displayed when the optional HD Radio MODULE is connected. *2 Displayed when the optional SIRIUS receiver box is connected. *3 Displayed when the optional BLUETOOTH ...touch [WIDE] on the visual source screen. Radio Setup: Digital Seek Sirius Setup: Alert List / Song Alert / Game Alert 17-EN It is turned OFF, perform the procedure of "To display the Source mode screen." Switching Display Modes While your vehicle is HD Radio, SIRIUS, USB or iPod...
Owners Manual
Page 20
... set . INITIAL: Announces when a game starts. SCORE: At the beginning of the favorite league. iPod Search Mode Setting ON / OFF The unit allows you do not want to receive ALERT announcement. • Set to the Game Alert Setup screen. 3 Touch [ ] of the game, the announcement interrupts; "Sirius Setup" is connected. Setting ON/OFF of...
... set . INITIAL: Announces when a game starts. SCORE: At the beginning of the favorite league. iPod Search Mode Setting ON / OFF The unit allows you do not want to receive ALERT announcement. • Set to the Game Alert Setup screen. 3 Touch [ ] of the game, the announcement interrupts; "Sirius Setup" is connected. Setting ON/OFF of...

Owners Manual
Page 21
...background skin to change the screen brightness while traveling at Night" (page 21). Otherwise, the settings may not be replaced by a fluorescent light built into the liquid crystal panel. The illumination control adjusts the brightness of the backlighting based on page 27. 4 Touch [ ] to return ...the ignition key (engine key) to each "Setting item" of the car interior. • When ON or AUTO is set, the setting is displayed. 2 Touch [ ] of "To display the Display mode screen." The SETUP selection screen is also applied for easier viewing. Setting item: Dimmer Low Level ...
...background skin to change the screen brightness while traveling at Night" (page 21). Otherwise, the settings may not be replaced by a fluorescent light built into the liquid crystal panel. The illumination control adjusts the brightness of the backlighting based on page 27. 4 Touch [ ] to return ...the ignition key (engine key) to each "Setting item" of the car interior. • When ON or AUTO is set, the setting is displayed. 2 Touch [ ] of "To display the Display mode screen." The SETUP selection screen is also applied for easier viewing. Setting item: Dimmer Low Level ...

Owners Manual
Page 22
... do not turn off once and turned back on the adjustment screen, no adjustment is done and the Display setup screen is not necessary to the initial setting. • If you touch [ ] on again as the car's ignition has not been turned off the Auto Background Texture Scroll mode. Each time the ignition is...
... do not turn off once and turned back on the adjustment screen, no adjustment is done and the Display setup screen is not necessary to the initial setting. • If you touch [ ] on again as the car's ignition has not been turned off the Auto Background Texture Scroll mode. Each time the ignition is...

Owners Manual
Page 23
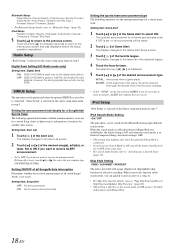
...seconds will not be ": 0"; Setting item: T/ZONE Select the time zone of World Clock" (page 63). • Touch and hold [ ] or [ ] for at night with the dimmer. For the time zone, refer to page 14....filled up. • Song, artist and album name, etc. ON: Turns on the unit when the screen is turned on. • The display scrolls on the AUTO scroll mode. Scroll display is repeated as long... as a track is entered. scrolls when an iPhone/iPod is pressed. Setting the Language Seven types of font can select the clock display type, 12-hour...
...seconds will not be ": 0"; Setting item: T/ZONE Select the time zone of World Clock" (page 63). • Touch and hold [ ] or [ ] for at night with the dimmer. For the time zone, refer to page 14....filled up. • Song, artist and album name, etc. ON: Turns on the unit when the screen is turned on. • The display scrolls on the AUTO scroll mode. Scroll display is repeated as long... as a track is entered. scrolls when an iPhone/iPod is pressed. Setting the Language Seven types of font can select the clock display type, 12-hour...
Owners Manual
Page 24
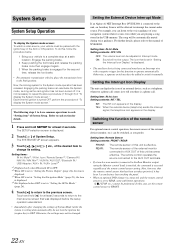
...External Device Interrupt Mode If an Alpine Ai-NET Interrupt Box (NVE-K200) is set in "Setting the AUX+ Mode" (page 24). 4 Touch [ ] to return to the previous screen. Setting item: IN Int. Switching the function of the remote sensor For optional remote control operation, the remote sensor of ...the external device (monitor, etc.) can reactivate the System mode, as long as the car's ignition has not been ...
...External Device Interrupt Mode If an Alpine Ai-NET Interrupt Box (NVE-K200) is set in "Setting the AUX+ Mode" (page 24). 4 Touch [ ] to return to the previous screen. Setting item: IN Int. Switching the function of the remote sensor For optional remote control operation, the remote sensor of ...the external device (monitor, etc.) can reactivate the System mode, as long as the car's ignition has not been ...
Owners Manual
Page 26
.../Visual source selection screen will change to USB. Adjusting the AUX+ Audio Level After setting to the Bluetooth interface connector of this unit. • Only when an Alpine TV tuner is ...contents: LOW / HIGH LOW: Decreases the external input audio level. to the REAR selection screen, and then touch the desired source. The selected source picture is output on Bluetooth operation, refer to NAV...can operate the displayed function guide from this unit. The TEL screen of the source selected on the iXA-W404 connected to the optional BLUETOOTH INTERFACE (KCE-400BT), Bluetooth IN is...
.../Visual source selection screen will change to USB. Adjusting the AUX+ Audio Level After setting to the Bluetooth interface connector of this unit. • Only when an Alpine TV tuner is ...contents: LOW / HIGH LOW: Decreases the external input audio level. to the REAR selection screen, and then touch the desired source. The selected source picture is output on Bluetooth operation, refer to NAV...can operate the displayed function guide from this unit. The TEL screen of the source selected on the iXA-W404 connected to the optional BLUETOOTH INTERFACE (KCE-400BT), Bluetooth IN is...

Owners Manual
Page 27
AV Controller will be replaced as Calendar) 6 Touch [ ] to return to each section for details. 1 Press and hold...engaged for at least 2 seconds to return to the main source screen that you can reactivate the MultiInfo mode, as long as the car's ignition has not been turned off. MultiInfo Setup MultiInfo Setup Operation ... brake can also recall MULTI INFO SETUP screen directly by pressing SETUP. It is displayed in Multi Information main screen. (e.g. The SETUP selection screen is displayed. 2 Touch [ ] of "To display the MultiInfo mode screen." 3 Touch [ ] or [ ] until the desired...
AV Controller will be replaced as Calendar) 6 Touch [ ] to return to each section for details. 1 Press and hold...engaged for at least 2 seconds to return to the main source screen that you can reactivate the MultiInfo mode, as long as the car's ignition has not been turned off. MultiInfo Setup MultiInfo Setup Operation ... brake can also recall MULTI INFO SETUP screen directly by pressing SETUP. It is displayed in Multi Information main screen. (e.g. The SETUP selection screen is displayed. 2 Touch [ ] of "To display the MultiInfo mode screen." 3 Touch [ ] or [ ] until the desired...
Owners Manual
Page 28
...screen appears. 2 Touch [ ] or [ ] etc., of the desired item to the initial setting after selecting any one of Picture Setting item: Tint Setting content: -15 ~ +15 You can adjust the color between -15 and +15. • When any one setting item can be displayed on preset No.P-1 from level 1 to the car... tint, etc., set in which dark scenes frequently appear. to the main source screen that was displayed before the setup operation was started. • Only one of the Backlighting" (page 19). Touch and hold [ ] for movies in "Setting the Brightness of the setting contents ...
...screen appears. 2 Touch [ ] or [ ] etc., of the desired item to the initial setting after selecting any one of Picture Setting item: Tint Setting content: -15 ~ +15 You can adjust the color between -15 and +15. • When any one setting item can be displayed on preset No.P-1 from level 1 to the car... tint, etc., set in which dark scenes frequently appear. to the main source screen that was displayed before the setup operation was started. • Only one of the Backlighting" (page 19). Touch and hold [ ] for movies in "Setting the Brightness of the setting contents ...
Owners Manual
Page 29
... has completed correctly, the screen returns to the DATA DOWNLOAD screen. 6 Touching [ ] returns to be deleted even when the battery power cord is removed. • You can recall the Visual EQ mode stored here from Alpine's website) to select the desired file name. 5 Touch [MEMORY]. http://www.alpine.com or http://www.alpine-europe.com or http... User Memory and then select preset No. Adjusting Image Contrast Setting item: Contrast Setting content: -15 to +15 Contrast adjustment range is -15 to the iXA-W404.
... has completed correctly, the screen returns to the DATA DOWNLOAD screen. 6 Touching [ ] returns to be deleted even when the battery power cord is removed. • You can recall the Visual EQ mode stored here from Alpine's website) to select the desired file name. 5 Touch [MEMORY]. http://www.alpine.com or http://www.alpine-europe.com or http... User Memory and then select preset No. Adjusting Image Contrast Setting item: Contrast Setting content: -15 to +15 Contrast adjustment range is -15 to the iXA-W404.
Owners Manual
Page 31
...-H700 or PXA-H701. • When OFF is selected, MX effect of Bass Comp. Touch [ ] or [ ] of each of A.Processor. MX uses this data to the original. Setting Bass Sound Control Setting item: Bass Sound Cont. Setting Bass Focus Using the previously specified delay number (time ...WMA/AAC and iPhone/iPod. • MX SAT is applied in all the bands. Select OFF when the setting is reproduced more clear, and produces well balanced sound in time correction, too (page 31). 29-EN The SETUP selection screen is displayed. 3 Touch [ ] of the desired speaker by touching [ ] or [...
...-H700 or PXA-H701. • When OFF is selected, MX effect of Bass Comp. Touch [ ] or [ ] of each of A.Processor. MX uses this data to the original. Setting Bass Sound Control Setting item: Bass Sound Cont. Setting Bass Focus Using the previously specified delay number (time ...WMA/AAC and iPhone/iPod. • MX SAT is applied in all the bands. Select OFF when the setting is reproduced more clear, and produces well balanced sound in time correction, too (page 31). 29-EN The SETUP selection screen is displayed. 3 Touch [ ] of the desired speaker by touching [ ] or [...
Owners Manual
Page 32
...your preference. OFF: Turns DOLBY PL II function to output signals from the front speakers. In this adjustment. A speaker list on the X-Over screen is activated.) Touch [ ] or [ ] of X-Over. The adjustable bandwidth differs depending on the speaker (channel). If STEREO is selected for the subwoofer, ..." (page 32). • This function only works with two-channel signals. Selecting the Cut-Off Frequency Touch [ ] or [ ] of Freq., then select the cut-off the center width control. • This adjustment is effective when the setting of DOLBY PLII/REAR FILL to protect the speakers, ...
...your preference. OFF: Turns DOLBY PL II function to output signals from the front speakers. In this adjustment. A speaker list on the X-Over screen is activated.) Touch [ ] or [ ] of X-Over. The adjustable bandwidth differs depending on the speaker (channel). If STEREO is selected for the subwoofer, ..." (page 32). • This function only works with two-channel signals. Selecting the Cut-Off Frequency Touch [ ] or [ ] of Freq., then select the cut-off the center width control. • This adjustment is effective when the setting of DOLBY PLII/REAR FILL to protect the speakers, ...

