
Owner's Manual (english)
Page 3
ENGLISH Contents Operating Instructions WARNING WARNING 6 CAUTION 6 PRECAUTIONS 7 Discs Playable on This Unit 8 Getting Started Accessory List 12 Location of Controls 12 Turning Power On or Off 13 Adjusting the Volume 13 Lowering Volume Quickly 13 How to view the Display 13 TOUCH PANEL operation 13 Recalling the Source 13 Displaying the Numeric Keypad Input Screen 14 Radio Listening to the Radio 15 Presetting Stations Manually 15 Presetting Stations Automatically 15 Tuning to Preset Stations 15 CD/MP3/WMA/AAC...
ENGLISH Contents Operating Instructions WARNING WARNING 6 CAUTION 6 PRECAUTIONS 7 Discs Playable on This Unit 8 Getting Started Accessory List 12 Location of Controls 12 Turning Power On or Off 13 Adjusting the Volume 13 Lowering Volume Quickly 13 How to view the Display 13 TOUCH PANEL operation 13 Recalling the Source 13 Displaying the Numeric Keypad Input Screen 14 Radio Listening to the Radio 15 Presetting Stations Manually 15 Presetting Stations Automatically 15 Tuning to Preset Stations 15 CD/MP3/WMA/AAC...
Owner's Manual (english)
Page 4
... Font 35 Adjusting the Dimmer of Button Lighting at Night 35 4-EN System Setup System Setup Operation 36 Setting the Rear Camera Input 36 Setting the Navigation Mode 37 Setting the Navigation Interruption 37 Setting the AUX Mode 37 Setting the AUX Front Mode 38 Setting the Picture/Sound Output 38 Setting the BLUETOOTH Connection (BLUETOOTH IN 38 BT Hands Free Calling Setup Before Using 39 About BLUETOOTH 39 Before Using Hands-Free Function 39 How to connect to a BLUETOOTH compatible device (Pairing 39 BLUETOOTH Setup 40 BLUETOOTH Setup Operation 40 Hands-Free Phone Control 41...
... Font 35 Adjusting the Dimmer of Button Lighting at Night 35 4-EN System Setup System Setup Operation 36 Setting the Rear Camera Input 36 Setting the Navigation Mode 37 Setting the Navigation Interruption 37 Setting the AUX Mode 37 Setting the AUX Front Mode 38 Setting the Picture/Sound Output 38 Setting the BLUETOOTH Connection (BLUETOOTH IN 38 BT Hands Free Calling Setup Before Using 39 About BLUETOOTH 39 Before Using Hands-Free Function 39 How to connect to a BLUETOOTH compatible device (Pairing 39 BLUETOOTH Setup 40 BLUETOOTH Setup Operation 40 Hands-Free Phone Control 41...
Owner's Manual (english)
Page 7
... Outside (Bumps) Installation Location Make sure the IVE-W530 will be installed in skips, but this unit and never use your Alpine dealer or the nearest Alpine Service Station for the moisture to : • Direct sun and heat • High humidity and water • Excessive dust • Excessive vibrations Correct Handling Do not drop the disc while handling. If the surface is facing up when...
... Outside (Bumps) Installation Location Make sure the IVE-W530 will be installed in skips, but this unit and never use your Alpine dealer or the nearest Alpine Service Station for the moisture to : • Direct sun and heat • High humidity and water • Excessive dust • Excessive vibrations Correct Handling Do not drop the disc while handling. If the surface is facing up when...
Owner's Manual (english)
Page 12
... connected. SOURCE/ ). Rotary encoder/MUTE/AUDIO • Adjust the volume by [ ] (e.g.[BAND]). 12-EN The Bass level*1, Treble level*1, and Subwoofer level*2 can operate this mode. Remote Sensor/Dimmer Sensor • Point the optional remote control transmitter towards the remote sensor within a range of 2 meters. • Senses the brightness of this unit are shown in bold (e.g. Front AUX Input Terminal Connects a portable music player, etc., to the system. Location of Controls DISC Slot button Ejects a disc. (Phone) button • Press to display the Telephone Menu...
... connected. SOURCE/ ). Rotary encoder/MUTE/AUDIO • Adjust the volume by [ ] (e.g.[BAND]). 12-EN The Bass level*1, Treble level*1, and Subwoofer level*2 can operate this mode. Remote Sensor/Dimmer Sensor • Point the optional remote control transmitter towards the remote sensor within a range of 2 meters. • Senses the brightness of this unit are shown in bold (e.g. Front AUX Input Terminal Connects a portable music player, etc., to the system. Location of Controls DISC Slot button Ejects a disc. (Phone) button • Press to display the Telephone Menu...
Owner's Manual (english)
Page 13
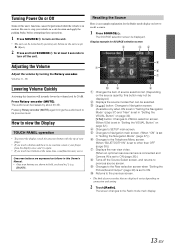
... Radio mode display on connection and setting 2 Touch [Radio]. Onscreen buttons are shown in bold, enclosed in this function will instantly lower the volume level by about 20 dB. Recalling the Source Here is an example explanation for SOURCE selection screen Adjusting the Volume Adjust the volume by pressing any button on page 32.) Changes to turn on the unit. • The unit can be turned on by turning the Rotary encoder. Volume: 0 - 35 Lowering Volume Quickly Activating...
... Radio mode display on connection and setting 2 Touch [Radio]. Onscreen buttons are shown in bold, enclosed in this function will instantly lower the volume level by about 20 dB. Recalling the Source Here is an example explanation for SOURCE selection screen Adjusting the Volume Adjust the volume by pressing any button on page 32.) Changes to turn on the unit. • The unit can be turned on by turning the Rotary encoder. Volume: 0 - 35 Lowering Volume Quickly Activating...
Owner's Manual (english)
Page 15
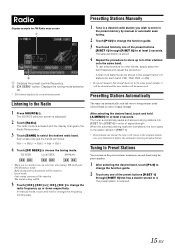
... FM Radio main screen Displays the preset number/frequency. [DX SEEK]* button: Displays the tuning mode selection list. * The button displays the current tuning mode. The selected station is DX. 5 Touch [ ], [ ] or [ ], [ ] to change the function guide. 2 Touch any one of signal strength. Presetting Stations Automatically The tuner can select for at least 2 seconds. Both strong and weak stations will be memorized. A total of 24 stations can tune in the preset stations in the preset memory by manual or automatic seek tuning. 2 Touch...
... FM Radio main screen Displays the preset number/frequency. [DX SEEK]* button: Displays the tuning mode selection list. * The button displays the current tuning mode. The selected station is DX. 5 Touch [ ], [ ] or [ ], [ ] to change the function guide. 2 Touch any one of signal strength. Presetting Stations Automatically The tuner can select for at least 2 seconds. Both strong and weak stations will be memorized. A total of 24 stations can tune in the preset stations in the preset memory by manual or automatic seek tuning. 2 Touch...
Owner's Manual (english)
Page 19
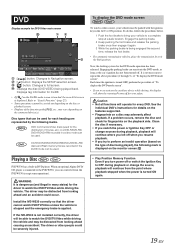
... a video mode can be used for the driver to watch a video source, your vehicle to full screen. Caution • Not all functions will operate for DivX®. • If [ ] on the type of "To display the DVD mode screen". • If you turn power off or switch the Ignition Key to activate the auxiliary device while driving, the display will continue from the IVE-W530 (except some operations). Displays tag information for every DVD. To display the DVD mode screen...
... a video mode can be used for the driver to watch a video source, your vehicle to full screen. Caution • Not all functions will operate for DivX®. • If [ ] on the type of "To display the DVD mode screen". • If you turn power off or switch the Ignition Key to activate the auxiliary device while driving, the display will continue from the IVE-W530 (except some operations). Displays tag information for every DVD. To display the DVD mode screen...
Owner's Manual (english)
Page 20
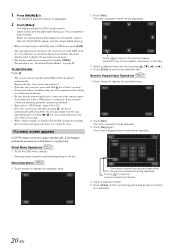
... connected, insert a disc into the unit and stopped. Menu Operations 1 Touch screen to display the operation keys. 2 Touch [Key]. Touch [ ] to confirm the selected item. Insert a disc with the label side facing up. When an optical Alpine DVD player is automatically pulled back into the DVD/CD player, and the player starts playing. * When you want to the remote output lead of a double-sided DVD will be used. cannot be displayed. Numeric Keypad Input Operations...
... connected, insert a disc into the unit and stopped. Menu Operations 1 Touch screen to display the operation keys. 2 Touch [Key]. Touch [ ] to confirm the selected item. Insert a disc with the label side facing up. When an optical Alpine DVD player is automatically pulled back into the DVD/CD player, and the player starts playing. * When you want to the remote output lead of a double-sided DVD will be used. cannot be displayed. Numeric Keypad Input Operations...
Owner's Manual (english)
Page 26
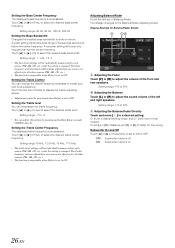
... changed . The bass frequency and bass band width settings adjusted for one source are effective for fine-tuning. Touch [ ] or [ ] of Freq. to ON. A narrower setting will be individually memorized for Balance/Fader Screen A Adjusting the Fader Touch [F] or [R] to adjust the volume of Level to select the desired bass band width. Setting range: 1, 1.25, 1.5, 2 • The bass level settings will boost a wide range of Subwoofer to set to ON. Setting the Treble Center Frequency The displayed treble frequency...
... changed . The bass frequency and bass band width settings adjusted for one source are effective for fine-tuning. Touch [ ] or [ ] of Freq. to ON. A narrower setting will be individually memorized for Balance/Fader Screen A Adjusting the Fader Touch [F] or [R] to adjust the volume of Level to select the desired bass band width. Setting range: 1, 1.25, 1.5, 2 • The bass level settings will boost a wide range of Subwoofer to set to ON. Setting the Treble Center Frequency The displayed treble frequency...
Owner's Manual (english)
Page 32
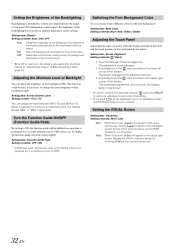
... the car ambient lighting for easier viewing. Setting item: Function Guide Fade Setting contents: OFF / ON • In DVD play mode, the function guide will appear on the touch panel do not match. Turn the Function Guide ON/OFF (Function Guide Fade) By setting to the adjustment screen. 3 Accurately touch the mark provided in "Adjusting the Dimmer of the backlight (LOW). Switching the Font Background Color You can adjust the brightness of Button Lighting at night. The screen changes to...
... the car ambient lighting for easier viewing. Setting item: Function Guide Fade Setting contents: OFF / ON • In DVD play mode, the function guide will appear on the touch panel do not match. Turn the Function Guide ON/OFF (Function Guide Fade) By setting to the adjustment screen. 3 Accurately touch the mark provided in "Adjusting the Dimmer of the backlight (LOW). Switching the Font Background Color You can adjust the brightness of Button Lighting at night. The screen changes to...

Owner's Manual (english)
Page 34
... turned on the main screen. Otherwise, the settings may not be stored. 2 After selecting a preset No., touch [L-Memory]. Adjusting Image Contrast Setting item: Contrast Setting content: -15 to OFF. Setting items: Clock / Clock Mode*1 / Clock Adjust*1 / Summer Time*1 / Demonstration / Beep / Beep Level*2 / Auto Scroll / Language Sel. / Dimmer Level*3 *1 Displayed only when "Clock" is set to "ON". *2 When Beep is ON, the item is displayed. *3 Not displayed when "OFF" is set to be changed. The adjusted Visual EQ mode is connected...
... turned on the main screen. Otherwise, the settings may not be stored. 2 After selecting a preset No., touch [L-Memory]. Adjusting Image Contrast Setting item: Contrast Setting content: -15 to OFF. Setting items: Clock / Clock Mode*1 / Clock Adjust*1 / Summer Time*1 / Demonstration / Beep / Beep Level*2 / Auto Scroll / Language Sel. / Dimmer Level*3 *1 Displayed only when "Clock" is set to "ON". *2 When Beep is ON, the item is displayed. *3 Not displayed when "OFF" is set to be changed. The adjusted Visual EQ mode is connected...
Owner's Manual (english)
Page 36
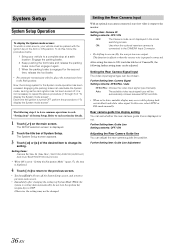
..., select NTSC or PAL mode manually. Mix* / AUX1 IN / AUX2 IN / AUX Front / AUX Out / BLUETOOTH IN / Illumi Color * When ON is set in the mode switching screen. Setting the Rear Camera Signal Input The video input signal type can be chosen. Further Setting item: Guide Line Adjustment 36-EN Refer to each "Setting item" of System Mode (While the system is displayed or not. Setting items: Camera IN / Nav. Setting item: Camera IN Setting...
..., select NTSC or PAL mode manually. Mix* / AUX1 IN / AUX2 IN / AUX Front / AUX Out / BLUETOOTH IN / Illumi Color * When ON is set in the mode switching screen. Setting the Rear Camera Signal Input The video input signal type can be chosen. Further Setting item: Guide Line Adjustment 36-EN Refer to each "Setting item" of System Mode (While the system is displayed or not. Setting items: Camera IN / Nav. Setting item: Camera IN Setting...
Owner's Manual (english)
Page 37
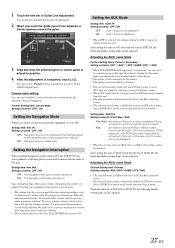
... and Rear selection screen. • The selected source name is displayed instead of this unit. A DVD player etc., with the radio or CD play. Further Setting item: Camera Mute Setting Contents: OFF / ON Setting the Navigation Mode When you cannot set to DTV. Setting item: Nav. The settings related to the navigation can not be changed from this item to the default adjustment. See "Adjusting Nav. The voice prompt volume is not displayed. AUX-1 source is displayed...
... and Rear selection screen. • The selected source name is displayed instead of this unit. A DVD player etc., with the radio or CD play. Further Setting item: Camera Mute Setting Contents: OFF / ON Setting the Navigation Mode When you cannot set to DTV. Setting item: Nav. The settings related to the navigation can not be changed from this item to the default adjustment. See "Adjusting Nav. The voice prompt volume is not displayed. AUX-1 source is displayed...
Owner's Manual (english)
Page 38
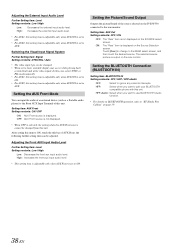
... input audio level. Adjusting the Front AUX Input Audio Level Further Setting item: Level Setting contents: Low / High Low: Decreases the front aux input audio level. Setting the Picture/Sound Output Outputs the picture/Sound of this unit. Setting the AUX Front Mode You can input the audio of an external device (such as a Portable audio player) to the Front AUX Input Terminal of the source selected on the IVE-W530 connected to the rear monitor. OFF: AUX Front source is not displayed. • When OFF is not displayed on the Source Selection screen. Setting...
... input audio level. Adjusting the Front AUX Input Audio Level Further Setting item: Level Setting contents: Low / High Low: Decreases the front aux input audio level. Setting the Picture/Sound Output Outputs the picture/Sound of this unit. Setting the AUX Front Mode You can input the audio of an external device (such as a Portable audio player) to the Front AUX Input Terminal of the source selected on the IVE-W530 connected to the rear monitor. OFF: AUX Front source is not displayed. • When OFF is not displayed on the Source Selection screen. Setting...

Owner's Manual (english)
Page 39
... Setup Before Using About BLUETOOTH BLUETOOTH is within 10 meters. Before Using Hands-Free Function Before using a hands-free phone, it must be paired with SSP (Secure Simple Pairing), a message "Connect/(Security Code)/Yes/No" will automatically connect to the Owner's Manual of the BLUETOOTH compatible device. 1 Set a BLUETOOTH connection from this unit. • Proper function of the BT compatible device, consult your car in a safe place. • Depending on the control from a BLUETOOTH compatible device, refer to the previously connected device. However, the connection...
... Setup Before Using About BLUETOOTH BLUETOOTH is within 10 meters. Before Using Hands-Free Function Before using a hands-free phone, it must be paired with SSP (Secure Simple Pairing), a message "Connect/(Security Code)/Yes/No" will automatically connect to the Owner's Manual of the BLUETOOTH compatible device. 1 Set a BLUETOOTH connection from this unit. • Proper function of the BT compatible device, consult your car in a safe place. • Depending on the control from a BLUETOOTH compatible device, refer to the previously connected device. However, the connection...

Owner's Manual (english)
Page 41
... input volume level. Disables recognition of speakers in the Phone Book (Shortcut Dial)" on , the call . When a call . Setting item: Speaker Select All: F-L: F-R: F-LR: The sound outputs from all of this unit from the BLUETOOTH compatible device. Adjust the setting before placing a call is set whether this unit. • Avoid performing a hands-free call in a noisy location, difficulty hearing the other product specifications, as well as shortcut dial, refer to OFF. Displaying the firmware...
... input volume level. Disables recognition of speakers in the Phone Book (Shortcut Dial)" on , the call . When a call . Setting item: Speaker Select All: F-L: F-R: F-LR: The sound outputs from all of this unit from the BLUETOOTH compatible device. Adjust the setting before placing a call is set whether this unit. • Avoid performing a hands-free call in a noisy location, difficulty hearing the other product specifications, as well as shortcut dial, refer to OFF. Displaying the firmware...

Owner's Manual (english)
Page 43
... some time for the list to be displayed, and also directly after connection, the list may not be performed. Dialing a Number in Received Calls History Telephone numbers from the Dialed Calls list. The call directly from the paired mobile phone, the phone number is recorded for Telephone Menu screen • During SOURCE selection screen, you can redial a number by searching here. Dialing a Number in Missed Calls History Telephone numbers for making...
... some time for the list to be displayed, and also directly after connection, the list may not be performed. Dialing a Number in Received Calls History Telephone numbers from the Dialed Calls list. The call directly from the paired mobile phone, the phone number is recorded for Telephone Menu screen • During SOURCE selection screen, you can redial a number by searching here. Dialing a Number in Missed Calls History Telephone numbers for making...
Owner's Manual (english)
Page 47
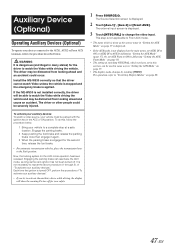
... activate your auxiliary devices". • If you have set in this , follow the procedure described below . 1 Bring your auxiliary devices". The Source Selection screen is applied. Install the IVE-W530 correctly so that the driver cannot watch the Video while driving the vehicle and may be distracted from looking ahead and an accident could be parked with the ignition key in many states) for the AUX mode operation...
... activate your auxiliary devices". • If you have set in this , follow the procedure described below . 1 Bring your auxiliary devices". The Source Selection screen is applied. Install the IVE-W530 correctly so that the driver cannot watch the Video while driving the vehicle and may be distracted from looking ahead and an accident could be parked with the ignition key in many states) for the AUX mode operation...
Owner's Manual (english)
Page 55
... mounting of the unit. - Check the connections with a new one. replace the antenna or cable if necessary. Radio Unable to fast forward or reverse the disc. • The disc has been damaged. - make sure the rest of your nearest ALPINE dealer. 55-EN Make sure the antenna is being inserted following checklist. Unable to receive stations. • No antenna, or open connection in the antenna cable. - Eject the disc and remove it...
... mounting of the unit. - Check the connections with a new one. replace the antenna or cable if necessary. Radio Unable to fast forward or reverse the disc. • The disc has been damaged. - make sure the rest of your nearest ALPINE dealer. 55-EN Make sure the antenna is being inserted following checklist. Unable to receive stations. • No antenna, or open connection in the antenna cable. - Eject the disc and remove it...
Owner's Manual (english)
Page 65
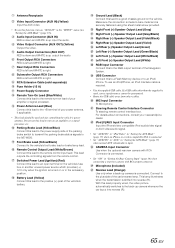
... "Setting the AUX Mode" (page 37) when an iPhone or a video compatible iPod is connected. • Set "AUX2 IN" to the IVE-W530. Rear Output RCA Connectors RED is left and WHITE is required. • Use the supplied USB cable. RCA Extension Cable (sold separately) Fuse Holder (15 A) Power Supply Connector Remote Turn-On Lead (Blue/White) Connect this lead properly wired, the video picture automatically switches to the positive (+) post of the vehicle's battery. Parking Brake Lead (Yellow/Blue) Connect...
... "Setting the AUX Mode" (page 37) when an iPhone or a video compatible iPod is connected. • Set "AUX2 IN" to the IVE-W530. Rear Output RCA Connectors RED is left and WHITE is required. • Use the supplied USB cable. RCA Extension Cable (sold separately) Fuse Holder (15 A) Power Supply Connector Remote Turn-On Lead (Blue/White) Connect this lead properly wired, the video picture automatically switches to the positive (+) post of the vehicle's battery. Parking Brake Lead (Yellow/Blue) Connect...


