Owners Manual
Page 3
...16 Sound Setting Adjusting Bass/Treble/ Balance (Between Left and Right)/ Fader (Between Front and Rear 18 Setting the MX mode 18 Equalizer Presets 19 Setting the Subwoofer 19 Operating the External Audio Processor ........ 19 SETUP Bluetooth Setting Setting the Bluetooth Connection 20 General Setting Setting the Clock Display (Clock Mode) .........20 Setting of Calendar Display Pattern Switching (Calendar Type 20 Setting Daylight Saving Time (Summer Time 20 Connecting an MP3 Changer (Play Mode) ......20 Sound (Beep) Guide Function 21 Turning Mute Mode On/Off (Int Mute 21 Setting Tone...
...16 Sound Setting Adjusting Bass/Treble/ Balance (Between Left and Right)/ Fader (Between Front and Rear 18 Setting the MX mode 18 Equalizer Presets 19 Setting the Subwoofer 19 Operating the External Audio Processor ........ 19 SETUP Bluetooth Setting Setting the Bluetooth Connection 20 General Setting Setting the Clock Display (Clock Mode) .........20 Setting of Calendar Display Pattern Switching (Calendar Type 20 Setting Daylight Saving Time (Summer Time 20 Connecting an MP3 Changer (Play Mode) ......20 Sound (Beep) Guide Function 21 Turning Mute Mode On/Off (Int Mute 21 Setting Tone...
Owners Manual
Page 4
Display Setting Changing Lighting Color (Illumination 22 Dimmer Control 22 Setting the Display Dimmer (Dimmer Level 22 Scroll Setting (Text Scroll 22 Switching the Display Type (BGV Select) ...... 22 Downloading the Wallpaper (BGV Download 22 iPod Setting iPod Search Mode Setting 22 HD Radio Setting (Only when HD Radio is connected) HD Radio Station Call Setting 22 Digital Seek On/Off Setting 22 SAT Radio Receiver (Optional) How to View the Display 23 Receiving Channels with the SAT Radio Receiver (Optional 23 Checking the SAT Radio ID Number 24 Storing Channel Presets 24 Receiving...
Display Setting Changing Lighting Color (Illumination 22 Dimmer Control 22 Setting the Display Dimmer (Dimmer Level 22 Scroll Setting (Text Scroll 22 Switching the Display Type (BGV Select) ...... 22 Downloading the Wallpaper (BGV Download 22 iPod Setting iPod Search Mode Setting 22 HD Radio Setting (Only when HD Radio is connected) HD Radio Station Call Setting 22 Digital Seek On/Off Setting 22 SAT Radio Receiver (Optional) How to View the Display 23 Receiving Channels with the SAT Radio Receiver (Optional 23 Checking the SAT Radio ID Number 24 Storing Channel Presets 24 Receiving...

Owners Manual
Page 5
... PANELS. MINIMIZE DISPLAY VIEWING WHILE DRIVING. HALT USE IMMEDIATELY IF A PROBLEM APPEARS. Installation Location Make sure the iDA-X001 will not be installed in a location subjected to: • Direct sun and heat • High humidity and water • Excessive dust • Excessive vibrations Protecting the USB connector • Only an iPod or USB memory can be played back on the unit is used, be connected to the USB connector on the connected USB memory device, the unit may not function...
... PANELS. MINIMIZE DISPLAY VIEWING WHILE DRIVING. HALT USE IMMEDIATELY IF A PROBLEM APPEARS. Installation Location Make sure the iDA-X001 will not be installed in a location subjected to: • Direct sun and heat • High humidity and water • Excessive dust • Excessive vibrations Protecting the USB connector • Only an iPod or USB memory can be played back on the unit is used, be connected to the USB connector on the connected USB memory device, the unit may not function...
Owners Manual
Page 8
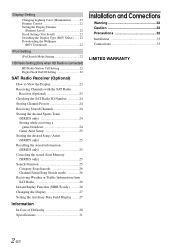
...; Digital Media receiver 1 • Power cable 1 • Mounting sleeve 1 • Carrying case 1 • Front frame 1 • Bracket key 2 • Screw (M5x8 4 • USB cable 1 • iPod Dock interface cable 1 • Owner's Manual 1 set Turning Power On and Off Press SOURCE/ to turn off the unit power. 2 Press (Release) to avoid pushing any buttons by pressing any other button except (Release) and VIEW. Press and hold SOURCE/ for the first time, after changing the car battery, etc. 1 Turn...
...; Digital Media receiver 1 • Power cable 1 • Mounting sleeve 1 • Carrying case 1 • Front frame 1 • Bracket key 2 • Screw (M5x8 4 • USB cable 1 • iPod Dock interface cable 1 • Owner's Manual 1 set Turning Power On and Off Press SOURCE/ to turn off the unit power. 2 Press (Release) to avoid pushing any buttons by pressing any other button except (Release) and VIEW. Press and hold SOURCE/ for the first time, after changing the car battery, etc. 1 Turn...
Owners Manual
Page 9
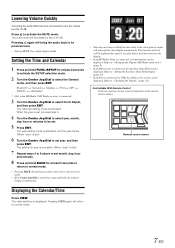
... the display. • If an HD Radio Tuner is connected via USB, the album cover screen can be displayed. Remote control sensor Displaying the Calendar/Time Press VIEW. Bluetooth General Display iPod XM* SIRIUS* HD Radio* * Only when HD Radio / SAT Radio receiver is connected. 3 Turn the Center Jog Dial to "Setting the Auxiliary Data Field Display" (page 27). • If an iPod is connected, text information can be displayed. Refer to select Clock Adjust, and then press ENT. The function selected will...
... the display. • If an HD Radio Tuner is connected via USB, the album cover screen can be displayed. Remote control sensor Displaying the Calendar/Time Press VIEW. Bluetooth General Display iPod XM* SIRIUS* HD Radio* * Only when HD Radio / SAT Radio receiver is connected. 3 Turn the Center Jog Dial to "Setting the Auxiliary Data Field Display" (page 27). • If an iPod is connected, text information can be displayed. Refer to select Clock Adjust, and then press ENT. The function selected will...
Owners Manual
Page 10
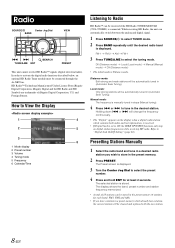
.... How to View the Display 1 4 2 5 3 6 1 Mode display 2 Preset number 3 Volume 4 Tuning mode 5 Frequency 6 Calendar/Time Listening to ON, the SEEK UP/DOWN functions only stop on digital station frequencies while receiving HD radio. The selected station is Distance mode. While receiving HD Radio, the unit can be automatically tuned in (Automatic Seek Tuning). Local mode: Only strong stations will be stored in a preset memory which contains both audio and text information, is received. • If Digital Seek is connected. Refer to select TUNER mode. 2 Press BAND...
.... How to View the Display 1 4 2 5 3 6 1 Mode display 2 Preset number 3 Volume 4 Tuning mode 5 Frequency 6 Calendar/Time Listening to ON, the SEEK UP/DOWN functions only stop on digital station frequencies while receiving HD radio. The selected station is Distance mode. While receiving HD Radio, the unit can be automatically tuned in (Automatic Seek Tuning). Local mode: Only strong stations will be stored in a preset memory which contains both audio and text information, is received. • If Digital Seek is connected. Refer to select TUNER mode. 2 Press BAND...
Owners Manual
Page 11
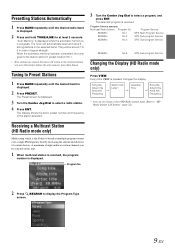
....8 Program Service MPS: Main Program Service SPS: Sub-program Service SPS: Sub-program Service SPS: Sub-program Service Changing the Display (HD Radio mode only) Press VIEW. A maximum of signal strength. The tuner will return to the original station you were listening to "HD Radio Station Call Setting" (page 22). They will be selected on this unit. 1 When multicast station is received, the program number is displayed. Presetting Stations Automatically 1 Press BAND repeatedly until the desired band is displayed. 2 Press PRESET. The Preset screen is displayed. 3 Turn the...
....8 Program Service MPS: Main Program Service SPS: Sub-program Service SPS: Sub-program Service SPS: Sub-program Service Changing the Display (HD Radio mode only) Press VIEW. A maximum of signal strength. The tuner will return to the original station you were listening to "HD Radio Station Call Setting" (page 22). They will be selected on this unit. 1 When multicast station is received, the program number is displayed. Presetting Stations Automatically 1 Press BAND repeatedly until the desired band is displayed. 2 Press PRESET. The Preset screen is displayed. 3 Turn the...
Owners Manual
Page 20
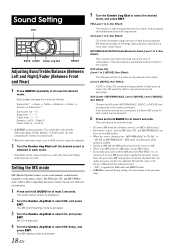
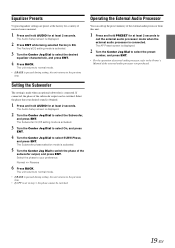
...", MX-mode switching may not match the head unit, the audio processor needs to reproduce a more clearly. (Level 3 (MUSIC), Non Effect): A DVD or Video CD contains a large quantity of data such as FM radio, CD, and MP3/WMA/AAC can be adjusted. Setting the MX mode MX (Media Xpander) makes vocals or instruments sound distinct regardless of data during setting, the unit returns to the music source. The FM radio, CD...
...", MX-mode switching may not match the head unit, the audio processor needs to reproduce a more clearly. (Level 3 (MUSIC), Non Effect): A DVD or Video CD contains a large quantity of data such as FM radio, CD, and MP3/WMA/AAC can be adjusted. Setting the MX mode MX (Media Xpander) makes vocals or instruments sound distinct regardless of data during setting, the unit returns to the music source. The FM radio, CD...
Owners Manual
Page 21
... subwoofer is activated. 5 Turn the Center Jog Dial to the Owner's Manual of the external audio processor you purchased. Operating the External Audio Processor You can be switched. 19-EN If connected, the phase of the subwoofer output can call the external audio processor mode when the external audio processor is set in step 3, the phase cannot be switched. The Audio Setup screen is displayed. 2 Turn the Center Jog Dial to select the preset number...
... subwoofer is activated. 5 Turn the Center Jog Dial to the Owner's Manual of the external audio processor you purchased. Operating the External Audio Processor You can be switched. 19-EN If connected, the phase of the subwoofer output can call the external audio processor mode when the external audio processor is set in step 3, the phase cannot be switched. The Audio Setup screen is displayed. 2 Turn the Center Jog Dial to select the preset number...
Owners Manual
Page 22
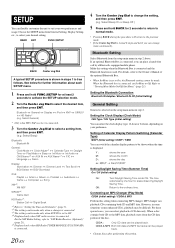
... "Turning Mute Mode On/Off (Int Mute)" (page 21). Make this setting when connecting MP3 changer. When the Bluetooth box is used. Refer to the ordinary time. Select Beep) Bluetooth: Bluetooth IN General: Clock Mode Clock Adjust*1 Calendar Type Daylight Time Play Mode Beep Int Mute Int Audio CHG Name*2 AUX IN AUX Name*3 P.IC Language Demo Display: Illumination BGV Select Dimmer Dimmer Level BGV Download Text Scroll iPod: Playlist Genre Artist Album Podcast Composer Song Audiobook XM*4: XM ADF SIRIUS*4: Game Alert HD Radio*5: Station...
... "Turning Mute Mode On/Off (Int Mute)" (page 21). Make this setting when connecting MP3 changer. When the Bluetooth box is used. Refer to the ordinary time. Select Beep) Bluetooth: Bluetooth IN General: Clock Mode Clock Adjust*1 Calendar Type Daylight Time Play Mode Beep Int Mute Int Audio CHG Name*2 AUX IN AUX Name*3 P.IC Language Demo Display: Illumination BGV Select Dimmer Dimmer Level BGV Download Text Scroll iPod: Playlist Genre Artist Album Podcast Composer Song Audiobook XM*4: XM ADF SIRIUS*4: Game Alert HD Radio*5: Station...
Owners Manual
Page 23
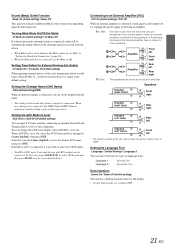
... Rear right The speakers are used to drive an external amplifier connected to the speakers. Sound (Beep) Guide Function Beep On (Initial setting) / Beep Off This function will give audible feedback with RCA output can change the AUX name display when AUX IN is set to Adapter, Int Mute cannot be connected. Refer to "Setting the Bluetooth Connection" (page 20). • When the Bluetooth box is connected, sound quality can input TV/video sound by the system when the power output is output...
... Rear right The speakers are used to drive an external amplifier connected to the speakers. Sound (Beep) Guide Function Beep On (Initial setting) / Beep Off This function will give audible feedback with RCA output can change the AUX name display when AUX IN is set to Adapter, Int Mute cannot be connected. Refer to "Setting the Bluetooth Connection" (page 20). • When the Bluetooth box is connected, sound quality can input TV/video sound by the system when the power output is output...
Owners Manual
Page 24
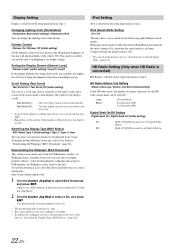
... Song/ Title" (page 11). Dimmer Control Dimmer On / Dimmer Off (Initial setting) Set the Dimmer control to On to decrease the illumination brightness of display characters for the HD radio station name can set . https://i-personalize.alpine.com/ 1 Turn the Center Jog Dial to "Downloading the Wallpaper (BGV Download)" (page 22). Switching the Display Type (BGV Select) BGV Select Type 1 (Initial setting) / Type 2 / Type 3 / User You can change the lighting color of the vehicle ON...
... Song/ Title" (page 11). Dimmer Control Dimmer On / Dimmer Off (Initial setting) Set the Dimmer control to On to decrease the illumination brightness of display characters for the HD radio station name can set . https://i-personalize.alpine.com/ 1 Turn the Center Jog Dial to "Downloading the Wallpaper (BGV Download)" (page 22). Switching the Display Type (BGV Select) BGV Select Type 1 (Initial setting) / Type 2 / Type 3 / User You can change the lighting color of the vehicle ON...
Owners Manual
Page 25
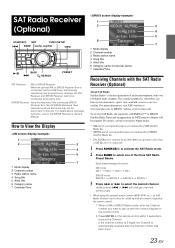
... are operative only when a SAT Receiver is connected. 1 Press SOURCE/ to activate the SAT Radio mode. 2 Press BAND to receive the Channel. To receive SAT Radio, the separately sold XMDirect™ or SIRIUS Satellite Radio Tuner and an appropriate Ai-NET Interface Adapter will change channels continuously. • When using the optional remote control (RUE-4190, etc.), an SAT Radio Channel can hear crystal-clear music, sports, news and talk, coast-to View the Display 1 2 3 4 5 6 7 1 Mode display 2 Channel number 3 Radio station name...
... are operative only when a SAT Receiver is connected. 1 Press SOURCE/ to activate the SAT Radio mode. 2 Press BAND to receive the Channel. To receive SAT Radio, the separately sold XMDirect™ or SIRIUS Satellite Radio Tuner and an appropriate Ai-NET Interface Adapter will change channels continuously. • When using the optional remote control (RUE-4190, etc.), an SAT Radio Channel can hear crystal-clear music, sports, news and talk, coast-to View the Display 1 2 3 4 5 6 7 1 Mode display 2 Channel number 3 Radio station name...
Owners Manual
Page 30
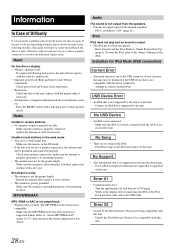
... the following instructions, the unit will help you encounter a problem, please turn the power off . - Unable to this unit and the iPod. P.IC is switched to "Initial System Start-Up" (page 6). If the unit is still not functioning normally, please review the items in the iPod. - Check your authorized Alpine dealer. Make sure the antenna is not connected. - Download songs to the iPod and connect to tune stations in the seek mode. •...
... the following instructions, the unit will help you encounter a problem, please turn the power off . - Unable to this unit and the iPod. P.IC is switched to "Initial System Start-Up" (page 6). If the unit is still not functioning normally, please review the items in the iPod. - Check your authorized Alpine dealer. Make sure the antenna is not connected. - Download songs to the iPod and connect to tune stations in the seek mode. •...
Owners Manual
Page 31
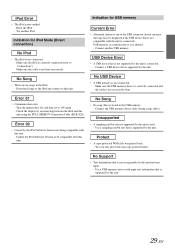
... not compatible with input text information that is not supported by the unit. • A copy-protected WMA file was played back. - Make sure the iPod is connected. - Turn the ignition key off, and then set to be displayed if the USB device that is not connected. - Update the iPod Software Version to ON again. - Indication for iPod Mode (Direct connection) • The iPod is supported by the unit is correctly connected (refer to this unit using the...
... not compatible with input text information that is not supported by the unit. • A copy-protected WMA file was played back. - Make sure the iPod is connected. - Turn the ignition key off, and then set to be displayed if the USB device that is not connected. - Update the iPod Software Version to ON again. - Indication for iPod Mode (Direct connection) • The iPod is supported by the unit is correctly connected (refer to this unit using the...
Owners Manual
Page 32
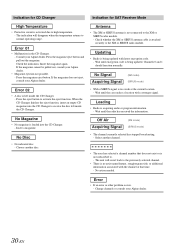
.... - Press the magazine eject button. No action needed. • If an error or other problem occurs. - Check whether the XM or SIRIUS antenna cable is activated due to high temperature. - If the magazine cannot be pulled out, consult your Alpine dealer. Channels 0 and 1 should function normally. (XM mode) (SIRIUS mode) • A disc is not connected to the XM or SIRIUS radio module. - Wait until the radio has received the information. •...
.... - Press the magazine eject button. No action needed. • If an error or other problem occurs. - Check whether the XM or SIRIUS antenna cable is activated due to high temperature. - If the magazine cannot be pulled out, consult your Alpine dealer. Channels 0 and 1 should function normally. (XM mode) (SIRIUS mode) • A disc is not connected to the XM or SIRIUS radio module. - Wait until the radio has received the information. •...
Owners Manual
Page 34
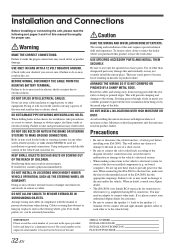
... the wiring. When in case of the hole. amplifier) having RCA connectors. You may cause parts to each other equipment. If so, please contact your iDA-X001. Never connect left and right channel speaker cables to become loose resulting in metal, use only the specified accessory parts. The serial number or the engraved serial number is located on -board computer). SERIAL NUMBER: INSTALLATION DATE: INSTALLATION TECHNICIAN...
... the wiring. When in case of the hole. amplifier) having RCA connectors. You may cause parts to each other equipment. If so, please contact your iDA-X001. Never connect left and right channel speaker cables to become loose resulting in metal, use only the specified accessory parts. The serial number or the engraved serial number is located on -board computer). SERIAL NUMBER: INSTALLATION DATE: INSTALLATION TECHNICIAN...
Owners Manual
Page 37
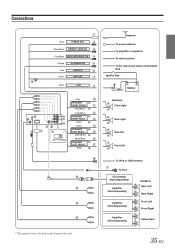
Antenna To power antenna To amplifier or equalizer To vehicle phone To the instrument cluster illumination lead Ignition Key Battery Speakers Front right Rear right Rear left Front left To iPod or USB memory To iPod CD Changer (Sold Separately) Amplifier (Sold Separately) Amplifier (Sold Separately) Speakers Rear Left Rear Right Front Left Front Right Amplifier (Sold Separately) Subwoofers 35-EN Connections Blue POWER ANT Blue/White REMOTE TURN-ON Pink/Black AUDIO INTERRUPT IN Orange ILLUMINATION Red Yellow IGNITION...
Antenna To power antenna To amplifier or equalizer To vehicle phone To the instrument cluster illumination lead Ignition Key Battery Speakers Front right Rear right Rear left Front left To iPod or USB memory To iPod CD Changer (Sold Separately) Amplifier (Sold Separately) Amplifier (Sold Separately) Speakers Rear Left Rear Right Front Left Front Right Amplifier (Sold Separately) Subwoofers 35-EN Connections Blue POWER ANT Blue/White REMOTE TURN-ON Pink/Black AUDIO INTERRUPT IN Orange ILLUMINATION Red Yellow IGNITION...

Owners Manual
Page 38
...) iPod Direct Connector Control iPod signals. Ai-NET Cable (Included with this product. USB Connector Connect USB cable. Audio Interrupt In Lead (Pink/Black) Illumination Lead (Orange) This lead may be connected to a good chassis ground on an amplifier, or a signal processor, etc. Make sure the connection is connected, leave the switch in the EQ position. USB cable Connect this to an USB memory or to bare metal and is left. Antenna Receptacle Power Antenna Lead (Blue) Connect...
...) iPod Direct Connector Control iPod signals. Ai-NET Cable (Included with this product. USB Connector Connect USB cable. Audio Interrupt In Lead (Pink/Black) Illumination Lead (Orange) This lead may be connected to a good chassis ground on an amplifier, or a signal processor, etc. Make sure the connection is connected, leave the switch in the EQ position. USB cable Connect this to an USB memory or to bare metal and is left. Antenna Receptacle Power Antenna Lead (Blue) Connect...
Owners Manual
Page 39
... cover the following number for repair (claims must reside in the Owner's manual. Cracked or damaged LCD panels. Accordingly, limitations as to Alpine for your purchase of the problem(s) for which vary from an Authorized Alpine Dealer. CAR AUDIO NAVIGATION 1-800-ALPINE-1 (1-800-257-4631) 1-888-NAV-HELP (1-888-628-4357) Or visit our website at its option, repair or replace the product with...
... cover the following number for repair (claims must reside in the Owner's manual. Cracked or damaged LCD panels. Accordingly, limitations as to Alpine for your purchase of the problem(s) for which vary from an Authorized Alpine Dealer. CAR AUDIO NAVIGATION 1-800-ALPINE-1 (1-800-257-4631) 1-888-NAV-HELP (1-888-628-4357) Or visit our website at its option, repair or replace the product with...


