Owners Manual
Page 2
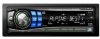
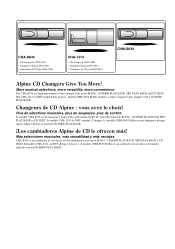
... rendimiento con nuevo M DAC, CD-R/RW PLAY BACK, MP3 PLAY BACK y CD TEXT. CHA-S634 • CD changer for DVA-9861 • Changeur CD pour DVA-9861 • Cambiador de CD para DVA-9861 CHA-1214 • CD changer for DVA-9861 • Changeur CD pour DVA-9861 • Cambiador de CD para DVA-9861 CHM-S630 Alpine CD Changers Give You More!
... rendimiento con nuevo M DAC, CD-R/RW PLAY BACK, MP3 PLAY BACK y CD TEXT. CHA-S634 • CD changer for DVA-9861 • Changeur CD pour DVA-9861 • Cambiador de CD para DVA-9861 CHA-1214 • CD changer for DVA-9861 • Changeur CD pour DVA-9861 • Cambiador de CD para DVA-9861 CHM-S630 Alpine CD Changers Give You More!

Owners Manual
Page 3
ENGLISH Contents Operating Instructions WARNING WARNING 4 CAUTION 4 PRECAUTIONS 4 Discs playable on this unit 6 Getting Started Turning Power On and Off 8 Detaching and Attaching the Front Panel ........ 8 Initial System Start-Up 9 Adjusting Volume 9 Lowering Volume Quickly 9 Setting Time 9 Radio Listening to Radio 10 Manual Storing of Station Presets 10 Automatic Memory of Station Presets 10 Tuning to Preset Stations 10 Frequency Search Function 11 Switching the HD Radio™ signal 11 CD/MP3/WMA Playback 11 Repeat Play 12 M.I.X. (Random Play 12 Searching from CD Text 13...
ENGLISH Contents Operating Instructions WARNING WARNING 4 CAUTION 4 PRECAUTIONS 4 Discs playable on this unit 6 Getting Started Turning Power On and Off 8 Detaching and Attaching the Front Panel ........ 8 Initial System Start-Up 9 Adjusting Volume 9 Lowering Volume Quickly 9 Setting Time 9 Radio Listening to Radio 10 Manual Storing of Station Presets 10 Automatic Memory of Station Presets 10 Tuning to Preset Stations 10 Frequency Search Function 11 Switching the HD Radio™ signal 11 CD/MP3/WMA Playback 11 Repeat Play 12 M.I.X. (Random Play 12 Searching from CD Text 13...
Owners Manual
Page 4
SETUP Sound Customizing Subwoofer On and Off 24 Setting the Subwoofer System 25 Visual Customizing Dimmer Control 25 Scroll Type Setting 25 Scroll Setting (TEXT SCROLL 25 HD Radio Station Call Setting 25 Demonstration 25 External Device Connecting an MP3 Changer (PLAY MODE) ... 25 Turning Mute Mode On/Off (INT MUTE) ...... 25 Setting the AUX Mode (V-Link 25 Connecting to an External Amplifier 26 Setting the Digital Output 26 DVD Setup DVD Setup Operation 26 Setting the language 27 Setting the TV Screen 27 Setting the Country Code 27 Setting the Rating Level (Parental Lock) ...
SETUP Sound Customizing Subwoofer On and Off 24 Setting the Subwoofer System 25 Visual Customizing Dimmer Control 25 Scroll Type Setting 25 Scroll Setting (TEXT SCROLL 25 HD Radio Station Call Setting 25 Demonstration 25 External Device Connecting an MP3 Changer (PLAY MODE) ... 25 Turning Mute Mode On/Off (INT MUTE) ...... 25 Setting the AUX Mode (V-Link 25 Connecting to an External Amplifier 26 Setting the Digital Output 26 DVD Setup DVD Setup Operation 26 Setting the language 27 Setting the TV Screen 27 Setting the Country Code 27 Setting the Rating Level (Parental Lock) ...

Owners Manual
Page 5
iPod™ (Optional) Playback 45 Searching for a desired Song 45 Searching by Playlist 45 Searching by artist name 45 Searching by album name 46 Searching by song name 46 Direct Search Function 46 Select Playlist/Artist/Album 46 Quick Search 47 Random Play Shuffle (M.I.X 47 Repeat Play 47 Displaying the Text 47 Changer (Optional) Controlling CD Changer (Optional 48 Quick Search 48 Playing MP3 Files with the CD Changer (Optional 48 Multi-Changer Selection (Optional 48 Remote Control Controls on Remote Control 49 When Using the Remote Control 51 Battery Replacement 51 ...
iPod™ (Optional) Playback 45 Searching for a desired Song 45 Searching by Playlist 45 Searching by artist name 45 Searching by album name 46 Searching by song name 46 Direct Search Function 46 Select Playlist/Artist/Album 46 Quick Search 47 Random Play Shuffle (M.I.X 47 Repeat Play 47 Displaying the Text 47 Changer (Optional) Controlling CD Changer (Optional 48 Quick Search 48 Playing MP3 Files with the CD Changer (Optional 48 Multi-Changer Selection (Optional 48 Remote Control Controls on Remote Control 49 When Using the Remote Control 51 Battery Replacement 51 ...

Owners Manual
Page 6
... personal injury or damage to the product. INSERT WITH THE CORRECT BATTERY POLARITY. Damaged Disc Do not attempt to your Alpine dealer or the nearest Alpine Service Station for periodic cleaning of dissolving the paint or damaging the plastic. Doing so may result in an accident,... fire or electric shock. Use for repairing. Failure to your authorized Alpine dealer or the nearest Alpine Service Centre for other injury. HALT USE IMMEDIATELY IF A PROBLEM APPEARS. Viewing the display may result in fire. Return it...
... personal injury or damage to the product. INSERT WITH THE CORRECT BATTERY POLARITY. Damaged Disc Do not attempt to your Alpine dealer or the nearest Alpine Service Station for periodic cleaning of dissolving the paint or damaging the plastic. Doing so may result in an accident,... fire or electric shock. Use for repairing. Failure to your authorized Alpine dealer or the nearest Alpine Service Centre for other injury. HALT USE IMMEDIATELY IF A PROBLEM APPEARS. Viewing the display may result in fire. Return it...

Owners Manual
Page 7
... soil on a very bumpy road may result in Alpine CD players. For routine cleaning, wipe the playing surface with irregular surfaces are inserted or if discs are various accessories available on the disc. Transparent Sheet Disc Stabilizer Installation Location Make sure the DVA-9861 will not be displayed even though the disc has...
... soil on a very bumpy road may result in Alpine CD players. For routine cleaning, wipe the playing surface with irregular surfaces are inserted or if discs are various accessories available on the disc. Transparent Sheet Disc Stabilizer Installation Location Make sure the DVA-9861 will not be displayed even though the disc has...
Owners Manual
Page 8
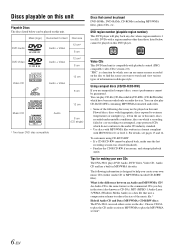
... This DVD head unit is designed to reduce the size of the music file.* Hybrid Audio CD and Data (MP3/WMA) CD-R/RW discs: The DVA-9861 can read either Audio CD or MP3/WMA encoded CD-R/RW files). For details, see pages 13 and 14. The following discs may not be... CD Audio * Two-layer DVD disc compatible 12 cm 8 cm (CD single) Discs that uses a compression scheme to help you create your own CDs The DVA-9861 plays DVD Audio, DVD Video, Video CD, Audio CD and has a built in the store (also known as CD-DA). DVDs with a region number other...
... This DVD head unit is designed to reduce the size of the music file.* Hybrid Audio CD and Data (MP3/WMA) CD-R/RW discs: The DVA-9861 can read either Audio CD or MP3/WMA encoded CD-R/RW files). For details, see pages 13 and 14. The following discs may not be... CD Audio * Two-layer DVD disc compatible 12 cm 8 cm (CD single) Discs that uses a compression scheme to help you create your own CDs The DVA-9861 plays DVD Audio, DVD Video, Video CD, Audio CD and has a built in the store (also known as CD-DA). DVDs with a region number other...
Owners Manual
Page 9
... of Microsoft Corporation in the United States and/or other intellectual property rights. revenuegeneration) real time broadcasting (terrestrial, satellite, cable and/or any commercial (i.e. The DVA-9861 can be playable. Never expose the disc to direct sunlight. Chapter Each Title may use standard ISO naming Level 1 (8.3 DOS standard), Level 2 (32 characters) or...
... of Microsoft Corporation in the United States and/or other intellectual property rights. revenuegeneration) real time broadcasting (terrestrial, satellite, cable and/or any commercial (i.e. The DVA-9861 can be playable. Never expose the disc to direct sunlight. Chapter Each Title may use standard ISO naming Level 1 (8.3 DOS standard), Level 2 (32 characters) or...

Owners Manual
Page 10
Press and hold SOURCE/POWER for at least 2 seconds to distinguish. Alphanumeric Display Alphanumeric Display To close the front panel, press the left , then pull to turn off the unit power. 2 Press (OPEN) to push the Rotary encoder inside 8-EN Push the Rotary encoder inside the unit before opening the front panel so that the front panel will start from level 12. • The front panel may become hot in normal usage (especially the connector terminals on the back of this unit. • The alphanumeric display in accident or malfunction. Getting Started SOURCE/ (OPEN) MUTE ...
Press and hold SOURCE/POWER for at least 2 seconds to distinguish. Alphanumeric Display Alphanumeric Display To close the front panel, press the left , then pull to turn off the unit power. 2 Press (OPEN) to push the Rotary encoder inside 8-EN Push the Rotary encoder inside the unit before opening the front panel so that the front panel will start from level 12. • The front panel may become hot in normal usage (especially the connector terminals on the back of this unit. • The alphanumeric display in accident or malfunction. Getting Started SOURCE/ (OPEN) MUTE ...

Owners Manual
Page 11
Attaching 1 Insert the right side of the front panel to avoid pushing buttons by mistake. Setting Time 1 Press TITLE repeatedly until the time is automatically set by 20 dB. Lowering Volume Quickly Activating the Audio Mute function will decrease by about 20 dB. The audio level will instantly lower the volume level by pressing TITLE. • To synchronize the clock to its previous level. 9-EN Pressing MUTE again will blink. 3 Turn the Rotary encoder to adjust the hours while the time indication is blinking. The time is displayed. The time can also be manually set 5...
Attaching 1 Insert the right side of the front panel to avoid pushing buttons by mistake. Setting Time 1 Press TITLE repeatedly until the time is automatically set by 20 dB. Lowering Volume Quickly Activating the Audio Mute function will decrease by about 20 dB. The audio level will instantly lower the volume level by pressing TITLE. • To synchronize the clock to its previous level. 9-EN Pressing MUTE again will blink. 3 Turn the Rotary encoder to adjust the hours while the time indication is blinking. The time is displayed. The time can also be manually set 5...

Owners Manual
Page 12
to store the station. FM1, FM2 and AM). • If you store a station in preset location No. 1. • If no stations are trademarks of Station Presets 1 Select the radio band and tune in the preset memory (6 stations for each band; When the automatic memory has been completed, the tuner goes to the station stored in a preset memory which you wish to tune in the selected band. F1 (FM1) F2 (FM2) AM F1 (FM1) 3 Press TUNE/A.ME to 6 in memory. Local mode: Only strong stations will be stored in a desired radio station you were listening to Radio 1 Press SOURCE/POWER ...
to store the station. FM1, FM2 and AM). • If you store a station in preset location No. 1. • If no stations are trademarks of Station Presets 1 Select the radio band and tune in the preset memory (6 stations for each band; When the automatic memory has been completed, the tuner goes to the station stored in a preset memory which you wish to tune in the selected band. F1 (FM1) F2 (FM2) AM F1 (FM1) 3 Press TUNE/A.ME to 6 in memory. Local mode: Only strong stations will be stored in a desired radio station you were listening to Radio 1 Press SOURCE/POWER ...

Owners Manual
Page 13
Switching the HD Radio™ signal HD Radio™ can be received if the HD Radio TUNER MODULE (TUA-T500HD) is already inserted, press SOURCE/POWER to switch to the CD mode. Fast forward: Press and hold . Or the search mode will be pulled into the unit automatically. The disc will be canceled when an operation has not been performed in 10 seconds. When a disc is connected. to the analog signal exclusively. 1 When receiving HD Radio, press FUNC. The currently received status is connected. 3 While playing back MP3/WMA, press or to the beginning ...
Switching the HD Radio™ signal HD Radio™ can be received if the HD Radio TUNER MODULE (TUA-T500HD) is already inserted, press SOURCE/POWER to switch to the CD mode. Fast forward: Press and hold . Or the search mode will be pulled into the unit automatically. The disc will be canceled when an operation has not been performed in 10 seconds. When a disc is connected. to the analog signal exclusively. 1 When receiving HD Radio, press FUNC. The currently received status is connected. 3 While playing back MP3/WMA, press or to the beginning ...

Owners Manual
Page 14
If is pressed, the beginning of hundred rank. MP3/WMA Play Display The folder number and file number will be played back in random sequence. to illuminate the " " indicator, and go to the step above within 10 seconds. 12-EN play back repeatedly the track being played. Repeat Play Press 4 to deactivate repeat play discs containing audio data, MP3 data and WMA data. • A WMA format file that is protected by DRM (Digital Rights Management) cannot be played back on this unit. • The track display for MP3/WMA data playback is the file numbers recorded on the disc. • ...
If is pressed, the beginning of hundred rank. MP3/WMA Play Display The folder number and file number will be played back in random sequence. to illuminate the " " indicator, and go to the step above within 10 seconds. 12-EN play back repeatedly the track being played. Repeat Play Press 4 to deactivate repeat play discs containing audio data, MP3 data and WMA data. • A WMA format file that is protected by DRM (Digital Rights Management) cannot be played back on this unit. • The track display for MP3/WMA data playback is the file numbers recorded on the disc. • ...

Owners Manual
Page 15
This will play the selected track. • Press and hold for at least 2 seconds in the search mode to cancel. Folder Name Search mode 3 Turn the Rotary encoder within 10 seconds. 5 Press MODE to the human ear or masked by other sounds. to return to the selecting search mode. • If a disc contains only the root folder, Folder Name Search cannot be made during M.I.X. to switch to the previous mode (Folder Search mode or the selecting search mode.) • File Name search cannot be made . • "ROOT" is displayed for at extremely high ratios, reducing the size of ...
This will play the selected track. • Press and hold for at least 2 seconds in the search mode to cancel. Folder Name Search mode 3 Turn the Rotary encoder within 10 seconds. 5 Press MODE to the human ear or masked by other sounds. to return to the selecting search mode. • If a disc contains only the root folder, Folder Name Search cannot be made during M.I.X. to switch to the previous mode (Folder Search mode or the selecting search mode.) • File Name search cannot be made . • "ROOT" is displayed for at extremely high ratios, reducing the size of ...

Owners Manual
Page 16
Files with no extension cannot be played back by using CD-R writing software. This device may be the same as the order you input. The number of characters may not play back discs recorded with ISO9660 Level 1 or Level 2. However, sometimes the file names, folder names, etc., are CD-ROMs, CD-Rs, and CD-RWs. Root folder Folder MP3/WMA File Terminology Bit rate This is the "sound" compression rate specified for a folder/file name is limited. Sampling rate This value shows how many times per second. For details on creating MP3/WMA files, refer to the user's manual for ...
Files with no extension cannot be played back by using CD-R writing software. This device may be the same as the order you input. The number of characters may not play back discs recorded with ISO9660 Level 1 or Level 2. However, sometimes the file names, folder names, etc., are CD-ROMs, CD-Rs, and CD-RWs. Root folder Folder MP3/WMA File Terminology Bit rate This is the "sound" compression rate specified for a folder/file name is limited. Sampling rate This value shows how many times per second. For details on creating MP3/WMA files, refer to the user's manual for ...

Owners Manual
Page 17
... reinsert it. • Never insert map discs for each heading are described. • To view DVD/Video CD, the optional TV monitor is required. • DVA-9861 automatically changes the video output signal (NTSC or PAL), according to 28). 15-EN Numeric keypad (0 to the DISC mode. DVD Commercial Audio discs can...
... reinsert it. • Never insert map discs for each heading are described. • To view DVD/Video CD, the optional TV monitor is required. • DVA-9861 automatically changes the video output signal (NTSC or PAL), according to 28). 15-EN Numeric keypad (0 to the DISC mode. DVD Commercial Audio discs can...

Owners Manual
Page 18
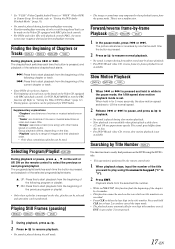
The selected playlist is played back. • Only discs containing a playlist can be displayed by pressing MENU. "PRE-STOP" is displayed. 2 Press / in 5 more seconds, the disc is turned off. Refer to select the desired playlist, then press ENT. When pressed for at 8 times the normal speed. If a menu screen appears On DVDs and video CDs with playback control (PBC), menu screens may not be performed. (Refer to "Setting the DVD Audio Playback Mode" (page 31) Video CD menu Use the numeric keypad ("0" to "9") to select items directly from the beginning when / is pressed while ...
The selected playlist is played back. • Only discs containing a playlist can be displayed by pressing MENU. "PRE-STOP" is displayed. 2 Press / in 5 more seconds, the disc is turned off. Refer to select the desired playlist, then press ENT. When pressed for at 8 times the normal speed. If a menu screen appears On DVDs and video CDs with playback control (PBC), menu screens may not be performed. (Refer to "Setting the DVD Audio Playback Mode" (page 31) Video CD menu Use the numeric keypad ("0" to "9") to select items directly from the beginning when / is pressed while ...
Owners Manual
Page 19
Set VCD PLAY MODE to delete the last digit in PRE-STOP, this to cancel the input mode. • The playback starts automatically for at least 2 seconds to start playback from the beginning of the current chapter or track. • Some DVDs do not have chapters. • The beginning of movies or musical selections on DVDs. "Tracks" are divisions of a track may not be performed for 5 more seconds, the slow motion speed switches to start playback from the beginning of the title you want to play back control). • For DVDs and video CDs with other tracks stored on the ...
Set VCD PLAY MODE to delete the last digit in PRE-STOP, this to cancel the input mode. • The playback starts automatically for at least 2 seconds to start playback from the beginning of the current chapter or track. • Some DVDs do not have chapters. • The beginning of movies or musical selections on DVDs. "Tracks" are divisions of a track may not be performed for 5 more seconds, the slow motion speed switches to start playback from the beginning of the title you want to play back control). • For DVDs and video CDs with other tracks stored on the ...

Owners Manual
Page 20
When playback stops, input the number of the group you want to play the disc's titles, chapters, tracks, etc., repeatedly. Playback starts from the selected program or playlist number. • While in PRE-STOP, this function finds the beginning of the chapters or tracks on the DVD using the numeric keypad ("0" to normal playback. (Factory default) DVD Audio (VOFF mode)*1 DVD Video The track is played repeatedly. is performed by the remote control unit. The mode returns to "9"). 2 Press ENT. The mode returns to delete the last digit in step 2. Playback starts from the...
When playback stops, input the number of the group you want to play the disc's titles, chapters, tracks, etc., repeatedly. Playback starts from the selected program or playlist number. • While in PRE-STOP, this function finds the beginning of the chapters or tracks on the DVD using the numeric keypad ("0" to normal playback. (Factory default) DVD Audio (VOFF mode)*1 DVD Video The track is played repeatedly. is performed by the remote control unit. The mode returns to "9"). 2 Press ENT. The mode returns to delete the last digit in step 2. Playback starts from the...

Owners Manual
Page 21
VIDEO CD The track is selected instead. Set VCD PLAY MODE to turn the PBC function off . • If the DVD-Audio disc is set to "Setting the DVD Audio Playback Mode" (page 31).) Tips Switching from the DVD's menu. • The selected subtitle language becomes the default setting every time the power is pressed. LR LL RR LR Video CD During playback, press AUDIO. The left and right channels will be output as shown below , each time the button is turned on video CDs with multiplex audio DVD-VR During playback, press and hold DISP./TOP M., select the item, then press ENT. 2. ...
VIDEO CD The track is selected instead. Set VCD PLAY MODE to turn the PBC function off . • If the DVD-Audio disc is set to "Setting the DVD Audio Playback Mode" (page 31).) Tips Switching from the DVD's menu. • The selected subtitle language becomes the default setting every time the power is pressed. LR LL RR LR Video CD During playback, press AUDIO. The left and right channels will be output as shown below , each time the button is turned on video CDs with multiplex audio DVD-VR During playback, press and hold DISP./TOP M., select the item, then press ENT. 2. ...
