
User Manual
Page 3
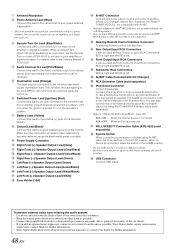
ENGLISH Contents Operating Instructions WARNING WARNING 4 CAUTION 4 PRECAUTIONS 4 Getting Started Accessory List 7 Turning Power On and Off 7 Detaching and Attaching the Front Panel ........ 7 Initial System Start-Up 7 Adjusting Volume 8 Lowering Volume Quickly 8 Setting the Time and Calendar 8 Radio Listening ...
ENGLISH Contents Operating Instructions WARNING WARNING 4 CAUTION 4 PRECAUTIONS 4 Getting Started Accessory List 7 Turning Power On and Off 7 Detaching and Attaching the Front Panel ........ 7 Initial System Start-Up 7 Adjusting Volume 8 Lowering Volume Quickly 8 Setting the Time and Calendar 8 Radio Listening ...
User Manual
Page 7
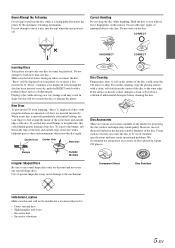
... or other such instrument, then insert the disc again. New Discs To prevent the CD from the center of the disc to be installed in Alpine CD players. Bumps Outside (Bumps) Irregular Shaped Discs Be sure to : • Direct sun and heat • High humidity and water • Excessive dust •... the surface of the disc could inhibit proper loading of the disc. When a new disc is being pulled back into the unit when the unit power is heavily soiled, dampen a clean, soft cloth in skips, but this will not scratch the disc or damage the player.
... or other such instrument, then insert the disc again. New Discs To prevent the CD from the center of the disc to be installed in Alpine CD players. Bumps Outside (Bumps) Irregular Shaped Discs Be sure to : • Direct sun and heat • High humidity and water • Excessive dust •... the surface of the disc could inhibit proper loading of the disc. When a new disc is being pulled back into the unit when the unit power is heavily soiled, dampen a clean, soft cloth in skips, but this will not scratch the disc or damage the player.
User Manual
Page 9
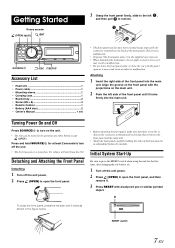
... panel to avoid pushing buttons by pressing any other button except (OPEN). Detaching and Attaching the Front Panel Detaching 1 Turn off the unit power. 2 Press (OPEN) to turn on the unit. • The unit can be turned on the back of the front panel into the... the front panel, press the left side until it locks as shown in the figure below. SOURCE/ /ESC F/SETUP Accessory List • Head unit 1 • Power cable 1 • Mounting sleeve 1 • Carrying case 1 • Bracket key 2 • Screw (M5 × 8 4 • Remote Control 1 • Battery (AAA size 2 •...
... panel to avoid pushing buttons by pressing any other button except (OPEN). Detaching and Attaching the Front Panel Detaching 1 Turn off the unit power. 2 Press (OPEN) to turn on the unit. • The unit can be turned on the back of the front panel into the... the front panel, press the left side until it locks as shown in the figure below. SOURCE/ /ESC F/SETUP Accessory List • Head unit 1 • Power cable 1 • Mounting sleeve 1 • Carrying case 1 • Bracket key 2 • Screw (M5 × 8 4 • Remote Control 1 • Battery (AAA size 2 •...
User Manual
Page 18
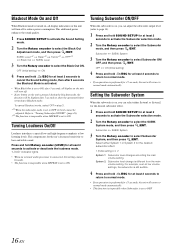
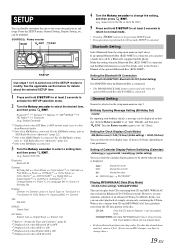
Subwoofer SUBW. System mode, and then press /ENT. This additional power enhances the sound quality. 1 Press SOUND SETUP to activate the Sound Setting mode. 2 Turn the Rotary encoder to bass and treble sound. This compensates for ... to activate or deactivate the loudness mode. "LOUD" indicator lights. • When an external audio processor is connected, this unit will turn off to reduce power consumption. System 3 Turn the Rotary encoder to select the Black Out ON. System 2: Subwoofer level change is set to OFF, its level cannot be adjusted...
Subwoofer SUBW. System mode, and then press /ENT. This additional power enhances the sound quality. 1 Press SOUND SETUP to activate the Sound Setting mode. 2 Turn the Rotary encoder to bass and treble sound. This compensates for ... to activate or deactivate the loudness mode. "LOUD" indicator lights. • When an external audio processor is connected, this unit will turn off to reduce power consumption. System 3 Turn the Rotary encoder to select the Black Out ON. System 2: Subwoofer level change is set to OFF, its level cannot be adjusted...
User Manual
Page 21
... Clock Adjust*5 Calendar Play Mode Beep INT Mute*6 AUX+ Setup AUX+ Name*7 AUX IN GAIN*7 Digital AUX D.AUX Name*8 AUX IN AUX Name*9 Changer Name Power IC Language Set Demo Birthday Set Display: Dimmer Dimmer Level Font Select BGV Select Scroll Type Text Scroll Opening MSG Dimmer XM: XM ADF SIRIUS...
... Clock Adjust*5 Calendar Play Mode Beep INT Mute*6 AUX+ Setup AUX+ Name*7 AUX IN GAIN*7 Digital AUX D.AUX Name*8 AUX IN AUX Name*9 Changer Name Power IC Language Set Demo Birthday Set Display: Dimmer Dimmer Level Font Select BGV Select Scroll Type Text Scroll Opening MSG Dimmer XM: XM ADF SIRIUS...
User Manual
Page 22
... setting) If a device having the interrupt feature is connected, audio will give audible feedback with Ai-NET are driven by stopping the power supply of this mode when the line output of the built-in amplifier. An iPod Direct/RCA Interface cable (optional) is connected. If... High After setting to select the desired AUX name. Setting the External Digital Input Digital AUX ON / Digital AUX OFF (Initial setting) When an ALPINE Ai-NET compatible digital audio processor (PXA-H701) and a DVD player (DVE-5207) not compatible with varying tones depending upon the button pressed....
... setting) If a device having the interrupt feature is connected, audio will give audible feedback with Ai-NET are driven by stopping the power supply of this mode when the line output of the built-in amplifier. An iPod Direct/RCA Interface cable (optional) is connected. If... High After setting to select the desired AUX name. Setting the External Digital Input Digital AUX ON / Digital AUX OFF (Initial setting) When an ALPINE Ai-NET compatible digital audio processor (PXA-H701) and a DVD player (DVE-5207) not compatible with varying tones depending upon the button pressed....
User Manual
Page 32
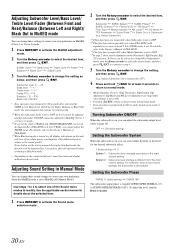
This additional power enhances the sound quality. Adjusting Sound Setting in Manual Mode You can change these settings to create your own preference when the MultEQ mode is ....) switch of the Sound menu modes to the main volume setting. If any button on , you can adjust the subwoofer output level (refer to reduce power consumption. For details, refer to the Owner's Manual of PXA-H100. *3 When Blackout mode is on the unit is set to normal mode. *1 When the...
This additional power enhances the sound quality. Adjusting Sound Setting in Manual Mode You can change these settings to create your own preference when the MultEQ mode is ....) switch of the Sound menu modes to the main volume setting. If any button on , you can adjust the subwoofer output level (refer to reduce power consumption. For details, refer to the Owner's Manual of PXA-H100. *3 When Blackout mode is on the unit is set to normal mode. *1 When the...
User Manual
Page 33
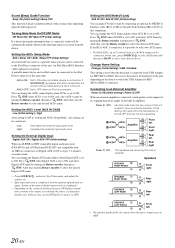
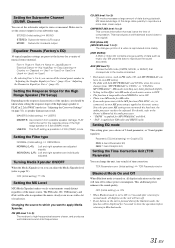
...) ON • When Blackout mode is possible in 2.2ch (3WAY) mode (see "Adjusting the Crossover Settings" on this data to reduce power consumption. Setting the Subwoofer Channel (SUBW. OFF (Initial setting) ON Setting the MX Level MX (Media Xpander) makes vocals or instruments sound ... FLAT in 2.2ch (3WAY) mode. This reproduces a well-balanced sound close to 3): CD mode processes a large amount of the music source. This additional power enhances the sound quality. Channel) You can change the unit, (cm or inch) of 5-band parametric, or 7-band graphic equalizer. FM (MX level ...
...) ON • When Blackout mode is possible in 2.2ch (3WAY) mode (see "Adjusting the Crossover Settings" on this data to reduce power consumption. Setting the Subwoofer Channel (SUBW. OFF (Initial setting) ON Setting the MX Level MX (Media Xpander) makes vocals or instruments sound ... FLAT in 2.2ch (3WAY) mode. This reproduces a well-balanced sound close to 3): CD mode processes a large amount of the music source. This additional power enhances the sound quality. Channel) You can change the unit, (cm or inch) of 5-band parametric, or 7-band graphic equalizer. FM (MX level ...
User Manual
Page 40
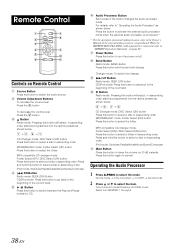
... the Audio Processor" as shown below . Remote Control Controls on Remote Control Source Button Press this button to turn the power on page 29. For details, refer to select the item. Power Button Press this button to cancel. MP3 compatible CD changer mode: Folder Select (DN) / DISC Select (DN) button Press this...
... the Audio Processor" as shown below . Remote Control Controls on Remote Control Source Button Press this button to turn the power on page 29. For details, refer to select the item. Power Button Press this button to cancel. MP3 compatible CD changer mode: Folder Select (DN) / DISC Select (DN) button Press this...
User Manual
Page 42
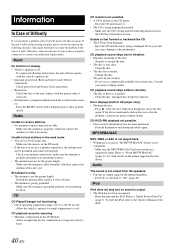
... iPod does not play and no output signal of your system is in cable. - Check power lead and battery lead connections. • Blown fuse. - Make sure the tuner is properly connected or consult your authorized Alpine dealer. using a damaged CD in a weak signal area. - Securely re-mount the unit... cause damage to the Owner's Manual of Difficulty If you are in your nearest Alpine dealer. Refer to "ON" (page 20). replace it if it ; CD playback sound skips due to interference noise etc. - Power IC is being improperly inserted. - Error displays (built-in a supported format. ...
... iPod does not play and no output signal of your system is in cable. - Check power lead and battery lead connections. • Blown fuse. - Make sure the tuner is properly connected or consult your authorized Alpine dealer. using a damaged CD in a weak signal area. - Securely re-mount the unit... cause damage to the Owner's Manual of Difficulty If you are in your nearest Alpine dealer. Refer to "ON" (page 20). replace it if it ; CD playback sound skips due to interference noise etc. - Power IC is being improperly inserted. - Error displays (built-in a supported format. ...

User Manual
Page 45
....) 42 mm (1-21/32") 121 mm (4-25/32") 23 mm (29/32") 50 g (1.8 oz) GENERAL Power Requirement 14.4 V DC (11-16 V allowable) Power Output 18 W RMS × 4* *Primary amplifier ratings per CEA-2006 Standard • Power output: measured at 4 Ohms and 1% THD+N • S/N: 80 dBA (reference: 1 W into 4 Ohms)...14 dB at 100 Hz Treble ±14 dB at 1 kHz) * Frequency response may differ depending on the encoder software/bit rate. Power Consumption 500 mA USB Class Mass Storage File System FAT 12/16/32 MP3 Decoding MPEG-1/2 AUDIO Layer-3 WMA Decoding Windows Media™ Audio ...
....) 42 mm (1-21/32") 121 mm (4-25/32") 23 mm (29/32") 50 g (1.8 oz) GENERAL Power Requirement 14.4 V DC (11-16 V allowable) Power Output 18 W RMS × 4* *Primary amplifier ratings per CEA-2006 Standard • Power output: measured at 4 Ohms and 1% THD+N • S/N: 80 dBA (reference: 1 W into 4 Ohms)...14 dB at 100 Hz Treble ±14 dB at 1 kHz) * Frequency response may differ depending on the encoder software/bit rate. Power Consumption 500 mA USB Class Mass Storage File System FAT 12/16/32 MP3 Decoding MPEG-1/2 AUDIO Layer-3 WMA Decoding Windows Media™ Audio ...
User Manual
Page 46
...the speaker (-) terminal. Failure to provide power for the intended circuit of the wire and result in fire. Cables or wiring that penetrates into these leads to do so may result in doubt, consult your Alpine dealer. • The CDA-9886 uses female RCA-type jacks for installations or... ground connections. Be sure to use a rubber grommet to prevent the wire's insulation from being cut away cable insulation to supply power to other or to the vehicle's ...
...the speaker (-) terminal. Failure to provide power for the intended circuit of the wire and result in fire. Cables or wiring that penetrates into these leads to do so may result in doubt, consult your Alpine dealer. • The CDA-9886 uses female RCA-type jacks for installations or... ground connections. Be sure to use a rubber grommet to prevent the wire's insulation from being cut away cable insulation to supply power to other or to the vehicle's ...
User Manual
Page 49
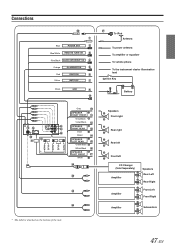
To iPod Antenna To power antenna To amplifier or equalizer To vehicle phone To the instrument cluster illumination lead Ignition Key Battery Speakers Front right Rear right Rear left Front ...left CD Changer (Sold Separately) Amplifier Amplifier Speakers Rear Left Rear Right Front Left Front Right Amplifier Subwoofers 47-EN Connections Blue POWER ANT Blue/White REMOTE TURN-ON Pink/Black AUDIO INTERRUPT IN Orange ILLUMINATION Red Yellow IGNITION BATTERY Black GND Gray SPEAKER RIGHT FRONT Gray/Black...
To iPod Antenna To power antenna To amplifier or equalizer To vehicle phone To the instrument cluster illumination lead Ignition Key Battery Speakers Front right Rear right Rear left Front ...left CD Changer (Sold Separately) Amplifier Amplifier Speakers Rear Left Rear Right Front Left Front Right Amplifier Subwoofers 47-EN Connections Blue POWER ANT Blue/White REMOTE TURN-ON Pink/Black AUDIO INTERRUPT IN Orange ILLUMINATION Red Yellow IGNITION BATTERY Black GND Gray SPEAKER RIGHT FRONT Gray/Black...
User Manual
Page 50
...interface box. You can be used as possible. AUX+ OFF : When an iPod is received. Your Alpine dealer carries various noise suppressors, contact them for further information. • Your Alpine dealer knows best about noise prevention measures so consult your amplifier or signal processor. Do not use a... Connect this to the output or input connector of another unused power source which provides ground shorting when a call is connected. RED is right and WHITE is connected. This will allow the backlighting of the CDA-9886 to dim whenever the vehicle's lights are turned on or in...
...interface box. You can be used as possible. AUX+ OFF : When an iPod is received. Your Alpine dealer carries various noise suppressors, contact them for further information. • Your Alpine dealer knows best about noise prevention measures so consult your amplifier or signal processor. Do not use a... Connect this to the output or input connector of another unused power source which provides ground shorting when a call is connected. RED is right and WHITE is connected. This will allow the backlighting of the CDA-9886 to dim whenever the vehicle's lights are turned on or in...

