
User Manual
Page 3
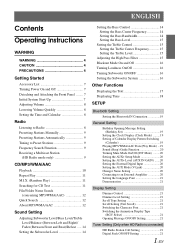
... Initial System Start-Up 7 Adjusting Volume 8 Lowering Volume Quickly 8 Setting the Time and Calendar 8 Radio Listening to Radio 8 Presetting Stations Manually 9 Presetting Stations Automatically 9 Tuning to Preset Stations 9 Frequency Search Function 9 Receiving a Multicast Station (HD Radio mode only 9 CD/MP3/... ON/OFF 16 Setting the Subwoofer System 16 Other Functions Displaying the Text 17 Displaying Time 18 SETUP Bluetooth Setting Setting the Bluetooth IN Connection 19 General Setting Birthday Opening Message Setting (Birthday Set 19 Setting the Clock Display (Clock ...
... Initial System Start-Up 7 Adjusting Volume 8 Lowering Volume Quickly 8 Setting the Time and Calendar 8 Radio Listening to Radio 8 Presetting Stations Manually 9 Presetting Stations Automatically 9 Tuning to Preset Stations 9 Frequency Search Function 9 Receiving a Multicast Station (HD Radio mode only 9 CD/MP3/... ON/OFF 16 Setting the Subwoofer System 16 Other Functions Displaying the Text 17 Displaying Time 18 SETUP Bluetooth Setting Setting the Bluetooth IN Connection 19 General Setting Birthday Opening Message Setting (Birthday Set 19 Setting the Clock Display (Clock ...
User Manual
Page 10
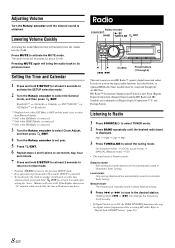
... is displayed. Holding down or will be connected through 6) This unit cannot receive HD Radio™ signals (digital terrestrial radio). Bluetooth*1 HD Radio*4 General Display Bluetooth XM*2/SIRIUS*3 *1 Displayed only when INT Mute is OFF and the mode is set to other than...the Time and Calendar 1 Press and hold /ENT for at least 2 seconds after setting the "hour". DX (Distance mode) LOCAL (Local mode) MANUAL (Manual mode) DX • The initial mode is obtained. Adjusting Volume Turn the Rotary encoder until the desired radio band is canceled. • To synchronize...
... is displayed. Holding down or will be connected through 6) This unit cannot receive HD Radio™ signals (digital terrestrial radio). Bluetooth*1 HD Radio*4 General Display Bluetooth XM*2/SIRIUS*3 *1 Displayed only when INT Mute is OFF and the mode is set to other than...the Time and Calendar 1 Press and hold /ENT for at least 2 seconds after setting the "hour". DX (Distance mode) LOCAL (Local mode) MANUAL (Manual mode) DX • The initial mode is obtained. Adjusting Volume Turn the Rotary encoder until the desired radio band is canceled. • To synchronize...

User Manual
Page 12
...time. Folder number display File number display Volume level Elapsed time • Press VIEW to select the desired track (file). Close the front panel manually. Pressing and holding or will be pulled into the unit automatically. A malfunction may not be played back on the disc. • The ... cannot be correctly displayed when a VBR (Variable Bit Rate) recorded file is connected. 3 While playing back MP3/WMA/AAC, press or to "Bluetooth Setting" (page 19). *5 Only when the CD changer is played back. MP3/WMA/AAC Play Display The folder number and file number will change ...
...time. Folder number display File number display Volume level Elapsed time • Press VIEW to select the desired track (file). Close the front panel manually. Pressing and holding or will be pulled into the unit automatically. A malfunction may not be played back on the disc. • The ... cannot be correctly displayed when a VBR (Variable Bit Rate) recorded file is connected. 3 While playing back MP3/WMA/AAC, press or to "Bluetooth Setting" (page 19). *5 Only when the CD changer is played back. MP3/WMA/AAC Play Display The folder number and file number will change ...
User Manual
Page 19
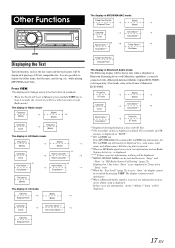
...Call Setting" (page 21). The display will change every time the button is pressed. • When the Text Scroll is set to the Owner's Manual of disc is correctly connected with CD Text. *2 The root folder of KCE-300BT. The display in Radio mode: Frequency (Blank) (Blank) (... disc. If there is displayed. Press VIEW. Elapsed Time The display in CD mode: Track No. The root folder of a disc with a Bluetooth Interface Module (Alpine KCE-300BT) (sold separately). It is displayed (e.g., song name, artist name, and album name). The display contents switch alternately. *7 When...
...Call Setting" (page 21). The display will change every time the button is pressed. • When the Text Scroll is set to the Owner's Manual of disc is correctly connected with CD Text. *2 The root folder of KCE-300BT. The display in Radio mode: Frequency (Blank) (Blank) (... disc. If there is displayed. Press VIEW. Elapsed Time The display in CD mode: Track No. The root folder of a disc with a Bluetooth Interface Module (Alpine KCE-300BT) (sold separately). It is displayed (e.g., song name, artist name, and album name). The display contents switch alternately. *7 When...
User Manual
Page 21
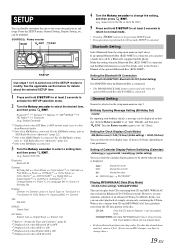
...*3 Only when SIRIUS Radio is displayed. For the XM Radio setting, refer to select the desired item, and then press /ENT. Select AUX IN) Bluetooth: Bluetooth IN General: Birthday Set Clock Mode Clock Adjust*5 Calendar Play Mode Beep INT Mute*6 AUX+ Setup AUX+ Name*7 AUX IN GAIN*7 Digital AUX D.AUX...+ is ON. *8 Displayed only when Digital AUX is ON. *9 Displayed only when AUX IN is connected. For details, refer to the Owner's Manual of the SETUP modes to change discs.) 19-EN equipped mobile phone. General Setting General is connected, you can play back CDs containing both CD...
...*3 Only when SIRIUS Radio is displayed. For the XM Radio setting, refer to select the desired item, and then press /ENT. Select AUX IN) Bluetooth: Bluetooth IN General: Birthday Set Clock Mode Clock Adjust*5 Calendar Play Mode Beep INT Mute*6 AUX+ Setup AUX+ Name*7 AUX IN GAIN*7 Digital AUX D.AUX...+ is ON. *8 Displayed only when Digital AUX is ON. *9 Displayed only when AUX IN is connected. For details, refer to the Owner's Manual of the SETUP modes to change discs.) 19-EN equipped mobile phone. General Setting General is connected, you can play back CDs containing both CD...
User Manual
Page 50
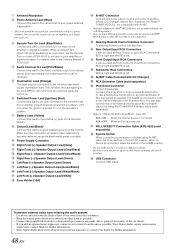
Ground Lead (Black) Connect this lead to a good chassis ground on connection, refer to the Owner's Manual of the Bluetooth Box. Power Supply Connector Right Front (+) Speaker Output Lead (Gray) Right Front (-) Speaker Output Lead (Gray/Black) Right Rear (-) Speaker ...processor. This will allow the backlighting of the CDA-9886 to dim whenever the vehicle's lights are turned on an amplifier, or a signal processor, etc. Your Alpine dealer carries various noise suppressors, contact them for further information. • Your Alpine dealer knows best about noise prevention measures so ...
Ground Lead (Black) Connect this lead to a good chassis ground on connection, refer to the Owner's Manual of the Bluetooth Box. Power Supply Connector Right Front (+) Speaker Output Lead (Gray) Right Front (-) Speaker Output Lead (Gray/Black) Right Rear (-) Speaker ...processor. This will allow the backlighting of the CDA-9886 to dim whenever the vehicle's lights are turned on an amplifier, or a signal processor, etc. Your Alpine dealer carries various noise suppressors, contact them for further information. • Your Alpine dealer knows best about noise prevention measures so ...


