Owners Manual
Page 2
...Contents Operating Instructions WARNING WARNING 3 CAUTION 3 PRECAUTIONS 3 Getting Started Turning Power On and Off 6 Initial System Start-Up 6 Setting Time 6 Adjusting Volume 6 Lowering Volume Quickly 6 Detaching and Attaching the Front Panel ......... 7 Radio Changing the Radio Frequencies for ...Erasing Disc Title/Station Title 16 Displaying Time 16 SETUP Sound Customizing Subwoofer On and Off 16 Setting the Subwoofer System 17 Visual Customizing Setting the Multicolor Illumination 17 Dimmer Control 17 Scroll Type Setting 17 Scroll Setting 17 Demonstration 17 MP3/WMA Playing ...
...Contents Operating Instructions WARNING WARNING 3 CAUTION 3 PRECAUTIONS 3 Getting Started Turning Power On and Off 6 Initial System Start-Up 6 Setting Time 6 Adjusting Volume 6 Lowering Volume Quickly 6 Detaching and Attaching the Front Panel ......... 7 Radio Changing the Radio Frequencies for ...Erasing Disc Title/Station Title 16 Displaying Time 16 SETUP Sound Customizing Subwoofer On and Off 16 Setting the Subwoofer System 17 Visual Customizing Setting the Multicolor Illumination 17 Dimmer Control 17 Scroll Type Setting 17 Scroll Setting 17 Demonstration 17 MP3/WMA Playing ...

Owners Manual
Page 7
.... 2 Remove the detachable front panel. 3 Press RESET with an optional Alpine remote control. Point the optional remote control transmitter at least 2 seconds while the time is turned on this , the time will decrease by 20 dB. For details, consult your Alpine dealer. RESET switch Setting Time 1 In the Clock priority mode, press and hold the Rotary...
.... 2 Remove the detachable front panel. 3 Press RESET with an optional Alpine remote control. Point the optional remote control transmitter at least 2 seconds while the time is turned on this , the time will decrease by 20 dB. For details, consult your Alpine dealer. RESET switch Setting Time 1 In the Clock priority mode, press and hold the Rotary...
Owners Manual
Page 8
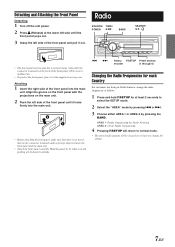
... America, change the radio frequencies as follows. 1 Press and hold F/SETUP for North America AREA 2: Other Radio frequencies 4 Pressing F/SETUP will be cleared every time you change the setting. 7-EN g f Rotary F/SETUP Preset buttons encoder (1 through 6) Changing the Radio Frequencies for each Country For customers not living in normal usage (especially the...
... America, change the radio frequencies as follows. 1 Press and hold F/SETUP for North America AREA 2: Other Radio frequencies 4 Pressing F/SETUP will be cleared every time you change the setting. 7-EN g f Rotary F/SETUP Preset buttons encoder (1 through 6) Changing the Radio Frequencies for each Country For customers not living in normal usage (especially the...
Owners Manual
Page 10
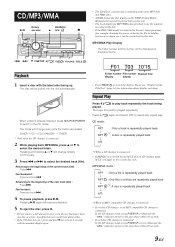
... the beginning of the current track (file): Press g. Please see "Displaying the Title/Text" (page 14) for MP3/WMA data playback is set to deactivate repeat play back repeatedly the track being played. Press 4 ( ) again and select OFF to ON during its eject cycle. The ...→ CD CHANGER* → TUNER * Only when the CD changer is already inserted, press SOURCE/POWER to switch to the unit, some operations (for at a time. Fast backward : Press and hold f. 4 To pause playback, press -/J. Fast forward : Press and hold g. Pressing -/J again will resume playback. 5 To eject ...
... the beginning of the current track (file): Press g. Please see "Displaying the Title/Text" (page 14) for MP3/WMA data playback is set to deactivate repeat play back repeatedly the track being played. Press 4 ( ) again and select OFF to ON during its eject cycle. The ...→ CD CHANGER* → TUNER * Only when the CD changer is already inserted, press SOURCE/POWER to switch to the unit, some operations (for at a time. Fast backward : Press and hold f. 4 To pause playback, press -/J. Fast forward : Press and hold g. Pressing -/J again will resume playback. 5 To eject ...
Owners Manual
Page 15
... → FOLDER NAME*4 → FILE NAME → ARTIST NAME*2 → ALBUM NAME*2 → TRACK NAME*2 → FRAME*3 → FOLDER NO./FILE NO./ELAPSED TIME *1 Displayed during playback of a disc with a lot of road noise. 1 Press SOURCE/POWER to select the source to which you want to apply BBE. 2 Press...mode for a folder that does not have a folder name. 14-EN "NO DATA" will be made. "NO TEXT" will change every time the button is connected, this setting cannot be displayed when an MP3/WMA file contains no ID3 tag/WMA tag information. *3 The recording sampling rate and bit rate of...
... → FOLDER NAME*4 → FILE NAME → ARTIST NAME*2 → ALBUM NAME*2 → TRACK NAME*2 → FRAME*3 → FOLDER NO./FILE NO./ELAPSED TIME *1 Displayed during playback of a disc with a lot of road noise. 1 Press SOURCE/POWER to select the source to which you want to apply BBE. 2 Press...mode for a folder that does not have a folder name. 14-EN "NO DATA" will be made. "NO TEXT" will change every time the button is connected, this setting cannot be displayed when an MP3/WMA file contains no ID3 tag/WMA tag information. *3 The recording sampling rate and bit rate of...
Owners Manual
Page 17
... OFF When the subwoofer is shown in steps 1 to change the setting. (e.g. The function selected will be displayed for about each SETUP menu. 1 Press and hold F/SETUP for further information about 5 seconds before the time returns to the display. • When the power is off but the ignition key... is ON. *3 Refer to "Radio" (page 7). *4 Refer to "SAT Radio" (page 20). 3 Press BAND to 4 as follows. See below to suit your desired setting. For details, see "Displaying...
... OFF When the subwoofer is shown in steps 1 to change the setting. (e.g. The function selected will be displayed for about each SETUP menu. 1 Press and hold F/SETUP for further information about 5 seconds before the time returns to the display. • When the power is off but the ignition key... is ON. *3 Refer to "Radio" (page 7). *4 Refer to "SAT Radio" (page 20). 3 Press BAND to 4 as follows. See below to suit your desired setting. For details, see "Displaying...

Owners Manual
Page 19
...switch is completed, turn the ignition off and back on the CDA-9847 are connected, set to -coast via the Ai-NET bus, the following according to OFF. To receive XM radio, the XM company sold XMDirect™ and ALPINE Interface Adapter Box (for Head unit). • After input selection.... For more information, visit XM's website at www.xmradio.com., and SIRIUS' website at the same time. Setting the External Digital Input D-AUX ON / D-AUX OFF (Initial setting) When an ALPINE Ai-NET compatible digital audio processor and an Ai-NET non-compatible DVD player (DVE-5207) are operative...
...switch is completed, turn the ignition off and back on the CDA-9847 are connected, set to -coast via the Ai-NET bus, the following according to OFF. To receive XM radio, the XM company sold XMDirect™ and ALPINE Interface Adapter Box (for Head unit). • After input selection.... For more information, visit XM's website at www.xmradio.com., and SIRIUS' website at the same time. Setting the External Digital Input D-AUX ON / D-AUX OFF (Initial setting) When an ALPINE Ai-NET compatible digital audio processor and an Ai-NET non-compatible DVD player (DVE-5207) are operative...

Owners Manual
Page 21
... mode to activate Quick Search mode. 2 Turn the Rotary encoder to normal mode. Each time you press this text information as shown below . Pressing :/J again will resume playback. •...Number * XM mode only: When ADF is turned OFF, this information is not displayed (see "Setting the Auxiliary Data Field Display" on this case, press BAND to select the changer mode applicable to...Alpine Interface Adapter for more than 2 seconds to scroll the display manually. • "Channel Number" and "Clock" displays do not scroll. • Depending on the model, the display may differ from the CDA-9847...
... mode to activate Quick Search mode. 2 Turn the Rotary encoder to normal mode. Each time you press this text information as shown below . Pressing :/J again will resume playback. •...Number * XM mode only: When ADF is turned OFF, this information is not displayed (see "Setting the Auxiliary Data Field Display" on this case, press BAND to select the changer mode applicable to...Alpine Interface Adapter for more than 2 seconds to scroll the display manually. • "Channel Number" and "Clock" displays do not scroll. • Depending on the model, the display may differ from the CDA-9847...
Owners Manual
Page 23
The selected song is not compatible with the CDA-9847. 22-EN The songs of the album are played ... (Shuffle Songs) 2 To cancel M.I .X. Playlist Name → Artist Name* → Album Name* → Song Title* → iPod/Elapsed Time → iPod/Clock → Playlist Name * "NO DATA" is displayed if there is no other songs are played back randomly. 1 Press 5 ...250 characters is displayed as M.I .X. on the CDA-9847. Shuffle Songs: All songs in the iPod mode takes more time than the normal Quick search. Repeat One: A single song is set to "SCROLL MANU," press and hold TITLE for ...
The selected song is not compatible with the CDA-9847. 22-EN The songs of the album are played ... (Shuffle Songs) 2 To cancel M.I .X. Playlist Name → Artist Name* → Album Name* → Song Title* → iPod/Elapsed Time → iPod/Clock → Playlist Name * "NO DATA" is displayed if there is no other songs are played back randomly. 1 Press 5 ...250 characters is displayed as M.I .X. on the CDA-9847. Shuffle Songs: All songs in the iPod mode takes more time than the normal Quick search. Repeat One: A single song is set to "SCROLL MANU," press and hold TITLE for ...
Owners Manual
Page 27
Download songs to the iPod and connect to ACC or ON again. - Turn the ignition key off, and then set to the CDA-9847. Select another channel. • The user has selected a channel number that time. - Wait until encryption code is not subscribed to the XM or SIRIUS radio module. - Channels 0 and 1 should function normally...
Download songs to the iPod and connect to ACC or ON again. - Turn the ignition key off, and then set to the CDA-9847. Select another channel. • The user has selected a channel number that time. - Wait until encryption code is not subscribed to the XM or SIRIUS radio module. - Channels 0 and 1 should function normally...
Owners Manual
Page 33
... cost or expense related to these addresses. THE TERM "INCIDENTAL DAMAGES" REFERS TO EXPENSES OF TRANSPORTING THE PRODUCT TO THE ALPINE SERVICE CENTER, LOSS OF THE ORIGINAL PURCHASER'S TIME, LOSS OF THE USE OF THE PRODUCT, BUS FARES, CAR RENTALS OR OTHERS COSTS RELATING TO THE CARE AND CUSTODY ...WARRANTIES: ANY IMPLIED WARRANTIES INCLUDING FITNESS FOR USE AND MERCHANTABILITY ARE LIMITED IN DURATION TO THE PERIOD OF THE EXPRESS WARRANTY SET FORTH ABOVE AND NO PERSON IS AUTHORIZED TO ASSUME FOR ALPINE ANY OTHER LIABILITY IN CONNECTION WITH THE SALE OF THE PRODUCT. [HOW WE EXCLUDE CERTAIN DAMAGES...
... cost or expense related to these addresses. THE TERM "INCIDENTAL DAMAGES" REFERS TO EXPENSES OF TRANSPORTING THE PRODUCT TO THE ALPINE SERVICE CENTER, LOSS OF THE ORIGINAL PURCHASER'S TIME, LOSS OF THE USE OF THE PRODUCT, BUS FARES, CAR RENTALS OR OTHERS COSTS RELATING TO THE CARE AND CUSTODY ...WARRANTIES: ANY IMPLIED WARRANTIES INCLUDING FITNESS FOR USE AND MERCHANTABILITY ARE LIMITED IN DURATION TO THE PERIOD OF THE EXPRESS WARRANTY SET FORTH ABOVE AND NO PERSON IS AUTHORIZED TO ASSUME FOR ALPINE ANY OTHER LIABILITY IN CONNECTION WITH THE SALE OF THE PRODUCT. [HOW WE EXCLUDE CERTAIN DAMAGES...


