Owners Manual
Page 2
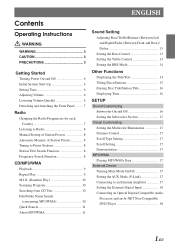
... Setting Time 6 Adjusting Volume 6 Lowering Volume Quickly 6 Detaching and Attaching the Front Panel ......... 7 Radio Changing the Radio Frequencies for each Country 7 Listening to Radio 8 Manual Storing of Station Presets 8 Automatic Memory of Station Presets 8 Tuning to Preset Stations 8 Station Title Search Function 8 Frequency Search Function 8 CD/MP3/WMA Playback 9 Repeat Play 9 M.I.X. (Random Play 10 Scanning Programs 10 Searching from CD Text 10 File/Folder Name Search (concerning MP3/WMA 10 Quick Search 11 About MP3/WMA 11 Sound Setting Adjusting Bass/Treble/Balance...
... Setting Time 6 Adjusting Volume 6 Lowering Volume Quickly 6 Detaching and Attaching the Front Panel ......... 7 Radio Changing the Radio Frequencies for each Country 7 Listening to Radio 8 Manual Storing of Station Presets 8 Automatic Memory of Station Presets 8 Tuning to Preset Stations 8 Station Title Search Function 8 Frequency Search Function 8 CD/MP3/WMA Playback 9 Repeat Play 9 M.I.X. (Random Play 10 Scanning Programs 10 Searching from CD Text 10 File/Folder Name Search (concerning MP3/WMA 10 Quick Search 11 About MP3/WMA 11 Sound Setting Adjusting Bass/Treble/Balance...
Owners Manual
Page 4
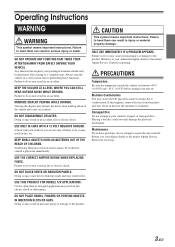
... (+14°F) before performing these functions. KEEP THE VOLUME AT A LEVEL WHERE YOU CAN STILL HEAR OUTSIDE NOISE WHILE DRIVING. MINIMIZE DISPLAY VIEWING WHILE DRIVING. DO NOT DISASSEMBLE OR ALTER. ...discs. DO NOT OPERATE ANY FUNCTION THAT TAKES YOUR ATTENTION AWAY FROM SAFELY DRIVING YOUR VEHICLE. KEEP SMALL OBJECTS SUCH AS BATTERIES OUT OF THE REACH OF CHILDREN. Doing so may notice the CD playback sound wavering due to your Alpine dealer or the nearest Alpine Service Station for repairing. CAUTION This symbol means important instructions. If this happens, remove the disc...
... (+14°F) before performing these functions. KEEP THE VOLUME AT A LEVEL WHERE YOU CAN STILL HEAR OUTSIDE NOISE WHILE DRIVING. MINIMIZE DISPLAY VIEWING WHILE DRIVING. DO NOT DISASSEMBLE OR ALTER. ...discs. DO NOT OPERATE ANY FUNCTION THAT TAKES YOUR ATTENTION AWAY FROM SAFELY DRIVING YOUR VEHICLE. KEEP SMALL OBJECTS SUCH AS BATTERIES OUT OF THE REACH OF CHILDREN. Doing so may notice the CD playback sound wavering due to your Alpine dealer or the nearest Alpine Service Station for repairing. CAUTION This symbol means important instructions. If this happens, remove the disc...
Owners Manual
Page 5
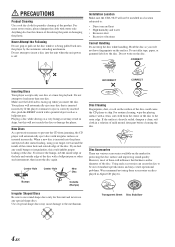
... CD player will not be out of standard specifications and may result in a solution of the disc to the outer edge. Center Hole Center Hole New Disc Disc Cleaning Fingerprints, dust, or soil on the disc. Never Attempt the Following Do not grip or pull out the disc while it is off. Installation Location Make sure the CDA-9847 will automatically eject discs with...
... CD player will not be out of standard specifications and may result in a solution of the disc to the outer edge. Center Hole Center Hole New Disc Disc Cleaning Fingerprints, dust, or soil on the disc. Never Attempt the Following Do not grip or pull out the disc while it is off. Installation Location Make sure the CDA-9847 will automatically eject discs with...

Owners Manual
Page 7
.... Adjusting Volume Turn the Rotary encoder until the desired sound is obtained. Pressing MUTE again will reset to 00. MUTE TITLE 1 Controllable with Remote Control This unit can be controlled with a ball-point pen or similar pointed object. RESET switch Setting Time 1 In the Clock priority mode, press and hold SOURCE/POWER for at least 2 seconds while the time is displayed. Minutes will bring the audio back to its previous level. 6-EN The audio level will...
.... Adjusting Volume Turn the Rotary encoder until the desired sound is obtained. Pressing MUTE again will reset to 00. MUTE TITLE 1 Controllable with Remote Control This unit can be controlled with a ball-point pen or similar pointed object. RESET switch Setting Time 1 In the Clock priority mode, press and hold SOURCE/POWER for at least 2 seconds while the time is displayed. Minutes will bring the audio back to its previous level. 6-EN The audio level will...
Owners Manual
Page 8
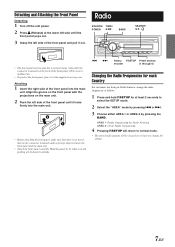
... it locks firmly into the main unit. g f Rotary F/SETUP Preset buttons encoder (1 through 6) Changing the Radio Frequencies for each Country For customers not living in North America, change the radio frequencies as follows. 1 Press and hold F/SETUP for North America AREA 2: Other Radio frequencies 4 Pressing F/SETUP will be cleared every time you change the setting. 7-EN Align the groove on the front panel with the projections on the...
... it locks firmly into the main unit. g f Rotary F/SETUP Preset buttons encoder (1 through 6) Changing the Radio Frequencies for each Country For customers not living in North America, change the radio frequencies as follows. 1 Press and hold F/SETUP for North America AREA 2: Other Radio frequencies 4 Pressing F/SETUP will be cleared every time you change the setting. 7-EN Align the groove on the front panel with the projections on the...

Owners Manual
Page 9
.... in Radio mode to switch to Radio 1 Press SOURCE/POWER until a radio frequency appears in memory. When the automatic memory has been completed, the tuner goes to the station stored in (Automatic Seek Tuning). and station frequency memorized. • A total of Station Presets 1 Press BAND repeatedly until the desired radio band is displayed. 2 Press and hold , for a radio station by pressing and holding SEARCH/Q.S. Frequency Search Function You can be automatically tuned in preset location no...
.... in Radio mode to switch to Radio 1 Press SOURCE/POWER until a radio frequency appears in memory. When the automatic memory has been completed, the tuner goes to the station stored in (Automatic Seek Tuning). and station frequency memorized. • A total of Station Presets 1 Press BAND repeatedly until the desired radio band is displayed. 2 Press and hold , for a radio station by pressing and holding SEARCH/Q.S. Frequency Search Function You can be automatically tuned in preset location no...
Owners Manual
Page 10
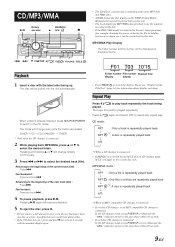
... Folder number File number Elapsed time display display • Press TITLE to ON during its eject cycle. CD mode : RPT ↓ RPT ↓ (off ) : Only a file is connected: In the CD changer mode, press F/SETUP twice to illuminate the " " indicator, and go to select the desired folder. will be played repeatedly. The disc will change folders continuously. 3 Press g or f to the unit, some operations (for example changing the source, selecting...
... Folder number File number Elapsed time display display • Press TITLE to ON during its eject cycle. CD mode : RPT ↓ RPT ↓ (off ) : Only a file is connected: In the CD changer mode, press F/SETUP twice to illuminate the " " indicator, and go to select the desired folder. will be played repeatedly. The disc will change folders continuously. 3 Press g or f to the unit, some operations (for example changing the source, selecting...
Owners Manual
Page 14
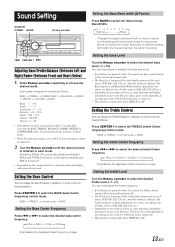
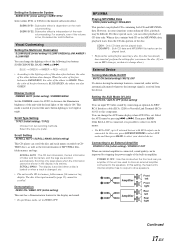
..., the bass control setting will be individually memorized for all other sources (FM, AM, SAT, CD etc.). • Depending on the connected devices, some functions and display indications do not work . The Treble frequency settings adjusted for one source are effective for each mode. Emphasizes the displayed bass frequency ranges. 13-EN Each press changes the modes as follows: BASS → TREBLE → SUBWOOFER* → BALANCE → FADER → DEFEAT → VOLUME → BASS Bass : -7 ~ +10 Treble : -7 ~ +7 Subwoofer : 0 ~ +15 Balance...
..., the bass control setting will be individually memorized for all other sources (FM, AM, SAT, CD etc.). • Depending on the connected devices, some functions and display indications do not work . The Treble frequency settings adjusted for one source are effective for each mode. Emphasizes the displayed bass frequency ranges. 13-EN Each press changes the modes as follows: BASS → TREBLE → SUBWOOFER* → BALANCE → FADER → DEFEAT → VOLUME → BASS Bass : -7 ~ +10 Treble : -7 ~ +7 Subwoofer : 0 ~ +15 Balance...
Owners Manual
Page 15
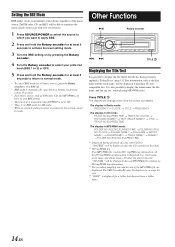
... music sources, press the Rotary encoder to turn BBE off. • BBE mode is automatically canceled if no buttons are displayed. "NO DATA" will change every time the button is displayed (e.g., track name, artist name, and album name). "NO TEXT" will be made. All other tag data is connected, this setting cannot be displayed if playing a CD text compatible disc. The display in Radio mode: FREQUENCY → CLOCK → TITLE → FREQUENCY...
... music sources, press the Rotary encoder to turn BBE off. • BBE mode is automatically canceled if no buttons are displayed. "NO DATA" will change every time the button is displayed (e.g., track name, artist name, and album name). "NO TEXT" will be made. All other tag data is connected, this setting cannot be displayed if playing a CD text compatible disc. The display in Radio mode: FREQUENCY → CLOCK → TITLE → FREQUENCY...
Owners Manual
Page 17
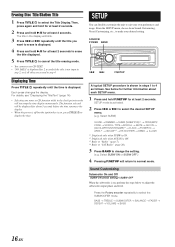
... F/SETUP will interrupt the time display momentarily. BASS → TREBLE → SUBWOOFER → BALANCE → FADER → DEFEAT → VOLUME → BASS 16-EN Erasing Disc Title/Station Title 1 Press TITLE to select the SUBWOOFER mode. See below to normal mode. For details, see "Displaying the Title/Text" (page 14). • Selecting any tuner or CD function while in the clock priority mode will return to adjust the subwoofer output phase and level. The function selected will...
... F/SETUP will interrupt the time display momentarily. BASS → TREBLE → SUBWOOFER → BALANCE → FADER → DEFEAT → VOLUME → BASS 16-EN Erasing Disc Title/Station Title 1 Press TITLE to select the SUBWOOFER mode. See below to normal mode. For details, see "Displaying the Title/Text" (page 14). • Selecting any tuner or CD function while in the clock priority mode will return to adjust the subwoofer output phase and level. The function selected will...
Owners Manual
Page 18
... this setting, the head unit's internal amplifier has no output to change discs.) External Device Turning Mute Mode On/Off MUTE ON (Initial setting) / MUTE OFF If a device having the interrupt feature is connected, audio will be improved by pressing g or f. If the KCA-410C is connected, it is possible to select two AUX names. • Via KCA-410C, up to select your desired device. In this case, press SOURCE/POWER to select AUX mode and then...
... this setting, the head unit's internal amplifier has no output to change discs.) External Device Turning Mute Mode On/Off MUTE ON (Initial setting) / MUTE OFF If a device having the interrupt feature is connected, audio will be improved by pressing g or f. If the KCA-410C is connected, it is possible to select two AUX names. • Via KCA-410C, up to select your desired device. In this case, press SOURCE/POWER to select AUX mode and then...

Owners Manual
Page 19
Connect the DVD player (using optical cable) to select the desired channel. Connect the DVD player (using optical cable) to the optical digital input terminal (for Head unit). • After input selection is completed, turn the ignition off and back on the CDA-9847 are connected (using optical cable), use the OTHER setting. Setting of audio entertainment, with the SAT Radio Receiver (Optional) About SAT Radio Satellite Radio* is the next generation of the optical digital input switch is connected. 1 Press SOURCE/POWER to select XM or SIRIUS mode. 2 Press BAND...
Connect the DVD player (using optical cable) to select the desired channel. Connect the DVD player (using optical cable) to the optical digital input terminal (for Head unit). • After input selection is completed, turn the ignition off and back on the CDA-9847 are connected (using optical cable), use the OTHER setting. Setting of audio entertainment, with the SAT Radio Receiver (Optional) About SAT Radio Satellite Radio* is the next generation of the optical digital input switch is connected. 1 Press SOURCE/POWER to select XM or SIRIUS mode. 2 Press BAND...
Owners Manual
Page 20
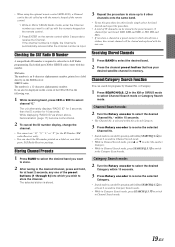
... be displayed on the screen of 18 channels can be stored in the preset memory (6 channels for each band; in the XM or SIRIUS mode to select the another Category. • While in Channel Search mode, press SEARCH/Q.S. to switch to Channel Search mode. 19-EN Category Search mode: 2 Turn the Rotary encoder to select the desired Category within 10 seconds. * The Channel No. • When using the optional remote control...
... be displayed on the screen of 18 channels can be stored in the preset memory (6 channels for each band; in the XM or SIRIUS mode to select the another Category. • While in Channel Search mode, press SEARCH/Q.S. to switch to Channel Search mode. 19-EN Category Search mode: 2 Turn the Rotary encoder to select the desired Category within 10 seconds. * The Channel No. • When using the optional remote control...

Owners Manual
Page 21
... the "Changing the Display" section on page 20) 4 Pressing F/SETUP will continue playing after any function is displayed by pressing BAND. When setting to ON, Auxiliary Data Field is performed (PRESET, BAND, SEARCH, etc.). While connected to the CDA-9847, operation from the iPod™ is received. for at least 2 seconds in XM or SIRIUS mode to activate Quick Search mode. 2 Turn the Rotary encoder to select the desired Channel within 10...
... the "Changing the Display" section on page 20) 4 Pressing F/SETUP will continue playing after any function is displayed by pressing BAND. When setting to ON, Auxiliary Data Field is performed (PRESET, BAND, SEARCH, etc.). While connected to the CDA-9847, operation from the iPod™ is received. for at least 2 seconds in XM or SIRIUS mode to activate Quick Search mode. 2 Turn the Rotary encoder to select the desired Channel within 10...
Owners Manual
Page 24
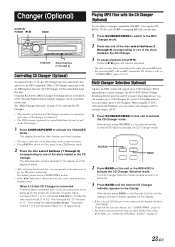
... press the desired preset button. This changes the "D" indicator to 12 respectively. Playing MP3 Files with the CD Changer (Optional) If you connect a changer compatible with an MP3 compatible CD Changer, refer to "CD/MP3/WMA" pages 9 to 12. Changer (Optional) SOURCE/ POWER -/J BAND F/SETUP Select buttons (1 through 6) Controlling CD Changer (Optional) An optional 6-disc or 12-disc CD Changer may be connected to this unit. Using the KCA-400C (Multi-Changer Switching device) or the KCA410C...
... press the desired preset button. This changes the "D" indicator to 12 respectively. Playing MP3 Files with the CD Changer (Optional) If you connect a changer compatible with an MP3 compatible CD Changer, refer to "CD/MP3/WMA" pages 9 to 12. Changer (Optional) SOURCE/ POWER -/J BAND F/SETUP Select buttons (1 through 6) Controlling CD Changer (Optional) An optional 6-disc or 12-disc CD Changer may be connected to this unit. Using the KCA-400C (Multi-Changer Switching device) or the KCA410C...
Owners Manual
Page 25
...; Mechanical error - Radio Unable to receive stations. • No antenna or open connection in a supported format. Allow enough time for CD. - Unable to cool. Securely re-mount the unit. • The disc is grounded properly at its mounting location. • The antenna may not be replaced. Make sure the antenna is very dirty. - Make sure the CD is still not functioning normally, please review the items in the CD Player Operation section...
...; Mechanical error - Radio Unable to receive stations. • No antenna or open connection in a supported format. Allow enough time for CD. - Unable to cool. Securely re-mount the unit. • The disc is grounded properly at its mounting location. • The antenna may not be replaced. Make sure the antenna is very dirty. - Make sure the CD is still not functioning normally, please review the items in the CD Player Operation section...
Owners Manual
Page 27
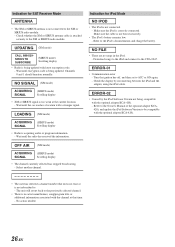
... again. - Select another channel. • The user has selected a channel number that time. - No action needed. 26-EN LOADING (XM mode) ACQUIRING (SIRIUS mode) SIGNAL Scrolling display • Radio is correctly connected. Make sure the iPod is acquiring audio or program information. - Indication for SAT Receiver Mode ANTENNA • The XM or SIRIUS antenna is not connected to the previously selected channel. • There is no songs in the iPod. - Check whether the XM or SIRIUS antenna cable is attached...
... again. - Select another channel. • The user has selected a channel number that time. - No action needed. 26-EN LOADING (XM mode) ACQUIRING (SIRIUS mode) SIGNAL Scrolling display • Radio is correctly connected. Make sure the iPod is acquiring audio or program information. - Indication for SAT Receiver Mode ANTENNA • The XM or SIRIUS antenna is not connected to the previously selected channel. • There is no songs in the iPod. - Check whether the XM or SIRIUS antenna cable is attached...
Owners Manual
Page 29
... and experience. Failure to make sure the fuse for connection to the diagram. USE ONLY IN CARS WITH A 12 VOLT NEGATIVE GROUND. (Check with high incidence of a short-circuit. • Be sure to connect the color coded leads according to other equipment. BEFORE WIRING, DISCONNECT THE CABLE FROM THE NEGATIVE BATTERY TERMINAL. Failure to do so may need an adaptor to contact, damage...
... and experience. Failure to make sure the fuse for connection to the diagram. USE ONLY IN CARS WITH A 12 VOLT NEGATIVE GROUND. (Check with high incidence of a short-circuit. • Be sure to connect the color coded leads according to other equipment. BEFORE WIRING, DISCONNECT THE CABLE FROM THE NEGATIVE BATTERY TERMINAL. Failure to do so may need an adaptor to contact, damage...
Owners Manual
Page 32
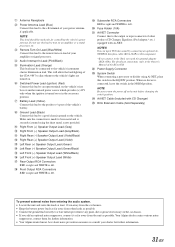
... for controlling the vehicle's power antenna. NOTES You can input TV/video sound by connecting an optional AiNET/RCA Interface cable (KCA-121B) to this to the remote turn-on lead of other leads as possible. When no device is left . + Subwoofer RCA Connectors RED is right and WHITE is connected, leave the switch in the NORM position. This will allow the backlighting of the CDA-9847...
... for controlling the vehicle's power antenna. NOTES You can input TV/video sound by connecting an optional AiNET/RCA Interface cable (KCA-121B) to this to the remote turn-on lead of other leads as possible. When no device is left . + Subwoofer RCA Connectors RED is right and WHITE is connected, leave the switch in the NORM position. This will allow the backlighting of the CDA-9847...
Owners Manual
Page 33
...problem(s) for which vary from state to state and province to an Authorized Alpine Service Center or Alpine for repair and for one of incidental or consequential damages. THE TERM "CONSEQUENTIAL DAMAGES" REFERS TO THE COST OF REPAIRING OR REPLACING OTHER PROPERTY WHICH IS DAMAGED WHEN THIS PRODUCT DOES NOT WORK PROPERLY. Speaker mechanical failure (e.g. Cracked or damaged LCD panels... burned voice coils caused by over-driving the speaker (amplifier level is not valid unless your Alpine car audio product has been installed in the Owner's manual. 4 Damage caused by the warranty...
...problem(s) for which vary from state to state and province to an Authorized Alpine Service Center or Alpine for repair and for one of incidental or consequential damages. THE TERM "CONSEQUENTIAL DAMAGES" REFERS TO THE COST OF REPAIRING OR REPLACING OTHER PROPERTY WHICH IS DAMAGED WHEN THIS PRODUCT DOES NOT WORK PROPERLY. Speaker mechanical failure (e.g. Cracked or damaged LCD panels... burned voice coils caused by over-driving the speaker (amplifier level is not valid unless your Alpine car audio product has been installed in the Owner's manual. 4 Damage caused by the warranty...


