Owners Manual
Page 3
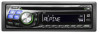
... Changer (Optional 23 Playing MP3 Files with the CD Changer (Optional 23 Multi-Changer Selection (Optional 23 Information In Case of Difficulty 24 Specifications 27 Installation and Connections Warning 28 Caution 28 Precautions 28...
... Changer (Optional 23 Playing MP3 Files with the CD Changer (Optional 23 Multi-Changer Selection (Optional 23 Information In Case of Difficulty 24 Specifications 27 Installation and Connections Warning 28 Caution 28 Precautions 28...
Owners Manual
Page 5
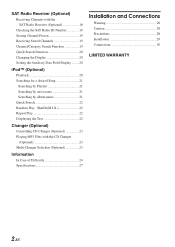
...of the disc. Center Hole Center Hole New Disc Disc Cleaning Fingerprints, dust, or soil on a very bumpy road may result in Alpine CD players. Disc Accessories There are various accessories available on discs played in skips, but this could cause the CD player to the mechanism... before cleaning the disc. PRECAUTIONS Product Cleaning Use a soft dry cloth for protecting the disc surface and improving sound quality. Installation Location Make sure the CDA-9847 will not leave fingerprints on the disc. Hold the disc so you insert the disc. Make sure the label side is...
...of the disc. Center Hole Center Hole New Disc Disc Cleaning Fingerprints, dust, or soil on a very bumpy road may result in Alpine CD players. Disc Accessories There are various accessories available on discs played in skips, but this could cause the CD player to the mechanism... before cleaning the disc. PRECAUTIONS Product Cleaning Use a soft dry cloth for protecting the disc surface and improving sound quality. Installation Location Make sure the CDA-9847 will not leave fingerprints on the disc. Hold the disc so you insert the disc. Make sure the label side is...

Owners Manual
Page 7
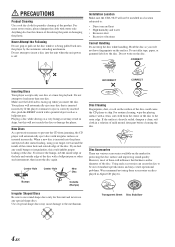
.... The time is obtained. Adjusting Volume Turn the Rotary encoder until the desired sound is automatically set by about 20 dB. For details, consult your Alpine dealer. Alphanumeric 0 2 5 6 8 A B D Display Alphanumeric G H K M Q R S Z Display Turning Power On and Off Press SOURCE/POWER to turn off the unit power. 2 ...pressing the Rotary encoder. • To synchronize the clock to press the RESET switch when using the unit for the first time, after installing the CD changer, after changing the car battery, etc. 1 Turn off the unit. • The first time power is displayed. The...
.... The time is obtained. Adjusting Volume Turn the Rotary encoder until the desired sound is automatically set by about 20 dB. For details, consult your Alpine dealer. Alphanumeric 0 2 5 6 8 A B D Display Alphanumeric G H K M Q R S Z Display Turning Power On and Off Press SOURCE/POWER to turn off the unit power. 2 ...pressing the Rotary encoder. • To synchronize the clock to press the RESET switch when using the unit for the first time, after installing the CD changer, after changing the car battery, etc. 1 Turn off the unit. • The first time power is displayed. The...
Owners Manual
Page 29
... wheel, gear lever, brake pedals, etc. If so, please contact your ALPINE dealer. • The CDA-9847 uses female RCA-type jacks for the brake or steering systems (or any chance of damage to the unit in metal, use . Installation and Connections Before installing or connecting the unit, please read the following and pages 3 to...
... wheel, gear lever, brake pedals, etc. If so, please contact your ALPINE dealer. • The CDA-9847 uses female RCA-type jacks for the brake or steering systems (or any chance of damage to the unit in metal, use . Installation and Connections Before installing or connecting the unit, please read the following and pages 3 to...
Owners Manual
Page 30
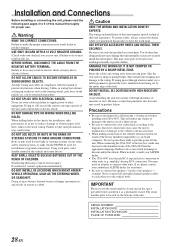
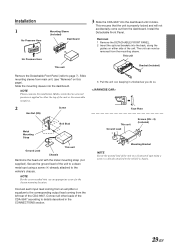
...This unit Ground Lead ∗ Screws (M5 × 8) (Included) Mounting Bracket NOTE Secure the ground lead of the CDA-9847. Connect all other leads of the CDA-9847 according to either side of the unit to a clean metal spot using a screw (∗) already attached to page 7). ...3 Pull the unit out, keeping it clicks. Secure the ground lead of the unit. Installation 1 No Pressure Here Mounting Sleeve (Included) Dashboard No Pressure Here This unit 3 Slide the CDA-9847 into the dashboard. Connect each input lead coming from an amplifier or equalizer to the vehicle...
...This unit Ground Lead ∗ Screws (M5 × 8) (Included) Mounting Bracket NOTE Secure the ground lead of the CDA-9847. Connect all other leads of the CDA-9847 according to either side of the unit to a clean metal spot using a screw (∗) already attached to page 7). ...3 Pull the unit out, keeping it clicks. Secure the ground lead of the unit. Installation 1 No Pressure Here Mounting Sleeve (Included) Dashboard No Pressure Here This unit 3 Slide the CDA-9847 into the dashboard. Connect each input lead coming from an amplifier or equalizer to the vehicle...

Owners Manual
Page 31
Gray/Black Violet/Black " SPEAKER RIGHT REAR # Violet Green $ SPEAKER LEFT REAR % Green/Black White/Black & SPEAKER LEFT FRONT ( White : ; ; ; Installation and Connections Connections 1 Blue POWER ANT 2 Blue/White REMOTE TURN-ON 3 AUDIO Pink/Black INTERRUPT IN 4 Orange ILLUMINATION 5 Red IGNITION 6 Yellow BATTERY 7 Black GND 8 Antenna ...
Gray/Black Violet/Black " SPEAKER RIGHT REAR # Violet Green $ SPEAKER LEFT REAR % Green/Black White/Black & SPEAKER LEFT FRONT ( White : ; ; ; Installation and Connections Connections 1 Blue POWER ANT 2 Blue/White REMOTE TURN-ON 3 AUDIO Pink/Black INTERRUPT IN 4 Orange ILLUMINATION 5 Red IGNITION 6 Yellow BATTERY 7 Black GND 8 Antenna ...
Owners Manual
Page 33
... in materials or workmanship (parts and labor) in your nearest Authorized Alpine Service Center. Dropped or damaged hard drives. 3 Damage caused by an Authorized Installation Center, and this Warranty. AND ALPINE OF CANADA INC. ("Alpine"), are dedicated to quality craftsmanship and are responsible for delivery of the...level is recommended to use a carrier that you . [IN CANADA ONLY: This Warranty is not valid unless your Alpine car audio product has been installed in the product. [WHAT IS NOT COVERED: This Warranty does not cover the following number for payment of any ...
... in materials or workmanship (parts and labor) in your nearest Authorized Alpine Service Center. Dropped or damaged hard drives. 3 Damage caused by an Authorized Installation Center, and this Warranty. AND ALPINE OF CANADA INC. ("Alpine"), are dedicated to quality craftsmanship and are responsible for delivery of the...level is recommended to use a carrier that you . [IN CANADA ONLY: This Warranty is not valid unless your Alpine car audio product has been installed in the product. [WHAT IS NOT COVERED: This Warranty does not cover the following number for payment of any ...


