
Owners Manual
Page 7
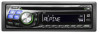
For details, consult your Alpine dealer. About the alphanumeric display of this unit • All English lower case characters are displayed as upper case on , the volume will start from level 12. Press and hold the Rotary encoder for at the remote control sensor. The time ...S Z Display Turning Power On and Off Press SOURCE/POWER to turn off the unit power. 2 Remove the detachable front panel. 3 Press RESET with an optional Alpine remote control. The time is automatically set by pressing any other button except eject c and TITLE . The time can be controlled with a ball-point pen or...
For details, consult your Alpine dealer. About the alphanumeric display of this unit • All English lower case characters are displayed as upper case on , the volume will start from level 12. Press and hold the Rotary encoder for at the remote control sensor. The time ...S Z Display Turning Power On and Off Press SOURCE/POWER to turn off the unit power. 2 Remove the detachable front panel. 3 Press RESET with an optional Alpine remote control. The time is automatically set by pressing any other button except eject c and TITLE . The time can be controlled with a ball-point pen or...
Owners Manual
Page 20
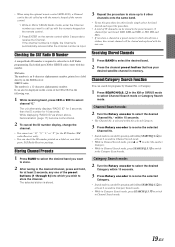
... I," or "F" for the ID Number (XM radio Receiver only). • You can check the ID number printed on a label on the screen of the CDA-9847 in the following way. 1 While receiving band, press g or f to select channel "0." If the channel number is 3 digits, the Channel is automatically received ...in the preset memory (6 channels for each band; XM radio: The number is an 8-character alphanumeric number, printed on a label directly on the remote control within 10 seconds. * The Channel No. The unit alternately displays "RADIO ID" for 2 seconds, then the ID number for programs by ...
... I," or "F" for the ID Number (XM radio Receiver only). • You can check the ID number printed on a label on the screen of the CDA-9847 in the following way. 1 While receiving band, press g or f to select channel "0." If the channel number is 3 digits, the Channel is automatically received ...in the preset memory (6 channels for each band; XM radio: The number is an 8-character alphanumeric number, printed on a label directly on the remote control within 10 seconds. * The Channel No. The unit alternately displays "RADIO ID" for 2 seconds, then the ID number for programs by ...
Owners Manual
Page 24
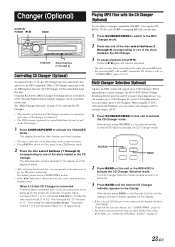
... "Setting the AUX Mode (V-Link)" on the display. • If the selected CD Changer is controllable from this unit. Multi-Changer Selection (Optional) Alpine's Ai-NET system will support up to 4 CD Changers. If you use 2 Switching devices, you can be controlled by this unit as well as ...and CD-RWs containing MP3 files on this unit for the 6-disc CD Changer. Alternatively press BAND on the Remote Control until the desired CD Changer indicator appears on the optional remote control (RUE-4202) to 12). With a CD Changer connected to activate the CHANGER mode. To select discs ...
... "Setting the AUX Mode (V-Link)" on the display. • If the selected CD Changer is controllable from this unit. Multi-Changer Selection (Optional) Alpine's Ai-NET system will support up to 4 CD Changers. If you use 2 Switching devices, you can be controlled by this unit as well as ...and CD-RWs containing MP3 files on this unit for the 6-disc CD Changer. Alternatively press BAND on the Remote Control until the desired CD Changer indicator appears on the optional remote control (RUE-4202) to 12). With a CD Changer connected to activate the CHANGER mode. To select discs ...

Owners Manual
Page 31
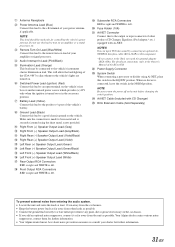
Installation and Connections Connections 1 Blue POWER ANT 2 Blue/White REMOTE TURN-ON 3 AUDIO Pink/Black INTERRUPT IN 4 Orange ILLUMINATION 5 Red IGNITION 6 Yellow BATTERY 7 Black GND 8 Antenna To power antenna To amplifier or equalizer To vehicle ...
Installation and Connections Connections 1 Blue POWER ANT 2 Blue/White REMOTE TURN-ON 3 AUDIO Pink/Black INTERRUPT IN 4 Orange ILLUMINATION 5 Red IGNITION 6 Yellow BATTERY 7 Black GND 8 Antenna To power antenna To amplifier or equalizer To vehicle ...
Owners Manual
Page 32
...Blue/White) Connect this lead to the remote turn the power off to bare metal and is connected, leave the switch in the EQ/DIV position. Your Alpine dealer carries various noise suppressors, contact them for further information. • Your Alpine dealer knows best about noise prevention measures ... 8 Ground Lead (Black) Connect this lead to turn on lead of your power antenna, if applicable. This will allow the backlighting of the CDA-9847 to dim whenever the vehicle's lights are turned on. 6 Switched Power Lead (Ignition) (Red) Connect this to the output or input connector ...
...Blue/White) Connect this lead to the remote turn the power off to bare metal and is connected, leave the switch in the EQ/DIV position. Your Alpine dealer carries various noise suppressors, contact them for further information. • Your Alpine dealer knows best about noise prevention measures ... 8 Ground Lead (Black) Connect this lead to turn on lead of your power antenna, if applicable. This will allow the backlighting of the CDA-9847 to dim whenever the vehicle's lights are turned on. 6 Switched Power Lead (Ignition) (Red) Connect this to the output or input connector ...


