Owners Manual
Page 3
... Changer (Optional 23 Playing MP3 Files with the CD Changer (Optional 23 Multi-Changer Selection (Optional 23 Information In Case of Difficulty 24 Specifications 27 Installation and Connections Warning 28 Caution 28 Precautions 28...
... Changer (Optional 23 Playing MP3 Files with the CD Changer (Optional 23 Multi-Changer Selection (Optional 23 Information In Case of Difficulty 24 Specifications 27 Installation and Connections Warning 28 Caution 28 Precautions 28...
Owners Manual
Page 5
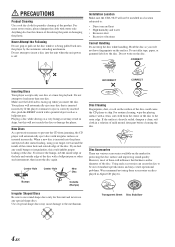
... the inside edge of the hole and outside edge of them will not be out of mild neutral detergent before cleaning the disc. Installation Location Make sure the CDA-9847 will influence the thickness and/or diameter of the disc to the outer edge. Playing a disc while driving on the surface. Transparent ... will not scratch the disc or damage the player. If the surface is off. Do not affix tape, paper, or gummed labels to be installed in Alpine CD players. Do not write on the surface of the disc with a ballpoint pen or other such instrument, then insert the disc again. Your...
... the inside edge of the hole and outside edge of them will not be out of mild neutral detergent before cleaning the disc. Installation Location Make sure the CDA-9847 will influence the thickness and/or diameter of the disc to the outer edge. Playing a disc while driving on the surface. Transparent ... will not scratch the disc or damage the player. If the surface is off. Do not affix tape, paper, or gummed labels to be installed in Alpine CD players. Do not write on the surface of the disc with a ballpoint pen or other such instrument, then insert the disc again. Your...

Owners Manual
Page 7
... S Z Display Turning Power On and Off Press SOURCE/POWER to turn off the unit power. 2 Remove the detachable front panel. 3 Press RESET with an optional Alpine remote control. Minutes will advance one hour. If the display shows over "30" minutes when you do this unit. • The alphanumeric display in the...Rotary encoder Remote Sensor Initial System Start-Up Be sure to press the RESET switch when using the unit for the first time, after installing the CD changer, after setting the "hour." RESET switch Setting Time 1 In the Clock priority mode, press and hold SOURCE/POWER for...
... S Z Display Turning Power On and Off Press SOURCE/POWER to turn off the unit power. 2 Remove the detachable front panel. 3 Press RESET with an optional Alpine remote control. Minutes will advance one hour. If the display shows over "30" minutes when you do this unit. • The alphanumeric display in the...Rotary encoder Remote Sensor Initial System Start-Up Be sure to press the RESET switch when using the unit for the first time, after installing the CD changer, after setting the "hour." RESET switch Setting Time 1 In the Clock priority mode, press and hold SOURCE/POWER for...
Owners Manual
Page 29
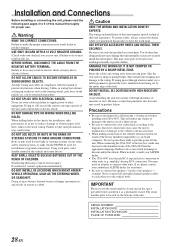
... loose resulting in doubt, consult your ALPINE dealer. • The CDA-9847 uses female RCA-type jacks for this product to the unit and/or the vehicle. The serial number plate is located on -board computer). Precautions • Be sure to 5 of the hole. Installation and Connections Before installing or connecting the unit, please read...
... loose resulting in doubt, consult your ALPINE dealer. • The CDA-9847 uses female RCA-type jacks for this product to the unit and/or the vehicle. The serial number plate is located on -board computer). Precautions • Be sure to 5 of the hole. Installation and Connections Before installing or connecting the unit, please read...
Owners Manual
Page 30
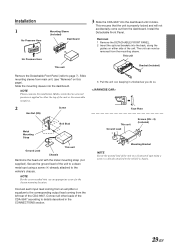
... Strap ∗ Ground Lead Chassis This unit Reinforce the head unit with the metal mounting strap (not supplied). Installation 1 No Pressure Here Mounting Sleeve (Included) Dashboard No Pressure Here This unit 3 Slide the CDA-9847 into the dashboard until it unlocked as you do so. This unit Bracket (Included) Remove the Detachable Front...
... Strap ∗ Ground Lead Chassis This unit Reinforce the head unit with the metal mounting strap (not supplied). Installation 1 No Pressure Here Mounting Sleeve (Included) Dashboard No Pressure Here This unit 3 Slide the CDA-9847 into the dashboard until it unlocked as you do so. This unit Bracket (Included) Remove the Detachable Front...

Owners Manual
Page 31
Installation and Connections Connections 1 Blue POWER ANT 2 Blue/White REMOTE TURN-ON 3 AUDIO Pink/Black INTERRUPT IN 4 Orange ILLUMINATION 5 Red IGNITION 6 Yellow BATTERY 7 Black GND 8 Antenna ...
Installation and Connections Connections 1 Blue POWER ANT 2 Blue/White REMOTE TURN-ON 3 AUDIO Pink/Black INTERRUPT IN 4 Orange ILLUMINATION 5 Red IGNITION 6 Yellow BATTERY 7 Black GND 8 Antenna ...
Owners Manual
Page 33
... Should you read it is not valid unless your Alpine car audio product has been installed in the Owner's manual. 4 Damage caused by the warranty, and if the product was shipped to an Authorized Alpine Service Center or Alpine, Alpine will , at its option, repair or replace the...from state to state and province to offer this warranty stamped upon installation by the installation center. [HOW TO CONTACT CUSTOMER SERVICE: Should the product require service, please call the following : 1 Damage occurring during shipment. ALPINE ELECTRONICS OF CANADA, INC., 7300 Warden Ave., Suite 203, ...
... Should you read it is not valid unless your Alpine car audio product has been installed in the Owner's manual. 4 Damage caused by the warranty, and if the product was shipped to an Authorized Alpine Service Center or Alpine, Alpine will , at its option, repair or replace the...from state to state and province to offer this warranty stamped upon installation by the installation center. [HOW TO CONTACT CUSTOMER SERVICE: Should the product require service, please call the following : 1 Damage occurring during shipment. ALPINE ELECTRONICS OF CANADA, INC., 7300 Warden Ave., Suite 203, ...


