
Owner's Manual (english)
Page 3
... MX Level 16 Setting EQ mode 17 Setting the Time Correction Unit (TCR Parameter 17 Sound Field Adjustment 17 Adjusting the Parametric Equalizer Curve ........17 Adjusting the Graphic Equalizer Curve 17 Adjusting the Time Correction 17 Storing the Sound Field Adjustment Settings 18 Recalling the Stored Sound Field Adjustment Settings 18 Other...
... MX Level 16 Setting EQ mode 17 Setting the Time Correction Unit (TCR Parameter 17 Sound Field Adjustment 17 Adjusting the Parametric Equalizer Curve ........17 Adjusting the Graphic Equalizer Curve 17 Adjusting the Time Correction 17 Storing the Sound Field Adjustment Settings 18 Recalling the Stored Sound Field Adjustment Settings 18 Other...
Owner's Manual (english)
Page 4
... Manual Mode ......36 Turning Subwoofer ON/OFF 36 Setting the Subwoofer System 36 Setting the Subwoofer Phase 37 Setting the Subwoofer Channel (SUBW. Channel 37 Equalizer Presets (Factory's EQ 37 Setting the Response Slope for a desired Song 33 Searching by artist name 33 Quick Search 33 Direct Search Function 34 Select...
... Manual Mode ......36 Turning Subwoofer ON/OFF 36 Setting the Subwoofer System 36 Setting the Subwoofer Phase 37 Setting the Subwoofer Channel (SUBW. Channel 37 Equalizer Presets (Factory's EQ 37 Setting the Response Slope for a desired Song 33 Searching by artist name 33 Quick Search 33 Direct Search Function 34 Select...
Owner's Manual (english)
Page 5
... MX Level 37 Setting EQ mode 37 Setting the Time Correction Unit (TCR Parameter 38 Sound Field Adjustment 38 Adjusting the Parametric Equalizer Curve ........38 Adjusting the Graphic Equalizer Curve 38 Adjusting the Time Correction 38 Adjusting the Crossover Settings 38 Storing the Sound Field Adjustment Settings 39 Recalling the Stored Sound...
... MX Level 37 Setting EQ mode 37 Setting the Time Correction Unit (TCR Parameter 38 Sound Field Adjustment 38 Adjusting the Parametric Equalizer Curve ........38 Adjusting the Graphic Equalizer Curve 38 Adjusting the Time Correction 38 Adjusting the Crossover Settings 38 Storing the Sound Field Adjustment Settings 39 Recalling the Stored Sound...
Owner's Manual (english)
Page 19
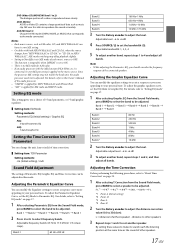
...the same time as music clip. Note • While adjusting the Parametric EQ, you a choice of 5-band parametric, or 7-band graphic equalizer. Setting item: EQ Mode Setting contents: Parametric EQ (Initial setting) / Graphic EQ PEQ: 5-band Parametric EQ GEQ: 7-...item: TCR Parameter Setting contents: cm (Initial setting) / inch Sound Field Adjustment The setting of Parametric EQ/Graphic EQ and Time Correction can modify the equalizer settings to create a response curve more clearly. (DVD MUSIC): A DVD or Video CD contains a large quantity of the connected speakers. F-L*1 ...
...the same time as music clip. Note • While adjusting the Parametric EQ, you a choice of 5-band parametric, or 7-band graphic equalizer. Setting item: EQ Mode Setting contents: Parametric EQ (Initial setting) / Graphic EQ PEQ: 5-band Parametric EQ GEQ: 7-...item: TCR Parameter Setting contents: cm (Initial setting) / inch Sound Field Adjustment The setting of Parametric EQ/Graphic EQ and Time Correction can modify the equalizer settings to create a response curve more clearly. (DVD MUSIC): A DVD or Video CD contains a large quantity of the connected speakers. F-L*1 ...
Owner's Manual (english)
Page 39
...): A DVD or Video CD contains a large quantity of data such as music clip. INDIVIDUAL (L/R): Left and right speakers are adjusted equally. MX takes advantage of this data to be adjusted. This reproduces a well-balanced sound close to the media connected. AUX (MX ... Channel (SUBW. Channel Setting contents: STEREO (Initial setting) / MONO STEREO: Subwoofer stereo (L/R) output MONO: Subwoofer monaural output Equalizer Presets (Factory's EQ) 10 typical equalizer settings are preset at all frequencies. Flat Pops Rock News Jazz&Blues Electrical...
...): A DVD or Video CD contains a large quantity of data such as music clip. INDIVIDUAL (L/R): Left and right speakers are adjusted equally. MX takes advantage of this data to be adjusted. This reproduces a well-balanced sound close to the media connected. AUX (MX ... Channel (SUBW. Channel Setting contents: STEREO (Initial setting) / MONO STEREO: Subwoofer stereo (L/R) output MONO: Subwoofer monaural output Equalizer Presets (Factory's EQ) 10 typical equalizer settings are preset at all frequencies. Flat Pops Rock News Jazz&Blues Electrical...
Owner's Manual (english)
Page 40
... Adjustment mode, press BAND to select a speaker to be adjusted. Adjustable frequency bands: LOW / MID-L 20 Hz~200 Hz 38-EN To adjust the Parametric Equalizer Curve, set the EQ Mode to be adjusted. 2.2ch (3WAY) System F-L*1 F-R*2 R-L*3 R-R*4 SW-L SW-R... Setting contents: cm (Initial setting) / inch Sound Field Adjustment The setting of Parametric EQ/Graphic EQ, Time Correction and X-Over can modify the Equalizer settings to create a response curve more appealing to adjust the level. Band 1 Band 2 Band 3 Band 4 ...
... Adjustment mode, press BAND to select a speaker to be adjusted. Adjustable frequency bands: LOW / MID-L 20 Hz~200 Hz 38-EN To adjust the Parametric Equalizer Curve, set the EQ Mode to be adjusted. 2.2ch (3WAY) System F-L*1 F-R*2 R-L*3 R-R*4 SW-L SW-R... Setting contents: cm (Initial setting) / inch Sound Field Adjustment The setting of Parametric EQ/Graphic EQ, Time Correction and X-Over can modify the Equalizer settings to create a response curve more appealing to adjust the level. Band 1 Band 2 Band 3 Band 4 ...
Owner's Manual (english)
Page 41
...., 18 dB/oct., 24 dB/ oct. 4 Turn the Rotary encoder to adjust the slope. X-Over), press and hold the desired preset buttons for at an equal distance between the left ear. X-Over), press any item of the connected speakers. • About the 2.2ch (3WAY)/4.2ch (FRONT/REAR/SUBW.) system, you can...
...., 18 dB/oct., 24 dB/ oct. 4 Turn the Rotary encoder to adjust the slope. X-Over), press and hold the desired preset buttons for at an equal distance between the left ear. X-Over), press any item of the connected speakers. • About the 2.2ch (3WAY)/4.2ch (FRONT/REAR/SUBW.) system, you can...
Owner's Manual (english)
Page 52
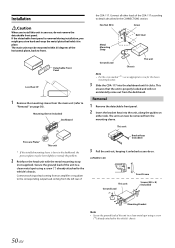
... from the left rear of the horizontal plane, back to "Removal" on either side. Mounting Sleeve (Included) Dashboard the CDA-117. Secure the ground lead of the CDA-117 according to the vehicle's chassis. Connect all other leads of the unit to a clean metal spot using a screw (*3) ...already attached to the corresponding output lead coming from the mounting sleeve. Connect each input lead coming from an amplifier or equalizer to the vehicle...
... from the left rear of the horizontal plane, back to "Removal" on either side. Mounting Sleeve (Included) Dashboard the CDA-117. Secure the ground lead of the CDA-117 according to the vehicle's chassis. Connect all other leads of the unit to a clean metal spot using a screw (*3) ...already attached to the corresponding output lead coming from the mounting sleeve. Connect each input lead coming from an amplifier or equalizer to the vehicle...
Owner's Manual (english)
Page 54
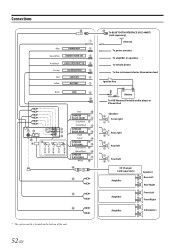
... switch is located on the bottom of the unit. 52-EN To BLUETOOTH INTERFACE (KCE-400BT) (sold separately) Antenna To power antenna To amplifier or equalizer To vehicle phone To the instrument cluster illumination lead Ignition Key Battery To USB Memory/Portable audio player or iPhone/iPod Speakers Front right Rear...
... switch is located on the bottom of the unit. 52-EN To BLUETOOTH INTERFACE (KCE-400BT) (sold separately) Antenna To power antenna To amplifier or equalizer To vehicle phone To the instrument cluster illumination lead Ignition Key Battery To USB Memory/Portable audio player or iPhone/iPod Speakers Front right Rear...
Owner's Manual (english)
Page 55
...in the EXT AP position. If a USB cable other than the supplied is turned on page 22. This will allow the backlighting of the CDA-117 to dim whenever the vehicle's lights are turned on. Switched Power Lead (Ignition) (Red) Connect this lead to an open ...for further information. • Your Alpine dealer knows best about noise prevention measures so consult your amplifier or signal processor. Audio Interrupt In Lead (Pink/Black) Connect this lead to the Audio interface output of other product (CD changer, IMPRINT audio processor, Equalizer, etc.) equipped with KCE-400BT...
...in the EXT AP position. If a USB cable other than the supplied is turned on page 22. This will allow the backlighting of the CDA-117 to dim whenever the vehicle's lights are turned on. Switched Power Lead (Ignition) (Red) Connect this lead to an open ...for further information. • Your Alpine dealer knows best about noise prevention measures so consult your amplifier or signal processor. Audio Interrupt In Lead (Pink/Black) Connect this lead to the Audio interface output of other product (CD changer, IMPRINT audio processor, Equalizer, etc.) equipped with KCE-400BT...


