Owners Manual
Page 3
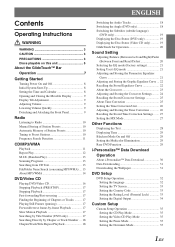
... Operating Instructions WARNING WARNING 3 CAUTION 3 PRECAUTIONS 3 Discs playable on this unit 5 About the GlideTouch™ Bar Operation 7 Getting Started Turning Power On and Off 8 Initial System Start-Up 8 Setting the Time and Calendar 8 Opening and Closing the Movable Display 9 Display Tilt Adjustment 9 Adjusting Volume 9 Lowering Volume Quickly 9 Detaching and Attaching the Front Panel 9 Radio Listening to Radio 10 Manual Storing of Station Presets 10 Automatic Memory of Station Presets 10 Tuning to Preset Stations 10 Frequency Search Function...
... Operating Instructions WARNING WARNING 3 CAUTION 3 PRECAUTIONS 3 Discs playable on this unit 5 About the GlideTouch™ Bar Operation 7 Getting Started Turning Power On and Off 8 Initial System Start-Up 8 Setting the Time and Calendar 8 Opening and Closing the Movable Display 9 Display Tilt Adjustment 9 Adjusting Volume 9 Lowering Volume Quickly 9 Detaching and Attaching the Front Panel 9 Radio Listening to Radio 10 Manual Storing of Station Presets 10 Automatic Memory of Station Presets 10 Tuning to Preset Stations 10 Frequency Search Function...

Owners Manual
Page 4
SETUP Setup Operation 36 General Setting Setting the Clock display 36 Playing MP3/WMA Data 36 Sound (Beep) Guide Function 36 Changing the Sound (Beep) Guide Pattern 36 Turning Mute Mode On/Off 37 Setting Tone Defeat for External Devices 37 Setting the AUX Mode (V-Link 37 Setting the Digital Output 37 Audio Setting Subwoofer On and Off 37 Setting the Response Slope for the High Range Speaker 37 Display Setting Dimmer Control 37 Setting the Display Dimmer 37 Changing the Display Color 38 Scroll Setting 38 Scroll Type Setting 38 Switching the...
SETUP Setup Operation 36 General Setting Setting the Clock display 36 Playing MP3/WMA Data 36 Sound (Beep) Guide Function 36 Changing the Sound (Beep) Guide Pattern 36 Turning Mute Mode On/Off 37 Setting Tone Defeat for External Devices 37 Setting the AUX Mode (V-Link 37 Setting the Digital Output 37 Audio Setting Subwoofer On and Off 37 Setting the Response Slope for the High Range Speaker 37 Display Setting Dimmer Control 37 Setting the Display Dimmer 37 Changing the Display Color 38 Scroll Setting 38 Scroll Type Setting 38 Switching the...
Owners Manual
Page 8
.... iPod and iPod mini are trademarks of this DVD player is considered as one session. Multisession CD-R/RW: Once a recording has been stopped, this is dirty, or when moisture condensation has occurred inside the unit. • Be sure to follow all cautions included with discs recorded in the DVD- The DVA-9965 can be played back. These can only read multisession DATA Formatted discs...
.... iPod and iPod mini are trademarks of this DVD player is considered as one session. Multisession CD-R/RW: Once a recording has been stopped, this is dirty, or when moisture condensation has occurred inside the unit. • Be sure to follow all cautions included with discs recorded in the DVD- The DVA-9965 can be played back. These can only read multisession DATA Formatted discs...
Owners Manual
Page 11
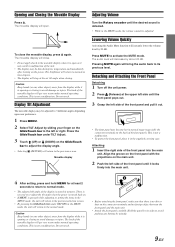
... into the main unit. 4 After setting, press and hold MENU for at the set tilt angle when closing to the normal mode. Lowering Volume Quickly Activating the Audio Mute function will return to avoid damage or injury. The back of the front panel until the desired sound is opening or closing to avoid damage or injury. This is open . Movable display Adjusting Volume Turn the Rotary encoder...
... into the main unit. 4 After setting, press and hold MENU for at the set tilt angle when closing to the normal mode. Lowering Volume Quickly Activating the Audio Mute function will return to avoid damage or injury. The back of the front panel until the desired sound is opening or closing to avoid damage or injury. This is open . Movable display Adjusting Volume Turn the Rotary encoder...
Owners Manual
Page 18
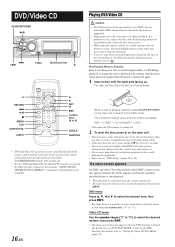
... remove a disc during playback or change every time the button is connected 2 To eject the disc, press c on the monitor screen: Play Position Memory Function Even if you try to "9"). The disc will be operated for every DVD. AUDIO 8 : ENT. 9 f number keys (0 to 9) ANGLE SUBTITLE • DVD and Video CD operation can also be careful to 34). The mode will not be played automatically. DVD menu Press 8, 9, ; Video CD menu Use the number keys ("0" to "9") to the DISC mode. If a menu screen appears On DVDs...
... remove a disc during playback or change every time the button is connected 2 To eject the disc, press c on the monitor screen: Play Position Memory Function Even if you try to "9"). The disc will be operated for every DVD. AUDIO 8 : ENT. 9 f number keys (0 to 9) ANGLE SUBTITLE • DVD and Video CD operation can also be careful to 34). The mode will not be played automatically. DVD menu Press 8, 9, ; Video CD menu Use the number keys ("0" to "9") to the DISC mode. If a menu screen appears On DVDs...
Owners Manual
Page 22
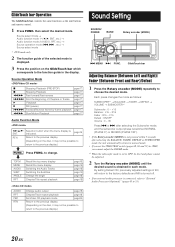
... playback page18 Set Video CD playback mode page35 Return to the previous display (Depending on the disc, it may not be possible to return to change. RTN C FUNC. B TOP.M MENU AUDIO SUBT. Each press changes the mode as the unit buttons and remote control. 1 Press FUNC. GlideTouch bar Operation The GlideTouch bar controls the same functions as follows: SUBWOOFER*1 → BALANCE → FADER → DEFEAT → VOLUME → SUBWOOFER*1 Subwoofer : 0 ~ +15...
... playback page18 Set Video CD playback mode page35 Return to the previous display (Depending on the disc, it may not be possible to return to change. RTN C FUNC. B TOP.M MENU AUDIO SUBT. Each press changes the mode as the unit buttons and remote control. 1 Press FUNC. GlideTouch bar Operation The GlideTouch bar controls the same functions as follows: SUBWOOFER*1 → BALANCE → FADER → DEFEAT → VOLUME → SUBWOOFER*1 Subwoofer : 0 ~ +15...
Owners Manual
Page 29
... step 3. • Each music source, such as music clip. For details, refer to the Owner's Manual of the audio processor. • "CMPM" is applied for MP3/WMA, WAV and iPod. • "SAT" is applied for XM radio and SIRIUS radio. • If MENU is pressed while adjusting or setting the items in the MENU mode, the unit returns to the previous selection screen. • By pressing the...
... step 3. • Each music source, such as music clip. For details, refer to the Owner's Manual of the audio processor. • "CMPM" is applied for MP3/WMA, WAV and iPod. • "SAT" is applied for XM radio and SIRIUS radio. • If MENU is pressed while adjusting or setting the items in the MENU mode, the unit returns to the previous selection screen. • By pressing the...
Owners Manual
Page 31
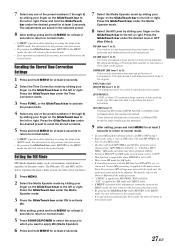
... stored color setting Select USER'S 1 through 512). Rear DVD Function 1 Select the desired audio source. 2 Press MENU. 3 Select Rear DVD by sliding your finger on the GlideTouch bar to store the adjustment. Press the GlideTouch bar under the desired preset to the left or right. If ON is pressed during the blackout mode, the function will turn off. • If any one of the illuminated buttons, their color switches...
... stored color setting Select USER'S 1 through 512). Rear DVD Function 1 Select the desired audio source. 2 Press MENU. 3 Select Rear DVD by sliding your finger on the GlideTouch bar to store the adjustment. Press the GlideTouch bar under the desired preset to the left or right. If ON is pressed during the blackout mode, the function will turn off. • If any one of the illuminated buttons, their color switches...

Owners Manual
Page 32
... rear monitor (from the navigation system, for at least 2 seconds to return to the calendar message. Do not change a file name once it has been created. SOURCE Built-in DISC REAR DVD ON/ OFF setting ON Remote Input is memorized in Preset 6 of download data shall be used . Data is set to normal mode. • The volume of Changer or SAT radio, etc. For details on the display itself. Adjust the volume on how to download data...
... rear monitor (from the navigation system, for at least 2 seconds to return to the calendar message. Do not change a file name once it has been created. SOURCE Built-in DISC REAR DVD ON/ OFF setting ON Remote Input is memorized in Preset 6 of download data shall be used . Data is set to normal mode. • The volume of Changer or SAT radio, etc. For details on the display itself. Adjust the volume on how to download data...
Owners Manual
Page 35
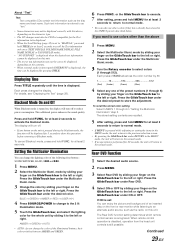
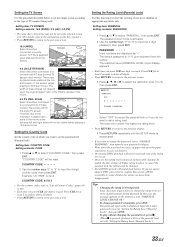
... Level (Parental Lock)", then press ENT. • To play , press ENT. Setting the Country Code Set the country code of which you press CLR one digit is activated. 2 Use the number keys "0" to "9" to input the 4-digit password, then press ENT. The restriction level (PARENTAL LEVEL) input display appears. • Each time you want to set the parental level (Parental lock). The password input mode is set. • Once set, this rating...
... Level (Parental Lock)", then press ENT. • To play , press ENT. Setting the Country Code Set the country code of which you press CLR one digit is activated. 2 Use the number keys "0" to "9" to input the 4-digit password, then press ENT. The restriction level (PARENTAL LEVEL) input display appears. • Each time you want to set the parental level (Parental lock). The password input mode is set. • Once set, this rating...
Owners Manual
Page 39
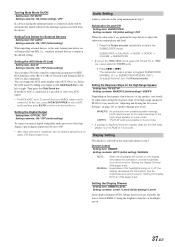
... muted whenever the interrupt signal is received from possible speaker damage, FLAT cannot be set for the high range speaker is set to FLAT in 3-way mode. The subwoofer output phase is set. Turning Mute Mode On/Off Setting item: INT MUTE Setting contents: ON (Initial setting) / OFF If a device having the interrupt feature is connected, audio will bypass EQ and MX, i.e., sound for External Devices Setting item: INT AUDIO Setting contents: ON / OFF (Initial setting) When inputting external devices to this unit, turning...
... muted whenever the interrupt signal is received from possible speaker damage, FLAT cannot be set for the high range speaker is set to FLAT in 3-way mode. The subwoofer output phase is set. Turning Mute Mode On/Off Setting item: INT MUTE Setting contents: ON (Initial setting) / OFF If a device having the interrupt feature is connected, audio will bypass EQ and MX, i.e., sound for External Devices Setting item: INT AUDIO Setting contents: ON / OFF (Initial setting) When inputting external devices to this unit, turning...
Owners Manual
Page 48
... radio. • MX COMPRESS MEDIA is applied for MP3/WMA, MMD and iPod. • If no operation is complete, press and hold MENU for at least 2 seconds. MX uses this large data quantity to reproduce a more clearly. (DVD MUSIC): A DVD or Video CD contains a large quantity of a video is reproduced more clear, clean output. If two external devices are connected, a different MX mode for each MX mode...
... radio. • MX COMPRESS MEDIA is applied for MP3/WMA, MMD and iPod. • If no operation is complete, press and hold MENU for at least 2 seconds. MX uses this large data quantity to reproduce a more clearly. (DVD MUSIC): A DVD or Video CD contains a large quantity of a video is reproduced more clear, clean output. If two external devices are connected, a different MX mode for each MX mode...
Owners Manual
Page 52
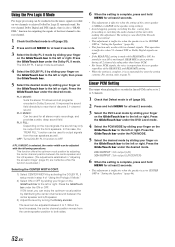
..., switching the disc, cueing, fastforwarding or switching the audio channel of this unit while making this function. • Through changing the settings on the GlideTouch bar to the left or right. Mixing bass sound to the rear channel (REAR MIX) This function mixes the front channel audio signals to page 53. Press the GlideTouch bar under the OUTPUT LEVEL mode. If ON is set, the audio signal which is output from the rear speaker...
..., switching the disc, cueing, fastforwarding or switching the audio channel of this unit while making this function. • Through changing the settings on the GlideTouch bar to the left or right. Mixing bass sound to the rear channel (REAR MIX) This function mixes the front channel audio signals to page 53. Press the GlideTouch bar under the OUTPUT LEVEL mode. If ON is set, the audio signal which is output from the rear speaker...
Owners Manual
Page 54
... MENU for at least 2 seconds. • This adjustment is effective when the setting of the centre speaker is set to CENTER OFF in the speaker setup settings. • Avoid stopping, pausing, switching the disc, cueing, fastforwarding or switching the audio channel of this unit while making this function is selected, the center width can be used to store the setting contents. Press the GlideTouch bar under the DVD...
... MENU for at least 2 seconds. • This adjustment is effective when the setting of the centre speaker is set to CENTER OFF in the speaker setup settings. • Avoid stopping, pausing, switching the disc, cueing, fastforwarding or switching the audio channel of this unit while making this function is selected, the center width can be used to store the setting contents. Press the GlideTouch bar under the DVD...
Owners Manual
Page 63
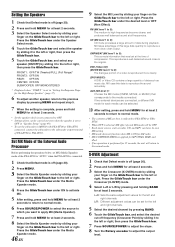
... properly grounded at its mounting location. Consult your unit can cause damage to "About MP3/WMA" on . - After the error indication disappears, insert the disc again. Connect the monitor's parking brake cord and set . - Radio Unable to tune stations in the seek mode. • You are in the "loading and unloading discs" section. Unable to receive stations. • No antenna or open connection in the DVD player. - Make sure the antenna is not set the parking brake...
... properly grounded at its mounting location. Consult your unit can cause damage to "About MP3/WMA" on . - After the error indication disappears, insert the disc again. Connect the monitor's parking brake cord and set . - Radio Unable to tune stations in the seek mode. • You are in the "loading and unloading discs" section. Unable to receive stations. • No antenna or open connection in the DVD player. - Make sure the antenna is not set the parking brake...
Owners Manual
Page 64
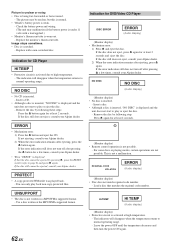
... the battery power and wiring. (The unit may be ejected, consult your Alpine dealer. 2) When the error indication remains after pressing c a few times, consult your Alpine dealer. 2) When the error indication remains after ejecting, press c again. Indication for at the MP3/WMA supported format. Use a disc written at least 2 seconds and eject the disc. Remove the disc by following step: Press c again for DVD/Video CD Player DISC ERROR ERROR (Audio display) (Monitor display) • Mechanism error. 1) Press c and eject the disc...
... the battery power and wiring. (The unit may be ejected, consult your Alpine dealer. 2) When the error indication remains after pressing c a few times, consult your Alpine dealer. 2) When the error indication remains after ejecting, press c again. Indication for at the MP3/WMA supported format. Use a disc written at least 2 seconds and eject the disc. Remove the disc by following step: Press c again for DVD/Video CD Player DISC ERROR ERROR (Audio display) (Monitor display) • Mechanism error. 1) Press c and eject the disc...
Owners Manual
Page 66
.../16") 19 mm (3/4") • Due to change without notice. 64-EN CAUTION-Laser radiation when open, DO NOT STARE INTO BEAM (Bottom side of the optional adapter KCA420i, and update the iPod Software Version to . - Refer to the Owner's Manual of player) No action needed. ERROR-01 • Communication error - • The user has selected a channel number that time. - NO FILE • There are subject to continuous...
.../16") 19 mm (3/4") • Due to change without notice. 64-EN CAUTION-Laser radiation when open, DO NOT STARE INTO BEAM (Bottom side of the optional adapter KCA420i, and update the iPod Software Version to . - Refer to the Owner's Manual of player) No action needed. ERROR-01 • Communication error - • The user has selected a channel number that time. - NO FILE • There are subject to continuous...
Owners Manual
Page 67
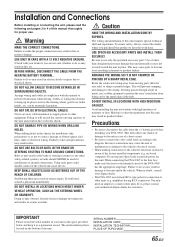
...-EN Failure to make sure the fuse for installations or ground connections. DO NOT USE BOLTS OR NUTS IN THE BRAKE OR STEERING SYSTEMS TO MAKE GROUND CONNECTIONS. Using such parts could disable control of the unit. The wiring and installation of this unit internally or may result in fire or product damage. Doing so may result in compliance with high incidence of the DVA-9965 has the appropriate...
...-EN Failure to make sure the fuse for installations or ground connections. DO NOT USE BOLTS OR NUTS IN THE BRAKE OR STEERING SYSTEMS TO MAKE GROUND CONNECTIONS. Using such parts could disable control of the unit. The wiring and installation of this unit internally or may result in fire or product damage. Doing so may result in compliance with high incidence of the DVA-9965 has the appropriate...
Owners Manual
Page 71
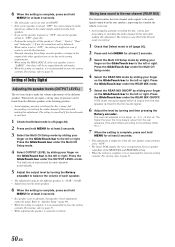
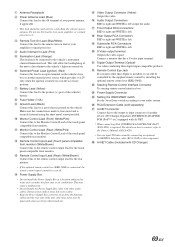
...'s power antenna. 1 Antenna Receptacle 2 Power Antenna Lead (Blue) Connect this to the remote control output lead for the rear monitor. • If the optional remote control eye (KRE-500E) is connected, the remote control signal cannot be received. % Power Supply Box • Do not install the Power Supply Box at a location subjected to water such as under the floor mat or air conditioner. Monitor Control Lead (Front) (White/Pink) Connect this to the output or input connector of another unused power source...
...'s power antenna. 1 Antenna Receptacle 2 Power Antenna Lead (Blue) Connect this to the remote control output lead for the rear monitor. • If the optional remote control eye (KRE-500E) is connected, the remote control signal cannot be received. % Power Supply Box • Do not install the Power Supply Box at a location subjected to water such as under the floor mat or air conditioner. Monitor Control Lead (Front) (White/Pink) Connect this to the output or input connector of another unused power source...
Owners Manual
Page 74
...TERM "INCIDENTAL DAMAGES" REFERS TO EXPENSES OF TRANSPORTING THE PRODUCT TO THE ALPINE SERVICE CENTER, LOSS OF THE ORIGINAL PURCHASER'S TIME, LOSS OF THE USE OF THE PRODUCT, BUS FARES, CAR RENTALS OR OTHERS COSTS RELATING TO THE CARE AND CUSTODY OF THE ...OF REPAIRING OR REPLACING OTHER PROPERTY WHICH IS DAMAGED WHEN THIS PRODUCT DOES NOT WORK PROPERLY. If the repairs are pleased to follow instructions contained in the Owner's manual. 4 Damage caused by negligence, misuse, improper operation or failure to offer this warranty stamped upon installation by Alpine within the United States,...
...TERM "INCIDENTAL DAMAGES" REFERS TO EXPENSES OF TRANSPORTING THE PRODUCT TO THE ALPINE SERVICE CENTER, LOSS OF THE ORIGINAL PURCHASER'S TIME, LOSS OF THE USE OF THE PRODUCT, BUS FARES, CAR RENTALS OR OTHERS COSTS RELATING TO THE CARE AND CUSTODY OF THE ...OF REPAIRING OR REPLACING OTHER PROPERTY WHICH IS DAMAGED WHEN THIS PRODUCT DOES NOT WORK PROPERLY. If the repairs are pleased to follow instructions contained in the Owner's manual. 4 Damage caused by negligence, misuse, improper operation or failure to offer this warranty stamped upon installation by Alpine within the United States,...


