Owners Manual
Page 1
...ÓVILES/SOLO PER L'UTILIZZO IN AUTOMOBILE/ENDAST FÖR BILBRUK R EN RDS MP3 CD Receiver CDE-9870R DE • OWNER'S MANUAL Please read before using this equipment. • BEDIENUNGSANLEITUNG Lesen Sie diese Bedienungsanleitung bitte vor Gebrauch des Gerätes. ALPINE ELECTRONICS MARKETING, INC. 1-1-8 Nishi Gotanda, Shinagawa-ku, Tokyo 141-0031, Japan Phone...
...ÓVILES/SOLO PER L'UTILIZZO IN AUTOMOBILE/ENDAST FÖR BILBRUK R EN RDS MP3 CD Receiver CDE-9870R DE • OWNER'S MANUAL Please read before using this equipment. • BEDIENUNGSANLEITUNG Lesen Sie diese Bedienungsanleitung bitte vor Gebrauch des Gerätes. ALPINE ELECTRONICS MARKETING, INC. 1-1-8 Nishi Gotanda, Shinagawa-ku, Tokyo 141-0031, Japan Phone...
Owners Manual
Page 2
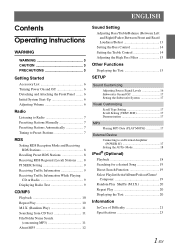
... 6 Turning Power On and Off 6 Detaching and Attaching the Front Panel ........ 6 Initial System Start-Up 6 Adjusting Volume 6 Radio Listening to Radio 7 Presetting Stations Manually 7 Presetting Stations Automatically 7 Tuning to Preset Stations 7 RDS Setting RDS Reception Mode and Receiving RDS Stations...PI SEEK Setting 9 Receiving Traffic Information 9 Receiving Traffic Information While Playing CD or Radio 9 Displaying Radio Text 9 CD/MP3 Playback 10 Repeat Play 10 M.I.X. (Random Play 11 Searching from CD Text 11 File/Folder Name Search (concerning MP3 11 About MP3 12 Sound...
... 6 Turning Power On and Off 6 Detaching and Attaching the Front Panel ........ 6 Initial System Start-Up 6 Adjusting Volume 6 Radio Listening to Radio 7 Presetting Stations Manually 7 Presetting Stations Automatically 7 Tuning to Preset Stations 7 RDS Setting RDS Reception Mode and Receiving RDS Stations...PI SEEK Setting 9 Receiving Traffic Information 9 Receiving Traffic Information While Playing CD or Radio 9 Displaying Radio Text 9 CD/MP3 Playback 10 Repeat Play 10 M.I.X. (Random Play 11 Searching from CD Text 11 File/Folder Name Search (concerning MP3 11 About MP3 12 Sound...

Owners Manual
Page 3
Installation and Connections Warning 24 Caution 24 Precautions 24 Installation 25 Connections 26 2-EN
Installation and Connections Warning 24 Caution 24 Precautions 24 Installation 25 Connections 26 2-EN
Owners Manual
Page 4
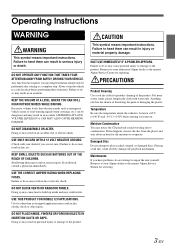
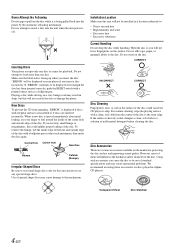
...ALTER. DO NOT BLOCK VENTS OR RADIATOR PANELS. CAUTION This symbol means important instructions. Failure to do so may notice the CD playback sound wavering due to the product. Anything else has the chance of the product. Swallowing them can result in injury or... shock or other injury. Operating Instructions WARNING WARNING This symbol means important instructions. Excessive volume levels that requires your authorized Alpine dealer or the nearest Alpine Service Centre for repairing. LISTENING AT LOUD VOLUME LEVELS IN A CAR MAY ALSO CAUSE HEARING DAMAGE. USE ONLY IN ...
...ALTER. DO NOT BLOCK VENTS OR RADIATOR PANELS. CAUTION This symbol means important instructions. Failure to do so may notice the CD playback sound wavering due to the product. Anything else has the chance of the product. Swallowing them can result in injury or... shock or other injury. Operating Instructions WARNING WARNING This symbol means important instructions. Excessive volume levels that requires your authorized Alpine dealer or the nearest Alpine Service Centre for repairing. LISTENING AT LOUD VOLUME LEVELS IN A CAR MAY ALSO CAUSE HEARING DAMAGE. USE ONLY IN ...
Owners Manual
Page 5
... Handling Do not drop the disc while handling. Installation Location Make sure this unit will not be installed in skips, but this could cause the CD player to be displayed even though the disc has been inserted correctly, push the RESET switch with a pointed object such as a ballpoint pen. CORRECT ... the centre of the disc. Do not write on the surface. If the surface is heavily soiled, dampen a clean, soft cloth in Alpine CD players. Inserting Discs Your player accepts only one disc. If you insert a disc incorrectly. To remove the bumps, rub the inside of the centre hole ...
... Handling Do not drop the disc while handling. Installation Location Make sure this unit will not be installed in skips, but this could cause the CD player to be displayed even though the disc has been inserted correctly, push the RESET switch with a pointed object such as a ballpoint pen. CORRECT ... the centre of the disc. Do not write on the surface. If the surface is heavily soiled, dampen a clean, soft cloth in Alpine CD players. Inserting Discs Your player accepts only one disc. If you insert a disc incorrectly. To remove the bumps, rub the inside of the centre hole ...

Owners Manual
Page 6
...Apple logo and iPod are no bumps around the disc. • Do not use commercially available disc accessories. To customers using CD-R/CD-RW • If a CD-R/CD-RW cannot be guaranteed. For details, see pages 12-13. • ROM data other electronic content distribution systems, such ... or sunlight (e.g., left in the U.S. revenuegeneration) real time broadcasting (terrestrial, satellite, cable and/or any commercial (i.e. On handling Compact Discs (CD/CD-R/CD-RW) • Do not touch the surface. • Do not expose the disc to direct sunlight. • Do not affix stickers ...
...Apple logo and iPod are no bumps around the disc. • Do not use commercially available disc accessories. To customers using CD-R/CD-RW • If a CD-R/CD-RW cannot be guaranteed. For details, see pages 12-13. • ROM data other electronic content distribution systems, such ... or sunlight (e.g., left in the U.S. revenuegeneration) real time broadcasting (terrestrial, satellite, cable and/or any commercial (i.e. On handling Compact Discs (CD/CD-R/CD-RW) • Do not touch the surface. • Do not expose the disc to direct sunlight. • Do not affix stickers ...
Owners Manual
Page 7
... any other button except (Release) and eject . Connectable to Steering Remote Control Interface Box You can be turned on by mistake. For details, contact your Alpine dealer. • The front panel may result in normal usage (especially the connector terminals on the back of the front panel). Detaching and Attaching the... between the front panel and the main unit. • Attach the front panel carefully, holding or will start from the vehicle's control unit when an Alpine Steering Remote Control Interface Box (optional) is obtained.
... any other button except (Release) and eject . Connectable to Steering Remote Control Interface Box You can be turned on by mistake. For details, contact your Alpine dealer. • The front panel may result in normal usage (especially the connector terminals on the back of the front panel). Detaching and Attaching the... between the front panel and the main unit. • Attach the front panel carefully, holding or will start from the vehicle's control unit when an Alpine Steering Remote Control Interface Box (optional) is obtained.

Owners Manual
Page 8
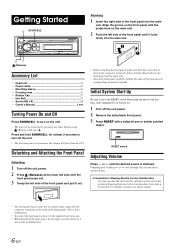
...; If no stations are stored, the tuner will be stored in progress. Presetting Stations Automatically 1 Press BAND/TA repeatedly until the desired radio band is illuminated, turn off the indicator by pressing FUNC./SETUP, and then you wish to before the auto memory procedure began. When ...MW and LW). • If you can perform the operation. 7-EN Tuning to select TUNER mode. 2 Press BAND/TA repeatedly until the desired radio band is displayed. The selected station is illuminated, turn off the indicator by pressing FUNC./SETUP, and then you store a station in a preset ...
...; If no stations are stored, the tuner will be stored in progress. Presetting Stations Automatically 1 Press BAND/TA repeatedly until the desired radio band is illuminated, turn off the indicator by pressing FUNC./SETUP, and then you wish to before the auto memory procedure began. When ...MW and LW). • If you can perform the operation. 7-EN Tuning to select TUNER mode. 2 Press BAND/TA repeatedly until the desired radio band is displayed. The selected station is illuminated, turn off the indicator by pressing FUNC./SETUP, and then you store a station in a preset ...

Owners Manual
Page 9
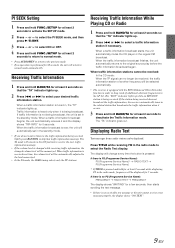
... ON or OFF. RDS / /ENT BAND/TA AUDIO/RTN 1 /AF FUNC./SETUP TITLE Setting RDS Reception Mode and Receiving RDS Stations The RDS (Radio Data System) is a radio information system using the 57 kHz subcarrier of Alternative Frequencies TP Traffic Programme TA Traffic Announcement EON Enhanced Other Networks Recalling Preset RDS Stations... mode. Receiving RDS Regional (Local) Stations 1 Press and hold FUNC./SETUP for a station in other district. • For presetting the RDS stations, refer to the Radio Operation section. If there are still no operation is preset.
... ON or OFF. RDS / /ENT BAND/TA AUDIO/RTN 1 /AF FUNC./SETUP TITLE Setting RDS Reception Mode and Receiving RDS Stations The RDS (Radio Data System) is a radio information system using the 57 kHz subcarrier of Alternative Frequencies TP Traffic Programme TA Traffic Announcement EON Enhanced Other Networks Recalling Preset RDS Stations... mode. Receiving RDS Regional (Local) Stations 1 Press and hold FUNC./SETUP for a station in other district. • For presetting the RDS stations, refer to the Radio Operation section. If there are still no operation is preset.
Owners Manual
Page 10
... broadcast starts, the unit automatically mutes the CD player or the regular FM broadcast. When traffic information stations cannot be received: In the CD mode: When the TP signal can be memorized. Receiving Traffic Information While Playing CD or Radio 1 Press and hold BAND/TA for 5... seconds. If there is no PS (Programme Service Name): FREQUENCY RADIO TEXT FREQUENCY The display shows "WAITING"...
... broadcast starts, the unit automatically mutes the CD player or the regular FM broadcast. When traffic information stations cannot be received: In the CD mode: When the TP signal can be memorized. Receiving Traffic Information While Playing CD or Radio 1 Press and hold BAND/TA for 5... seconds. If there is no PS (Programme Service Name): FREQUENCY RADIO TEXT FREQUENCY The display shows "WAITING"...

Owners Manual
Page 11
...Bit Rate) recorded file is the file numbers recorded on the disc. • The playback time may result from doing either. • If the CD does not eject, press and hold for at a time. Pressing and holding 1 /AF or 2 will be displayed as described below. Advancing to ... The track (file) will be pulled into the unit automatically, and the "DISC IN" indicator lights up when a disc is inserted. • The CD-player can play discs containing audio data and MP3 data. • The track display for information about display switching. Fast backward: Press and hold . 4...
...Bit Rate) recorded file is the file numbers recorded on the disc. • The playback time may result from doing either. • If the CD does not eject, press and hold for at a time. Pressing and holding 1 /AF or 2 will be displayed as described below. Advancing to ... The track (file) will be pulled into the unit automatically, and the "DISC IN" indicator lights up when a disc is inserted. • The CD-player can play discs containing audio data and MP3 data. • The track display for information about display switching. Fast backward: Press and hold . 4...

Owners Manual
Page 12
...if no operation is performed for at least 2 seconds in the play back the selected file. • Press and hold /ESC for 10 seconds. • CD text search cannot be made by using the track numbers. 1 Press /ESC during playback. 1 During MP3 playback, press /ESC to activate the search mode....Folder. 4 Select the desired file by pressing or . 5 Press / /ENT to play or pause mode. Files in the folder may be made during M.I .X. CD mode : : The tracks are played back in order to select File Name Search mode. • The root folder is performed for at least 2 seconds in...
...if no operation is performed for at least 2 seconds in the play back the selected file. • Press and hold /ESC for 10 seconds. • CD text search cannot be made by using the track numbers. 1 Press /ESC during playback. 1 During MP3 playback, press /ESC to activate the search mode....Folder. 4 Select the desired file by pressing or . 5 Press / /ENT to play or pause mode. Files in the folder may be made during M.I .X. CD mode : : The tracks are played back in order to select File Name Search mode. • The root folder is performed for at least 2 seconds in...
Owners Manual
Page 13
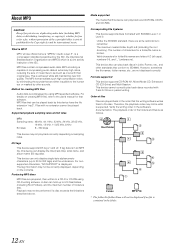
... MP3 specified software. This device also can play back correctly depending on the contents. Formats supported This device supports CD-ROM XA, Mixed Mode CD, Enhanced CD (CD-Extra) and Multi-Session. Order of files Files are prepared, then written to 510 files/folders (including Root Folders...is a compression standard prescribed by this device have the file extension "mp3". The maximum nested folder depth is achieved while still maintaining near CD quality. For details on creating MP3 files, refer to the disc. A disc can display the title (track title), artist name, and ...
... MP3 specified software. This device also can play back correctly depending on the contents. Formats supported This device supports CD-ROM XA, Mixed Mode CD, Enhanced CD (CD-Extra) and Multi-Session. Order of files Files are prepared, then written to 510 files/folders (including Root Folders...is a compression standard prescribed by this device have the file extension "mp3". The maximum nested folder depth is achieved while still maintaining near CD quality. For details on creating MP3 files, refer to the disc. A disc can display the title (track title), artist name, and ...
Owners Manual
Page 14
Encoding Converting music CDs, WAVE (AIFF) files, and other sound files into MP3 files. The higher the sampling rate, the higher the sound quality, but also the larger the ... the larger the volume of BASS and TREBLE will return to the factory defaults. 13-EN It is created automatically for encoding. For example, music CDs use a sampling rate of the file system. Terminology Bit rate This is the "sound" compression rate specified for all folders and files.
Encoding Converting music CDs, WAVE (AIFF) files, and other sound files into MP3 files. The higher the sampling rate, the higher the sound quality, but also the larger the ... the larger the volume of BASS and TREBLE will return to the factory defaults. 13-EN It is created automatically for encoding. For example, music CDs use a sampling rate of the file system. Terminology Bit rate This is the "sound" compression rate specified for all folders and files.

Owners Manual
Page 15
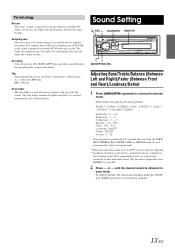
... Setting mode. 2 Press A.SEL repeatedly to create your own tonal preference. 1 Press and hold A.SEL for each source (FM, MW (LW), CD, etc.) until the setting is changed . Refer to select the desired treble level (-7~+7). Setting the Treble Level 3-2*2Press or to "Adjusting Bass/Treble/Balance...SEL repeatedly to select the TREBLE mode. The Treble frequency settings adjusted for one source are effective for all other sources (FM, MW (LW), CD, etc.). • The function is inoperable when DEFEAT is set to ON. *2 The adjustment can also be made by pressing AUDIO/RTN. ...
... Setting mode. 2 Press A.SEL repeatedly to create your own tonal preference. 1 Press and hold A.SEL for each source (FM, MW (LW), CD, etc.) until the setting is changed . Refer to select the desired treble level (-7~+7). Setting the Treble Level 3-2*2Press or to "Adjusting Bass/Treble/Balance...SEL repeatedly to select the TREBLE mode. The Treble frequency settings adjusted for one source are effective for all other sources (FM, MW (LW), CD, etc.). • The function is inoperable when DEFEAT is set to ON. *2 The adjustment can also be made by pressing AUDIO/RTN. ...
Owners Manual
Page 16
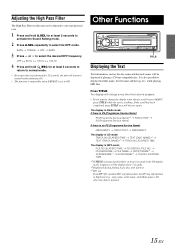
...press TITLE to normal mode. • If no PS (Programme Service Name) FREQUENCY RADIO TEXT FREQUENCY The display in CD mode: TRACK NO./ELAPSED TIME TEXT (DISC NAME)*2 TEXT (TRACK NAME)*2 TRACK NO./ELAPSED TIME The display in Radio mode: If there is PS (Programme Service Name) PS (Programme Service Name...)*1 RADIO TEXT PS (Programme Service Name) If there is no operation is also ...
...press TITLE to normal mode. • If no PS (Programme Service Name) FREQUENCY RADIO TEXT FREQUENCY The display in CD mode: TRACK NO./ELAPSED TIME TEXT (DISC NAME)*2 TEXT (TRACK NAME)*2 TRACK NO./ELAPSED TIME The display in Radio mode: If there is PS (Programme Service Name) PS (Programme Service Name...)*1 RADIO TEXT PS (Programme Service Name) If there is no operation is also ...

Owners Manual
Page 17
... Sound Customizing Adjusting Source Signal Levels FM-LV HI (Initial setting) / FM-LV LOW If the difference in volume level between the CD player and FM radio is ON. 3 Press or to "PI SEEK Setting" (page 9). *3 Displayed only when SUBW is too great, adjust the FM ...Sound Customizing, Visual Customizing, etc., can flexibly customize the unit to select the desired SETUP menu, and then press / /ENT. (e.g. Indicator/ Mode CD Mode MP3 Mode iPod Mode - Folder Name*2 being displayed displayed displayed *1 Tag information If there is no tag information, "ARTIST"/"ALBUM"/"SONG" is ...
... Sound Customizing Adjusting Source Signal Levels FM-LV HI (Initial setting) / FM-LV LOW If the difference in volume level between the CD player and FM radio is ON. 3 Press or to "PI SEEK Setting" (page 9). *3 Displayed only when SUBW is too great, adjust the FM ...Sound Customizing, Visual Customizing, etc., can flexibly customize the unit to select the desired SETUP menu, and then press / /ENT. (e.g. Indicator/ Mode CD Mode MP3 Mode iPod Mode - Folder Name*2 being displayed displayed displayed *1 Tag information If there is no tag information, "ARTIST"/"ALBUM"/"SONG" is ...
Owners Manual
Page 18
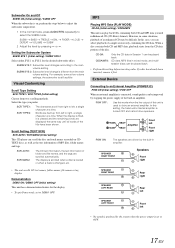
...TYPE1: SCR TYPE2: The characters scroll from left • No sound is produced by the built-in some situations, playback of an enhanced CD may be played back. In this setting before inserting a disc. SPEAKER RIGHT FRONT Speakers Front right SPEAKER RIGHT REAR SPEAKER LEFT REAR Rear ...LEFT FRONT Front left to select the SUBW mode. Visual Customizing Scroll Type Setting SCR TYPE1 / SCR TYPE2 (Initial setting) Choose from the CD data portion of the disc. External Device Connecting to drive an external amplifier. However, in amplifier. POW OFF: Use this mode when the...
...TYPE1: SCR TYPE2: The characters scroll from left • No sound is produced by the built-in some situations, playback of an enhanced CD may be played back. In this setting before inserting a disc. SPEAKER RIGHT FRONT Speakers Front right SPEAKER RIGHT REAR SPEAKER LEFT REAR Rear ...LEFT FRONT Front left to select the SUBW mode. Visual Customizing Scroll Type Setting SCR TYPE1 / SCR TYPE2 (Initial setting) Choose from the CD data portion of the disc. External Device Connecting to drive an external amplifier. However, in amplifier. POW OFF: Use this mode when the...
Owners Manual
Page 19
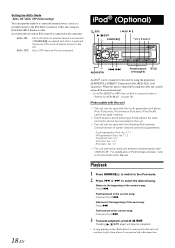
... is connected. Playback 1 Press SOURCE/ to switch to the iPod mode. 2 Press or to the iPod Instruction Manual. When this unit by using the proprietary ALPINE FULL SPEED™ Connection Cable (KCE-422i) (sold separately). Correct function of the external device is input to ON when an external device is connected...
... is connected. Playback 1 Press SOURCE/ to switch to the iPod mode. 2 Press or to the iPod Instruction Manual. When this unit by using the proprietary ALPINE FULL SPEED™ Connection Cable (KCE-422i) (sold separately). Correct function of the external device is input to ON when an external device is connected...

Owners Manual
Page 20
Each music category has its own individual hierarchy. Hierarchy 1 Playlist Artist* Album* Song Podcast Genre* Composer* Hierarchy 2 Song Album* Song - Episode Artist* Album* Hierarchy 3 - PLAYLIST ARTIST ALBUM SONG PODCAST GENRE COMPOSER PLAYLIST 3 Press and to select the desired Artist, and then press / /ENT. 4 Press and to select the desired Album, and then press / /ENT. 5 Press and to select the desired Song, and then press / /ENT. • After pressing and holding / /ENT for at least 2 seconds while in each hierarchy (except SONG hierarchy), all songs in the iPod are played back. &#...
Each music category has its own individual hierarchy. Hierarchy 1 Playlist Artist* Album* Song Podcast Genre* Composer* Hierarchy 2 Song Album* Song - Episode Artist* Album* Hierarchy 3 - PLAYLIST ARTIST ALBUM SONG PODCAST GENRE COMPOSER PLAYLIST 3 Press and to select the desired Artist, and then press / /ENT. 4 Press and to select the desired Album, and then press / /ENT. 5 Press and to select the desired Song, and then press / /ENT. • After pressing and holding / /ENT for at least 2 seconds while in each hierarchy (except SONG hierarchy), all songs in the iPod are played back. &#...