Owners Manual
Page 1
..., INC. 1-1-8 Nishi Gotanda, Shinagawa-ku, Tokyo 141-0031, Japan Phone 03-5496-8231 ALPINE ELECTRONICS OF AMERICA, INC. 19145 Gramercy Place, Torrance, California 90501, U.S.A. R MP3 CD Receiver EN CDE-9846 FR FM/AM CD Receiver CDE-9842 ES • OWNER'S MANUAL Please read before using this equipment. • MODE D'EMPLOI Veuillez lire avant d'utiliser cet...
..., INC. 1-1-8 Nishi Gotanda, Shinagawa-ku, Tokyo 141-0031, Japan Phone 03-5496-8231 ALPINE ELECTRONICS OF AMERICA, INC. 19145 Gramercy Place, Torrance, California 90501, U.S.A. R MP3 CD Receiver EN CDE-9846 FR FM/AM CD Receiver CDE-9842 ES • OWNER'S MANUAL Please read before using this equipment. • MODE D'EMPLOI Veuillez lire avant d'utiliser cet...
Owners Manual
Page 2
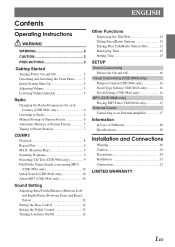
... 5 Lowering Volume Quickly 5 Radio Changing the Radio Frequencies for each Country (CDE-9846 only 6 Listening to Radio 6 Manual Storing of Station Presets 6 Automatic Memory of Station Presets 7 Tuning to Preset Stations 7 CD/MP3 Playback 8 Repeat Play 9 M.I.X. (Random Play 9 Scanning Programs 9 Searching CD Text (CDE-9846 only 9...Treble Control 13 Turning Loudness On/Off 13 Other Functions Displaying the Title/Text 14 Titling Discs/Radio Stations 15 Erasing Disc Title/Radio Station Title 15 Displaying Time 15 Setting Time 15 SETUP Sound Customizing Subwoofer On and Off 16 ...
... 5 Lowering Volume Quickly 5 Radio Changing the Radio Frequencies for each Country (CDE-9846 only 6 Listening to Radio 6 Manual Storing of Station Presets 6 Automatic Memory of Station Presets 7 Tuning to Preset Stations 7 CD/MP3 Playback 8 Repeat Play 9 M.I.X. (Random Play 9 Scanning Programs 9 Searching CD Text (CDE-9846 only 9...Treble Control 13 Turning Loudness On/Off 13 Other Functions Displaying the Title/Text 14 Titling Discs/Radio Stations 15 Erasing Disc Title/Radio Station Title 15 Displaying Time 15 Setting Time 15 SETUP Sound Customizing Subwoofer On and Off 16 ...
Owners Manual
Page 7
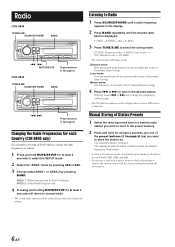
...any one of the preset buttons (1 through 6) CDE-9842 TUNE/A.ME SOURCE/POWER BAND Listening to select the tuning mode. Manual Storing of 18 stations can be automatically tuned in . Local mode: Only strong stations will change the radio frequencies as follows. 1 Press and hold , for...display. 2 Press BAND repeatedly until a radio frequency appears in (Automatic Seek Tuning). DX SEEK (Distance mode) → SEEK (Local mode) → OFF (Manual mode) → DX SEEK • The initial mode is stored. Manual mode: The frequency is manually tuned in the preset memory. 2 Press...
...any one of the preset buttons (1 through 6) CDE-9842 TUNE/A.ME SOURCE/POWER BAND Listening to select the tuning mode. Manual Storing of 18 stations can be automatically tuned in . Local mode: Only strong stations will change the radio frequencies as follows. 1 Press and hold , for...display. 2 Press BAND repeatedly until a radio frequency appears in (Automatic Seek Tuning). DX SEEK (Distance mode) → SEEK (Local mode) → OFF (Manual mode) → DX SEEK • The initial mode is stored. Manual mode: The frequency is manually tuned in the preset memory. 2 Press...

Owners Manual
Page 11
... mode. 2 Turn the Rotary encoder within 10 seconds. 4 Press the Rotary encoder to play back are prepared, then written to a CD-R or CD-RW using MP3 specified software. This is canceled by this device can only display single-byte alphanumeric characters (up to 510 files/ folders ... is played back immediately. • Search mode is achieved while still maintaining near CD quality. The tag information may not play back correctly depending on creating MP3 files, refer to the user's manual for that are either inaudible to the human ear or masked by pressing and holding...
... mode. 2 Turn the Rotary encoder within 10 seconds. 4 Press the Rotary encoder to play back are prepared, then written to a CD-R or CD-RW using MP3 specified software. This is canceled by this device can only display single-byte alphanumeric characters (up to 510 files/ folders ... is played back immediately. • Search mode is achieved while still maintaining near CD quality. The tag information may not play back correctly depending on creating MP3 files, refer to the user's manual for that are either inaudible to the human ear or masked by pressing and holding...
Owners Manual
Page 16
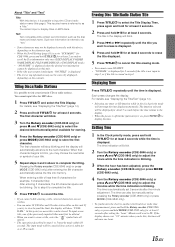
... Rotary encoder (CDE-9846 only) or press 4 and 3 (CDE-9842 only) to adjust the minutes while the time indication is blinking. The time can enter 18 CD titles and 24 radio station titles on MP3 discs. Titling Discs/Radio Stations It is possible to title your title. 5 Repeat steps 3 ...for at least 2 seconds. 2 Press and hold MODE (CDE-9842 only) for at least 2 seconds after entering the 8th character automatically stores the title into all spaces. • The operations described in the display will be manually set 5 seconds after the minute adjustment. The function selected will...
... Rotary encoder (CDE-9846 only) or press 4 and 3 (CDE-9842 only) to adjust the minutes while the time indication is blinking. The time can enter 18 CD titles and 24 radio station titles on MP3 discs. Titling Discs/Radio Stations It is possible to title your title. 5 Repeat steps 3 ...for at least 2 seconds. 2 Press and hold MODE (CDE-9842 only) for at least 2 seconds after entering the 8th character automatically stores the title into all spaces. • The operations described in the display will be manually set 5 seconds after the minute adjustment. The function selected will...
Owners Manual
Page 17
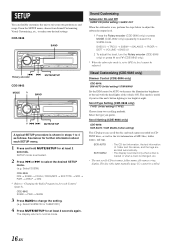
See below to adjust the subwoofer output level. 1 Press the Rotary encoder (CDE-9846 only) or press MODE (CDE-9842 only) repeatedly to "Changing the Radio Frequencies for each SETUP menu. 1 Press and hold MUTE/SETUP for at least 2 seconds. Visual Customizing (CDE-9846 only) Dimmer ...9846: SCR AUTO / SCR MANU (Initial setting) This CD player can flexibly customize the unit to OFF, its level cannot be scrolled. 16-EN The disc titles input manually (page 15) cannot be adjusted. SCR AUTO SCR MANU : The CD text information, the text information of folder and file names...
See below to adjust the subwoofer output level. 1 Press the Rotary encoder (CDE-9846 only) or press MODE (CDE-9842 only) repeatedly to "Changing the Radio Frequencies for each SETUP menu. 1 Press and hold MUTE/SETUP for at least 2 seconds. Visual Customizing (CDE-9846 only) Dimmer ...9846: SCR AUTO / SCR MANU (Initial setting) This CD player can flexibly customize the unit to OFF, its level cannot be scrolled. 16-EN The disc titles input manually (page 15) cannot be adjusted. SCR AUTO SCR MANU : The CD text information, the text information of folder and file names...
Owners Manual
Page 21
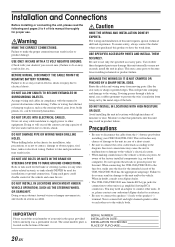
... Doing so will prevent crimping and damage to make sure the fuse for installation, take such precautions may result in compliance with the manual to the vehicle body. When drilling holes in fire. and results in fire or product damage. The wiring and installation of other ... INSTALLATION TECHNICIAN: PLACE OF PURCHASE: 20-EN Failure to disconnect the cable from the (-) battery post before installing your Alpine dealer. • The CDE-9846/CDE-9842 uses female RCA-type jacks for proper use only the specified accessory parts. ARRANGE THE WIRING SO IT IS NOT CRIMPED...
... Doing so will prevent crimping and damage to make sure the fuse for installation, take such precautions may result in compliance with the manual to the vehicle body. When drilling holes in fire. and results in fire or product damage. The wiring and installation of other ... INSTALLATION TECHNICIAN: PLACE OF PURCHASE: 20-EN Failure to disconnect the cable from the (-) battery post before installing your Alpine dealer. • The CDE-9846/CDE-9842 uses female RCA-type jacks for proper use only the specified accessory parts. ARRANGE THE WIRING SO IT IS NOT CRIMPED...
Owners Manual
Page 22
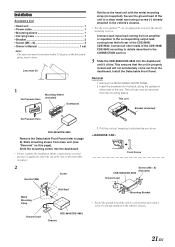
... • Head unit 1 • Power cable 1 • Mounting sleeve 1 • Carrying case 1 • Bracket 2 • Screw (M5 × 8 4 • Owner's Manual 1 set Note: The main unit must be removed from the mounting sleeve. Front Frame Screws (M5 × 8) (Included) CDE-9846/CDE... the head unit with the metal mounting strap (not supplied). Install the Detachable Front Panel. Secure the ground lead of the CDE-9846/ CDE-9842. Slide mounting sleeve from the left rear of the unit to a clean metal spot using a screw (*) already attached to the vehicle's chassis....
... • Head unit 1 • Power cable 1 • Mounting sleeve 1 • Carrying case 1 • Bracket 2 • Screw (M5 × 8 4 • Owner's Manual 1 set Note: The main unit must be removed from the mounting sleeve. Front Frame Screws (M5 × 8) (Included) CDE-9846/CDE... the head unit with the metal mounting strap (not supplied). Install the Detachable Front Panel. Secure the ground lead of the CDE-9846/ CDE-9842. Slide mounting sleeve from the left rear of the unit to a clean metal spot using a screw (*) already attached to the vehicle's chassis....
Owners Manual
Page 25
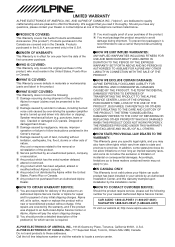
... implied warranty lasts, and some do not allow the exclusion or limitation of any questions, please contact your Alpine car audio product has been installed in the Owner's manual. 4 Damage caused by the warranty, and if the product was shipped to avoid damage during shipment.... Alpine will pay the return shipping charges. 2 You should provide a detailed description of nature. ALPINE ELECTRONICS OF CANADA, INC., 777 Supertest Road,...
... implied warranty lasts, and some do not allow the exclusion or limitation of any questions, please contact your Alpine car audio product has been installed in the Owner's manual. 4 Damage caused by the warranty, and if the product was shipped to avoid damage during shipment.... Alpine will pay the return shipping charges. 2 You should provide a detailed description of nature. ALPINE ELECTRONICS OF CANADA, INC., 777 Supertest Road,...


