

Owners Manual
Page 4
XM Radio Operation (Optional) Receiving XM Channels with the XM Receiver (Optional 22 Checking the XM Radio ID Number 22 Storing XM Channel Presets 22 Receiving Stored XM Channels 22 Channel/Category Search Function 23 Quick Search Function 23 Changing the Display 23 Setting the tuning method 23 Setting the Auxiliary Data Field ...
XM Radio Operation (Optional) Receiving XM Channels with the XM Receiver (Optional 22 Checking the XM Radio ID Number 22 Storing XM Channel Presets 22 Receiving Stored XM Channels 22 Channel/Category Search Function 23 Quick Search Function 23 Changing the Display 23 Setting the tuning method 23 Setting the Auxiliary Data Field ...

Owners Manual
Page 9
...Rotary encoder to select the desired Treble Level (-7~+7). NOTES • If no buttons are effective for all other sources (FM, AM, XM, CD etc.). • Depending on the connected devices, some functions and display indications do not work . The Bass frequency and Bass Band Width...boost band width to select the desired bass Band Width. → B. Type 1 will be individually memorized for all other sources (FM, AM, XM, CD, etc.). • Depending on the connected devices, some functions and display indications do not work . Width2 → B. The Treble frequency settings...
...Rotary encoder to select the desired Treble Level (-7~+7). NOTES • If no buttons are effective for all other sources (FM, AM, XM, CD etc.). • Depending on the connected devices, some functions and display indications do not work . The Bass frequency and Bass Band Width...boost band width to select the desired bass Band Width. → B. Type 1 will be individually memorized for all other sources (FM, AM, XM, CD, etc.). • Depending on the connected devices, some functions and display indications do not work . Width2 → B. The Treble frequency settings...
Owners Manual
Page 10
...start the blackout mode. FM (MX level 1 to 3): The medium to select your preferred mode or OFF. MP3/WMA/XM (MX level 1 to 3): This corrects information that corresponds to 3): CD mode processes a large amount of the audio processor. By doing so the display will turn off . • MX mode...Setting the MX Mode MX (Media Xpander) makes vocals or instruments sound distinct regardless of this data to reproduce a more clear, clean output. The radio, CD, and MP3, will be displayed for at least 3 seconds. 8-EN MX takes advantage of the music source. Since the processor MX settings may...
...start the blackout mode. FM (MX level 1 to 3): The medium to select your preferred mode or OFF. MP3/WMA/XM (MX level 1 to 3): This corrects information that corresponds to 3): CD mode processes a large amount of the audio processor. By doing so the display will turn off . • MX mode...Setting the MX Mode MX (Media Xpander) makes vocals or instruments sound distinct regardless of this data to reproduce a more clear, clean output. The radio, CD, and MP3, will be displayed for at least 3 seconds. 8-EN MX takes advantage of the music source. Since the processor MX settings may...
Owners Manual
Page 13
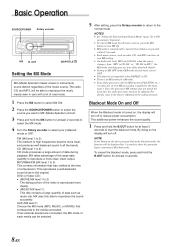
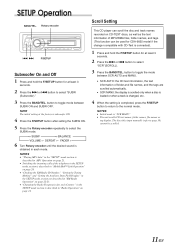
... Press the f or g button to select "SCR"(SCROLL). 3 Press the BAND/TEL. Scroll Setting This CD player can be scrolled. 11-EN Rotary encoder gf F/SETUP Subwoofer On and Off 1 Press and hold the F/SETUP... F/SETUP button to return to page 10) cannot be used for CDA-9825 model if the changer compatible with CD-Text is subwoofer ON. 4 Press the F/SETUP button after setting the ... • "Checking the XM Radio ID Number," "Setting the Tuning Method" and "Setting the Auxiliary Data Field Display" in "XM Radio Operation" on page 22-23. • "Changing the Radio Frequencies for each mode....
... Press the f or g button to select "SCR"(SCROLL). 3 Press the BAND/TEL. Scroll Setting This CD player can be scrolled. 11-EN Rotary encoder gf F/SETUP Subwoofer On and Off 1 Press and hold the F/SETUP... F/SETUP button to return to page 10) cannot be used for CDA-9825 model if the changer compatible with CD-Text is subwoofer ON. 4 Press the F/SETUP button after setting the ... • "Checking the XM Radio ID Number," "Setting the Tuning Method" and "Setting the Auxiliary Data Field Display" in "XM Radio Operation" on page 22-23. • "Changing the Radio Frequencies for each mode....
Owners Manual
Page 24
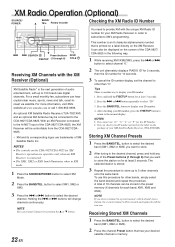
...trademarks of your ID number. 1. NOTE If you want to select XM Mode. 2 Press the BAND/TEL. After checking your ID number. 4. A total of the CDA-9827/ CDA-9825 in order to subscribe to display your XM Satellite Radio Receiver (TUA-T021XM). Press the f or g button repeatedly to select... or XM3). 2 Press the channel Preset button that is another way to XM's programming. NOTES • The controls on the screen of 18 channels can also be displayed on the CDA-9827/CDA-9825 for other channels onto the same band. XM Radio Operation (Optional) SOURCE/ POWER BAND/ 8 TEL.
...trademarks of your ID number. 1. NOTE If you want to select XM Mode. 2 Press the BAND/TEL. After checking your ID number. 4. A total of the CDA-9827/ CDA-9825 in order to subscribe to display your XM Satellite Radio Receiver (TUA-T021XM). Press the f or g button repeatedly to select... or XM3). 2 Press the channel Preset button that is another way to XM's programming. NOTES • The controls on the screen of 18 channels can also be displayed on the CDA-9827/CDA-9825 for other channels onto the same band. XM Radio Operation (Optional) SOURCE/ POWER BAND/ 8 TEL.
Owners Manual
Page 25
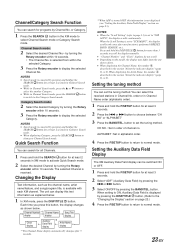
... the indicator display" (page 9), is canceled by pressing the BAND/TEL. ALPHABET :Set in Channel No. Setting the Auxiliary Data Field Display The XM Auxiliary Data Field display can be switched ON or OFF. 1 Press and hold the DISP/TITLE button for more than 3 seconds to scroll the ... "ADF" (Auxiliary Data Field) by pressing the g or f button. 3 Select ON/OFF by pressing and holding the SEARCH button for at least 2 seconds in XM mode to activate Quick Search mode. 2 Select the desired Channel by turning the Rotary encoder within 10 seconds. You can display this information is selected...
... the indicator display" (page 9), is canceled by pressing the BAND/TEL. ALPHABET :Set in Channel No. Setting the Auxiliary Data Field Display The XM Auxiliary Data Field display can be switched ON or OFF. 1 Press and hold the DISP/TITLE button for more than 3 seconds to scroll the ... "ADF" (Auxiliary Data Field) by pressing the g or f button. 3 Select ON/OFF by pressing and holding the SEARCH button for at least 2 seconds in XM mode to activate Quick Search mode. 2 Select the desired Channel by turning the Rotary encoder within 10 seconds. You can display this information is selected...

Owners Manual
Page 34
.... - Check whether the XM antenna cable is not subscribed to. - NO SIGNL • XM signal is not connected to the XM radio module. - OFF AIR • The channel currently selected has stopped broadcasting. - Information Indication for XM Radio Mode ANTENNA • The XM antenna is too weak at... that does not exist or is attached securely to the XM radio module. The unit will revert back to the previously selected channel. •...
.... - Check whether the XM antenna cable is not subscribed to. - NO SIGNL • XM signal is not connected to the XM radio module. - OFF AIR • The channel currently selected has stopped broadcasting. - Information Indication for XM Radio Mode ANTENNA • The XM antenna is too weak at... that does not exist or is attached securely to the XM radio module. The unit will revert back to the previously selected channel. •...


