
User Manual
Page 1
Dual Band Wireless N Router Model # AR725W User's Manual Rev. 1.0
Dual Band Wireless N Router Model # AR725W User's Manual Rev. 1.0
User Manual
Page 2
... Connection...8 5. Information...60 Technical Support ...60 2 Connecting to the Router Wirelessly 9 6. Web Configuration Utility ...10 6.1 Setup ...10 6.1.1 Setup > Basic Setup ...10 6.1.2 Setup > DDNS ...16 6.1.3 Setup > MAC Address Clone 17 6.1.4 Setup......51 6.6.1 Administration > Management 51 6.6.2 Administration > Log 52 6.6.3 Administration > Diagnostics 53 6.6.4 Administration > Factory Defaults 54 6.6.5 Administration > Firmware Upgrade 55 6.7 Status...56 6.7.1 Status > Router...56 6.7.2 Status > Local Network 57 6.7.3 Status > Wireless Network 58 7. Configuring the...
... Connection...8 5. Information...60 Technical Support ...60 2 Connecting to the Router Wirelessly 9 6. Web Configuration Utility ...10 6.1 Setup ...10 6.1.1 Setup > Basic Setup ...10 6.1.2 Setup > DDNS ...16 6.1.3 Setup > MAC Address Clone 17 6.1.4 Setup......51 6.6.1 Administration > Management 51 6.6.2 Administration > Log 52 6.6.3 Administration > Diagnostics 53 6.6.4 Administration > Factory Defaults 54 6.6.5 Administration > Firmware Upgrade 55 6.7 Status...56 6.7.1 Status > Router...56 6.7.2 Status > Local Network 57 6.7.3 Status > Wireless Network 58 7. Configuring the...
User Manual
Page 3
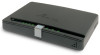
..., please check the items of Service) designed for your wireless connection • QoS (Quality of your package: • Dual Band Wireless N Router • Power Adapter • Ethernet Cable (Cat.5) • Manual CD • Quick Installation Guide If any item contained is damaged or ...data rate of up to 300Mbps* with 802.11n draft 2.0 • WPS button for easy connection with your wireless network. The AR725W Dual Band Wireless N Router provides switchable 2.4 and 5 GHz wireless frequency which allows more powerful Dual Band Wireless N • Advanced NAT+SPI firewall provides fully...
..., please check the items of Service) designed for your wireless connection • QoS (Quality of your package: • Dual Band Wireless N Router • Power Adapter • Ethernet Cable (Cat.5) • Manual CD • Quick Installation Guide If any item contained is damaged or ...data rate of up to 300Mbps* with 802.11n draft 2.0 • WPS button for easy connection with your wireless network. The AR725W Dual Band Wireless N Router provides switchable 2.4 and 5 GHz wireless frequency which allows more powerful Dual Band Wireless N • Advanced NAT+SPI firewall provides fully...

User Manual
Page 4
...and wait for the lights on your computer. Step 1 Connect one of the LAN ports of the cable to the INTERNET port of the router and connect the other end of the router. Step 2 With another network cable, connect one end of the cable to your computer, DSL/Cable modem, and the... router. Step 4 Plug the power adapter to the router and connect to settle down. LED Indicators: How the router connects: 4 Step 6 Make sure the INTERNET, WIRELESS, and the LAN port that the computer is connected ...
...and wait for the lights on your computer. Step 1 Connect one of the LAN ports of the cable to the INTERNET port of the router and connect the other end of the router. Step 2 With another network cable, connect one end of the cable to your computer, DSL/Cable modem, and the... router. Step 4 Plug the power adapter to the router and connect to settle down. LED Indicators: How the router connects: 4 Step 6 Make sure the INTERNET, WIRELESS, and the LAN port that the computer is connected ...

User Manual
Page 5
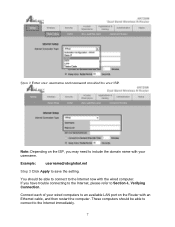
Cable Modem For most cable modem users, you with a host name, enter it in the Address bar and press Enter. 3. Step 2 Enter admin for both the username and password fields and click OK. If your ISP has provided you should be able to connect to save the setting. 5 Configuring the Router Step 1 Open the web browser (Internet Explorer or Mozilla Firefox), type 192.168.1.1 in the optional Host Name field. Click Apply to the Internet without any configuration.
Cable Modem For most cable modem users, you with a host name, enter it in the Address bar and press Enter. 3. Step 2 Enter admin for both the username and password fields and click OK. If your ISP has provided you should be able to connect to save the setting. 5 Configuring the Router Step 1 Open the web browser (Internet Explorer or Mozilla Firefox), type 192.168.1.1 in the optional Host Name field. Click Apply to the Internet without any configuration.

User Manual
Page 6
If your ISP requires a registered MAC Address, click on the MAC Address Clone tab, select Enabled, and click on the Clone My PC's MAC button. DSL For DSL users, follow the steps below to Section 4, Verifying Connection. If you have trouble connecting to the Internet, please refer to configure the router. Step 1 Select PPPoE from the drop-down menu. 6 Click Apply to save the setting.
If your ISP requires a registered MAC Address, click on the MAC Address Clone tab, select Enabled, and click on the Clone My PC's MAC button. DSL For DSL users, follow the steps below to Section 4, Verifying Connection. If you have trouble connecting to the Internet, please refer to configure the router. Step 1 Select PPPoE from the drop-down menu. 6 Click Apply to save the setting.
User Manual
Page 7
... name with the wired computer. These computers should be able to connect to save the setting. Connect each of your ISP. Note: Depending on the Router with an Ethernet cable, and then restart the computer.
... name with the wired computer. These computers should be able to connect to save the setting. Connect each of your ISP. Note: Depending on the Router with an Ethernet cable, and then restart the computer.

User Manual
Page 8
...lights on the IP Address Renew button (for Cable Modem users) or the Connect button (for DSL users). Step 4 Turn on the modem to the router and select the Status tab. If you have valid numbers assigned to them (instead of the DNS fields have trouble connecting to the Internet, try... the following steps. If each field has a valid number assigned, the router is connected to settle down . Step 5 Log in to settle down . Step 1 Power off the Cable/DSL modem, router, and computer and wait for the lights on the computer. Verifying Connection If you see all...
...lights on the IP Address Renew button (for Cable Modem users) or the Connect button (for DSL users). Step 4 Turn on the modem to the router and select the Status tab. If you have valid numbers assigned to them (instead of the DNS fields have trouble connecting to the Internet, try... the following steps. If each field has a valid number assigned, the router is connected to settle down . Step 5 Log in to settle down . Step 1 Power off the Cable/DSL modem, router, and computer and wait for the lights on the computer. Verifying Connection If you see all...

User Manual
Page 9
SSID: default Network Mode: BGN-Mixed Authentication: Open System Channel #: 6 WEP: disabled If you make changes. 9 Please refer to your wireless network card to the same settings in to the Router Wirelessly Below are the default wireless settings of the router. Click Apply to configure these settings. Connecting to the router and select the Wireless tab. 5. You must configure your wireless network card's manual on how to save the settings after you want to change the router's wireless and security settings, log in order to establish a wireless connection to the router.
SSID: default Network Mode: BGN-Mixed Authentication: Open System Channel #: 6 WEP: disabled If you make changes. 9 Please refer to your wireless network card to the same settings in to the Router Wirelessly Below are the default wireless settings of the router. Click Apply to configure these settings. Connecting to the router and select the Wireless tab. 5. You must configure your wireless network card's manual on how to save the settings after you want to change the router's wireless and security settings, log in order to establish a wireless connection to the router.

User Manual
Page 10
You can setup your Internet connection here as well as configuring the Network and DHCP settings and selecting your computer's web browser. 6.1 Setup 6.1.1 Setup > Basic Setup This is the default screen when you can use to configure the router's settings. Web Configuration Utility This router has a built-in to the router's web configuration utility. Simply log in web configuration utility that you log in to the router using your Time Zone. 10 6.
You can setup your Internet connection here as well as configuring the Network and DHCP settings and selecting your computer's web browser. 6.1 Setup 6.1.1 Setup > Basic Setup This is the default screen when you can use to configure the router's settings. Web Configuration Utility This router has a built-in to the router's web configuration utility. Simply log in web configuration utility that you log in to the router using your Time Zone. 10 6.
User Manual
Page 14
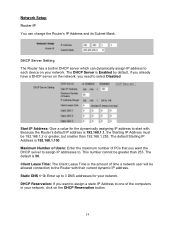
...allowed connection to . Start IP Address: Give a value for your network. DHCP Reservation: If you want the DHCP server to assign IP addresses to the Router with . Static DNS 1~3: Enter up to 3 DNS addresses for the dynamically assigning IP address to one of time a network user will be 192.168.1.2... or greater, but smaller than 253. Network Setup Router IP You can dynamically assign IP address to each device on the network, you want to assign a static IP Address to start with their ...
...allowed connection to . Start IP Address: Give a value for your network. DHCP Reservation: If you want the DHCP server to assign IP addresses to the Router with . Static DNS 1~3: Enter up to 3 DNS addresses for the dynamically assigning IP address to one of time a network user will be 192.168.1.2... or greater, but smaller than 253. Network Setup Router IP You can dynamically assign IP address to each device on the network, you want to assign a static IP Address to start with their ...

User Manual
Page 15
Step 4 Click Save Settings. Time Settings Set up the time zone and daylight saving for the Router. 15 Step 1 Enter the Static IP Address in the To this IP field. Step 3 Check the Enabled box. Step 2 Enter the MAC address of the corresponding computer in the Assign this MAC field.
Step 4 Click Save Settings. Time Settings Set up the time zone and daylight saving for the Router. 15 Step 1 Enter the Static IP Address in the To this IP field. Step 3 Check the Enabled box. Step 2 Enter the MAC address of the corresponding computer in the Assign this MAC field.

User Manual
Page 20
... channel. If you have 802.11b/g/n 2.4GHz devices on the wireless network, select BGN-Mixed. Network Name (SSID): You can configure the router's basic wireless settings on the wireless network, select AN-Mixed. Standard Channel: If you have 802.11a/n 5GHz devices on this field. Once... the new SSID. Channel: Select the desired channel. Note: If your wireless computer cannot detect the router after you have changed the SSID, your primary Wireless N channel. You can change the router's SSID in a network, keep the default, Auto. 20 If you selected AN-Mixed, please make...
... channel. If you have 802.11b/g/n 2.4GHz devices on the wireless network, select BGN-Mixed. Network Name (SSID): You can configure the router's basic wireless settings on the wireless network, select AN-Mixed. Standard Channel: If you have 802.11a/n 5GHz devices on this field. Once... the new SSID. Channel: Select the desired channel. Note: If your wireless computer cannot detect the router after you have changed the SSID, your primary Wireless N channel. You can change the router's SSID in a network, keep the default, Auto. 20 If you selected AN-Mixed, please make...

User Manual
Page 21
... to use the same security settings in order to connect to select, keep the default, Auto. If you are not sure which channel to the router. WEP To enable WEP, select WEP from the Security Mode. 21 All of your SSID (wireless network name). 6.2.2 Wireless > Wireless Security You can configure wireless...
... to use the same security settings in order to connect to select, keep the default, Auto. If you are not sure which channel to the router. WEP To enable WEP, select WEP from the Security Mode. 21 All of your SSID (wireless network name). 6.2.2 Wireless > Wireless Security You can configure wireless...

User Manual
Page 22
... long. WPA Personal Select WPA Personal from 64 bits or 128 bits Passphrase: You can enter a passphrase and click on the Generate button and the router will automatically generate four WEP keys for each key. Click Apply to save the setting. 22 Passphrase: Enter a passphrase between 8 to be the active key...
... long. WPA Personal Select WPA Personal from 64 bits or 128 bits Passphrase: You can enter a passphrase and click on the Generate button and the router will automatically generate four WEP keys for each key. Click Apply to save the setting. 22 Passphrase: Enter a passphrase between 8 to be the active key...

User Manual
Page 26
RADIUS Port: Enter the port number of your RADIUS server. Shared Secret: Enter the shared key. Passphrase: Enter a Passphrase to the Router.) Encryption Methods: Select either TKIP or AES or AES as the encryption method. Encryption: Select a level of your RADIUS server. Then click Generate. Key 1-4: If ...
RADIUS Port: Enter the port number of your RADIUS server. Shared Secret: Enter the shared key. Passphrase: Enter a Passphrase to the Router.) Encryption Methods: Select either TKIP or AES or AES as the encryption method. Encryption: Select a level of your RADIUS server. Then click Generate. Key 1-4: If ...
User Manual
Page 27
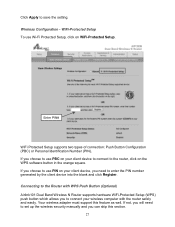
... connect your client device, you need to set up the wireless security manually and you choose to use PIN on your wireless computer with the router safely and easily. Wireless Configuration - If you can skip this feature as well. If not, you choose to enter the PIN number generated by the... will need to use Wi-Fi Protected Setup, click on WiFi-Protected Setup. Your wireless adapter must support this section. 27 Click Apply to the router, click on the WPS software button in the orange square. WiFi-Protected Setup To use PBC on your client device to connect to save the...
... connect your client device, you need to set up the wireless security manually and you choose to use PIN on your wireless computer with the router safely and easily. Wireless Configuration - If you can skip this feature as well. If not, you choose to enter the PIN number generated by the... will need to use Wi-Fi Protected Setup, click on WiFi-Protected Setup. Your wireless adapter must support this section. 27 Click Apply to the router, click on the WPS software button in the orange square. WiFi-Protected Setup To use PBC on your client device to connect to save the...
User Manual
Page 28
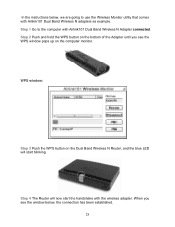
WPS window: Step 3 Push the WPS button on the Dual Band Wireless N Router, and the blue LED will now start blinking. Step 4 The Router will start the handshake with Airlink101 Dual Band Wireless N Adapter connected. Step 1 Go to use the Wireless Monitor utility that comes with Airlink101 Dual Band ...
WPS window: Step 3 Push the WPS button on the Dual Band Wireless N Router, and the blue LED will now start blinking. Step 4 The Router will start the handshake with Airlink101 Dual Band Wireless N Adapter connected. Step 1 Go to use the Wireless Monitor utility that comes with Airlink101 Dual Band ...

User Manual
Page 30
Select Enabled and choose whether the specified wireless clients will be prevented or permitted to save the setting. 30 Enter their MAC address and enabling access restriction. 6.2.3 Wireless > Wireless MAC Filter You can restrict certain wireless clients from accessing the router by specifying their MAC address in the fields below and click Apply to access the wireless network.
Select Enabled and choose whether the specified wireless clients will be prevented or permitted to save the setting. 30 Enter their MAC address and enabling access restriction. 6.2.3 Wireless > Wireless MAC Filter You can restrict certain wireless clients from accessing the router by specifying their MAC address in the fields below and click Apply to access the wireless network.

User Manual
Page 31
... Open System or Shared Key authentication to be able to Auto, which will be used. Authentication Type: The default is set to communicate with the Router but not with each other . With Shared Key authentication, the sender and recipient use a WEP key for authentication. With Open System authentication, the sender and...
... Open System or Shared Key authentication to be able to Auto, which will be used. Authentication Type: The default is set to communicate with the Router but not with each other . With Shared Key authentication, the sender and recipient use a WEP key for authentication. With Open System authentication, the sender and...

