User Manual
Page 1
Wireless N 150 Router Model # AR570W User's Manual Ver. 2A
Wireless N 150 Router Model # AR570W User's Manual Ver. 2A
User Manual
Page 3
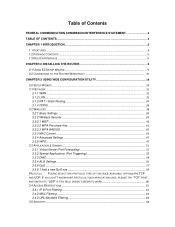
Table of Contents FEDERAL COMMUNICATION COMMISSION INTERFERENCE STATEMENT 2 TABLE OF CONTENTS ...3 CHAPTER 1 INTRODUCTION...6 1.1 FEATURES...6 1.2 PACKAGE CONTENTS ...6 1.3 ROUTER INTERFACE ...6 CHAPTER 2 INSTALLING THE ROUTER 9 2.1 USING EZ SETUP WIZARD ...9 2.2 CONNECTING TO THE ROUTER WIRELESSLY 16 CHAPTER 3 USING WEB CONFIGURATION UTILITY 18 3.0 SETUP WIZARD...20 3.1 NETWORK ...31 3.1.1 WAN...31 3.1.2 LAN ...31 3.1.3 NAT / Static Routing ...34 3.1.4 DDNS...36 3.2 WIRELESS...
Table of Contents FEDERAL COMMUNICATION COMMISSION INTERFERENCE STATEMENT 2 TABLE OF CONTENTS ...3 CHAPTER 1 INTRODUCTION...6 1.1 FEATURES...6 1.2 PACKAGE CONTENTS ...6 1.3 ROUTER INTERFACE ...6 CHAPTER 2 INSTALLING THE ROUTER 9 2.1 USING EZ SETUP WIZARD ...9 2.2 CONNECTING TO THE ROUTER WIRELESSLY 16 CHAPTER 3 USING WEB CONFIGURATION UTILITY 18 3.0 SETUP WIZARD...20 3.1 NETWORK ...31 3.1.1 WAN...31 3.1.2 LAN ...31 3.1.3 NAT / Static Routing ...34 3.1.4 DDNS...36 3.2 WIRELESS...

User Manual
Page 5
...speed for various networking applications, such as WEP, WPA-PSK, and WPA2-PSK provide the highest level of Airlink101 Wireless N 150 Router AR570W. A full range of security features such as VoIP phone, online gaming or online video/audio streaming. Chapter 1 Introduction Congratulations ...purchase to claim for missing items: • Wireless N 150 Router • Quick Installation Guide • Setup CD • A/C power adapter • Ethernet Cable 1.3 Router Interface Front Panel LEDs 6 Best of all, Wireless N 150 Router works with IEEE 802.11 b/g/n network devices, which ensures ...
...speed for various networking applications, such as WEP, WPA-PSK, and WPA2-PSK provide the highest level of Airlink101 Wireless N 150 Router AR570W. A full range of security features such as VoIP phone, online gaming or online video/audio streaming. Chapter 1 Introduction Congratulations ...purchase to claim for missing items: • Wireless N 150 Router • Quick Installation Guide • Setup CD • A/C power adapter • Ethernet Cable 1.3 Router Interface Front Panel LEDs 6 Best of all, Wireless N 150 Router works with IEEE 802.11 b/g/n network devices, which ensures ...

User Manual
Page 6
LED POWER WLAN WAN LNK/ACT LAN 1-4 LNK/ACT Light Status On On Off Flashing On Off Flashing On Off Flashing Description Router is connected. WAN port is powered on. Wireless network is ready and WPS setup is 3dBi dipole antenna. Back Panel Item Name Antenna Radio ON/.... WAN port is in progress. WPS setup is transferring or receiving data. LAN port is not connected. Switch the button to activate or deactivate the Router's wireless function. 7
LED POWER WLAN WAN LNK/ACT LAN 1-4 LNK/ACT Light Status On On Off Flashing On Off Flashing On Off Flashing Description Router is connected. WAN port is powered on. Wireless network is ready and WPS setup is 3dBi dipole antenna. Back Panel Item Name Antenna Radio ON/.... WAN port is in progress. WPS setup is transferring or receiving data. LAN port is not connected. Switch the button to activate or deactivate the Router's wireless function. 7

User Manual
Page 7
Wide Area Network (WAN / Internet) port. Power connector, connects to factory default settings (clear all settings to factory defaults. Reset / WPS 1 - 4 WAN Power Reset the router to A/C power adapter. 8 Press this button and hold for no longer than 1 second to 4. Local Area Network (LAN) ports 1 to start security synchronization function (WPS). Press this button for 10 seconds to restore all settings) or start security synchronization.
Wide Area Network (WAN / Internet) port. Power connector, connects to factory default settings (clear all settings to factory defaults. Reset / WPS 1 - 4 WAN Power Reset the router to A/C power adapter. 8 Press this button and hold for no longer than 1 second to 4. Local Area Network (LAN) ports 1 to start security synchronization function (WPS). Press this button for 10 seconds to restore all settings) or start security synchronization.

User Manual
Page 8
Chapter 2 Installing the Router 2.1 Using EZ Setup Wizard Step 1 Insert the Setup CD into your CD-ROM drive. Step 2 Click Next to start the configuration. 9
Chapter 2 Installing the Router 2.1 Using EZ Setup Wizard Step 1 Insert the Setup CD into your CD-ROM drive. Step 2 Click Next to start the configuration. 9

User Manual
Page 9
Step 4 Connect one end of a network cable to the WAN port of the router and connect the other end to your DSL/Cable modem. Step 3 Connect one end of another network cable to the LAN port of the router and connect the other end to your computer. 10
Step 4 Connect one end of a network cable to the WAN port of the router and connect the other end to your DSL/Cable modem. Step 3 Connect one end of another network cable to the LAN port of the router and connect the other end to your computer. 10

User Manual
Page 10
Step 6 Make sure POWER, WAN, WLAN, and the LAN port that the computer is "admin". The default password is connected to protect it from being accessed by other users. If you do not wish to change the router's password to are lit. Click Next. 11 It is recommended to the Router. Step 7 Enter the Router's password to log in to change the current password, you can leave New Password and Confirm New Password blank. Step 5 Power on the Router. It will take about 30 seconds. If not, try the above steps again.
Step 6 Make sure POWER, WAN, WLAN, and the LAN port that the computer is "admin". The default password is connected to protect it from being accessed by other users. If you do not wish to change the router's password to are lit. Click Next. 11 It is recommended to the Router. Step 7 Enter the Router's password to log in to change the current password, you can leave New Password and Confirm New Password blank. Step 5 Power on the Router. It will take about 30 seconds. If not, try the above steps again.

User Manual
Page 12
If you see the window "Internet Connection Succeed", your router has been successfully connected to the Internet. Step 10 Please wait while the Wizard trying to connect to the Internet. Please click Next to configure the wireless settings. 13
If you see the window "Internet Connection Succeed", your router has been successfully connected to the Internet. Step 10 Please wait while the Wizard trying to connect to the Internet. Please click Next to configure the wireless settings. 13

User Manual
Page 14
Step 13 Verify the settings you just configured for the Router. Your router configuration has been finished. 15 Click Finish to restart the Router. Congratulations!
Step 13 Verify the settings you just configured for the Router. Your router configuration has been finished. 15 Click Finish to restart the Router. Congratulations!

User Manual
Page 15
2.2 Connecting to the Router Wirelessly You must configure your wireless network card regarding how to connect to a router wirelessly. In this icon are available. on the task bar of how to connect to the router. You can find the instructions of your desktop, then click on this section, you want to connect to and click Connect. 16 Step 1 Click on Wireless networks Step 2 Select the wireless network you can also refer to the manual of your wireless computer in order to establish a wireless connection to the router wirelessly with your Vista computer.
2.2 Connecting to the Router Wirelessly You must configure your wireless network card regarding how to connect to a router wirelessly. In this icon are available. on the task bar of how to connect to the router. You can find the instructions of your desktop, then click on this section, you want to connect to and click Connect. 16 Step 1 Click on Wireless networks Step 2 Select the wireless network you can also refer to the manual of your wireless computer in order to establish a wireless connection to the router wirelessly with your Vista computer.

User Manual
Page 16
You should be able to connect to Internet wirelessly now. 17 Step 3 Enter the Security key you configured for the Router (see Step 12 in Chapter 2.1). Now the wireless connection has been established successfully with the Router. Click Connect. Step 4 Click on Close.
You should be able to connect to Internet wirelessly now. 17 Step 3 Enter the Security key you configured for the Router (see Step 12 in Chapter 2.1). Now the wireless connection has been established successfully with the Router. Click Connect. Step 4 Click on Close.
User Manual
Page 17
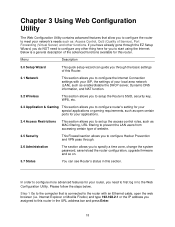
... network (LAN), such as enable/disable the DHCP server, Dynamic DNS information, and NAT function. 3.2 Wireless This section allows you to setup the Router's SSID, security key, WPS, etc. 3.3 Application & Gaming This section allows you assigned to set up the access control rules, such as :... Access Control, QoS (Quality of Service), Port Forwarding (Virtual Server) and other thing here for you to this router. If you need to configure any other functions. Chapter 3 Using Web Configuration Utility The Web Configuration Utility contains advanced features that is a ...
... network (LAN), such as enable/disable the DHCP server, Dynamic DNS information, and NAT function. 3.2 Wireless This section allows you to setup the Router's SSID, security key, WPS, etc. 3.3 Application & Gaming This section allows you assigned to set up the access control rules, such as :... Access Control, QoS (Quality of Service), Port Forwarding (Virtual Server) and other thing here for you to this router. If you need to configure any other functions. Chapter 3 Using Web Configuration Utility The Web Configuration Utility contains advanced features that is a ...

User Manual
Page 18
You can now access the complete features/settings of the router. 19 Step 2 Enter your user name and password and click OK. (The default user name and password are both "admin".) Step 3 When you see this page coming up, you have successfully logged in to the router.
You can now access the complete features/settings of the router. 19 Step 2 Enter your user name and password and click OK. (The default user name and password are both "admin".) Step 3 When you see this page coming up, you have successfully logged in to the router.

User Manual
Page 19
... it is applicable in your local time zone here. Enable Daylight Saving if it or Click on the settings configured here, this router. Click NEXT. If you have gone through Internet. You can select your country. Check to your... router to set up the router again. Parameter Description Current Time Enable NTP Update Time Zone Display the router's current time. Step 1 Configure the Time Zone Settings of the Router. The router will affect functions such as Log entries and Firewall settings.
... it is applicable in your local time zone here. Enable Daylight Saving if it or Click on the settings configured here, this router. Click NEXT. If you have gone through Internet. You can select your country. Check to your... router to set up the router again. Parameter Description Current Time Enable NTP Update Time Zone Display the router's current time. Step 1 Configure the Time Zone Settings of the Router. The router will affect functions such as Log entries and Firewall settings.

User Manual
Page 20
... some DSL users) Click on Dynamic IP if you are using the computer which Internet service you to access internet. Select the type of your router; if your service provider only permits computer with the MAC address of your computer. If you are using . Parameter Host Name MAC Address DNS Address...
... some DSL users) Click on Dynamic IP if you are using the computer which Internet service you to access internet. Select the type of your router; if your service provider only permits computer with the MAC address of your computer. If you are using . Parameter Host Name MAC Address DNS Address...

User Manual
Page 27
... from others when there are connecting to the access point. WPA2(Mixed) is some wireless client supports manual channel number selecting, and this router (maximum transfer rate 11Mbps for 802.11b clients, maximum 54Mbps for 802.11g clients, and maximum 150Mbps for 802.11n clients). WEP is...all wireless clients can type any problem. This is the name of all active wireless stations that you want to use WPA2(Mixed) for your router. Step 5 Set up . You can choose any channel number you can identify, such as myhome, office_room1, etc. SSID Channel Number Associated ...
... from others when there are connecting to the access point. WPA2(Mixed) is some wireless client supports manual channel number selecting, and this router (maximum transfer rate 11Mbps for 802.11b clients, maximum 54Mbps for 802.11g clients, and maximum 150Mbps for 802.11n clients). WEP is...all wireless clients can type any problem. This is the name of all active wireless stations that you want to use WPA2(Mixed) for your router. Step 5 Set up . You can choose any channel number you can identify, such as myhome, office_room1, etc. SSID Channel Number Associated ...

User Manual
Page 28
... you to add more wireless device to your wireless network Click OK to write down the security settings (Encryption and Key) you configured for the Router on a piece of paper and keep it for you use Static IP) in the future. This is suggested to save the settings. Step 6 Click Apply...: • WPA Unicast Cipher Suite: Select WPA2(Mixed) • Pre-Shared Key Format: Select Passphrase • Pre-shared Key: Enter a key between 8 to restart the router. Note: It is the security key for Encryption.
... you to add more wireless device to your wireless network Click OK to write down the security settings (Encryption and Key) you configured for the Router on a piece of paper and keep it for you use Static IP) in the future. This is suggested to save the settings. Step 6 Click Apply...: • WPA Unicast Cipher Suite: Select WPA2(Mixed) • Pre-Shared Key Format: Select Passphrase • Pre-shared Key: Enter a key between 8 to restart the router. Note: It is the security key for Encryption.

User Manual
Page 29
If each field has valid numbers or IP addresses being assigned, the router is connected to the Internet. 30
If each field has valid numbers or IP addresses being assigned, the router is connected to the Internet. 30
User Manual
Page 30
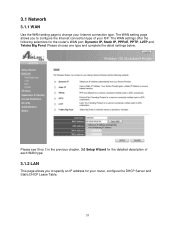
... the DHCP Server and Static DHCP Lease Table. 31 The WAN setting page allows you to specify an IP address for the router's WAN port, Dynamic IP, Static IP, PPPoE, PPTP, L2TP and Telstra Big Pond. Please see Step 2 in the previous chapter, 3.0 Setup Wizard for the detailed ...
... the DHCP Server and Static DHCP Lease Table. 31 The WAN setting page allows you to specify an IP address for the router's WAN port, Dynamic IP, Static IP, PPPoE, PPTP, L2TP and Telstra Big Pond. Please see Step 2 in the previous chapter, 3.0 Setup Wizard for the detailed ...

