
User Manual
Page 4
...and voices. „ Day & Night Surveillance Supported The six Infrared LEDs around the standard lens assembly enable the camera to the factory's default settings. when it is pressed quickly; Ethernet Cable Connector is used to connect the power adapter, in black & white mode using the ...easily change the configuration of the camera via the network. „ Multiple Platforms Supported The camera supports multiple network protocols, including TCP/IP, SMTP e-mail, HTTP, and other Internet related protocols. DC Power Connector is used to monitor the images and take snapshots via Intranet...
...and voices. „ Day & Night Surveillance Supported The six Infrared LEDs around the standard lens assembly enable the camera to the factory's default settings. when it is pressed quickly; Ethernet Cable Connector is used to connect the power adapter, in black & white mode using the ...easily change the configuration of the camera via the network. „ Multiple Platforms Supported The camera supports multiple network protocols, including TCP/IP, SMTP e-mail, HTTP, and other Internet related protocols. DC Power Connector is used to monitor the images and take snapshots via Intranet...

User Manual
Page 14
... of the screen and click on Install ActiveX Control. - 13 - Click on the bar on your camera (the default IP is 192.168.1.240) in the Address bar, and then press [Enter]. Step 4 If it is the first time for both the User name and ..." for your computer to access the Web based viewing page, you may be prompted to install the software of your network camera, you know the IP address of ActiveX Control. Access from Web Browser Step 1 If you may open the Web Browser on top of your computer.
... of the screen and click on Install ActiveX Control. - 13 - Click on the bar on your camera (the default IP is 192.168.1.240) in the Address bar, and then press [Enter]. Step 4 If it is the first time for both the User name and ..." for your computer to access the Web based viewing page, you may be prompted to install the software of your network camera, you know the IP address of ActiveX Control. Access from Web Browser Step 1 If you may open the Web Browser on top of your computer.

User Manual
Page 23
... camera is found and is shown in the Camera List. 5. Enter the camera's IP address (default: 192.168.1.240) and Port (default: 80), and then click Add Camera. 4. Click SETTING to return to add a camera by entering its IP address directly. Enter the User name and Password for the camera, and then click...the Video View Window. The connected camera will be displayed in the list, select it and click Add Camera. The video view of the camera's IP address. Click Search camera to search the available camera within the network. In the pop-up Add New Camera dialog window, you can: z Select...
... camera is found and is shown in the Camera List. 5. Enter the camera's IP address (default: 192.168.1.240) and Port (default: 80), and then click Add Camera. 4. Click SETTING to return to add a camera by entering its IP address directly. Enter the User name and Password for the camera, and then click...the Video View Window. The connected camera will be displayed in the list, select it and click Add Camera. The video view of the camera's IP address. Click Search camera to search the available camera within the network. In the pop-up Add New Camera dialog window, you can: z Select...

User Manual
Page 35
...behind a NAT router or firewall. Please note that enable the device-to use SkyIPCam Utility to a dynamic Internet IP address. To set of the camera. Enter the Default Gateway of computer network protocols that you have to you can assign a fixed host and domain name to obtain ... You should instead use this option when your router manufacturer for the camera directly. It is 255.255.255.0. IP Subnet Mask Default Gateway Primary/ Secondary DNS Enter the IP address of your router. „ UPnP The camera supports UPnP (Universal Plug and Play), which is 192.168...
...behind a NAT router or firewall. Please note that enable the device-to use SkyIPCam Utility to a dynamic Internet IP address. To set of the camera. Enter the Default Gateway of computer network protocols that you have to you can assign a fixed host and domain name to obtain ... You should instead use this option when your router manufacturer for the camera directly. It is 255.255.255.0. IP Subnet Mask Default Gateway Primary/ Secondary DNS Enter the IP address of your router. „ UPnP The camera supports UPnP (Universal Plug and Play), which is 192.168...
User Manual
Page 36
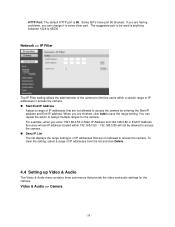
... 80 blocked. To clear the setting, select a range of IP addresses that provide the video and audio settings for the camera. - HTTP Port: The default HTTP port is anything between 1024 to 65535 Network >> IP Filter The IP Filter setting allows the administrator of the camera to limit the ...users within a certain range of IP addresses to access the camera. „ Start/End IP Address Assign a range of IP addresses from the list...
... 80 blocked. To clear the setting, select a range of IP addresses that provide the video and audio settings for the camera. - HTTP Port: The default HTTP port is anything between 1024 to 65535 Network >> IP Filter The IP Filter setting allows the administrator of the camera to limit the ...users within a certain range of IP addresses to access the camera. „ Start/End IP Address Assign a range of IP addresses from the list...

Quick Installation Guide
Page 11
Step 2 Type the IP address of your network camera, you know the IP address of your computer. Section 4 Viewing Images Method 1 --- Access from Web Browser Step 1 If you may open the Web Browser on your camera (the default IP is 192.168.1.240) in the Address bar, and then press [Enter]. Step 3 Enter "admin" for both the User name and Password, and click OK.
Step 2 Type the IP address of your network camera, you know the IP address of your computer. Section 4 Viewing Images Method 1 --- Access from Web Browser Step 1 If you may open the Web Browser on your camera (the default IP is 192.168.1.240) in the Address bar, and then press [Enter]. Step 3 Enter "admin" for both the User name and Password, and click OK.

