User Manual
Page 4
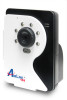
...operating system environment, such as Windows 2000 and Windows XP. -3- DC Power Connector is long pressed for ten seconds, the camera will restart the camera when it is used to connect the power adapter, in order to supply power to capture crystal clear images in dark ...the images and take snapshots via Intranet or Internet. In addition, the camera can easily change the configuration of the camera via the network. „ Multiple Platforms Supported The camera supports multiple network protocols, including TCP/IP, SMTP e-mail, HTTP, and other Internet related protocols. Rear View ...
...operating system environment, such as Windows 2000 and Windows XP. -3- DC Power Connector is long pressed for ten seconds, the camera will restart the camera when it is used to connect the power adapter, in order to supply power to capture crystal clear images in dark ...the images and take snapshots via Intranet or Internet. In addition, the camera can easily change the configuration of the camera via the network. „ Multiple Platforms Supported The camera supports multiple network protocols, including TCP/IP, SMTP e-mail, HTTP, and other Internet related protocols. Rear View ...
User Manual
Page 9
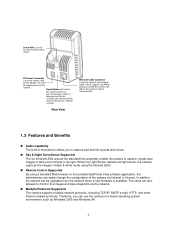
Note: If the Camera's IP address does not show up in the window, make sure the camera is properly connected to configure from the list and click on the Search button. -8- 3.2 Using SkyIPCam Utility Step 1 Go to Start > (All) Programs > AirLink101 > AirLink101 SkyIPCam Utiliy Step 2 Select the IP Camera you want to the same network as your computer is, and then click on the Change IP button.
Note: If the Camera's IP address does not show up in the window, make sure the camera is properly connected to configure from the list and click on the Search button. -8- 3.2 Using SkyIPCam Utility Step 1 Go to Start > (All) Programs > AirLink101 > AirLink101 SkyIPCam Utiliy Step 2 Select the IP Camera you want to the same network as your computer is, and then click on the Change IP button.
User Manual
Page 10
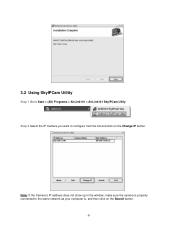
Enter "admin" for both the ID and password, and click Change. Another option is that the suggested Static IP, or you can manually change the last 3-digit number of the IP Address, in case that if your router's DHCP server is enabled, you can select DCHP, so the router will return to your camera from the list and click Link. -9- Select your camera. Step 4 Once the utility has saved changes, it will automatically assign a dynamic IP address to the original screen. Step 3 You may simply accept the suggested one has already been used by another device in the same network.
Enter "admin" for both the ID and password, and click Change. Another option is that the suggested Static IP, or you can manually change the last 3-digit number of the IP Address, in case that if your router's DHCP server is enabled, you can select DCHP, so the router will return to your camera from the list and click Link. -9- Select your camera. Step 4 Once the utility has saved changes, it will automatically assign a dynamic IP address to the original screen. Step 3 You may simply accept the suggested one has already been used by another device in the same network.

User Manual
Page 12
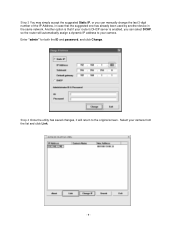
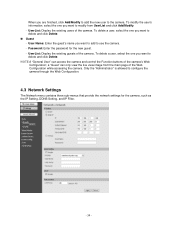
You can receive in the below window, and click Next. If you can get this up email alerts that you want to set up at a later time, click Next. - 11 - Step 8 You may also change the camera's IP settings in the future, Please enter your internet service provider. Step 9 If you would like to set this information from your email information here.
You can receive in the below window, and click Next. If you can get this up email alerts that you want to set up at a later time, click Next. - 11 - Step 8 You may also change the camera's IP settings in the future, Please enter your internet service provider. Step 9 If you would like to set this information from your email information here.
User Manual
Page 14
... of the screen and click on top of ActiveX Control. Step 2 Type the IP address of your network camera, you may be prompted to access the Web based viewing page, you know the IP address of your camera (the default IP is the first time for both the User name and Password, and click OK...
... of the screen and click on top of ActiveX Control. Step 2 Type the IP address of your network camera, you may be prompted to access the Web based viewing page, you know the IP address of your camera (the default IP is the first time for both the User name and Password, and click OK...
User Manual
Page 23
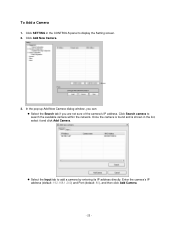
Once the camera is found and is shown in the CONTROLS panel to display the Setting screen. 2. In the pop-up Add New Camera dialog window, you can: z Select the Search tab if you are not sure of the camera's IP address. Click Search camera to add a camera by entering its IP address directly. Enter the camera's IP address (default: 192.168.1.240) and Port (default: 80), and then click Add Camera. - 22 - z Select the Input tab to search the available camera within the network. Click Add New Camera. 3. Click SETTING in the list, select it and click Add Camera. To Add a Camera 1.
Once the camera is found and is shown in the CONTROLS panel to display the Setting screen. 2. In the pop-up Add New Camera dialog window, you can: z Select the Search tab if you are not sure of the camera's IP address. Click Search camera to add a camera by entering its IP address directly. Enter the camera's IP address (default: 192.168.1.240) and Port (default: 80), and then click Add Camera. - 22 - z Select the Input tab to search the available camera within the network. Click Add New Camera. 3. Click SETTING in the list, select it and click Add Camera. To Add a Camera 1.

User Manual
Page 34
... the time will be synchronized with PC: Select this option to change the password for your camera „ General User - User Name: Enter the user's name you want to add to enter the IP address of the camera will be synchronized with NTP Server: Select this option to set the date and time...
... the time will be synchronized with PC: Select this option to change the password for your camera „ General User - User Name: Enter the user's name you want to add to enter the IP address of the camera will be synchronized with NTP Server: Select this option to set the date and time...
User Manual
Page 35
...'s name you are finished, click Add/Modify to add the new user to the camera. UserList: Display the existing users of the camera. Password: Enter the password for the camera, such as the IP Setting, DDNS Setting, and IP Filter. - 34 - To delete a user, select the one you want to ...modify from the main page of the camera's Web Configuration; Only the "Administrator" is allowed to delete ...
...'s name you are finished, click Add/Modify to add the new user to the camera. UserList: Display the existing users of the camera. Password: Enter the password for the camera, such as the IP Setting, DDNS Setting, and IP Filter. - 34 - To delete a user, select the one you want to ...modify from the main page of the camera's Web Configuration; Only the "Administrator" is allowed to delete ...

User Manual
Page 36
...Number - 35 - The default setting is 192.168.1.1. Enter the Default Gateway of the camera. DNS (Domain Name System) translates domain names into IP addresses. Check with your router manufacturer for the camera directly. Therefore, when you select PPPoE as starting up, it is. - Select the ...know what it automatically sends a notification email to obtain the related setting values. IP Subnet Mask Default Gateway Primary/ Secondary DNS Enter the IP address of the camera. You should instead use Static IP mode to set up the email or DDNS configuration in advance. It is ...
...Number - 35 - The default setting is 192.168.1.1. Enter the Default Gateway of the camera. DNS (Domain Name System) translates domain names into IP addresses. Check with your router manufacturer for the camera directly. Therefore, when you select PPPoE as starting up, it is. - Select the ...know what it automatically sends a notification email to obtain the related setting values. IP Subnet Mask Default Gateway Primary/ Secondary DNS Enter the IP address of the camera. You should instead use Static IP mode to set up the email or DDNS configuration in advance. It is ...
User Manual
Page 37
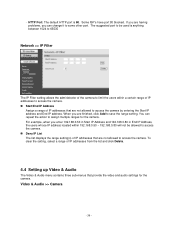
...to access the camera by entering the Start IP address and End IP address. To clear the setting, select a range of IP addresses that are not allowed to access the camera. If you are finished, click Add to access the camera. „ Start/End IP Address Assign a range of IP addresses to ...save the range setting. - Video & Audio >> Camera - 36 - You can change it to assign multiple ranges for the camera. For example, when you ...
...to access the camera by entering the Start IP address and End IP address. To clear the setting, select a range of IP addresses that are not allowed to access the camera. If you are finished, click Add to access the camera. „ Start/End IP Address Assign a range of IP addresses to ...save the range setting. - Video & Audio >> Camera - 36 - You can change it to assign multiple ranges for the camera. For example, when you ...
User Manual
Page 41
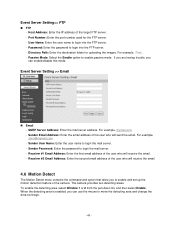
... 40 - Port Number: Enter the port number used for uploading the images. If you are having trouble, you can enable/disable this mode. The camera provides two detecting areas. Event Server Setting >> Email „ Email - SMTP Server Address: Enter the mail server address. Receiver #1 Email Address: ... For example, [email protected]. - Password: Enter the password to login the mail server. - For example, /Test/. - Host Address: Enter the IP address of the camera. Event Server Setting>> FTP „ FTP - Directory Path: Enter the destination folder for the FTP server. -
... 40 - Port Number: Enter the port number used for uploading the images. If you are having trouble, you can enable/disable this mode. The camera provides two detecting areas. Event Server Setting >> Email „ Email - SMTP Server Address: Enter the mail server address. Receiver #1 Email Address: ... For example, [email protected]. - Password: Enter the password to login the mail server. - For example, /Test/. - Host Address: Enter the IP address of the camera. Event Server Setting>> FTP „ FTP - Directory Path: Enter the destination folder for the FTP server. -
Quick Installation Guide
Page 2
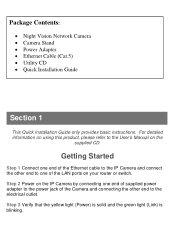
... yellow light (Power) is solid and the green light (Link) is blinking. Getting Started Step 1 Connect one end of the Ethernet cable to the IP Camera and connect the other end to one end of supplied power adapter to the electrical outlet. For detailed information on using this product, please refer... to the User's Manual on the IP Camera by connecting one of the Camera and connecting the other end to the power jack of the LAN ports on your router or switch. Step 2 Power on the...
... yellow light (Power) is solid and the green light (Link) is blinking. Getting Started Step 1 Connect one end of the Ethernet cable to the IP Camera and connect the other end to one end of supplied power adapter to the electrical outlet. For detailed information on using this product, please refer... to the User's Manual on the IP Camera by connecting one of the Camera and connecting the other end to the power jack of the LAN ports on your router or switch. Step 2 Power on the...
Quick Installation Guide
Page 5
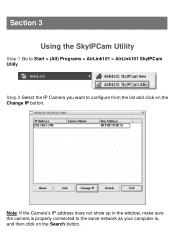
Note: If the Camera's IP address does not show up in the window, make sure the camera is , and then click on the Change IP button. Section 3 Using the SkyIPCam Utility Step 1 Go to Start > (All) Programs > AirLink101 > AirLink101 SkyIPCam Utiliy Step 2 Select the IP Camera you want to the same network as your computer is properly connected to configure from the list and click on the Search button.
Note: If the Camera's IP address does not show up in the window, make sure the camera is , and then click on the Change IP button. Section 3 Using the SkyIPCam Utility Step 1 Go to Start > (All) Programs > AirLink101 > AirLink101 SkyIPCam Utiliy Step 2 Select the IP Camera you want to the same network as your computer is properly connected to configure from the list and click on the Search button.
Quick Installation Guide
Page 6
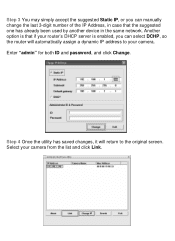
Step 4 Once the utility has saved changes, it will automatically assign a dynamic IP address to the original screen. Select your camera. Another option is that if your router's DHCP server is enabled, you can manually change the last 3-digit number of the IP Address, in the same network. Enter "admin" for both ID and password, and click Change. Step 3 You may simply accept the suggested one has already been used by another device in case that the suggested Static IP, or you can select DCHP, so the router will return to your camera from the list and click Link.
Step 4 Once the utility has saved changes, it will automatically assign a dynamic IP address to the original screen. Select your camera. Another option is that if your router's DHCP server is enabled, you can manually change the last 3-digit number of the IP Address, in the same network. Enter "admin" for both ID and password, and click Change. Step 3 You may simply accept the suggested one has already been used by another device in case that the suggested Static IP, or you can select DCHP, so the router will return to your camera from the list and click Link.

Quick Installation Guide
Page 8
Step 8 You can change the camera's IP settings in Step 3, click Next and go to the next step. Then enter "admin" for your camera and a location if you have done this in the below window. Click Next. If you like. Step 7 Enter a name for both Admin Password and Confirm Password.
Step 8 You can change the camera's IP settings in Step 3, click Next and go to the next step. Then enter "admin" for your camera and a location if you have done this in the below window. Click Next. If you like. Step 7 Enter a name for both Admin Password and Confirm Password.

Quick Installation Guide
Page 10
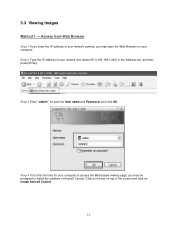
Step 2 Type the IP address of your network camera, you may open the Web Browser on your camera (the default IP is 192.168.1.240) in the Address bar, and then press [Enter]. Access from "Web Browser" Step 1 If you know the IP address of your computer. Section 4 Viewing Images Method 1 --- Step 3 Enter "admin" for both the User name and Password, and click OK.
Step 2 Type the IP address of your network camera, you may open the Web Browser on your camera (the default IP is 192.168.1.240) in the Address bar, and then press [Enter]. Access from "Web Browser" Step 1 If you know the IP address of your computer. Section 4 Viewing Images Method 1 --- Step 3 Enter "admin" for both the User name and Password, and click OK.

