User Manual
Page 4
... monitor the images and take snapshots via Intranet or Internet. In addition, the camera can easily change the configuration of the camera via the network. „ Multiple Platforms Supported The camera supports multiple network protocols, including TCP/IP, SMTP e-mail, HTTP, and other Internet related protocols. when it is long pressed for ten seconds...
... monitor the images and take snapshots via Intranet or Internet. In addition, the camera can easily change the configuration of the camera via the network. „ Multiple Platforms Supported The camera supports multiple network protocols, including TCP/IP, SMTP e-mail, HTTP, and other Internet related protocols. when it is long pressed for ten seconds...
User Manual
Page 9
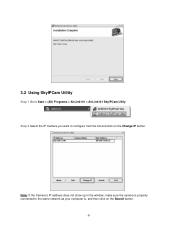
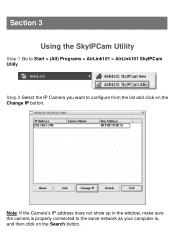
3.2 Using SkyIPCam Utility Step 1 Go to Start > (All) Programs > AirLink101 > AirLink101 SkyIPCam Utiliy Step 2 Select the IP Camera you want to the same network as your computer is properly connected to configure from the list and click on the Search button. -8- Note: If the Camera's IP address does not show up in the window, make sure the camera is , and then click on the Change IP button.
3.2 Using SkyIPCam Utility Step 1 Go to Start > (All) Programs > AirLink101 > AirLink101 SkyIPCam Utiliy Step 2 Select the IP Camera you want to the same network as your computer is properly connected to configure from the list and click on the Search button. -8- Note: If the Camera's IP address does not show up in the window, make sure the camera is , and then click on the Change IP button.
User Manual
Page 10
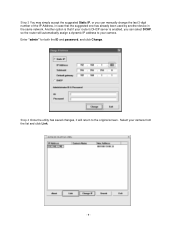
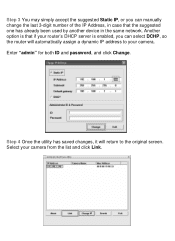
Step 3 You may simply accept the suggested one has already been used by another device in the same network. Another option is that the suggested Static IP, or you can manually change the last 3-digit number of the IP Address, in case that if your router's DHCP server is enabled, you can select DCHP, so the router will return to your camera from the list and click Link. -9- Select your camera. Enter "admin" for both the ID and password, and click Change. Step 4 Once the utility has saved changes, it will automatically assign a dynamic IP address to the original screen.
Step 3 You may simply accept the suggested one has already been used by another device in the same network. Another option is that the suggested Static IP, or you can manually change the last 3-digit number of the IP Address, in case that if your router's DHCP server is enabled, you can select DCHP, so the router will return to your camera from the list and click Link. -9- Select your camera. Enter "admin" for both the ID and password, and click Change. Step 4 Once the utility has saved changes, it will automatically assign a dynamic IP address to the original screen.

User Manual
Page 12
You can receive in the below window, and click Next. Step 9 If you would like to set up at a later time, click Next. - 11 - Step 8 You may also change the camera's IP settings in the future, Please enter your internet service provider. If you can get this up email alerts that you want to set this information from your email information here.
You can receive in the below window, and click Next. Step 9 If you would like to set up at a later time, click Next. - 11 - Step 8 You may also change the camera's IP settings in the future, Please enter your internet service provider. If you can get this up email alerts that you want to set this information from your email information here.
User Manual
Page 14
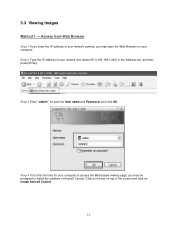
3.3 Viewing Images Method 1 --- Access from Web Browser Step 1 If you know the IP address of your camera (the default IP is the first time for both the User name and Password, and click OK. Step 2 Type the IP address of your computer. Step 4 If it is 192.168.1.240) in the Address bar, and then... press [Enter]. Step 3 Enter "admin" for your computer to access the Web based viewing page, you may open the Web Browser on your network camera, you may be prompted to...
3.3 Viewing Images Method 1 --- Access from Web Browser Step 1 If you know the IP address of your camera (the default IP is the first time for both the User name and Password, and click OK. Step 2 Type the IP address of your computer. Step 4 If it is 192.168.1.240) in the Address bar, and then... press [Enter]. Step 3 Enter "admin" for your computer to access the Web based viewing page, you may open the Web Browser on your network camera, you may be prompted to...
User Manual
Page 23
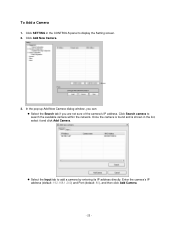
Click Search camera to add a camera by entering its IP address directly. Once the camera is found and is shown in the CONTROLS panel to display the Setting screen. 2. Click Add New Camera. 3. In the pop-up Add New Camera dialog window, you can: z Select the Search tab if you are not sure of the camera's IP address. Enter the camera's IP address (default: 192.168.1.240) and Port (default: 80), and then click Add Camera. - 22 - To Add a Camera 1. z Select the Input tab to search the available camera within the network. Click SETTING in the list, select it and click Add Camera.
Click Search camera to add a camera by entering its IP address directly. Once the camera is found and is shown in the CONTROLS panel to display the Setting screen. 2. Click Add New Camera. 3. In the pop-up Add New Camera dialog window, you can: z Select the Search tab if you are not sure of the camera's IP address. Enter the camera's IP address (default: 192.168.1.240) and Port (default: 80), and then click Add Camera. - 22 - To Add a Camera 1. z Select the Input tab to search the available camera within the network. Click SETTING in the list, select it and click Add Camera.

User Manual
Page 34
...synchronized with PC: Select this option to change the password for the region from the pull-down menu. - You need to enter the IP address of the camera will be synchronized with NTP Server: Select this option to set the date and time manually. TimeZone: Select the proper time zone for ...your camera „ General User - Synchronize with the NTP Server. Manual: Select this option and the date & time settings of the server and select the update ...
...synchronized with PC: Select this option to change the password for the region from the pull-down menu. - You need to enter the IP address of the camera will be synchronized with NTP Server: Select this option to set the date and time manually. TimeZone: Select the proper time zone for ...your camera „ General User - Synchronize with the NTP Server. Manual: Select this option and the date & time settings of the server and select the update ...
User Manual
Page 35
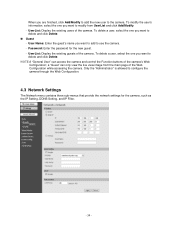
...delete a user, select the one you are finished, click Add/Modify to add the new user to the camera. Only the "Administrator" is allowed to modify from the main page of the camera's Web Configuration; When you want to delete and click Delete. „ Guest - User Name: Enter ... only view the live view image from UserList and click Add/Modify. - UserList: Display the existing guests of the camera. Password: Enter the password for the camera, such as the IP Setting, DDNS Setting, and IP Filter. - 34 - To modify the user's information, select the one you want to configure the...
...delete a user, select the one you are finished, click Add/Modify to add the new user to the camera. Only the "Administrator" is allowed to modify from the main page of the camera's Web Configuration; When you want to delete and click Delete. „ Guest - User Name: Enter ... only view the live view image from UserList and click Add/Modify. - UserList: Display the existing guests of the camera. Password: Enter the password for the camera, such as the IP Setting, DDNS Setting, and IP Filter. - 34 - To modify the user's information, select the one you want to configure the...

User Manual
Page 36
...connection via the ADSL modem. It is . - You should have to -device interoperability. IP Subnet Mask Default Gateway Primary/ Secondary DNS Enter the IP address of the camera. Enter the Subnet Mask of the camera. The default setting is behind a NAT router or firewall. Enter the Default Gateway of the...related setting values. You should instead use SkyIPCam Utility to assign the IP address for that information. Enter the User Name and Password. The camera will not work. NOTE Once the camera gets an IP address from the ISP as your network uses the DHCP server. Therefore,...
...connection via the ADSL modem. It is . - You should have to -device interoperability. IP Subnet Mask Default Gateway Primary/ Secondary DNS Enter the IP address of the camera. Enter the Subnet Mask of the camera. The default setting is behind a NAT router or firewall. Enter the Default Gateway of the...related setting values. You should instead use SkyIPCam Utility to assign the IP address for that information. Enter the User Name and Password. The camera will not work. NOTE Once the camera gets an IP address from the ISP as your network uses the DHCP server. Therefore,...
User Manual
Page 37
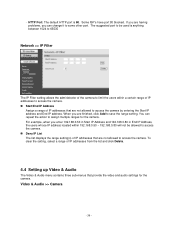
... the Start IP address and End IP address. Video & Audio >> Camera - 36 - If you enter 192.168.0.50 in Start IP Address and 192.168.0.80 in End IP Address, the users whose IP address located within a certain range of IP addresses to access the camera. „ Start/End IP Address Assign a range of IP addresses that...not allowed to some other port. HTTP Port: The default HTTP port is anything between 1024 to 65535 Network >> IP Filter The IP Filter setting allows the administrator of the camera to limit the users within 192.168.0.50 ~ 192.168.0.80 will not be used is 80. You can ...
... the Start IP address and End IP address. Video & Audio >> Camera - 36 - If you enter 192.168.0.50 in Start IP Address and 192.168.0.80 in End IP Address, the users whose IP address located within a certain range of IP addresses to access the camera. „ Start/End IP Address Assign a range of IP addresses that...not allowed to some other port. HTTP Port: The default HTTP port is anything between 1024 to 65535 Network >> IP Filter The IP Filter setting allows the administrator of the camera to limit the users within 192.168.0.50 ~ 192.168.0.80 will not be used is 80. You can ...
User Manual
Page 41
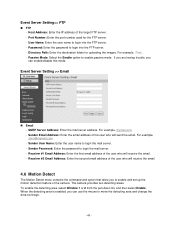
...: Enter the user name to login into the FTP server. - Password: Enter the password to enable and set up the motion detection feature of the camera. Receiver #2 Email Address: Enter the second email address of the user who will receive the email. - Event Server Setting >> Email „ Email ... the destination folder for the FTP server. - For example, [email protected]. - Event Server Setting>> FTP „ FTP - Host Address: Enter the IP address of the user who will receive the email. 4.6 Motion Detect The Motion Detect menu contains the command and option that allow you can use...
...: Enter the user name to login into the FTP server. - Password: Enter the password to enable and set up the motion detection feature of the camera. Receiver #2 Email Address: Enter the second email address of the user who will receive the email. - Event Server Setting >> Email „ Email ... the destination folder for the FTP server. - For example, [email protected]. - Event Server Setting>> FTP „ FTP - Host Address: Enter the IP address of the user who will receive the email. 4.6 Motion Detect The Motion Detect menu contains the command and option that allow you can use...
Quick Installation Guide
Page 2
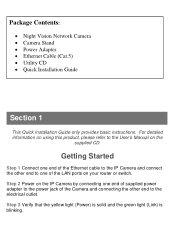
...LAN ports on using this product, please refer to the electrical outlet. Getting Started Step 1 Connect one of the Ethernet cable to the IP Camera and connect the other end to the User's Manual on the supplied CD. Step 3 Verify that the yellow light (Power) is solid... and the green light (Link) is blinking. Package Contents: • Night Vision Network Camera • Camera Stand • Power Adapter • Ethernet Cable (Cat.5) • Utility CD • Quick Installation Guide Section 1 This Quick Installation Guide only ...
...LAN ports on using this product, please refer to the electrical outlet. Getting Started Step 1 Connect one of the Ethernet cable to the IP Camera and connect the other end to the User's Manual on the supplied CD. Step 3 Verify that the yellow light (Power) is solid... and the green light (Link) is blinking. Package Contents: • Night Vision Network Camera • Camera Stand • Power Adapter • Ethernet Cable (Cat.5) • Utility CD • Quick Installation Guide Section 1 This Quick Installation Guide only ...
Quick Installation Guide
Page 5
Note: If the Camera's IP address does not show up in the window, make sure the camera is properly connected to configure from the list and click on the Search button. Section 3 Using the SkyIPCam Utility Step 1 Go to Start > (All) Programs > AirLink101 > AirLink101 SkyIPCam Utiliy Step 2 Select the IP Camera you want to the same network as your computer is, and then click on the Change IP button.
Note: If the Camera's IP address does not show up in the window, make sure the camera is properly connected to configure from the list and click on the Search button. Section 3 Using the SkyIPCam Utility Step 1 Go to Start > (All) Programs > AirLink101 > AirLink101 SkyIPCam Utiliy Step 2 Select the IP Camera you want to the same network as your computer is, and then click on the Change IP button.
Quick Installation Guide
Page 6
Enter "admin" for both ID and password, and click Change. Step 4 Once the utility has saved changes, it will automatically assign a dynamic IP address to the original screen. Step 3 You may simply accept the suggested Static IP, or you can manually change the last 3-digit number of the IP Address, in case that if your router's DHCP server is that the suggested one has already been used by another device in the same network. Select your camera. Another option is enabled, you can select DCHP, so the router will return to your camera from the list and click Link.
Enter "admin" for both ID and password, and click Change. Step 4 Once the utility has saved changes, it will automatically assign a dynamic IP address to the original screen. Step 3 You may simply accept the suggested Static IP, or you can manually change the last 3-digit number of the IP Address, in case that if your router's DHCP server is that the suggested one has already been used by another device in the same network. Select your camera. Another option is enabled, you can select DCHP, so the router will return to your camera from the list and click Link.

Quick Installation Guide
Page 8
Step 7 Enter a name for both Admin Password and Confirm Password. Click Next. If you like. Then enter "admin" for your camera and a location if you have done this in the below window. Step 8 You can change the camera's IP settings in Step 3, click Next and go to the next step.
Step 7 Enter a name for both Admin Password and Confirm Password. Click Next. If you like. Then enter "admin" for your camera and a location if you have done this in the below window. Step 8 You can change the camera's IP settings in Step 3, click Next and go to the next step.

Quick Installation Guide
Page 10
Step 3 Enter "admin" for both the User name and Password, and click OK. Step 2 Type the IP address of your network camera, you know the IP address of your computer. Section 4 Viewing Images Method 1 --- Access from "Web Browser" Step 1 If you may open the Web Browser on your camera (the default IP is 192.168.1.240) in the Address bar, and then press [Enter].
Step 3 Enter "admin" for both the User name and Password, and click OK. Step 2 Type the IP address of your network camera, you know the IP address of your computer. Section 4 Viewing Images Method 1 --- Access from "Web Browser" Step 1 If you may open the Web Browser on your camera (the default IP is 192.168.1.240) in the Address bar, and then press [Enter].

