User Manual
Page 6
...the environmental light level as being too low, the camera captures the images in a mixed operating system environment, such as Windows 7 and Windows XP. Multiple Platforms Supported The camera supports multiple network protocols, including TCP/IP, SMTP e-mail, HTTP, and other Internet related protocols.... In addition, you can connect an external speaker to the camera to talk to monitor various objects and places for ...
...the environmental light level as being too low, the camera captures the images in a mixed operating system environment, such as Windows 7 and Windows XP. Multiple Platforms Supported The camera supports multiple network protocols, including TCP/IP, SMTP e-mail, HTTP, and other Internet related protocols.... In addition, you can connect an external speaker to the camera to talk to monitor various objects and places for ...
User Manual
Page 15
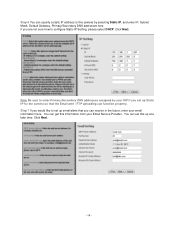
... sure to enter Primary/Secondary DNS addresses assigned by selecting Static IP, and enter IP, Subnet Mask, Default Gateway, Primary/Secondary DNS addresses here. Step 6 You can specify a static IP address to this camera by your ISP if you set up Static IP for the camera so that you are not sure how to configure Static...
... sure to enter Primary/Secondary DNS addresses assigned by selecting Static IP, and enter IP, Subnet Mask, Default Gateway, Primary/Secondary DNS addresses here. Step 6 You can specify a static IP address to this camera by your ISP if you set up Static IP for the camera so that you are not sure how to configure Static...

User Manual
Page 17
... Enter. 3.3 Viewing Images Method A > Access Camera from Web Browser Step 1B If you assigned a static IP address for your camera (at Step 5, Chapter 3.2. - 16 - Step 2B Type the IP address of the camera, then click OK. Method B > Access Camera from SkyIPCam Utility Step 1A Open Airlink101 SkyIPCam Utility, select the camera you did not make any change...
... Enter. 3.3 Viewing Images Method A > Access Camera from Web Browser Step 1B If you assigned a static IP address for your camera (at Step 5, Chapter 3.2. - 16 - Step 2B Type the IP address of the camera, then click OK. Method B > Access Camera from SkyIPCam Utility Step 1A Open Airlink101 SkyIPCam Utility, select the camera you did not make any change...
User Manual
Page 21
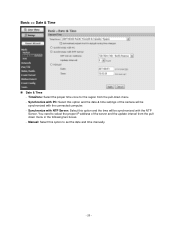
Synchronize with PC: Select this option to select the proper IP address of the camera will be synchronized with the NTP Server. You need to set the date and time manually. - 20 - TimeZone: Select the proper time zone for the region from the pulldown menu in the following two boxes. - Manual: Select this option and the date & time settings of the server and the update interval from the pull-down menu. - Synchronize with NTP Server: Select this option and the time will be synchronized with the connected computer. - Basic >> Date & Time Date & Time -
Synchronize with PC: Select this option to select the proper IP address of the camera will be synchronized with the NTP Server. You need to set the date and time manually. - 20 - TimeZone: Select the proper time zone for the region from the pulldown menu in the following two boxes. - Manual: Select this option and the date & time settings of the server and the update interval from the pull-down menu. - Synchronize with NTP Server: Select this option and the time will be synchronized with the connected computer. - Basic >> Date & Time Date & Time -

User Manual
Page 23
... 255.255.255.0. The default setting is recommended that you to assign the IP address for the camera, such as the IP Setting, DDNS Setting, IP Filter, and Wireless Network. You should instead use DCHP. Enter the Default Gateway of the camera. You can use SkyIPCam Utility to set up , it will always know what...
... 255.255.255.0. The default setting is recommended that you to assign the IP address for the camera, such as the IP Setting, DDNS Setting, IP Filter, and Wireless Network. You should instead use DCHP. Enter the Default Gateway of the camera. You can use SkyIPCam Utility to set up , it will always know what...
User Manual
Page 24
... and your router manufacturer for DDNS service with a NAT router, the camera's DDNS function will NOT use a direct connection via the ADSL modem. UPnP The camera supports UPnP (Universal Plug and Play), which is the IP address of your Internet service provider. Ports Number - You should have...and Password boxes. Enter the Primary DNS and Secondary DNS that you . The camera will need to set of your network, which is ONLY used is 80. NOTE Once the camera gets an IP address from the pulldown list and enter the required information in your connecting type,...
... and your router manufacturer for DDNS service with a NAT router, the camera's DDNS function will NOT use a direct connection via the ADSL modem. UPnP The camera supports UPnP (Universal Plug and Play), which is the IP address of your Internet service provider. Ports Number - You should have...and Password boxes. Enter the Primary DNS and Secondary DNS that you . The camera will need to set of your network, which is ONLY used is 80. NOTE Once the camera gets an IP address from the pulldown list and enter the required information in your connecting type,...

User Manual
Page 25
... multiple ranges for the camera. Start/End IP Address Assign a range of IP addresses that are not allowed to access the camera. Deny IP List The list displays the range setting(s) of IP addresses that are not allowed to access the camera. Network >> IP Filter The IP Filter setting allows the ...administrator of the camera to limit the users within 192.168.0.50 ~...
... multiple ranges for the camera. Start/End IP Address Assign a range of IP addresses that are not allowed to access the camera. Deny IP List The list displays the range setting(s) of IP addresses that are not allowed to access the camera. Network >> IP Filter The IP Filter setting allows the ...administrator of the camera to limit the users within 192.168.0.50 ~...
User Manual
Page 33
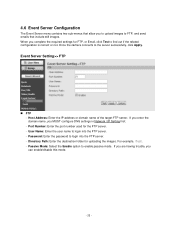
...Directory Path: Enter the destination folder for the FTP server. - When you to upload images to the server successfully, click Apply. Once the camera connects to FTP, and send emails that allow you complete the required settings for FTP, or Email, click Test to login into the FTP ...The Event Server menu contains two sub-menus that include still images. If you are having trouble, you MUST configure DNS settings in Network / IP Setting first. - Port Number: Enter the port number used for uploading the images. Password: Enter the password to enable passive mode. Event Server...
...Directory Path: Enter the destination folder for the FTP server. - When you to upload images to the server successfully, click Apply. Once the camera connects to FTP, and send emails that allow you complete the required settings for FTP, or Email, click Test to login into the FTP ...The Event Server menu contains two sub-menus that include still images. If you are having trouble, you MUST configure DNS settings in Network / IP Setting first. - Port Number: Enter the port number used for uploading the images. Password: Enter the password to enable passive mode. Event Server...
User Manual
Page 47
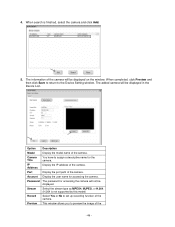
...the user name for the camera. You have to preview the image of the camera will be displayed in the Device List. The added camera will be displayed. The password for accessing the camera will not be displayed on the window. Option Model Camera Title IP Address Port Account Password ...Stream Record Preview Description Display the model name of the camera. This window allows you to ...
...the user name for the camera. You have to preview the image of the camera will be displayed in the Device List. The added camera will be displayed. The password for accessing the camera will not be displayed on the window. Option Model Camera Title IP Address Port Account Password ...Stream Record Preview Description Display the model name of the camera. This window allows you to ...

