
User Guide
Page 5
... 7 Setting up Removable option - -Windows 98SE Only 7 Connecting and Disconnecting Your Enclosure 8 Troubleshooting 9 About USB Technology 10 About SATA Technology 10 ® This User's Guide explains how to install and connect your Adaptec ACS-300 Combo eSATA/USB 2.0 Hard Disk Drive Enclosure, and provides a brief overview of USB and SATA technology. In this Guide...
... 7 Setting up Removable option - -Windows 98SE Only 7 Connecting and Disconnecting Your Enclosure 8 Troubleshooting 9 About USB Technology 10 About SATA Technology 10 ® This User's Guide explains how to install and connect your Adaptec ACS-300 Combo eSATA/USB 2.0 Hard Disk Drive Enclosure, and provides a brief overview of USB and SATA technology. In this Guide...
User Guide
Page 6
... device drivers and documentation A disk drive is not included in this kit. The Adaptec ACS-300 Combo eSATA/USB 2.0 Enclosure supports 3.5-inch SATA I (1.5Gbps) and SATA II (3.0Gbps) hard disk drives. System Requirements To successfully install and use your Adaptec ACS-300 enclosure, your computer must meet these requirements: ƒ CD ROM drive ƒ For SATA...
... device drivers and documentation A disk drive is not included in this kit. The Adaptec ACS-300 Combo eSATA/USB 2.0 Enclosure supports 3.5-inch SATA I (1.5Gbps) and SATA II (3.0Gbps) hard disk drives. System Requirements To successfully install and use your Adaptec ACS-300 enclosure, your computer must meet these requirements: ƒ CD ROM drive ƒ For SATA...
User Guide
Page 7
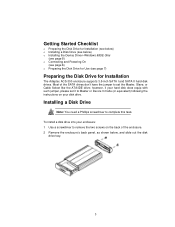
... it to remove the two screws on the back of the SATA drives don't have the jumper to complete this task. Most of the enclosure. 2 Remove the enclosure's back panel, as shown below ) o Installing the Device Driver-Windows 98SE Only (see page 5) o Connecting and Powering On (see page 6) ...) following the instructions on your hard disk does equip with such jumper, please set the Master, Slave, or Cable Select like the ATA/IDE drive; Getting Started Checklist o Preparing the Disk Drive for Installation The Adaptec ACS-300 enclosure supports 3.5-inch SATA I and SATA II hard disk drives.
... it to remove the two screws on the back of the SATA drives don't have the jumper to complete this task. Most of the enclosure. 2 Remove the enclosure's back panel, as shown below ) o Installing the Device Driver-Windows 98SE Only (see page 5) o Connecting and Powering On (see page 6) ...) following the instructions on your hard disk does equip with such jumper, please set the Master, Slave, or Cable Select like the ATA/IDE drive; Getting Started Checklist o Preparing the Disk Drive for Installation The Adaptec ACS-300 enclosure supports 3.5-inch SATA I and SATA II hard disk drives.
User Guide
Page 8
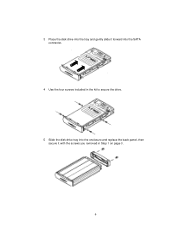
3 Place the disk drive into the tray and gently slide it forward into the SATA connector. 4 Use the four screws included in the kit to secure the drive. 5 Slide the disk drive tray into the enclosure and replace the back panel, then secure it with the screws you removed in Step 1 on page 3. 4
3 Place the disk drive into the tray and gently slide it forward into the SATA connector. 4 Use the four screws included in the kit to secure the drive. 5 Slide the disk drive tray into the enclosure and replace the back panel, then secure it with the screws you removed in Step 1 on page 3. 4
User Guide
Page 9
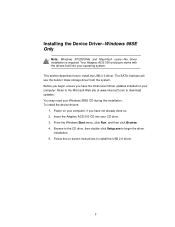
The SATA interface will use the build-in mass storage driver from the system. Refer to the Microsoft Web site at www.microsoft.com to begin , ensure you have the most recent driver updates installed ... your operating system. This section describes how to install the USB 2.0 driver. 5 From the Windows Start menu, click Run, and then click Browse. 4. Your Adaptec ACS-300 enclosure works with the drivers built into your Windows 98SE CD during this installation. Installing the Device Driver-Windows 98SE Only Note: Windows XP/2000/Me...
The SATA interface will use the build-in mass storage driver from the system. Refer to the Microsoft Web site at www.microsoft.com to begin , ensure you have the most recent driver updates installed ... your operating system. This section describes how to install the USB 2.0 driver. 5 From the Windows Start menu, click Run, and then click Browse. 4. Your Adaptec ACS-300 enclosure works with the drivers built into your Windows 98SE CD during this installation. Installing the Device Driver-Windows 98SE Only Note: Windows XP/2000/Me...
User Guide
Page 10
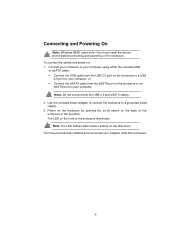
To connect the cables and power on the front of the enclosure to a grounded power supply. 3 Power on the enclosure by pushing the on/off switch on your Adaptec ACS-300 enclosure. 6 The LED on : 1. You have successfully installed and connected your computer. Connect your enclosure to your computer using either the included USB or eSATA cable...
To connect the cables and power on the front of the enclosure to a grounded power supply. 3 Power on the enclosure by pushing the on/off switch on your Adaptec ACS-300 enclosure. 6 The LED on : 1. You have successfully installed and connected your computer. Connect your enclosure to your computer using either the included USB or eSATA cable...
User Guide
Page 11
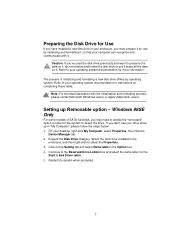
... it. Refer to your operating system documentation for the system to your operating system documentation for more information. Select the hard drive installed in the enclosure, and then right-click to the Reserved Drive Letters box and select the same letter for use by operating system. Restart the system when prompted... instructions on completing these tasks. Continue to select the Properties. 3. Preparing the Disk Drive for Use If you have installed a new disk drive in your enclosure, you must prepare it for the Start & End Driver letter. 5.
... it. Refer to your operating system documentation for the system to your operating system documentation for more information. Select the hard drive installed in the enclosure, and then right-click to the Reserved Drive Letters box and select the same letter for use by operating system. Restart the system when prompted... instructions on completing these tasks. Continue to select the Properties. 3. Preparing the Disk Drive for Use If you have installed a new disk drive in your enclosure, you must prepare it for the Start & End Driver letter. 5.
User Guide
Page 12
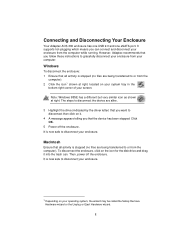
... has been stopped. It is stopped (no files are being transferred to disconnect your enclosure. 1 Depending on it into the trash can connect and disconnect your screen. However, Adaptec recommends that all activity is now safe to or from the computer while running. Macintosh... or Eject Hardware wizard. 8 To disconnect the enclosure, click on your system tray in the bottom right corner of your enclosure from the computer). 2 Click the icon1 shown at right. Connecting and Disconnecting Your Enclosure Your Adaptec ACS-300 enclosure has one USB 2.0 and one eSATA port.
... has been stopped. It is stopped (no files are being transferred to disconnect your enclosure. 1 Depending on it into the trash can connect and disconnect your screen. However, Adaptec recommends that all activity is now safe to or from the computer while running. Macintosh... or Eject Hardware wizard. 8 To disconnect the enclosure, click on your system tray in the bottom right corner of your enclosure from the computer). 2 Click the icon1 shown at right. Connecting and Disconnecting Your Enclosure Your Adaptec ACS-300 enclosure has one USB 2.0 and one eSATA port.

User Guide
Page 13
...Windows 98SE users - If you connected and powered on your enclosure before you turn on page 6. d. Troubleshooting If you have problems installing or using your Adaptec ACS-300 enclosure, work properly. See the Table below to find your enclosure, which will appear with some SATA add-on page 5.... b. Power off the enclosure and disconnect the USB or eSATA cable. If you are ...
...Windows 98SE users - If you connected and powered on your enclosure before you turn on page 6. d. Troubleshooting If you have problems installing or using your Adaptec ACS-300 enclosure, work properly. See the Table below to find your enclosure, which will appear with some SATA add-on page 5.... b. Power off the enclosure and disconnect the USB or eSATA cable. If you are ...
User Guide
Page 14
...computer does not have an eSATA port or SATA II 3Gbps speed, Adaptec recommends connecting the enclosure to an Adaptec's SATA adapters. 10 USB devices can be able to directly interface with legacy Ultra ATA hardware, it is the interface between your computer. USB 2.0 devices ... up to 10 years of storage evolution based on historical trends. USB 1.1 devices operate at a maximum speed of 480 Mbps. About USB 2.0 Performance Your Adaptec ACS-300 enclosure provides a USB 2.0 port. About SATA II (3Gbps) Performance Your Adaptec ACS-300 enclosure provides an industrial standard eSATA ...
...computer does not have an eSATA port or SATA II 3Gbps speed, Adaptec recommends connecting the enclosure to an Adaptec's SATA adapters. 10 USB devices can be able to directly interface with legacy Ultra ATA hardware, it is the interface between your computer. USB 2.0 devices ... up to 10 years of storage evolution based on historical trends. USB 1.1 devices operate at a maximum speed of 480 Mbps. About USB 2.0 Performance Your Adaptec ACS-300 enclosure provides a USB 2.0 port. About SATA II (3Gbps) Performance Your Adaptec ACS-300 enclosure provides an industrial standard eSATA ...