User Guide
Page 3
..., bar-coded labels, like the example below . The TSID number identifies your product. For support via e-mail, submit your question to Adaptec's Technical Support Specialists at ask-de.adaptec.com. ■ French: Search the Adaptec Support Knowledgebase (ASK) at www.adaptec.com/buy -cables. Or, you need further assistance, use the support options listed below . Adaptec Customer Support If you have questions about installing or using your Adaptec product, check this document first-you...
..., bar-coded labels, like the example below . The TSID number identifies your product. For support via e-mail, submit your question to Adaptec's Technical Support Specialists at ask-de.adaptec.com. ■ French: Search the Adaptec Support Knowledgebase (ASK) at www.adaptec.com/buy -cables. Or, you need further assistance, use the support options listed below . Adaptec Customer Support If you have questions about installing or using your Adaptec product, check this document first-you...
User Guide
Page 5
..., NETWORK OR CREATE DERIVATIVE WORKS BASED UPON THE SOFTWARE OR ANY PART THEREOF. 3. You agree to maintain the Software in this Agreement. This license is either loaded into RAM or installed on the Internet. Upon any termination, including termination by Adaptec ("Software"), and the related documentation, you reproduce Adaptec's copyright proprietary legends. AND OTHER LICENSORS WHOSE SOFTWARE MAY BE BUNDLED WITH THIS PRODUCT. Use the Software on...
..., NETWORK OR CREATE DERIVATIVE WORKS BASED UPON THE SOFTWARE OR ANY PART THEREOF. 3. You agree to maintain the Software in this Agreement. This license is either loaded into RAM or installed on the Internet. Upon any termination, including termination by Adaptec ("Software"), and the related documentation, you reproduce Adaptec's copyright proprietary legends. AND OTHER LICENSORS WHOSE SOFTWARE MAY BE BUNDLED WITH THIS PRODUCT. Use the Software on...
User Guide
Page 6
... workmanship, you may not apply to Adaptec; If the Software is acquired under normal use and service for a breach of the United States and other rights which is subject to deliver replacement media which vary from defects in this warranty, shall be: a. No additional or any different terms will not export or re-export the Software or documentation in any form in...
... workmanship, you may not apply to Adaptec; If the Software is acquired under normal use and service for a breach of the United States and other rights which is subject to deliver replacement media which vary from defects in this warranty, shall be: a. No additional or any different terms will not export or re-export the Software or documentation in any form in...
User Guide
Page 7
... between equipment and receiver. ■ Connect the equipment to an outlet on a circuit different from that to which can radiate radio frequency energy, and if not installed and used in a residential installation. Operation is no guarantee that may cause harmful interference to radio communications. Adaptec, Inc. Australian/New Zealand Compliance Statement This device has been tested and found...
... between equipment and receiver. ■ Connect the equipment to an outlet on a circuit different from that to which can radiate radio frequency energy, and if not installed and used in a residential installation. Operation is no guarantee that may cause harmful interference to radio communications. Adaptec, Inc. Australian/New Zealand Compliance Statement This device has been tested and found...

User Guide
Page 10
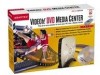
... Adaptec VideOh!TM Media Center kit. DISCLAIMER: This product or software may be violating copyright law and be creative. Media Center lets you own the copyright or have permission to payment of your videos for easy navigation. If you are ready to burn a VCD or DVD and share your personalized content with the latest personal video recorder (PVR) technology, and burn television programs to suit...
... Adaptec VideOh!TM Media Center kit. DISCLAIMER: This product or software may be violating copyright law and be creative. Media Center lets you own the copyright or have permission to payment of your videos for easy navigation. If you are ready to burn a VCD or DVD and share your personalized content with the latest personal video recorder (PVR) technology, and burn television programs to suit...
User Guide
Page 11
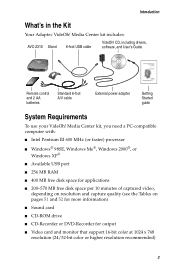
... Getting Started guide System Requirements To use your VideOh! Media Center kit, you need a PC-compatible computer with: ■ Intel Pentium III 600 MHz (or faster) processor ■ Windows® 98SE, Windows Me®, Windows 2000®, or Windows XP® ■ Available USB port ■ 256 MB RAM ■ 400 MB free disk space for applications ■ 200-570 MB free disk space per 10 minutes of captured video, depending...
... Getting Started guide System Requirements To use your VideOh! Media Center kit, you need a PC-compatible computer with: ■ Intel Pentium III 600 MHz (or faster) processor ■ Windows® 98SE, Windows Me®, Windows 2000®, or Windows XP® ■ Available USB port ■ 256 MB RAM ■ 400 MB free disk space for applications ■ 200-570 MB free disk space per 10 minutes of captured video, depending...
User Guide
Page 13
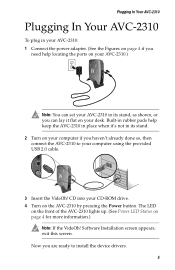
... page 4 for more information.) Note: If the VideOh! Software Installation screen appears, exit this screen. Built-in rubber pads help locating the ports on your AVC-2310.) Note: You can set your AVC-2310 in its stand. 2 Turn on your computer if you haven't already done so, then connect the AVC-2310 to install the device drivers. 5 Plugging In Your AVC-2310 Plugging In...
... page 4 for more information.) Note: If the VideOh! Software Installation screen appears, exit this screen. Built-in rubber pads help locating the ports on your AVC-2310.) Note: You can set your AVC-2310 in its stand. 2 Turn on your computer if you haven't already done so, then connect the AVC-2310 to install the device drivers. 5 Plugging In Your AVC-2310 Plugging In...
User Guide
Page 14
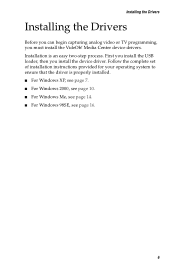
Follow the complete set of installation instructions provided for your operating system to ensure that the driver is an easy two-step process. Installation is properly installed. ■ For Windows XP, see page 7. ■ For Windows 2000, see page 10. ■ For Windows Me, see page 14. ■ For Windows 98SE, see page 16. 6 Installing the Drivers Installing the Drivers Before you can begin capturing analog video or TV programming, you install the device driver. First you install the USB loader, then you must install the VideOh! Media Center device drivers.
Follow the complete set of installation instructions provided for your operating system to ensure that the driver is an easy two-step process. Installation is properly installed. ■ For Windows XP, see page 7. ■ For Windows 2000, see page 10. ■ For Windows Me, see page 14. ■ For Windows 98SE, see page 16. 6 Installing the Drivers Installing the Drivers Before you can begin capturing analog video or TV programming, you install the device driver. First you install the USB loader, then you must install the VideOh! Media Center device drivers.

User Guide
Page 30
.... Connecting a Video Device Connect your analog video device using the S-Video port on ) to the AVC-2310. S-Video users only-Connect your S-Video cable (not included) to your video device to your AVC-2310 using the included A/V cable or the proprietary cable that came with your VideOh! Now you're ready to red audio port. Connecting a TV Source Connect your TV source to the AVC-2310 using a standard TV cable. Media Center kit to connect...
.... Connecting a Video Device Connect your analog video device using the S-Video port on ) to the AVC-2310. S-Video users only-Connect your S-Video cable (not included) to your video device to your AVC-2310 using the included A/V cable or the proprietary cable that came with your VideOh! Now you're ready to red audio port. Connecting a TV Source Connect your TV source to the AVC-2310 using a standard TV cable. Media Center kit to connect...

User Guide
Page 33
... Time Shift mode Stops recorded program; stops Time Shift Rewinds Displays current channel and other settings POWER LIVE TIME SHIFT SCAN 1 2 3 4 5 6 7 8 FULL SCREEN 0 9 MUTE PLAY/PAUSE STOP SKIP REPLAY CH+ VOL+ ENTER OSD CC CH- R Opens/closes WinDVR (See Note below . Time Shift Controls VOL- Using a Set-top Box If you have connected a digital cable or satellite receiver to your AVC-2310, you must set WinDVR to match...
... Time Shift mode Stops recorded program; stops Time Shift Rewinds Displays current channel and other settings POWER LIVE TIME SHIFT SCAN 1 2 3 4 5 6 7 8 FULL SCREEN 0 9 MUTE PLAY/PAUSE STOP SKIP REPLAY CH+ VOL+ ENTER OSD CC CH- R Opens/closes WinDVR (See Note below . Time Shift Controls VOL- Using a Set-top Box If you have connected a digital cable or satellite receiver to your AVC-2310, you must set WinDVR to match...

User Guide
Page 34
... WinDVR Opening WinDVR To open WinDVR after installation, a wizard opens to walk you through an electronic program guide (EPG). 26 The Display Window is selected. Open the Panel Menu to suit your location through the initial set the device standard, and provide TV programming schedules for your needs. The Display Window may show static until an available channel is where you view live or recorded TV. WinDVR uses this...
... WinDVR Opening WinDVR To open WinDVR after installation, a wizard opens to walk you through an electronic program guide (EPG). 26 The Display Window is selected. Open the Panel Menu to suit your location through the initial set the device standard, and provide TV programming schedules for your needs. The Display Window may show static until an available channel is where you view live or recorded TV. WinDVR uses this...

User Guide
Page 36
... channels, if required. Still images from available channels appear in the Display Window. 2 Click on any image to preview that channel. 3 Double-click on any image to open that are playing on other available channels: 1 Press Scan on the remote control, or open the TV Panel on the Control Panel at any time to select from a list of available channels. 4 Change channels and adjust volume...
... channels, if required. Still images from available channels appear in the Display Window. 2 Click on any image to preview that channel. 3 Double-click on any image to open that are playing on other available channels: 1 Press Scan on the remote control, or open the TV Panel on the Control Panel at any time to select from a list of available channels. 4 Change channels and adjust volume...
User Guide
Page 38
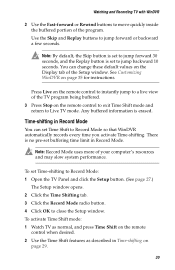
... TV Panel and click the Setup button. (See page 27.) The Setup window opens. 2 Click the Time Shifting tab. 3 Click the Record Mode radio button. 4 Click OK to jump backward 10 seconds. You can set buffering time limit in Record Mode You can change these default values on the Display tab of the program. Time-shifting in Record Mode. Watching and Recording TV with WinDVR 2 Use...
... TV Panel and click the Setup button. (See page 27.) The Setup window opens. 2 Click the Time Shifting tab. 3 Click the Record Mode radio button. 4 Click OK to jump backward 10 seconds. You can set buffering time limit in Record Mode You can change these default values on the Display tab of the program. Time-shifting in Record Mode. Watching and Recording TV with WinDVR 2 Use...

User Guide
Page 39
... TV with WinDVR 3 Press Stop on the remote control to exit Time Shift mode and return to your hard drive for later viewing. Recording TV You can use WinDVR to record a TV program and save to a different location). 31 By default, your file will be saved to the My Video folder under My Documents in Windows Explorer (unless you have configured WinDVR to save it...
... TV with WinDVR 3 Press Stop on the remote control to exit Time Shift mode and return to your hard drive for later viewing. Recording TV You can use WinDVR to record a TV program and save to a different location). 31 By default, your file will be saved to the My Video folder under My Documents in Windows Explorer (unless you have configured WinDVR to save it...

User Guide
Page 40
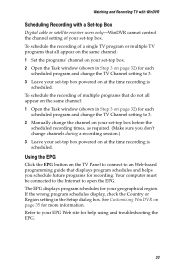
... create a single-use schedule, or you create a schedule. 4 Follow the wizard to schedule two programs for the same date and time. Note: If you of the Schedule window show whether tasks are powered on at the scheduled time. 32 To schedule recording: 1 Open the TV Panel. (See page 27 for important recording information. 5 Make sure your AVC-2310 and your set...
... create a single-use schedule, or you create a schedule. 4 Follow the wizard to schedule two programs for the same date and time. Note: If you of the Schedule window show whether tasks are powered on at the scheduled time. 32 To schedule recording: 1 Open the TV Panel. (See page 27 for important recording information. 5 Make sure your AVC-2310 and your set...
User Guide
Page 41
...: 1 Open the Task window (shown in Step 3 on page 32) for each scheduled program and change channels during a recording session.) 3 Leave your set-top box powered on at the time recording is scheduled. Using the EPG Click the EPG button on the TV Panel to connect to an Web-based programming guide that displays program schedules and helps you don't change the TV Channel setting...
...: 1 Open the Task window (shown in Step 3 on page 32) for each scheduled program and change channels during a recording session.) 3 Leave your set-top box powered on at the time recording is scheduled. Using the EPG Click the EPG button on the TV Panel to connect to an Web-based programming guide that displays program schedules and helps you don't change the TV Channel setting...

User Guide
Page 46
... Now that is displayed in the MyDVD Main project window is loaded into MyDVD and appears as the thumbnail picture that you've captured your TV. For example, you want to use as a thumbnail picture on your Main project window. Select the video file you can change your DVD menu will look like on page 44 for detailed trimming and editing instructions. 38 The layout...
... Now that is displayed in the MyDVD Main project window is loaded into MyDVD and appears as the thumbnail picture that you've captured your TV. For example, you want to use as a thumbnail picture on your Main project window. Select the video file you can change your DVD menu will look like on page 44 for detailed trimming and editing instructions. 38 The layout...
User Guide
Page 55
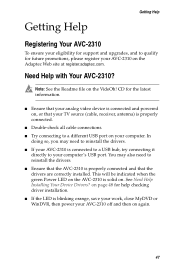
...-2310 To ensure your eligibility for support and upgrades, and to a different USB port on your computer. You may need to your computer's USB port. Note: See the Readme file on . See Need Help Installing Your Device Drivers? In doing so, you may also need to reinstall the drivers. ■ If your AVC-2310 is connected to a USB hub, try connecting it directly to reinstall the...
...-2310 To ensure your eligibility for support and upgrades, and to a different USB port on your computer. You may need to your computer's USB port. Note: See the Readme file on . See Need Help Installing Your Device Drivers? In doing so, you may also need to reinstall the drivers. ■ If your AVC-2310 is connected to a USB hub, try connecting it directly to reinstall the...

User Guide
Page 60
... video device. d Click Capture. ■ For optimum quality when creating DVDs, use a NTSF formatted hard disk drive. ■ If you will get an error message. However, if you have limited disk space, Adaptec recommends that you can capture is connected to Windows' FAT file system, the largest file you choose the Better or Good capture setting. To allow MyDVD to recognize and capture the video: a Click OK to close the error message. Use this table...
... video device. d Click Capture. ■ For optimum quality when creating DVDs, use a NTSF formatted hard disk drive. ■ If you will get an error message. However, if you have limited disk space, Adaptec recommends that you can capture is connected to Windows' FAT file system, the largest file you choose the Better or Good capture setting. To allow MyDVD to recognize and capture the video: a Click OK to close the error message. Use this table...

User Guide
Page 61
... any CPU-loaded software. 53 To check your analog video tape, MyDVD stops capturing. Getting Help ■ If there are playing your video and it is not appearing on the MyDVD Main project window, make sure MyDVD is selected. ■ To avoid choppy video in a captured file, especially a long video clip, disable any scanning background programs such as shown in Step 3 of Capturing Your Video) and under Record Settings, click Change. They can...
... any CPU-loaded software. 53 To check your analog video tape, MyDVD stops capturing. Getting Help ■ If there are playing your video and it is not appearing on the MyDVD Main project window, make sure MyDVD is selected. ■ To avoid choppy video in a captured file, especially a long video clip, disable any scanning background programs such as shown in Step 3 of Capturing Your Video) and under Record Settings, click Change. They can...