
User Manual
Page 6
... not frequently turn off the main power abruptly or unplug the projector during operation. The best way is capable of the lamp itself. Only use acer ceiling mount kit for mounting the projector and ensure it to fall over, causing injury or damage. • This product is to wait for... on . • Do not block the projector lens with dirt or dust. • Do not look into the air outlet grille when projector is securely installed. There are clogged with any electronic components unless the projector is the lamp which may cause the projector to break on end vertically. Refer...
... not frequently turn off the main power abruptly or unplug the projector during operation. The best way is capable of the lamp itself. Only use acer ceiling mount kit for mounting the projector and ensure it to fall over, causing injury or damage. • This product is to wait for... on . • Do not block the projector lens with dirt or dust. • Do not look into the air outlet grille when projector is securely installed. There are clogged with any electronic components unless the projector is the lamp which may cause the projector to break on end vertically. Refer...
User Manual
Page 12
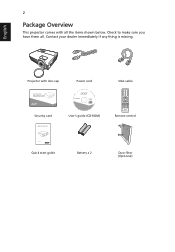
English 2 Package Overview This projector comes with lens cap Acer Projector Security Card Power cord Acer Projector This CD contains • User's manual • Quick Start Guide • Acrobat® Reader® www.acer.com Security card User's guide (CD-ROM) VGA cable ENTER BACK PgUp PgDn SD/USB A HDMI/DVI LAN/WiFi USBB Remote control Quick Start Guide Quick start guide Battery x 2 Dust filter (Optional) Projector with all . Check to make sure you have them all the items shown below. Contact your dealer immediately if any thing is missing.
English 2 Package Overview This projector comes with lens cap Acer Projector Security Card Power cord Acer Projector This CD contains • User's manual • Quick Start Guide • Acrobat® Reader® www.acer.com Security card User's guide (CD-ROM) VGA cable ENTER BACK PgUp PgDn SD/USB A HDMI/DVI LAN/WiFi USBB Remote control Quick Start Guide Quick start guide Battery x 2 Dust filter (Optional) Projector with all . Check to make sure you have them all the items shown below. Contact your dealer immediately if any thing is missing.

User Manual
Page 15
...input a password in or out. To change source to the projector. Enables unique Acer functions: eView, eTimer, ePower Management. Adjusts image distortion caused by tilting projection (±...DVI) (for the model with HDMI™ or DVI connector). (For S1210Hn/ S1213Hn/T212DT/XS-X13HG/S1310WHn/S1313WHn) Sends signals to VGA. To choose the desired aspect ratio. Four directional select... Keystone Description Refer to the input source. Zooms the projector display in the "Setting" > "Security" OSD. HDMI™/DVI 11 Infrared transmitter 12 Empowering key Selects items or makes adjustments to...
...input a password in or out. To change source to the projector. Enables unique Acer functions: eView, eTimer, ePower Management. Adjusts image distortion caused by tilting projection (±...DVI) (for the model with HDMI™ or DVI connector). (For S1210Hn/ S1213Hn/T212DT/XS-X13HG/S1310WHn/S1313WHn) Sends signals to VGA. To choose the desired aspect ratio. Four directional select... Keystone Description Refer to the input source. Zooms the projector display in the "Setting" > "Security" OSD. HDMI™/DVI 11 Infrared transmitter 12 Empowering key Selects items or makes adjustments to...

User Manual
Page 19
English 9 Turning the Projector On/Off Turning On the Projector 1 Remove the lens cap. 2 Ensure that the power cord and signal cable are securely connected. • If you connect to multiple sources at the same time, use "SOURCE" on the control panel or remote control, or the direct source .... 3 Turn on the projector by pressing (POWER) on your source automatically. • If the screen displays "No Signal", please make sure the signal cables are securely connected.
English 9 Turning the Projector On/Off Turning On the Projector 1 Remove the lens cap. 2 Ensure that the power cord and signal cable are securely connected. • If you connect to multiple sources at the same time, use "SOURCE" on the control panel or remote control, or the direct source .... 3 Turn on the projector by pressing (POWER) on your source automatically. • If the screen displays "No Signal", please make sure the signal cables are securely connected.

User Manual
Page 35
.... • Press to select timeout duration. • The range is from 10 to 990 minutes. • When time is up or change the "Security" setting. User Password • Press to set the password and press "MENU" to confirm. • To delete the digits, Press . • ...cord", you are requested to input the password every time the power cord is selected, you can be accepted for this dialogue. Security 25 Security This projector provides a useful security function for details. • If "Off" is plugged. • If you select "Always request password while projector turns on...
.... • Press to select timeout duration. • The range is from 10 to 990 minutes. • When time is up or change the "Security" setting. User Password • Press to set the password and press "MENU" to confirm. • To delete the digits, Press . • ...cord", you are requested to input the password every time the power cord is selected, you can be accepted for this dialogue. Security 25 Security This projector provides a useful security function for details. • If "Off" is plugged. • If you select "Always request password while projector turns on...

User Manual
Page 36
... displays. • Press to the devices. This unique password will be accepted by the projector no matter what the administrator password is. • If the Security Card is lost, please contact your projector. English 26 VGA OUT (Standby) Reset Administrator Password You can output a VGA signal when it is in standby..." to return the display parameters on all menus to retrieve the administrator password: • Enter the unique 6-digit "Universal Password" which is printed on the Security Card that came with your local Acer service center.
... displays. • Press to the devices. This unique password will be accepted by the projector no matter what the administrator password is. • If the Security Card is lost, please contact your projector. English 26 VGA OUT (Standby) Reset Administrator Password You can output a VGA signal when it is in standby..." to return the display parameters on all menus to retrieve the administrator password: • Enter the unique 6-digit "Universal Password" which is printed on the Security Card that came with your local Acer service center.

User Manual
Page 37
... 27 To connect your computer. 2 The remote network operation page is displayed. The next level menu is displayed.You can change it in the Setting > Security > Administrator Password menu. 4 Select LAN in the address bar of the web browser on Projector IP Address, Subnet Mask, Default Gateway, and DNS Server. 1 Press...
... 27 To connect your computer. 2 The remote network operation page is displayed. The next level menu is displayed.You can change it in the Setting > Security > Administrator Password menu. 4 Select LAN in the address bar of the web browser on Projector IP Address, Subnet Mask, Default Gateway, and DNS Server. 1 Press...

User Manual
Page 42
... the "Change" button under the "Monitor" tab. • Click "Show all the cables are bent or broken. • Check if the projection lamp has been securely installed. If the problem still appears, change the monitor display you are using and follow the steps below: • Verify that the resolution setting of...; Verify that the resolution setting is lower than or equal to the following troubleshooting guide. 30 Appendices English Troubleshooting If you experience a problem with your Acer projector, refer to 1600 x 1200, 1920 x 1080.
... the "Change" button under the "Monitor" tab. • Click "Show all the cables are bent or broken. • Check if the projection lamp has been securely installed. If the problem still appears, change the monitor display you are using and follow the steps below: • Verify that the resolution setting of...; Verify that the resolution setting is lower than or equal to the following troubleshooting guide. 30 Appendices English Troubleshooting If you experience a problem with your Acer projector, refer to 1600 x 1200, 1920 x 1080.

User Manual
Page 47
.... When you a warning message "Lamp is hot! English 35 Replacing the Lamp Use a screwdriver to remove the screw(s) from the projector and the screw that secures the lamp module (Illustration #3). 8 Lift the handle so that it stands up and remove the cover. 6 Remove and dispose of personal injury, do not drop...
.... When you a warning message "Lamp is hot! English 35 Replacing the Lamp Use a screwdriver to remove the screw(s) from the projector and the screw that secures the lamp module (Illustration #3). 8 Lift the handle so that it stands up and remove the cover. 6 Remove and dispose of personal injury, do not drop...

User Manual
Page 48
Please obtain the appropriate screws for your type of ceiling. 2 Secure the ceiling rod using a ceiling mount, please refer to the steps below: 1 Drill four holes into a solid, structurally sound part of cylinder screws. English 8.4 mm 2 0 ...36 Ceiling Mount Installation If you wish to install the projector using the appropriate type of the ceiling, and secure the mount base. For tighten/loosen Tightening Screw Medium Rod Short Rod Ceiling Mount Base - Attach to ceiling Long Rod Screw Type A 50 mm length...
Please obtain the appropriate screws for your type of ceiling. 2 Secure the ceiling rod using a ceiling mount, please refer to the steps below: 1 Drill four holes into a solid, structurally sound part of cylinder screws. English 8.4 mm 2 0 ...36 Ceiling Mount Installation If you wish to install the projector using the appropriate type of the ceiling, and secure the mount base. For tighten/loosen Tightening Screw Medium Rod Short Rod Ceiling Mount Base - Attach to ceiling Long Rod Screw Type A 50 mm length...

User Manual
Page 52
...XS-S10/S1210/T210/XS-X10/S1210Hn/ S1310W/T220/XS-W10/S1310WHn: 240 W • S1213/T212/XS-X13/S1213Hn/T212DT/XS-X13HG/ S1313W/S1313WHn: 285 W Power consumption (standby) • S1110/T200/XS-S10/S1210/T210/XS-X10/S1210Hn/ S1310W/T220/XS-W10/S1310WHn: < 1 W • S1213/T212/XS-X13/S1213Hn/T212DT/XS...1 • Battery x 2 (for the remote control) • User's guide (CD-ROM) x 1 • Quick start guide x 1 • Security card x 1 Accessory (optional) • Composite video cable x 1 • Carrying case x 1 • Dust filter x 1 * Design and specifications are subject to change...
...XS-S10/S1210/T210/XS-X10/S1210Hn/ S1310W/T220/XS-W10/S1310WHn: 240 W • S1213/T212/XS-X13/S1213Hn/T212DT/XS-X13HG/ S1313W/S1313WHn: 285 W Power consumption (standby) • S1110/T200/XS-S10/S1210/T210/XS-X10/S1210Hn/ S1310W/T220/XS-W10/S1310WHn: < 1 W • S1213/T212/XS-X13/S1213Hn/T212DT/XS...1 • Battery x 2 (for the remote control) • User's guide (CD-ROM) x 1 • Quick start guide x 1 • Security card x 1 Accessory (optional) • Composite video cable x 1 • Carrying case x 1 • Dust filter x 1 * Design and specifications are subject to change...


