

XD1170D/1280D Service Guide
Page 15
Firmware (PD100 /PD100D / PD120 / PD120D/XD1170D/XD1270D) Hardware : Item Photo Item Photo Projector (PD100 / PD100D) Projector (PD120 / PD100D) Power Cord Projector (XD1170D/XD1270D) USB Cable PC or Laptop 7 Chapt er 2 USB) - Chapter 2 Firmware Upgrade Equipment Needed Software : (DDP 2000- DLP Composer -
Firmware (PD100 /PD100D / PD120 / PD120D/XD1170D/XD1270D) Hardware : Item Photo Item Photo Projector (PD100 / PD100D) Projector (PD120 / PD100D) Power Cord Projector (XD1170D/XD1270D) USB Cable PC or Laptop 7 Chapt er 2 USB) - Chapter 2 Firmware Upgrade Equipment Needed Software : (DDP 2000- DLP Composer -

XD1170D/1280D Service Guide
Page 16
Click "Next" button. 4 Next Click ""Next"" button. Choose "I accept and agree to be bound by all the terms and conditions of this License Agreement" icon, 3. Reading the "License Agreement" rules. 2. Chapter2 8 Installation Procedure DLP Composer Lite Setup Procedure No Step Procedure 1 Execute FW program Choose "DLP Composer Lite v3.6 Setup" program. 2 Next Click "Next" button. Photo 3 Next 1.
Click "Next" button. 4 Next Click ""Next"" button. Choose "I accept and agree to be bound by all the terms and conditions of this License Agreement" icon, 3. Reading the "License Agreement" rules. 2. Chapter2 8 Installation Procedure DLP Composer Lite Setup Procedure No Step Procedure 1 Execute FW program Choose "DLP Composer Lite v3.6 Setup" program. 2 Next Click "Next" button. Photo 3 Next 1.
XD1170D/1280D Service Guide
Page 18
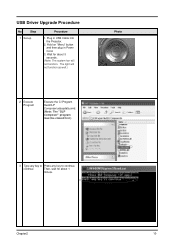
Wait for about 5 seconds. (Note: The system fan will not function as well.) 2 Execute Program Execute the C:\Program files\DLP Composer\usbupdata.cmd. (Note: The "DLP Composer" program must be closed first.) Photo 3 Type any key to Press any key to continue. Chapter2 10 The light will not function. continue Then, wait for about 1 minute. Hold on "Menu" button and then plug in USB Cable into the Projector. 2. USB Driver Upgrade Procedure No Step 1 Set-up Procedure 1. Plug in Power Cord. 3.
Wait for about 5 seconds. (Note: The system fan will not function as well.) 2 Execute Program Execute the C:\Program files\DLP Composer\usbupdata.cmd. (Note: The "DLP Composer" program must be closed first.) Photo 3 Type any key to Press any key to continue. Chapter2 10 The light will not function. continue Then, wait for about 1 minute. Hold on "Menu" button and then plug in USB Cable into the Projector. 2. USB Driver Upgrade Procedure No Step 1 Set-up Procedure 1. Plug in Power Cord. 3.
XD1170D/1280D Service Guide
Page 20
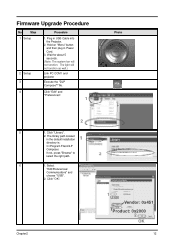
Plug in the default installation directory is: C:\Program Files\DLP Composer. Click "Library". 2. Click "OK". Chapter2 1 USB Vendor: 0x451 Product: 0x2000 2 OK 12 If not, press "Browse" to select the right path. 6 1....\Preferences\ Communications" and choose "USB". 2. Wait for about 5 seconds. (Note: The system fan will not function as well.) Link PC COM1 and projector Execute the "DLP ComposeTM" file. . 4 Click "Edit" and "Preferences". 1 Photo 2 5 1. The library path located in USB Cable into the Projector. 2. Firmware Upgrade Procedure No Step ...
Plug in the default installation directory is: C:\Program Files\DLP Composer. Click "Library". 2. Click "OK". Chapter2 1 USB Vendor: 0x451 Product: 0x2000 2 OK 12 If not, press "Browse" to select the right path. 6 1....\Preferences\ Communications" and choose "USB". 2. Wait for about 5 seconds. (Note: The system fan will not function as well.) Link PC COM1 and projector Execute the "DLP ComposeTM" file. . 4 Click "Edit" and "Preferences". 1 Photo 2 5 1. The library path located in USB Cable into the Projector. 2. Firmware Upgrade Procedure No Step ...


