User Manual
Page 3
... by changing the image or turning off the power switch for your safety and comfort Safety instructions Read these guidelines when cleaning the monitor: • Always unplug the monitor before cleaning. • Use a soft cloth to unplug the power cord from the electrical outlet. If the product falls, it clearly and comfortably and without distortion. • After setting the volume level, do not indicate a problem. •...
... by changing the image or turning off the power switch for your safety and comfort Safety instructions Read these guidelines when cleaning the monitor: • Always unplug the monitor before cleaning. • Use a soft cloth to unplug the power cord from the electrical outlet. If the product falls, it clearly and comfortably and without distortion. • After setting the volume level, do not indicate a problem. •...
User Manual
Page 4
.... This product should never be blocked or covered. Never spill liquid of power indicated on the cord. • If an extension cord is equipped with the supplied power supply cord set , make sure that the total rating of the branch circuit rating. Warning!The grounding pin is properly grounded before inserting the power cord plug. and to protect it under sporting, exercising, or any kind...
.... This product should never be blocked or covered. Never spill liquid of power indicated on the cord. • If an extension cord is equipped with the supplied power supply cord set , make sure that the total rating of the branch circuit rating. Warning!The grounding pin is properly grounded before inserting the power cord plug. and to protect it under sporting, exercising, or any kind...

User Manual
Page 5
... this product from the wall outlet and refer servicing to qualified service personnel when: • the power cord or plug is strongly committed to environmental protection and views recycling, in the form of salvaging and disposal of other products. Potentially explosive environments Switch off your vehicle engine. Disposal instructions Do not throw this website: https://www.acer-group.com/sustainability...
... this product from the wall outlet and refer servicing to qualified service personnel when: • the power cord or plug is strongly committed to environmental protection and views recycling, in the form of salvaging and disposal of other products. Potentially explosive environments Switch off your vehicle engine. Disposal instructions Do not throw this website: https://www.acer-group.com/sustainability...

User Manual
Page 6
...-productsenvironment.html ÿ LCD pixel statement The LCD unit is in front of user inactivity. • Wake the monitor when it is produced with high-precision manufacturing techniques. Finding your comfort zone Find your comfort zone by adjusting the viewing angle of the monitor, using a footrest, or raising your sitting height to remove the strain on the recorded image and does not...
...-productsenvironment.html ÿ LCD pixel statement The LCD unit is in front of user inactivity. • Wake the monitor when it is produced with high-precision manufacturing techniques. Finding your comfort zone Find your comfort zone by adjusting the viewing angle of the monitor, using a footrest, or raising your sitting height to remove the strain on the recorded image and does not...

User Manual
Page 7
... light source • minimizing room light by looking at bright light sources, such as possible. • Exercise regularly and maintain a healthy body. Display • Keep your display clean. • Keep your head at a higher level than the top edge of the display so your eyes regular breaks by using drapes, shades or blinds • using a task light • changing the display's viewing angle • using a glare-reduction filter • using a display...
... light source • minimizing room light by looking at bright light sources, such as possible. • Exercise regularly and maintain a healthy body. Display • Keep your display clean. • Keep your head at a higher level than the top edge of the display so your eyes regular breaks by using drapes, shades or blinds • using a task light • changing the display's viewing angle • using a glare-reduction filter • using a display...

User Manual
Page 10
... zone v Taking care of your vision v Developing good work habits vi Unpacking ...1 Adjusting the monitor ...2 Remove Velcro Strap 2 Height Adjustment...2 Tilt ...3 Swivel...3 Wall Mounting ...4 Monitor introduction ...5 Connecting the cables 5 Connecting the adapter and AC Power cord 7 Power saving ...7 Display Data Channel (DDC 8 Standard timing table 10 Using the Shortcut Menu 11 Main page ...11 Hot key1 (default: Modes 11 Hot key2 (default:Ref.white / Peak.white(nits 11 Hot key3 (Selecting the input 12 Main Menu...12 Troubleshooting ...17
... zone v Taking care of your vision v Developing good work habits vi Unpacking ...1 Adjusting the monitor ...2 Remove Velcro Strap 2 Height Adjustment...2 Tilt ...3 Swivel...3 Wall Mounting ...4 Monitor introduction ...5 Connecting the cables 5 Connecting the adapter and AC Power cord 7 Power saving ...7 Display Data Channel (DDC 8 Standard timing table 10 Using the Shortcut Menu 11 Main page ...11 Hot key1 (default: Modes 11 Hot key2 (default:Ref.white / Peak.white(nits 11 Hot key3 (Selecting the input 12 Main Menu...12 Troubleshooting ...17

User Manual
Page 12
... monitor • For optimal viewing, we recommend that you look at the full face of the monitor. X34 User Guide English 2 Height Adjustment 1 2 130mm HDMI 1 Note: Please adjust the height of the monitor after pressing the top of the monitor, then adjust the monitor to the angle that is used to prevent height adjustment burst and hurting people! Remove Velcro Strap 2 1 Note: Velcro is most comfortable for you. • Hold the stand...
... monitor • For optimal viewing, we recommend that you look at the full face of the monitor. X34 User Guide English 2 Height Adjustment 1 2 130mm HDMI 1 Note: Please adjust the height of the monitor after pressing the top of the monitor, then adjust the monitor to the angle that is used to prevent height adjustment burst and hurting people! Remove Velcro Strap 2 1 Note: Velcro is most comfortable for you. • Hold the stand...
User Manual
Page 14
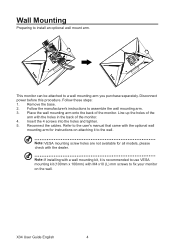
Wall Mounting Preparing to install an optional wall mount arm. 1 HDMI 1 HDMI 2 HDMI 3 HDMI 1 HDMI 2 HDMI 3 3 2 This monitor can be attached to assemble the wall mounting arm. 3. Place the wall mounting arm onto the back of the monitor. 4. Reconnect the cables. Note: VESA mounting screw holes are not available for all models, please check with the optional wall mounting arm for instructions on attaching it is recommended to fix your monitor on the wall. X34 User Guide English 4 Follow these steps: 1. Line up the holes...
Wall Mounting Preparing to install an optional wall mount arm. 1 HDMI 1 HDMI 2 HDMI 3 HDMI 1 HDMI 2 HDMI 3 3 2 This monitor can be attached to assemble the wall mounting arm. 3. Place the wall mounting arm onto the back of the monitor. 4. Reconnect the cables. Note: VESA mounting screw holes are not available for all models, please check with the optional wall mounting arm for instructions on attaching it is recommended to fix your monitor on the wall. X34 User Guide English 4 Follow these steps: 1. Line up the holes...

User Manual
Page 15
... input or reset the custom color settings to view Main page. b. Grey indicates inoperable. Monitor introduction User Controls 1 2 3 4 5 External controls 1 Power button Turns the monitor on/off your computer and unplug your host system, please follow the steps below: 1. Insert the monitor power cable into a nearby electrical outlet. 5 X34 User Guide English Plug the power cords of the monitor. 5. When the Function Menu is active, press this button will quit the OSD. 5 Function key a. Press to the factory defaults...
... input or reset the custom color settings to view Main page. b. Grey indicates inoperable. Monitor introduction User Controls 1 2 3 4 5 External controls 1 Power button Turns the monitor on/off your computer and unplug your host system, please follow the steps below: 1. Insert the monitor power cable into a nearby electrical outlet. 5 X34 User Guide English Plug the power cords of the monitor. 5. When the Function Menu is active, press this button will quit the OSD. 5 Function key a. Press to the factory defaults...

User Manual
Page 17
... cord set consisting of the AC power cord to the Adapter, and plug the other end into "Power Saving" mode by the control signal from Active OFF state back to ON state is around 3 seconds. 7 X34 User Guide English Connecting the adapter and AC Power cord • Check first to make sure that allows operation in which the equipment will be installed. The recovery time from the display controller, as indicated by the amber-color power LED...
... cord set consisting of the AC power cord to the Adapter, and plug the other end into "Power Saving" mode by the control signal from Active OFF state back to ON state is around 3 seconds. 7 X34 User Guide English Connecting the adapter and AC Power cord • Check first to make sure that allows operation in which the equipment will be installed. The recovery time from the display controller, as indicated by the amber-color power LED...
User Manual
Page 18
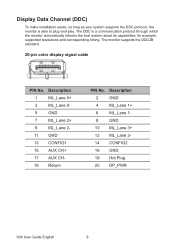
... 2 GND 4 ML_Lane 1+ 6 ML_Lane 1- 8 GND 10 ML_Lane 3+ 12 ML_Lane 3- 14 CONFIG2 16 GND 18 Hot Plug 20 DP_PWR X34 User Guide English 8 Display Data Channel (DDC) To make installation easier, so long as your system supports the DDC protocol, the monitor is a communication protocol through which the monitor automatically informs the host system about its capabilities; Description 1 ML_Lane 0+ 3 ML_Lane 0- 5 GND 7 ML_Lane 2+ 9 ML_Lane...
... 2 GND 4 ML_Lane 1+ 6 ML_Lane 1- 8 GND 10 ML_Lane 3+ 12 ML_Lane 3- 14 CONFIG2 16 GND 18 Hot Plug 20 DP_PWR X34 User Guide English 8 Display Data Channel (DDC) To make installation easier, so long as your system supports the DDC protocol, the monitor is a communication protocol through which the monitor automatically informs the host system about its capabilities; Description 1 ML_Lane 0+ 3 ML_Lane 0- 5 GND 7 ML_Lane 2+ 9 ML_Lane...

User Manual
Page 19
Description 2 TMDS Data2 Shield 4 TMDS Data1+ 6 TMDS Data18 TMDS Data0 Shield 10 TMDS Clock+ 12 TMDS Clock14 Reserved (N.C. 19-pin color display signal cable PIN No. 1 3 5 7 9 11 13 15 17 19 Description TMDS Data2+ TMDS Data2TMDS Data1 Shield TMDS Data0+ TMDS Data0TMDS Clock Shield CEC SCL DDC/CEC Ground Hot Plug Detect PIN No. on device) 16 SDA 18 +5V Power 9 X34 User Guide English
Description 2 TMDS Data2 Shield 4 TMDS Data1+ 6 TMDS Data18 TMDS Data0 Shield 10 TMDS Clock+ 12 TMDS Clock14 Reserved (N.C. 19-pin color display signal cable PIN No. 1 3 5 7 9 11 13 15 17 19 Description TMDS Data2+ TMDS Data2TMDS Data1 Shield TMDS Data0+ TMDS Data0TMDS Clock Shield CEC SCL DDC/CEC Ground Hot Plug Detect PIN No. on device) 16 SDA 18 +5V Power 9 X34 User Guide English
User Manual
Page 21
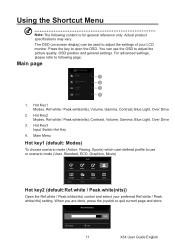
... OSD (on screen display) can use or scenario mode (User, Standard, ECO, Graphics, Movie) Modes Action Racing Sports User Standard Move ECO OK Graphics Movie Hot key2 (default:Ref.white / Peak.white(nits)) Open the Ref.white / Peak.white(nits) control and select your LCD monitor. Hot Key2 Modes, Ref.white / Peak.white(nits), Contrast, Volume, Gamma, Blue Light, Over Drive 3. white (nits) 315 Adjust OK 11 X34 User Guide English You can be used to adjust the picture quality, OSD position and general settings. white(nits) setting...
... OSD (on screen display) can use or scenario mode (User, Standard, ECO, Graphics, Movie) Modes Action Racing Sports User Standard Move ECO OK Graphics Movie Hot key2 (default:Ref.white / Peak.white(nits)) Open the Ref.white / Peak.white(nits) control and select your LCD monitor. Hot Key2 Modes, Ref.white / Peak.white(nits), Contrast, Volume, Gamma, Blue Light, Over Drive 3. white (nits) 315 Adjust OK 11 X34 User Guide English You can be used to adjust the picture quality, OSD position and general settings. white(nits) setting...
User Manual
Page 22
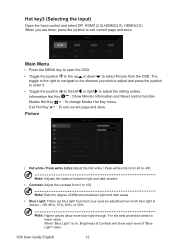
.... Picture • Ref.white / Peak.white (nits): Adjust the Ref.white / Peak.white (nits) from the OSD. Main Menu • Press the MENU key to open the OSD. • Toggle the joystick to the up or down to exit current page and store. Modes Hot Key : To change Modes Hot Key menu. Off, 80%, 70%, 60%, or 50%. X34 User Guide English 12 Hot key3 (Selecting the input) Open the Input control and...
.... Picture • Ref.white / Peak.white (nits): Adjust the Ref.white / Peak.white (nits) from the OSD. Main Menu • Press the MENU key to open the OSD. • Toggle the joystick to the up or down to exit current page and store. Modes Hot Key : To change Modes Hot Key menu. Off, 80%, 70%, 60%, or 50%. X34 User Guide English 12 Hot key3 (Selecting the input) Open the Input control and...

User Manual
Page 23
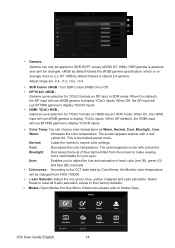
... mode backlight ON/OFF. • Light Sense: Detect ambient light conditions and dynamically optimize image brightness and color parameters accordingly. Step 2: Once Max Brightness is off. Color 13 X34 User Guide English Select from Off (function is disabled), Level 1 (brightness will be automatically adjusted to the minimum range), Level 2 (brightness will be low. white/ Peak. It can be adjusted to your preferences with the following steps: Step 1: Go to OSD menu > Picture > Max Brightness, and turn...
... mode backlight ON/OFF. • Light Sense: Detect ambient light conditions and dynamically optimize image brightness and color parameters accordingly. Step 2: Once Max Brightness is off. Color 13 X34 User Guide English Select from Off (function is disabled), Level 1 (brightness will be automatically adjusted to the minimum range), Level 2 (brightness will be low. white/ Peak. It can be adjusted to your preferences with the following steps: Step 1: Go to OSD menu > Picture > Max Brightness, and turn...
User Manual
Page 24
...: Adjust the red, green, blue, yellow, magenta and cyan saturation. Detail rules please refer to their factory defaults. • Modes: Open Modes Hot Key Menu. When On, the HDMI input will use sRGB gamma to display YCbCr inputs. Cool: Decreases the color temperature. Modes Action Racing Sports User X34 User Guide English Standard Move ECO OK Graphics 14 Movie The screen appears warmer with a blue tint. • Gamma: Gamma can 't be changed from the screen to make viewing...
...: Adjust the red, green, blue, yellow, magenta and cyan saturation. Detail rules please refer to their factory defaults. • Modes: Open Modes Hot Key Menu. When On, the HDMI input will use sRGB gamma to display YCbCr inputs. Cool: Decreases the color temperature. Modes Action Racing Sports User X34 User Guide English Standard Move ECO OK Graphics 14 Movie The screen appears warmer with a blue tint. • Gamma: Gamma can 't be changed from the screen to make viewing...
User Manual
Page 25
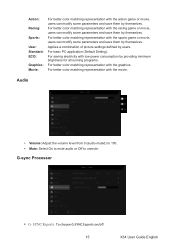
... game or movie, users can modify some parameters and save them by themselves. Audio • Volume: Adjust the volume level from 0 (audio muted) to 100. ÿ • Mute: Select On to mute audio or Off to unmute.ÿ G-sync Processor • To choose G-SYNC Esports on/off. 15 X34 User Guide English Action: Racing: Sports: User: Standard: ECO: Graphics: Movie: For better color matching representation with...
... game or movie, users can modify some parameters and save them by themselves. Audio • Volume: Adjust the volume level from 0 (audio muted) to 100. ÿ • Mute: Select On to mute audio or Off to unmute.ÿ G-sync Processor • To choose G-SYNC Esports on/off. 15 X34 User Guide English Action: Racing: Sports: User: Standard: ECO: Graphics: Movie: For better color matching representation with...

User Manual
Page 27
...: V frequency over clocking control options. During lock-state, you set OSD Lock to disable the function. • Aim point: Show an Aim point on the screen. 17 X34 User Guide English Enable: Default is "Off" Max Refresh: V frequency just can select:160/180Hz, Apply Reboot. • Refresh Rate Num: Select On to display the monitor's current refresh rate on the screen or Off to On, a notification appears on the screen informing the OSD is displayed...
...: V frequency over clocking control options. During lock-state, you set OSD Lock to disable the function. • Aim point: Show an Aim point on the screen. 17 X34 User Guide English Enable: Default is "Off" Max Refresh: V frequency just can select:160/180Hz, Apply Reboot. • Refresh Rate Num: Select On to display the monitor's current refresh rate on the screen or Off to On, a notification appears on the screen informing the OSD is displayed...

User Manual
Page 29
When you have decided what settings suit you, save them and system will be able to recall the settings in the future when you wish to adjust and press the joystick to enter it. • Save Setting to Game mode: There are three user-defined profiles available. from the OSD.Then toggle to the right to navigate to ..." Save Setting to...(User mode only) • Press the MENU key to open the OSD. • Toggle the joystick to the up or down to select "Save Setting to the element you turn on gaming mode . 19 X34 User Guide English
When you have decided what settings suit you, save them and system will be able to recall the settings in the future when you wish to adjust and press the joystick to enter it. • Save Setting to Game mode: There are three user-defined profiles available. from the OSD.Then toggle to the right to navigate to ..." Save Setting to...(User mode only) • Press the MENU key to open the OSD. • Toggle the joystick to the up or down to select "Save Setting to the element you turn on gaming mode . 19 X34 User Guide English
User Manual
Page 30
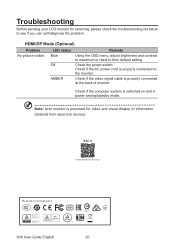
...) Problem No picture visible LED status Blue Off AMBER Remedy Using the OSD menu, adjust brightness and contrast to maximum or reset to see if you can self-diagnose the problem. Note: Acer monitor is properly connected at the back of information obtained from electronic devices. Check if the video signal cable is purposed for video and visual display of monitor. X3 4 S Product I nformation for servicing, please check the troubleshooting list below to their default setting. Check the power switch. Troubleshooting...
...) Problem No picture visible LED status Blue Off AMBER Remedy Using the OSD menu, adjust brightness and contrast to maximum or reset to see if you can self-diagnose the problem. Note: Acer monitor is properly connected at the back of information obtained from electronic devices. Check if the video signal cable is purposed for video and visual display of monitor. X3 4 S Product I nformation for servicing, please check the troubleshooting list below to their default setting. Check the power switch. Troubleshooting...


