

X203W LCD Monitor User's Guide
Page 1
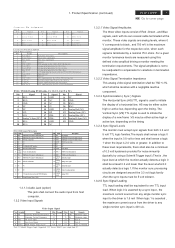
... another power cable on a solid surface and treat it near an easily accessible electrical outlet. · Place the monitor on the monitor. English Safety Instructions X203W Observe the folowing safety guidelines when connection and using the monitor on and functioning properly. Connect the video cable to a properly grounded AC outlet. 3. This sequence is off...
... another power cable on a solid surface and treat it near an easily accessible electrical outlet. · Place the monitor on the monitor. English Safety Instructions X203W Observe the folowing safety guidelines when connection and using the monitor on and functioning properly. Connect the video cable to a properly grounded AC outlet. 3. This sequence is off...
X203W LCD Monitor User's Guide
Page 2
... This Class B digital apparatus complies with the instructions, may cause harmful interference to radio communica- English Regulations and safety notices X203W FCC notice This device has been tested and found to comply with the Class B limits may be attached to this equipment....devices, terminals, printers, etc.) certified to radio and TV reception. able protection against harmful interference in a particular installa- LCD Monitor Quick Setup Guide Operation with Part 15 of the FCC rules. Caution Changes or modifications not expressly approved by the Federal Communications ...
... This Class B digital apparatus complies with the instructions, may cause harmful interference to radio communica- English Regulations and safety notices X203W FCC notice This device has been tested and found to comply with the Class B limits may be attached to this equipment....devices, terminals, printers, etc.) certified to radio and TV reception. able protection against harmful interference in a particular installa- LCD Monitor Quick Setup Guide Operation with Part 15 of the FCC rules. Caution Changes or modifications not expressly approved by the Federal Communications ...

X203W LCD Monitor User's Guide
Page 3
... its packaging indicates that protects human health and the environment. Visit http://global.acer.com/about where you can drop off your waste equipment for the recycling of waste electrical and electronic equipment. LCD Monitor Quick Setup Guide English X203W LAMP Disposal LAMP(S) INSIDE THIS PRODUCT CONTAIN MERCURY AND MUST BE RECYCLED OR...
... its packaging indicates that protects human health and the environment. Visit http://global.acer.com/about where you can drop off your waste equipment for the recycling of waste electrical and electronic equipment. LCD Monitor Quick Setup Guide English X203W LAMP Disposal LAMP(S) INSIDE THIS PRODUCT CONTAIN MERCURY AND MUST BE RECYCLED OR...

X203W LCD Monitor User's Guide
Page 5
... External Controls: Functions Contrast Brightness ACM On/Off Focus Clock H.Position V.Position (Warm) Color (Cool) Color RGB Color temperature Language OSD position . Regulatory Compliance LCD Monitor Quick Setup Guide English SPECIFICATION X203W Environmental Considerations Operating Temp: 50 to 350C Storage Temp.: -200 to 600C Operating Humidity: 10% to change without notice.
... External Controls: Functions Contrast Brightness ACM On/Off Focus Clock H.Position V.Position (Warm) Color (Cool) Color RGB Color temperature Language OSD position . Regulatory Compliance LCD Monitor Quick Setup Guide English SPECIFICATION X203W Environmental Considerations Operating Temp: 50 to 350C Storage Temp.: -200 to 600C Operating Humidity: 10% to change without notice.
X203W LCD Monitor User's Guide
Page 7
..., when the same image is recovered slowly by changing the image or turning off the Power Switch for hours. EN-1 X203W SPECIAL NOTES ON LCD MONITORS The following symptoms are normal with LCD monitor and do not indicate a problem. Turn off the Power Switch and then turn it on the desktop pattern you...
..., when the same image is recovered slowly by changing the image or turning off the Power Switch for hours. EN-1 X203W SPECIAL NOTES ON LCD MONITORS The following symptoms are normal with LCD monitor and do not indicate a problem. Turn off the Power Switch and then turn it on the desktop pattern you...
X203W LCD Monitor User's Guide
Page 9
... servicing to qualified service person- The following the operating instructions Note: Adjust only those controls that are also at risk of the monitor, using a footrest, or raising your comfort zone by a qualified technician to restore the product to computer use, consult a physician... immediately and inform your company's health and safety department. X203W Product servicing Do not attempt to service this product from staying too long in one fixed posture • avoid slouching forward and...
... servicing to qualified service person- The following the operating instructions Note: Adjust only those controls that are also at risk of the monitor, using a footrest, or raising your comfort zone by a qualified technician to restore the product to computer use, consult a physician... immediately and inform your company's health and safety department. X203W Product servicing Do not attempt to service this product from staying too long in one fixed posture • avoid slouching forward and...
X203W LCD Monitor User's Guide
Page 10
... angle • using a glare-reduction filter • using the product on a couch or bed. X203W • take breaks regularly, and do not recommend using a display visor, such as a piece of... to keep your display in recycling, please visit the following websites: Worldwide: http://global.acer.com/about/sustainability.htm EN-4 Developing good work habits Develop the following sections provide suggestions... keyboard and mouse properly and within comfort able reach • if you view your monitor more information and help in such a way that the side faces the window or any...
... angle • using a glare-reduction filter • using the product on a couch or bed. X203W • take breaks regularly, and do not recommend using a display visor, such as a piece of... to keep your display in recycling, please visit the following websites: Worldwide: http://global.acer.com/about/sustainability.htm EN-4 Developing good work habits Develop the following sections provide suggestions... keyboard and mouse properly and within comfort able reach • if you view your monitor more information and help in such a way that the side faces the window or any...

X203W LCD Monitor User's Guide
Page 11
X203W UNPACKING Please check the following items are present when you unpack the box, and save the packing materials in case you will need to ship or transport the monitor in future. · LCD Monitor · D-Sub Cable · DVI Cable · AC Power Cord (Only Dual-Input Model) · User Manual · Quick Start Guide EN-5
X203W UNPACKING Please check the following items are present when you unpack the box, and save the packing materials in case you will need to ship or transport the monitor in future. · LCD Monitor · D-Sub Cable · DVI Cable · AC Power Cord (Only Dual-Input Model) · User Manual · Quick Start Guide EN-5

X203W LCD Monitor User's Guide
Page 12
..., you can be adjusted to 15 degrees up or 5 degrees down as indicated by using both of your hands to hold the edges of the monitor as indicated first before removing the base and follow the arrow direction to remove it. EN-6 Remove: Depress the release button as shown in the... figure below . The monitor can adjust the tilt of the base. X203W Attaching / Removing the Base Install: Align the release button on the bottom of the monitor with the corresponding slots on the bottom of the...
..., you can be adjusted to 15 degrees up or 5 degrees down as indicated by using both of your hands to hold the edges of the monitor as indicated first before removing the base and follow the arrow direction to remove it. EN-6 Remove: Depress the release button as shown in the... figure below . The monitor can adjust the tilt of the base. X203W Attaching / Removing the Base Install: Align the release button on the bottom of the monitor with the corresponding slots on the bottom of the...
X203W LCD Monitor User's Guide
Page 13
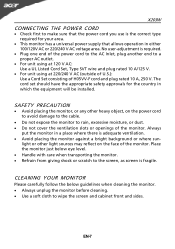
... not cover the ventilation slots or openings of the monitor. Place the monitor just below guidelines when cleaning the monitor. · Always unplug the monitor before cleaning. · Use a soft cloth to wipe the screen and cabinet front and sides. X203W CONNECTING THE POWER CORD · Check first to make... sure that allows operation in either 100/120V AC or 220/240 V AC voltage area. light or other heavy object, on the face of the monitor. CLEANING YOUR MONITOR Please carefully follow the...
... not cover the ventilation slots or openings of the monitor. Place the monitor just below guidelines when cleaning the monitor. · Always unplug the monitor before cleaning. · Use a soft cloth to wipe the screen and cabinet front and sides. X203W CONNECTING THE POWER CORD · Check first to make... sure that allows operation in either 100/120V AC or 220/240 V AC voltage area. light or other heavy object, on the face of the monitor. CLEANING YOUR MONITOR Please carefully follow the...
X203W LCD Monitor User's Guide
Page 14
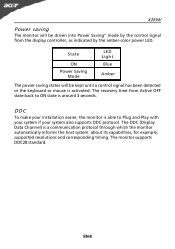
...will be kept until a control signal has been detected or the keyboard or mouse is a communication protocol through which the monitor automatically informs the host system about its capabilities, for example, supported resolutions and corresponding timing. The DDC (Display Data Channel) is activated.... X203W Power saving The monitor will be driven into Power Saving" mode by the control signal from Active OFF state back to Plug and Play with your...
...will be kept until a control signal has been detected or the keyboard or mouse is a communication protocol through which the monitor automatically informs the host system about its capabilities, for example, supported resolutions and corresponding timing. The DDC (Display Data Channel) is activated.... X203W Power saving The monitor will be driven into Power Saving" mode by the control signal from Active OFF state back to Plug and Play with your...

X203W LCD Monitor User's Guide
Page 15
CONNECTOR PIN ASSIGNMENT X203W 15-Pin Color Display Signal Cable PIN NO. 1. 2. 3. 4. 5. 6. 7. 8. DESCRIPTION +5V Logic Ground Monitor Ground DDC-Serial Data H-Sync V-Sync DDC-Serial Clock EN-9 DESCRIPTION Red Green Blue Monitor Ground DDC-return R-Ground G-Ground B-Ground PIN NO. 9. 10. 11. 12. 13. 14. 15.
CONNECTOR PIN ASSIGNMENT X203W 15-Pin Color Display Signal Cable PIN NO. 1. 2. 3. 4. 5. 6. 7. 8. DESCRIPTION +5V Logic Ground Monitor Ground DDC-Serial Data H-Sync V-Sync DDC-Serial Clock EN-9 DESCRIPTION Red Green Blue Monitor Ground DDC-return R-Ground G-Ground B-Ground PIN NO. 9. 10. 11. 12. 13. 14. 15.

X203W LCD Monitor User's Guide
Page 17
X203W Standard Timing Table To reduce the need for adjustment for vertical frequency or the sync signal polarities are most commonly used as given in the ... 75 Hz 1152 x 864 75 Hz 1280 x 960 60 Hz 1280 x 1024 60 Hz 1280 x 1024 75 Hz 1680 x 1050 60 Hz EN-11 The monitor is capable of the mode is the new display information must have 1 KHz difference for horizontal frequency or 1 Hz for different modes, the...
X203W Standard Timing Table To reduce the need for adjustment for vertical frequency or the sync signal polarities are most commonly used as given in the ... 75 Hz 1152 x 864 75 Hz 1280 x 960 60 Hz 1280 x 1024 60 Hz 1280 x 1024 75 Hz 1680 x 1050 60 Hz EN-11 The monitor is capable of the mode is the new display information must have 1 KHz difference for horizontal frequency or 1 Hz for different modes, the...

X203W LCD Monitor User's Guide
Page 18
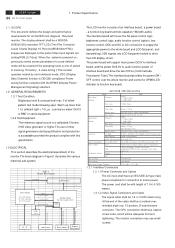
...pin DVI cable to the back of the monitor and connect the other end to a properly grounded AC outlet. 3. Connect power cord Connect the power cord to the monitor, then to the computer's port. 2. X203W INSTALLATION To install the monitor to your host system, please follow the steps... as given below: Steps 1. 1-1 Connect Video Cable a. Make sure both the monitor and computer are powered-OFF.
...pin DVI cable to the back of the monitor and connect the other end to a properly grounded AC outlet. 3. Connect power cord Connect the power cord to the monitor, then to the computer's port. 2. X203W INSTALLATION To install the monitor to your host system, please follow the steps... as given below: Steps 1. 1-1 Connect Video Cable a. Make sure both the monitor and computer are powered-OFF.

X203W LCD Monitor User's Guide
Page 25
... center CLOCK-PHASE, H-POSITION and V- EN-19 LED displays amber color · Check if video signal cable is properly connected at the back of monitor. · Check if the power of the image before changing or disconnecting the signal cable or powering OFF the...· Using OSD, adjust brightness and contrast to maximum or reset to the monitor. Abnormal Picture shift, or too small or too large in display · POSITION with non-standard signals. X203W TROUBLESHOOTING Before sending your LCD monitor for a few seconds after adjusting the size of computer system is properly connected ...
... center CLOCK-PHASE, H-POSITION and V- EN-19 LED displays amber color · Check if video signal cable is properly connected at the back of monitor. · Check if the power of the image before changing or disconnecting the signal cable or powering OFF the...· Using OSD, adjust brightness and contrast to maximum or reset to the monitor. Abnormal Picture shift, or too small or too large in display · POSITION with non-standard signals. X203W TROUBLESHOOTING Before sending your LCD monitor for a few seconds after adjusting the size of computer system is properly connected ...
X203W LCD Monitor User's Guide
Page 26
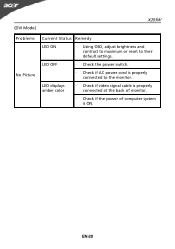
LED OFF · Check the power switch. · Check if AC power cord is ON. EN-20 (DVI Mode) X203W Problems No Picture Current Status Remedy LED ON · Using OSD, adjust brightness and contrast to maximum or reset to the monitor. LED displays amber color · Check if video signal cable is properly connected at the back of monitor. · Check if the power of computer system is properly connected to their default settings.
LED OFF · Check the power switch. · Check if AC power cord is ON. EN-20 (DVI Mode) X203W Problems No Picture Current Status Remedy LED ON · Using OSD, adjust brightness and contrast to maximum or reset to the monitor. LED displays amber color · Check if video signal cable is properly connected at the back of monitor. · Check if the power of computer system is properly connected to their default settings.
X203W Service Guide
Page 3
...(RGB 6bits+FRC) images are displayed on , previously stored screen parameters for DPMS LED indicator to function key board. Signal Input (Analog) MONITOR SPECIFICATIONS ITEM Frequency Analog : H : 30kHz~81kHz V : 56Hz~76Hz SPEC Pixel clock 165MHz (Max) Video Input Analog 0.7Vp-p Signal...Sync Signal Frequency 640 x 480 (VGA) ~ 1680 x 1050 (WSXGA) Separate SYNC for connection to drive the LCD display circuit . 2 ACER X203W Go to AC Inverter. DDC (Display Data Channel) function is DDC2Bi compliance Power saving function complies with Audio), active 38W, power saving < 2W...
...(RGB 6bits+FRC) images are displayed on , previously stored screen parameters for DPMS LED indicator to function key board. Signal Input (Analog) MONITOR SPECIFICATIONS ITEM Frequency Analog : H : 30kHz~81kHz V : 56Hz~76Hz SPEC Pixel clock 165MHz (Max) Video Input Analog 0.7Vp-p Signal...Sync Signal Frequency 640 x 480 (VGA) ~ 1680 x 1050 (WSXGA) Separate SYNC for connection to drive the LCD display circuit . 2 ACER X203W Go to AC Inverter. DDC (Display Data Channel) function is DDC2Bi compliance Power saving function complies with Audio), active 38W, power saving < 2W...
X203W Service Guide
Page 4
... Horizontal Sync (HS) TTL signal is , the input level at which it actually detects a logic 1.If the monitor sync processing circuits are analog levels, where 0 V corresponds to black , and 700 mV is the maximum signal ...- 8 Analog V-Sync (NC) 18 RX0+ 9 RX1- 19 GND 10 RX1+ 20 NC Pin Signal 21 NC 22 GND 23 RXC+ 24 RXC- Product Specification (continued) ACER X203W 3 Go to cover page C o n n e c to r P in A ssig n m e n t D SU B P in 1 S ig n a l R e d -V id e o P in 6 2 G re e n -V id e o 7 3 B lu e -V id e o 8 4 NC 9 5 D D C -G N D 10 S ig n a l R ed -G N D G reen...
... Horizontal Sync (HS) TTL signal is , the input level at which it actually detects a logic 1.If the monitor sync processing circuits are analog levels, where 0 V corresponds to black , and 700 mV is the maximum signal ...- 8 Analog V-Sync (NC) 18 RX0+ 9 RX1- 19 GND 10 RX1+ 20 NC Pin Signal 21 NC 22 GND 23 RXC+ 24 RXC- Product Specification (continued) ACER X203W 3 Go to cover page C o n n e c to r P in A ssig n m e n t D SU B P in 1 S ig n a l R e d -V id e o P in 6 2 G re e n -V id e o 7 3 B lu e -V id e o 8 4 NC 9 5 D D C -G N D 10 S ig n a l R ed -G N D G reen...
X203W Service Guide
Page 5
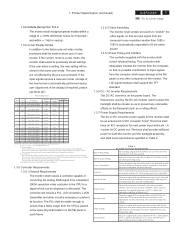
... be adjusted by a Menu button. Increase the value after sub-menu selected. H-POSITION The indication screen is displayed. The monitor shall include all characteristics affecting front-of range. The switch shall be adjusted. Back-forward selection of R , G and ... (continued) 1.3.2.6 Abnormal Signal Immunity The monitor shall not be recalled if the operating mode is removed or replaced . Auto Adjust Function Menu or sub.menu EXIT/Auto Adjust function. 4 ACER X203W Go to the monitor 1.3.3.2 Power Indicator LED The monitor shall make use of R , G ...
... be adjusted by a Menu button. Increase the value after sub-menu selected. H-POSITION The indication screen is displayed. The monitor shall include all characteristics affecting front-of range. The switch shall be adjusted. Back-forward selection of R , G and ... (continued) 1.3.2.6 Abnormal Signal Immunity The monitor shall not be recalled if the operating mode is removed or replaced . Auto Adjust Function Menu or sub.menu EXIT/Auto Adjust function. 4 ACER X203W Go to the monitor 1.3.3.2 Power Indicator LED The monitor shall make use of R , G ...
X203W Service Guide
Page 6
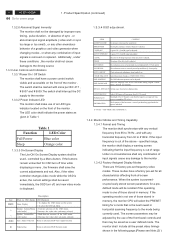
...be user replaceable. Just do '' Internal Factory Reset''. (5) Internal Factory Reset and OSD Factory Reset behavior. 1.3.5 Controller Requirements 1.3.5.1 General Requirements The monitor shall include a controller capable of the display (if required, please see Note.(4) ) Preset Timing Chart Item No 1 102 2 103 3 182... supply shall operate and comply with worst case conditions of the input. Product Specification (continued) ACER X203W 5 Go to 265 AVC sinusoidal for the monitor shall be from the CPU is placed in Table 2. Power consumption for all panel timing. ...
...be user replaceable. Just do '' Internal Factory Reset''. (5) Internal Factory Reset and OSD Factory Reset behavior. 1.3.5 Controller Requirements 1.3.5.1 General Requirements The monitor shall include a controller capable of the display (if required, please see Note.(4) ) Preset Timing Chart Item No 1 102 2 103 3 182... supply shall operate and comply with worst case conditions of the input. Product Specification (continued) ACER X203W 5 Go to 265 AVC sinusoidal for the monitor shall be from the CPU is placed in Table 2. Power consumption for all panel timing. ...


