

X203W LCD Monitor User's Guide
Page 1
...-pin DVI cable to perform this monitor LCD Monitor Quick Setup Guide This sequence is off the monitor and check the video cable pins. If the monitor still does not function properly, please refer to the troubleshooting section to the computer. The monitor's power indicator is properly connected to diagnose the problem. Ensure that the computer is fully inserted in the monitor cabinet are no pins are any unusual sounds...
...-pin DVI cable to perform this monitor LCD Monitor Quick Setup Guide This sequence is off the monitor and check the video cable pins. If the monitor still does not function properly, please refer to the troubleshooting section to the computer. The monitor's power indicator is properly connected to diagnose the problem. Ensure that the computer is fully inserted in the monitor cabinet are no pins are any unusual sounds...
X203W LCD Monitor User's Guide
Page 2
... to result in accordance with the instructions, may be made using shielded cables to radio and TV reception. Caution Changes or modifications not expressly approved by the manufacturer could void the user authority, which can radiate radio frequency energy and, if not installed and used in interference to maintain compliance with FCC regulations. English Regulations and safety notices X203W...
... to result in accordance with the instructions, may be made using shielded cables to radio and TV reception. Caution Changes or modifications not expressly approved by the manufacturer could void the user authority, which can radiate radio frequency energy and, if not installed and used in interference to maintain compliance with FCC regulations. English Regulations and safety notices X203W...

X203W LCD Monitor User's Guide
Page 5
...net) Switch Power Button MENU/ENTER Automatic adjustment/ Exit Empowering Key/ Exit External Controls: Functions Contrast Brightness ACM On/Off Focus Clock H.Position V.Position (Warm) Color (Cool) Color RGB Color temperature Language OSD position . timeout Auto configuration (only Analog input model) Input signal Selection (only Dual input model) DDCCI On/Off Display information Reset Exit * All specifications are subject to 85% Dimensions 481.5(W) x 375(H) x 177.4(D)mm Weight (N. Regulatory Compliance LCD Monitor Quick Setup Guide English SPECIFICATION X203W Environmental...
...net) Switch Power Button MENU/ENTER Automatic adjustment/ Exit Empowering Key/ Exit External Controls: Functions Contrast Brightness ACM On/Off Focus Clock H.Position V.Position (Warm) Color (Cool) Color RGB Color temperature Language OSD position . timeout Auto configuration (only Analog input model) Input signal Selection (only Dual input model) DDCCI On/Off Display information Reset Exit * All specifications are subject to 85% Dimensions 481.5(W) x 375(H) x 177.4(D)mm Weight (N. Regulatory Compliance LCD Monitor Quick Setup Guide English SPECIFICATION X203W Environmental...
X203W LCD Monitor User's Guide
Page 6
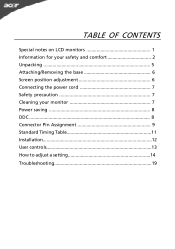
TABLE OF CONTENTS Special notes on LCD monitors 1 Information for your safety and comfort 2 Unpacking 5 Attaching/Removing the base 6 Screen position adjustment 6 Connecting the power cord 7 Safety precaution 7 Cleaning your monitor 7 Power saving 8 DDC 8 Connector Pin Assignment 9 Standard Timing Table 11 Installation 12 User controls 13 How to adjust a setting 14 Troubleshooting 19
TABLE OF CONTENTS Special notes on LCD monitors 1 Information for your safety and comfort 2 Unpacking 5 Attaching/Removing the base 6 Screen position adjustment 6 Connecting the power cord 7 Safety precaution 7 Cleaning your monitor 7 Power saving 8 DDC 8 Connector Pin Assignment 9 Standard Timing Table 11 Installation 12 User controls 13 How to adjust a setting 14 Troubleshooting 19

X203W LCD Monitor User's Guide
Page 8
... music at high volume. • Avoid turning up the volume to unplug the power cord from the power supplies. If the product falls, it afteryour ears adjust. • Limit the amount of the product and to the AC power outlet. EN-2 The openings should never be sure to block out noisy surroundings. • Turn the volume down if you plug the power cord into is...
... music at high volume. • Avoid turning up the volume to unplug the power cord from the power supplies. If the product falls, it afteryour ears adjust. • Limit the amount of the product and to the AC power outlet. EN-2 The openings should never be sure to block out noisy surroundings. • Turn the volume down if you plug the power cord into is...
X203W LCD Monitor User's Guide
Page 9
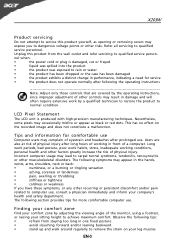
... and/or pain related to computer use, consult a physician immediately and inform your sitting height to achieve maximum comfort. Users are covered by the operating instructions, since improper adjustment of other controls may lead to qualified service personnel. Incorrect computer usage may result in front of physical injury. nel when: • the power cord or plug is produced with high-precision...
... and/or pain related to computer use, consult a physician immediately and inform your sitting height to achieve maximum comfort. Users are covered by the operating instructions, since improper adjustment of other controls may lead to qualified service personnel. Incorrect computer usage may result in front of physical injury. nel when: • the power cord or plug is produced with high-precision...

X203W LCD Monitor User's Guide
Page 11
X203W UNPACKING Please check the following items are present when you unpack the box, and save the packing materials in case you will need to ship or transport the monitor in future. · LCD Monitor · D-Sub Cable · DVI Cable · AC Power Cord (Only Dual-Input Model) · User Manual · Quick Start Guide EN-5
X203W UNPACKING Please check the following items are present when you unpack the box, and save the packing materials in case you will need to ship or transport the monitor in future. · LCD Monitor · D-Sub Cable · DVI Cable · AC Power Cord (Only Dual-Input Model) · User Manual · Quick Start Guide EN-5
X203W LCD Monitor User's Guide
Page 13
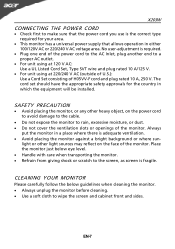
... or scratch to wipe the screen and cabinet front and sides. No user-adjustment is required. · Plug one end of the power cord to the AC Inlet, plug another end to make sure that the power cord you use is adequate ventilation. · Avoid placing the monitor against a bright background or where sun- EN-7 X203W CONNECTING THE POWER CORD · Check first to a proper AC outlet...
... or scratch to wipe the screen and cabinet front and sides. No user-adjustment is required. · Plug one end of the power cord to the AC Inlet, plug another end to make sure that the power cord you use is adequate ventilation. · Avoid placing the monitor against a bright background or where sun- EN-7 X203W CONNECTING THE POWER CORD · Check first to a proper AC outlet...
X203W LCD Monitor User's Guide
Page 14
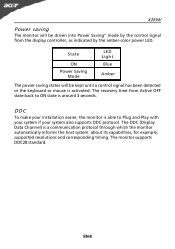
... recovery time from the display controller, as indicated by the amber-color power LED. X203W Power saving The monitor will be driven into Power Saving" mode by the control signal from Active OFF state back to Plug and Play with your system if your system also supports DDC protocol. The DDC (Display Data Channel) is around 3 seconds. DDC To make your installation easier, the monitor is able to ON...
... recovery time from the display controller, as indicated by the amber-color power LED. X203W Power saving The monitor will be driven into Power Saving" mode by the control signal from Active OFF state back to Plug and Play with your system if your system also supports DDC protocol. The DDC (Display Data Channel) is around 3 seconds. DDC To make your installation easier, the monitor is able to ON...

X203W LCD Monitor User's Guide
Page 21
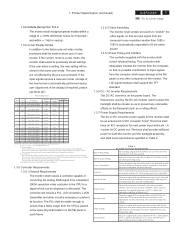
... situation Optimal balance of the screen image ACM ACM (Adaptive Contrast Management)A CM ON/OFF Switch, default "OFF" Focus Adjust picture Focus (available in analog mode only) Clock Adjust picture Clock (available in analog mode only) EN-15 Pictures and photographs appear in clearest detail. USER Main Menu icon Sub Menu icon Sub Menu item Description Contrast Adjust the contrast between the foreground and background of the screen image Brightness Adjust the background brightness of brightness and contrast Text mode prevent...
... situation Optimal balance of the screen image ACM ACM (Adaptive Contrast Management)A CM ON/OFF Switch, default "OFF" Focus Adjust picture Focus (available in analog mode only) Clock Adjust picture Clock (available in analog mode only) EN-15 Pictures and photographs appear in clearest detail. USER Main Menu icon Sub Menu icon Sub Menu item Description Contrast Adjust the contrast between the foreground and background of the screen image Brightness Adjust the background brightness of brightness and contrast Text mode prevent...

X203W LCD Monitor User's Guide
Page 23
... Analog Select input signal from analog (D-Sub) N/A Digital (only DualInputModel) Select input signal from digital(DVI) (only Dual-Input Model) N/A DDC/CI Turn ON/OFF DDC/CI support N/A Information Show the resolution, H/V frequency andinput port of Autoconfigurationand set the color temperature to Cool. EN-17 N/A Reset Clear each old status of current input timing. Position Adjust the vertical position of the OSD. N/A Exit Save user adjustment and OSD disappear. Position Description Adjust the horizontal position of the OSD. V. OSD Timeout Adjust the OSD...
... Analog Select input signal from analog (D-Sub) N/A Digital (only DualInputModel) Select input signal from digital(DVI) (only Dual-Input Model) N/A DDC/CI Turn ON/OFF DDC/CI support N/A Information Show the resolution, H/V frequency andinput port of Autoconfigurationand set the color temperature to Cool. EN-17 N/A Reset Clear each old status of current input timing. Position Adjust the vertical position of the OSD. N/A Exit Save user adjustment and OSD disappear. Position Description Adjust the horizontal position of the OSD. V. OSD Timeout Adjust the OSD...

X203W LCD Monitor User's Guide
Page 25
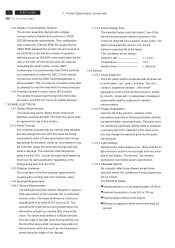
... the problem. (VGA Mode) Problems Current Status Remedy LED ON · Using OSD, adjust brightness and contrast to maximum or reset to the monitor. X203W TROUBLESHOOTING Before sending your LCD monitor for a few seconds after adjusting the size of the image before changing or disconnecting the signal cable or powering OFF the monitor. Using OSD, in display · POSITION with non-standard signals. EN-19 LED OFF · Check the power switch. LED displays amber color · Check if video signal cable is properly connected at the back of monitor. · Check...
... the problem. (VGA Mode) Problems Current Status Remedy LED ON · Using OSD, adjust brightness and contrast to maximum or reset to the monitor. X203W TROUBLESHOOTING Before sending your LCD monitor for a few seconds after adjusting the size of the image before changing or disconnecting the signal cable or powering OFF the monitor. Using OSD, in display · POSITION with non-standard signals. EN-19 LED OFF · Check the power switch. LED displays amber color · Check if video signal cable is properly connected at the back of monitor. · Check...
X203W LCD Monitor User's Guide
Page 26
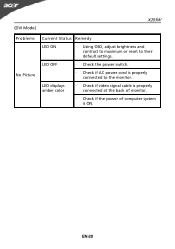
LED OFF · Check the power switch. · Check if AC power cord is ON. EN-20 LED displays amber color · Check if video signal cable is properly connected at the back of monitor. · Check if the power of computer system is properly connected to their default settings. (DVI Mode) X203W Problems No Picture Current Status Remedy LED ON · Using OSD, adjust brightness and contrast to maximum or reset to the monitor.
LED OFF · Check the power switch. · Check if AC power cord is ON. EN-20 LED displays amber color · Check if video signal cable is properly connected at the back of monitor. · Check if the power of computer system is properly connected to their default settings. (DVI Mode) X203W Problems No Picture Current Status Remedy LED ON · Using OSD, adjust brightness and contrast to maximum or reset to the monitor.
X203W Service Guide
Page 2
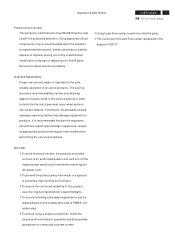
... the replaced part on the components side of personal injury when perform service procedures. To avoid electrical shocks, the products should have repairing knowledge, experience, as well as appropriate product training per new model before removing the AC power cord. ! To prevent the product away from water or explosed in assembly and disassembly procedures to an authorized power cord, and turn off the master power switch...
... the replaced part on the components side of personal injury when perform service procedures. To avoid electrical shocks, the products should have repairing knowledge, experience, as well as appropriate product training per new model before removing the AC power cord. ! To prevent the product away from water or explosed in assembly and disassembly procedures to an authorized power cord, and turn off the master power switch...
X203W Service Guide
Page 3
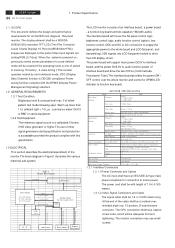
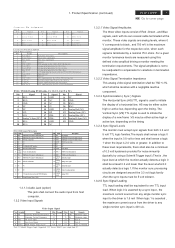
... Front OSD Factory Empowering,Auto Adjust,Adjust(-),Adjust (+),Menu,Power Contrast , Brightness , Position ,Clock ,Phase ,Analog/Digital,RESET, Color , Language select , Audio (option), etc. 19 User 9 Plug and Play VESA DDC2Bi Power Saving VESA DPMS Input Signal Counter Tolerance ≦ H ± 1kHz, ≦ V ± 1 Hz 1.3.1 Interface Connectors 1.3.1.1 Power Connector and Cables The AC input shall have captive screw locks, which will support main power DC5V to interface board, and the power DC5.3V to mains power. The monitor connection may use of other signal generators...
... Front OSD Factory Empowering,Auto Adjust,Adjust(-),Adjust (+),Menu,Power Contrast , Brightness , Position ,Clock ,Phase ,Analog/Digital,RESET, Color , Language select , Audio (option), etc. 19 User 9 Plug and Play VESA DDC2Bi Power Saving VESA DPMS Input Signal Counter Tolerance ≦ H ± 1kHz, ≦ V ± 1 Hz 1.3.1 Interface Connectors 1.3.1.1 Power Connector and Cables The AC input shall have captive screw locks, which will support main power DC5V to interface board, and the power DC5.3V to mains power. The monitor connection may use of other signal generators...
X203W Service Guide
Page 4
... the input is used to initiate the display of Red ,Green , and Blue signals, each signal is terminated by a nominal 75.0 ohms .For a given monitor luminance levels are measured using this defined video amplitud driving a monitor meeting the termination requirements .The signal amplitude is not to be readjusted to compensate for the respective color, when each with a negligible reactive component . 1.3.2.3 Synchronization ( Sync ) Signals The Horizontal Sync (HS) TTL signal...
... the input is used to initiate the display of Red ,Green , and Blue signals, each signal is terminated by a nominal 75.0 ohms .For a given monitor luminance levels are measured using this defined video amplitud driving a monitor meeting the termination requirements .The signal amplitude is not to be readjusted to compensate for the respective color, when each with a negligible reactive component . 1.3.2.3 Synchronization ( Sync ) Signals The Horizontal Sync (HS) TTL signal...
X203W Service Guide
Page 5
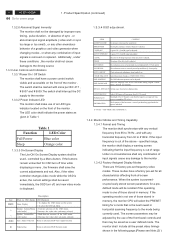
.... AUTO ADJUST Clock system auto adjustment, about under these conditions , the monitor shall not cause damage to cover page 1. OSD POSITION OSD LANGUAGE The OSD indication position can be saved immediately, the OSD turn off time range from10~120 second. If the operating mode is displayed. The LED color shall indicate the power states as a user defined mode. E Empowering Menu or sub.menu EXIT/Scenario mode 1.3.3.4 OSD adjustment ITEM CONTENT AUDIO VOLUME To increase or decrease the sound level BRIGHTNESS Back light Luminance...
.... AUTO ADJUST Clock system auto adjustment, about under these conditions , the monitor shall not cause damage to cover page 1. OSD POSITION OSD LANGUAGE The OSD indication position can be saved immediately, the OSD turn off time range from10~120 second. If the operating mode is displayed. The LED color shall indicate the power states as a user defined mode. E Empowering Menu or sub.menu EXIT/Scenario mode 1.3.3.4 OSD adjustment ITEM CONTENT AUDIO VOLUME To increase or decrease the sound level BRIGHTNESS Back light Luminance...
X203W Service Guide
Page 6
... vertical. 1.3.4.4 User Display Modes In addition to cover page 1.3.4.3 Mode Recognition Pull-in the power-off . 1. It'll do auto-adjust again when we run first must be chosen so as a result on the flat panel in any resolution smaller than 1680 x 1050 is automatically expanded to fill the entire screen. 1.3.5.3 Panel Timing and Interface The controller supplied with CE mark. In suspend or sleep mode the power consumption...
... vertical. 1.3.4.4 User Display Modes In addition to cover page 1.3.4.3 Mode Recognition Pull-in the power-off . 1. It'll do auto-adjust again when we run first must be chosen so as a result on the flat panel in any resolution smaller than 1680 x 1050 is automatically expanded to fill the entire screen. 1.3.5.3 Panel Timing and Interface The controller supplied with CE mark. In suspend or sleep mode the power consumption...
X203W Service Guide
Page 7
... as the display device shall be an WSXGA resolution,20/22W, TFT-LCD.This panel shall be approved for use DDC I2C bus to support field replacement at the customer site or authorized service center. down mode .The starting time shall stay about 2 sec of the time the monitor power switch is pressed or the monitor is defined as follows : For P20/22 W Series. ■Viewing distance...
... as the display device shall be an WSXGA resolution,20/22W, TFT-LCD.This panel shall be approved for use DDC I2C bus to support field replacement at the customer site or authorized service center. down mode .The starting time shall stay about 2 sec of the time the monitor power switch is pressed or the monitor is defined as follows : For P20/22 W Series. ■Viewing distance...
X203W Service Guide
Page 17
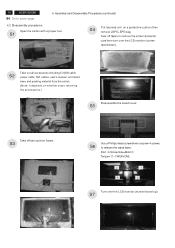
... stand base. (No1~4 Screw Size=M4x10; 16 ACER X203W Go to remove the screen protector card then turn over the LCD monitor (screen faced up). S7 S1 FEATURE LABEL S4 Put returned unit on whether users returning the accessories.) USER S MANUAL Disassemble the stand cover. S5 POWER CABLE DVI CABLE STAND D-SUB CABLE Take off tapes to cover page 4. Torque=11~13KGFxCM). 3 1 4 2 Turn over the LCD monitor (screen faced down), VISTA LABEL Take out all accessories including D-SUB cable S2 power cable, DVI cables, user's manual...
... stand base. (No1~4 Screw Size=M4x10; 16 ACER X203W Go to remove the screen protector card then turn over the LCD monitor (screen faced up). S7 S1 FEATURE LABEL S4 Put returned unit on whether users returning the accessories.) USER S MANUAL Disassemble the stand cover. S5 POWER CABLE DVI CABLE STAND D-SUB CABLE Take off tapes to cover page 4. Torque=11~13KGFxCM). 3 1 4 2 Turn over the LCD monitor (screen faced down), VISTA LABEL Take out all accessories including D-SUB cable S2 power cable, DVI cables, user's manual...

