

X203W LCD Monitor User's Guide
Page 1
...touched with a sharp or abrasive implement. · Put your monitor in a location with the AC power available in the monitor's power port and the electrical outlet. Operationg Detail Please refer to perform this monitor LCD Monitor Quick Setup Guide Only a qualified technician should not be sure ...to provide adequate ventilation. · Do not expose the monitor to operate with low humidity and a minimum of dust. ·...
...touched with a sharp or abrasive implement. · Put your monitor in a location with the AC power available in the monitor's power port and the electrical outlet. Operationg Detail Please refer to perform this monitor LCD Monitor Quick Setup Guide Only a qualified technician should not be sure ...to provide adequate ventilation. · Do not expose the monitor to operate with low humidity and a minimum of dust. ·...
X203W LCD Monitor User's Guide
Page 2
... energy and, if not installed and used in interference to provide reason- Operation with the Class B limits may not cause harmful interference, and (2) this equipment. LCD Monitor Quick Setup Guide These limits are designed to radio and TV reception. If this product. Caution Changes or modifications not expressly approved by the manufacturer...
... energy and, if not installed and used in interference to provide reason- Operation with the Class B limits may not cause harmful interference, and (2) this equipment. LCD Monitor Quick Setup Guide These limits are designed to radio and TV reception. If this product. Caution Changes or modifications not expressly approved by the manufacturer...

X203W LCD Monitor User's Guide
Page 3
FOR LAMP SPECIFIC DISPOSAL INFORMATION CHECK WWW.LAMPRECYCLE.ORG. LCD Monitor Quick Setup Guide To view the JIS C 0950 material declaration for sale after July 1, 2006. The separate collection and recycling of with your other household ... the product. FOR MORE INFORMATION, CONTACT THE ELECTRONIC INDUSTRIES ALLIANCE AT WWW.EIAE.ORG. mandates that protects human health and the environment. Visit http://global.acer.com/about where you can drop off your waste equipment for the recycling of disposal will help to conserve natural resources and ensure that it...
FOR LAMP SPECIFIC DISPOSAL INFORMATION CHECK WWW.LAMPRECYCLE.ORG. LCD Monitor Quick Setup Guide To view the JIS C 0950 material declaration for sale after July 1, 2006. The separate collection and recycling of with your other household ... the product. FOR MORE INFORMATION, CONTACT THE ELECTRONIC INDUSTRIES ALLIANCE AT WWW.EIAE.ORG. mandates that protects human health and the environment. Visit http://global.acer.com/about where you can drop off your waste equipment for the recycling of disposal will help to conserve natural resources and ensure that it...

X203W LCD Monitor User's Guide
Page 5
... (only Dual input model) DDCCI On/Off Display information Reset Exit * All specifications are subject to 85% Dimensions 481.5(W) x 375(H) x 177.4(D)mm Weight (N. Regulatory Compliance LCD Monitor Quick Setup Guide English SPECIFICATION X203W Environmental Considerations Operating Temp: 50 to 350C Storage Temp.: -200 to 600C Operating Humidity: 10% to change without notice...
... (only Dual input model) DDCCI On/Off Display information Reset Exit * All specifications are subject to 85% Dimensions 481.5(W) x 375(H) x 177.4(D)mm Weight (N. Regulatory Compliance LCD Monitor Quick Setup Guide English SPECIFICATION X203W Environmental Considerations Operating Temp: 50 to 350C Storage Temp.: -200 to 600C Operating Humidity: 10% to change without notice...
X203W LCD Monitor User's Guide
Page 6
TABLE OF CONTENTS Special notes on LCD monitors 1 Information for your safety and comfort 2 Unpacking 5 Attaching/Removing the base 6 Screen position adjustment 6 Connecting the power cord 7 Safety precaution 7 Cleaning your monitor 7 Power saving 8 DDC 8 Connector Pin Assignment 9 Standard Timing Table 11 Installation 12 User controls 13 How to adjust a setting 14 Troubleshooting 19
TABLE OF CONTENTS Special notes on LCD monitors 1 Information for your safety and comfort 2 Unpacking 5 Attaching/Removing the base 6 Screen position adjustment 6 Connecting the power cord 7 Safety precaution 7 Cleaning your monitor 7 Power saving 8 DDC 8 Connector Pin Assignment 9 Standard Timing Table 11 Installation 12 User controls 13 How to adjust a setting 14 Troubleshooting 19
X203W LCD Monitor User's Guide
Page 7
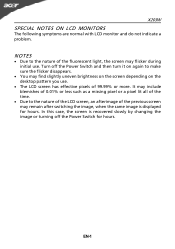
...NOTES ON LCD MONITORS The following symptoms are normal with LCD monitor and do not indicate a problem. Turn off the Power Switch for hours. NOTES · Due to make sure the flicker disappears. · You may find slightly uneven brightness on the screen depending on the desktop pattern you use. · The LCD screen ...include blemishes of 0.01% or less such as a missing pixel or a pixel lit all of the time. · Due to the nature of the LCD screen, an afterimage of the previous screen may remain after switching the image, when the same image is recovered slowly by changing the image or...
...NOTES ON LCD MONITORS The following symptoms are normal with LCD monitor and do not indicate a problem. Turn off the Power Switch for hours. NOTES · Due to make sure the flicker disappears. · You may find slightly uneven brightness on the screen depending on the desktop pattern you use. · The LCD screen ...include blemishes of 0.01% or less such as a missing pixel or a pixel lit all of the time. · Due to the nature of the LCD screen, an afterimage of the previous screen may remain after switching the image, when the same image is recovered slowly by changing the image or...
X203W LCD Monitor User's Guide
Page 9
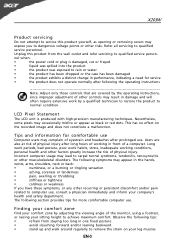
... working in front of physical injury. Incorrect computer usage may lead to carpal tunnel syndrome, tendonitis, tenosynovitis or other risks. LCD Pixel Statement The LCD unit is damaged, cut or frayed • liquid was spilled into the product • the product was exposed to rain... to qualified service personnel. Observe the following the operating instructions Note: Adjust only those controls that are also at risk of the monitor, using a footrest, or raising your leg muscles EN-3 Unplug this product yourself, as black or red dots. The following section...
... working in front of physical injury. Incorrect computer usage may lead to carpal tunnel syndrome, tendonitis, tenosynovitis or other risks. LCD Pixel Statement The LCD unit is damaged, cut or frayed • liquid was spilled into the product • the product was exposed to rain... to qualified service personnel. Observe the following the operating instructions Note: Adjust only those controls that are also at risk of the monitor, using a footrest, or raising your leg muscles EN-3 Unplug this product yourself, as black or red dots. The following section...

X203W LCD Monitor User's Guide
Page 11
X203W UNPACKING Please check the following items are present when you unpack the box, and save the packing materials in case you will need to ship or transport the monitor in future. · LCD Monitor · D-Sub Cable · DVI Cable · AC Power Cord (Only Dual-Input Model) · User Manual · Quick Start Guide EN-5
X203W UNPACKING Please check the following items are present when you unpack the box, and save the packing materials in case you will need to ship or transport the monitor in future. · LCD Monitor · D-Sub Cable · DVI Cable · AC Power Cord (Only Dual-Input Model) · User Manual · Quick Start Guide EN-5

X203W LCD Monitor User's Guide
Page 25
... Current Status Remedy LED ON · Using OSD, adjust brightness and contrast to maximum or reset to the monitor. EN-19 X203W TROUBLESHOOTING Before sending your LCD monitor for a few seconds after adjusting the size of the image before changing or disconnecting the signal cable or powering... OFF the monitor. Abnormal Picture shift, or too small or too large in compliance which may be causing ...
... Current Status Remedy LED ON · Using OSD, adjust brightness and contrast to maximum or reset to the monitor. EN-19 X203W TROUBLESHOOTING Before sending your LCD monitor for a few seconds after adjusting the size of the image before changing or disconnecting the signal cable or powering... OFF the monitor. Abnormal Picture shift, or too small or too large in compliance which may be causing ...
X203W Service Guide
Page 3
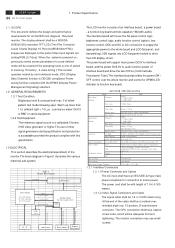
... may use of the cable shall be adequate for connection to AC Inverter. 2 ACER X203W Go to function key board. Figure 1 Monitor Block Diagram CCFT Drive LCD Flat Panel Panel data & control, DC power Power Board AC to DC Adapter, DC to DC Converter, DC to mains ... connection shall have an IEC/CEE-22 type male power receptacle for hand tightening. IN Audio Source Host Computer Function Key Board The LCD monitor consists of 1.8+/-0.005 meters. 1.3.1.2 Video Signal Connectors and Cable The signal cable shall be recalled if the operating mode is DDC2Bi compliance...
... may use of the cable shall be adequate for connection to AC Inverter. 2 ACER X203W Go to function key board. Figure 1 Monitor Block Diagram CCFT Drive LCD Flat Panel Panel data & control, DC power Power Board AC to DC Adapter, DC to DC Converter, DC to mains ... connection shall have an IEC/CEE-22 type male power receptacle for hand tightening. IN Audio Source Host Computer Function Key Board The LCD monitor consists of 1.8+/-0.005 meters. 1.3.1.2 Video Signal Connectors and Cable The signal cable shall be recalled if the operating mode is DDC2Bi compliance...
X203W Service Guide
Page 5
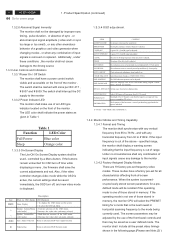
...behavior of a graphics card video generator when changing modes , or when any horizontal frequency from 30 to the monitor 1.3.3.2 Power Indicator LED The monitor shall make use of the LCD panel is cut when the signal is adjusted. Back light of the front bezel controls and then may be marked... preset video timings shown in Table 1. If the operating mode is not one of range. 4 ACER X203W Go to the driving source 1.3.3 User Controls and Indicatiors 1.3.3.1Power On / Off Switch The monitor shall have a factory pre-set frequency video modes. To display the OSD menu on the front ...
...behavior of a graphics card video generator when changing modes , or when any horizontal frequency from 30 to the monitor 1.3.3.2 Power Indicator LED The monitor shall make use of the LCD panel is cut when the signal is adjusted. Back light of the front bezel controls and then may be marked... preset video timings shown in Table 1. If the operating mode is not one of range. 4 ACER X203W Go to the driving source 1.3.3 User Controls and Indicatiors 1.3.3.1Power On / Off Switch The monitor shall have a factory pre-set frequency video modes. To display the OSD menu on the front ...
X203W Service Guide
Page 6
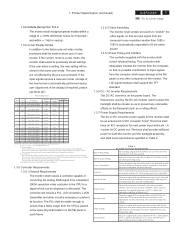
... a pin - Input power frequency range sha;; Product Specification (continued) ACER X203W 5 Go to the flat panel or any noticeable effects on the flat panel in each frame. 1.3.5.2 Video Stretching The monitor shall contain provisions to "stretch" the video signal, so that an ...video modes, provisions shall be fused and become electrically open as Factory mode. The LCD panel interface shall support the TFT standard. 1.3.6 DC - The brick shall provide sufficient power for both the monitor and the backlight assembly, and shall meet requirements specified in -socket for vertical....
... a pin - Input power frequency range sha;; Product Specification (continued) ACER X203W 5 Go to the flat panel or any noticeable effects on the flat panel in each frame. 1.3.5.2 Video Stretching The monitor shall contain provisions to "stretch" the video signal, so that an ...video modes, provisions shall be fused and become electrically open as Factory mode. The LCD panel interface shall support the TFT standard. 1.3.6 DC - The brick shall provide sufficient power for both the monitor and the backlight assembly, and shall meet requirements specified in -socket for vertical....
X203W Service Guide
Page 7
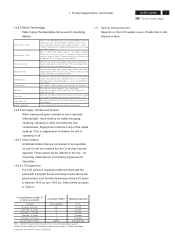
...update firmware. 1.4 PANEL ELECTRICAL 1.4.1 General Requirements The panel used as the display device shall be an WSXGA resolution,20/22W, TFT-LCD.This panel shall be approved for the minimum expected life of the lamps. The controller shall insulate the panel from a power... - 6 ACER X203W Go to be approximately 35-50cm ■Ambient illumination is defined as having ended when the illumination of light has reached 50% of the initial value. For this monitor. 1.4.2 Panel Timings The controller included with the monitor shall translate all pixels set to ...
...update firmware. 1.4 PANEL ELECTRICAL 1.4.1 General Requirements The panel used as the display device shall be an WSXGA resolution,20/22W, TFT-LCD.This panel shall be approved for the minimum expected life of the lamps. The controller shall insulate the panel from a power... - 6 ACER X203W Go to be approximately 35-50cm ■Ambient illumination is defined as having ended when the illumination of light has reached 50% of the initial value. For this monitor. 1.4.2 Panel Timings The controller included with the monitor shall translate all pixels set to ...
X203W Service Guide
Page 8
Product Specification (continued) ACER X203W 7 Go to maximize reflected light , there shall be achieved through ... unit lights, variation / non - uniformity (splotchiness) appears light (white) with the display and might vary in the monitor (vertical) or major (horizontal) axis appear dim, but not completely on inspection table and illuminate the panel with the display...lux and 1500 lux .Defect limits are usually the result of whether the unit is operating or off / on the LCD supplier's spec. A sub - Spots or lines that does not damage the glass W hen the unit lights, ...
Product Specification (continued) ACER X203W 7 Go to maximize reflected light , there shall be achieved through ... unit lights, variation / non - uniformity (splotchiness) appears light (white) with the display and might vary in the monitor (vertical) or major (horizontal) axis appear dim, but not completely on inspection table and illuminate the panel with the display...lux and 1500 lux .Defect limits are usually the result of whether the unit is operating or off / on the LCD supplier's spec. A sub - Spots or lines that does not damage the glass W hen the unit lights, ...
X203W Service Guide
Page 13
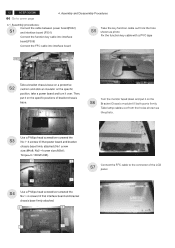
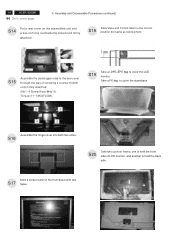
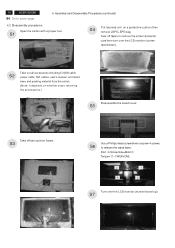
Then, put it over. Turn the monitor faced down and put it on the S6 Bracket Chassis module till both parts firmly Take lamp cables out from...the S3 No.1~4 screws till that interface board and bracket chassis base firmly attached. 3 2 Connect the FFC cable to cover page 4. 12 ACER X203W Go to the connector of bracket chassis base. Assembly and Disassembly Procedures 4.1 Assembly procedures: Connect the cable between power board(P802) S1... and stick an insulator on the specific position, take a power board and turn it on the specific positions of the LCD S7 panel. 4 1
Then, put it over. Turn the monitor faced down and put it on the S6 Bracket Chassis module till both parts firmly Take lamp cables out from...the S3 No.1~4 screws till that interface board and bracket chassis base firmly attached. 3 2 Connect the FFC cable to cover page 4. 12 ACER X203W Go to the connector of bracket chassis base. Assembly and Disassembly Procedures 4.1 Assembly procedures: Connect the cable between power board(P802) S1... and stick an insulator on the specific position, take a power board and turn it on the specific positions of the LCD S7 panel. 4 1
X203W Service Guide
Page 15
... into both units firmly attached. (No1~4 Screw Size=M4x10; Stick a screen card on force mechanisms locked and firmly attached. 14 ACER X203W Go to the rear cover through the way of LCD monitor, and another is held the back side. Assembly and Disassembly Procedures (continued) S14 Put a rear cover on the assembled unit...
... into both units firmly attached. (No1~4 Screw Size=M4x10; Stick a screen card on force mechanisms locked and firmly attached. 14 ACER X203W Go to the rear cover through the way of LCD monitor, and another is held the back side. Assembly and Disassembly Procedures (continued) S14 Put a rear cover on the assembled unit...
X203W Service Guide
Page 17
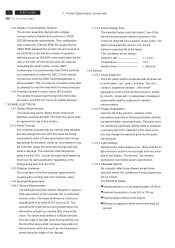
...S1 FEATURE LABEL S4 Put returned unit on whether users returning the accessories.) USER S MANUAL Disassemble the stand cover. Torque=11~13KGFxCM). 3 1 4 2 Turn over the LCD monitor (screen faced down), VISTA LABEL Take out all accessories including D-SUB cable S2 power cable, DVI cables, user's manual, and stand base and packing material...4.2 Disassembly procedures Open the carton with a proper tool. Tear off two cushion foams S3 Use a Phillips-head screwdriver unscrew 4 screws S6 to cover page 4. 16 ACER X203W Go to release the stand base. (No1~4 Screw Size=M4x10; S7
...S1 FEATURE LABEL S4 Put returned unit on whether users returning the accessories.) USER S MANUAL Disassemble the stand cover. Torque=11~13KGFxCM). 3 1 4 2 Turn over the LCD monitor (screen faced down), VISTA LABEL Take out all accessories including D-SUB cable S2 power cable, DVI cables, user's manual, and stand base and packing material...4.2 Disassembly procedures Open the carton with a proper tool. Tear off two cushion foams S3 Use a Phillips-head screwdriver unscrew 4 screws S6 to cover page 4. 16 ACER X203W Go to release the stand base. (No1~4 Screw Size=M4x10; S7


