User Guide
Page 2
X193W SPECIAL NOTES ON LCD MONITORS The following symptoms are normal with LCD monitor and do not indicate a problem. In this case, the screen is displayed for hours. Turn off the Power Switch for hours. NOTES · Due to the nature of the LCD screen, an afterimage of the previous screen may ...find slightly uneven brightness on the screen depending on the desktop pattern you use . EN-1 It may flicker during initial use . · The LCD screen has effective pixels of the fluorescent light, the screen may include blemishes of 0.01% or less such as a missing pixel or a pixel ...
X193W SPECIAL NOTES ON LCD MONITORS The following symptoms are normal with LCD monitor and do not indicate a problem. In this case, the screen is displayed for hours. Turn off the Power Switch for hours. NOTES · Due to the nature of the LCD screen, an afterimage of the previous screen may ...find slightly uneven brightness on the screen depending on the desktop pattern you use . EN-1 It may flicker during initial use . · The LCD screen has effective pixels of the fluorescent light, the screen may include blemishes of 0.01% or less such as a missing pixel or a pixel ...
User Guide
Page 3
...; Gradually increase the volume until you can hear it from the power supplies. When you need to disconnect power to protect your safety and comfort X193W Safety instructions Read these instructions, suggested by hearing experts,to the equipment, be blocked or covered. These openings must not be sure to block out...
...; Gradually increase the volume until you can hear it from the power supplies. When you need to disconnect power to protect your safety and comfort X193W Safety instructions Read these instructions, suggested by hearing experts,to the equipment, be blocked or covered. These openings must not be sure to block out...
User Guide
Page 4
LCD Pixel Statement The LCD unit is damaged, cut or frayed • liquid was spilled into... EN-3 The following the operating instructions Note: Adjust only those controls that are also at risk of the monitor, using a footrest, or raising your sitting height to carpal tunnel syndrome, tendonitis, tenosynovitis or other recurring...removing covers may complain of eyestrain and headaches after long hours of working conditions, personal health and other risks. X193W Product servicing Do not attempt to service this product from staying too long in the hands, wrists, arms,...
LCD Pixel Statement The LCD unit is damaged, cut or frayed • liquid was spilled into... EN-3 The following the operating instructions Note: Adjust only those controls that are also at risk of the monitor, using a footrest, or raising your sitting height to carpal tunnel syndrome, tendonitis, tenosynovitis or other recurring...removing covers may complain of eyestrain and headaches after long hours of working conditions, personal health and other risks. X193W Product servicing Do not attempt to service this product from staying too long in the hands, wrists, arms,...
User Guide
Page 5
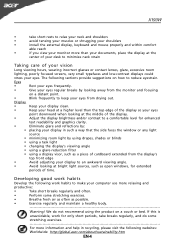
...acer.com/about/sustainability.htm EN-4 We do some stretching exercises. • Breathe fresh air as often as possible. • Exercise regularly and maintain a healthy body. Warning! Eyes • Rest your eyes frequently. • Give your eyes regular breaks by looking away from the monitor... and low-contrast displays could stress your display in recycling, please visit the following sections provide suggestions on a couch or bed. X193W • take breaks regularly, and do not recommend using a display visor, such as a piece of time. Developing good work...
...acer.com/about/sustainability.htm EN-4 We do some stretching exercises. • Breathe fresh air as often as possible. • Exercise regularly and maintain a healthy body. Warning! Eyes • Rest your eyes frequently. • Give your eyes regular breaks by looking away from the monitor... and low-contrast displays could stress your display in recycling, please visit the following sections provide suggestions on a couch or bed. X193W • take breaks regularly, and do not recommend using a display visor, such as a piece of time. Developing good work...
User Guide
Page 6
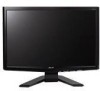
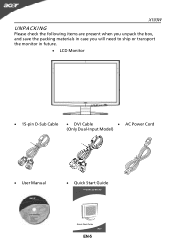
X193W UNPACKING Please check the following items are present when you unpack the box, and save the packing materials in case you will need to ship or transport the monitor in future. · LCD Monitor · 15-pin D-Sub Cable · DVI Cable · AC Power Cord (Only Dual-Input Model) · User Manual · Quick Start Guide EN-5
X193W UNPACKING Please check the following items are present when you unpack the box, and save the packing materials in case you will need to ship or transport the monitor in future. · LCD Monitor · 15-pin D-Sub Cable · DVI Cable · AC Power Cord (Only Dual-Input Model) · User Manual · Quick Start Guide EN-5
User Guide
Page 7
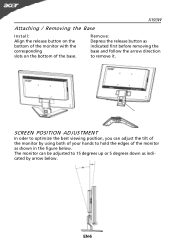
... using both of your hands to hold the edges of the base. EN-6 X193W Attaching / Removing the Base Install: Align the release button on the bottom of the monitor with the corresponding slots on the bottom of the monitor as indicated by arrow below . SCREEN POSITION ADJUSTMENT In oder to optimize the best...
... using both of your hands to hold the edges of the base. EN-6 X193W Attaching / Removing the Base Install: Align the release button on the bottom of the monitor with the corresponding slots on the bottom of the monitor as indicated by arrow below . SCREEN POSITION ADJUSTMENT In oder to optimize the best...
User Guide
Page 8
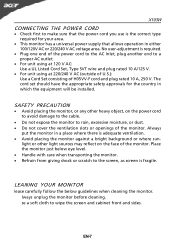
... Set, Type SVT wire and plug rated 10 A/125 V. · For unit using at 220/240 V AC (outside of U.S.): Use a Cord Set consisting of the monitor. X193W CONNECTING THE POWER CORD · Check first to make sure that allows operation in either 100/120V AC or 220/240 V AC voltage area. SAFETY... PRECAUTION · Avoid placing the monitor, or any other light sources may reflect on the power cord to avoid damage to the cable. · Do not expose the...
... Set, Type SVT wire and plug rated 10 A/125 V. · For unit using at 220/240 V AC (outside of U.S.): Use a Cord Set consisting of the monitor. X193W CONNECTING THE POWER CORD · Check first to make sure that allows operation in either 100/120V AC or 220/240 V AC voltage area. SAFETY... PRECAUTION · Avoid placing the monitor, or any other light sources may reflect on the power cord to avoid damage to the cable. · Do not expose the...
User Guide
Page 9
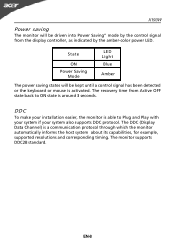
... be kept until a control signal has been detected or the keyboard or mouse is able to ON state is around 3 seconds. The monitor supports DDC2B standard. X193W Power saving The monitor will be driven into Power Saving" mode by the amber-color power LED. The recovery time from the display controller, as indicated...
... be kept until a control signal has been detected or the keyboard or mouse is able to ON state is around 3 seconds. The monitor supports DDC2B standard. X193W Power saving The monitor will be driven into Power Saving" mode by the amber-color power LED. The recovery time from the display controller, as indicated...
User Guide
Page 10
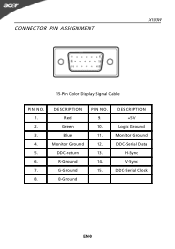
DESCRIPTION +5V Logic Ground Monitor Ground DDC-Serial Data H-Sync V-Sync DDC-Serial Clock EN-9 CONNECTOR PIN ASSIGNMENT X193W 15-Pin Color Display Signal Cable PIN NO. 1. 2. 3. 4. 5. 6. 7. 8. DESCRIPTION Red Green Blue Monitor Ground DDC-return R-Ground G-Ground B-Ground PIN NO. 9. 10. 11. 12. 13. 14. 15.
DESCRIPTION +5V Logic Ground Monitor Ground DDC-Serial Data H-Sync V-Sync DDC-Serial Clock EN-9 CONNECTOR PIN ASSIGNMENT X193W 15-Pin Color Display Signal Cable PIN NO. 1. 2. 3. 4. 5. 6. 7. 8. DESCRIPTION Red Green Blue Monitor Ground DDC-return R-Ground G-Ground B-Ground PIN NO. 9. 10. 11. 12. 13. 14. 15.
User Guide
Page 13
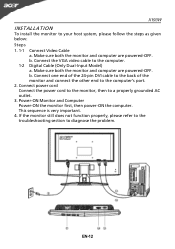
... to a properly grounded AC outlet. 3. b. EN-12 Make sure both the monitor and computer are powered-OFF. Connect power cord Connect the power cord to the monitor, then to the computer. 1-2 Digital Cable (Only Dual-Input Model) a. X193W INSTALLATION To install the monitor to your host system, please follow the steps as given below...
... to a properly grounded AC outlet. 3. b. EN-12 Make sure both the monitor and computer are powered-OFF. Connect power cord Connect the power cord to the monitor, then to the computer. 1-2 Digital Cable (Only Dual-Input Model) a. X193W INSTALLATION To install the monitor to your host system, please follow the steps as given below...
User Guide
Page 14
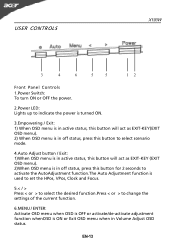
EN-13 USER CONTROLS X193W 3 4 6 5 5 12 Front Panel Controls 1.Power Switch: To turn ON or OFF the power. 2.Power LED: Lights up to indicate the power is turned ON. 3.Empowering / ...
EN-13 USER CONTROLS X193W 3 4 6 5 5 12 Front Panel Controls 1.Power Switch: To turn ON or OFF the power. 2.Power LED: Lights up to indicate the power is turned ON. 3.Empowering / ...
User Guide
Page 15
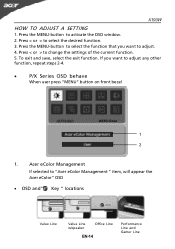
...183; P/X Series OSD behave When user press "MENU" button on front bezel 1 2 1. Acer eColor Management If selected to select the desired function. 3. Press < or > to "Acer eColor Management " item, will appear the Acer eColor" OSD · OSD and" Key " locations Value Line Value Line w/speaker Office ...Line EN-14 Performance Line and Gamer Line Press the MENU-button to change the settings of the current function. 5. To exit and save, select the exit function. X193W HOW TO ...
...183; P/X Series OSD behave When user press "MENU" button on front bezel 1 2 1. Acer eColor Management If selected to select the desired function. 3. Press < or > to "Acer eColor Management " item, will appear the Acer eColor" OSD · OSD and" Key " locations Value Line Value Line w/speaker Office ...Line EN-14 Performance Line and Gamer Line Press the MENU-button to change the settings of the current function. 5. To exit and save, select the exit function. X193W HOW TO ...
User Guide
Page 16
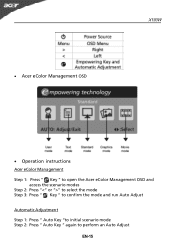
· Acer eColor Management OSD X193W · Operation instructions Acer eColor Management Step 1: Press " Key " to open the Acer eColor Management OSD and access the scenario modes Step 2: Press "" to select the mode Step 3: Press " Key " to confirm the mode and run Auto Adjust Automatic Adjustment Step 1: Press " Auto Key "to initial scenario mode Step 2: Press " Auto Key " again to perform an Auto Adjust EN-15
· Acer eColor Management OSD X193W · Operation instructions Acer eColor Management Step 1: Press " Key " to open the Acer eColor Management OSD and access the scenario modes Step 2: Press "" to select the mode Step 3: Press " Key " to confirm the mode and run Auto Adjust Automatic Adjustment Step 1: Press " Auto Key "to initial scenario mode Step 2: Press " Auto Key " again to perform an Auto Adjust EN-15
User Guide
Page 17
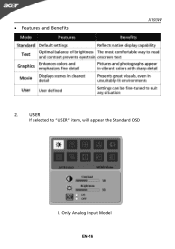
· Features and Benefits X193W 2. USER If selected to "USER" item, will appear the Standard OSD I. Only Analog Input Model EN-16
· Features and Benefits X193W 2. USER If selected to "USER" item, will appear the Standard OSD I. Only Analog Input Model EN-16
User Guide
Page 18
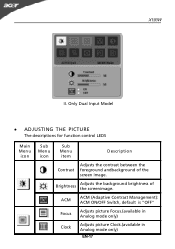
Only Dual Input Model · ADJUSTING THE PICTURE The descriptions for function control LEDS Main Menu icon Sub Menu icon Sub Menu item Description Contrast Adjusts the contrast between the foreground andbackground of the screenimage. Brightness Adjusts the background brightness of the screen image. ACM ACM (Adaptive Contrast Management): ACM ON/OFF Switch, default is "OFF" Focus Adjusts picture Focus.(available in Analog mode only) Clock Adjusts picture Clock.(available in Analog mode only) EN-17 X193W II.
Only Dual Input Model · ADJUSTING THE PICTURE The descriptions for function control LEDS Main Menu icon Sub Menu icon Sub Menu item Description Contrast Adjusts the contrast between the foreground andbackground of the screenimage. Brightness Adjusts the background brightness of the screen image. ACM ACM (Adaptive Contrast Management): ACM ON/OFF Switch, default is "OFF" Focus Adjusts picture Focus.(available in Analog mode only) Clock Adjusts picture Clock.(available in Analog mode only) EN-17 X193W II.
User Guide
Page 19
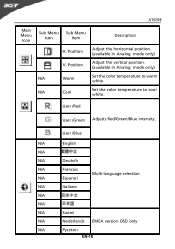
X193W Main Menu Icon Sub Menu Sub Menu Icon Item H. Set the color temperature to warm white. User /Blue N/A English N/A N/A Deutsch N/A Francais Multi-language selection. User /Red User /Green Adjusts Red/Green/Blue intensity. N/A Espanol N/A Italiano N/A N/A N/A Suomi N/A Nederlands EMEA version OSD only N/A Pyccknn EN-18 Position N/A Warm N/A Cool Description Adjust the horizontal position. (available in Analog mode only) Adjust the vertical position. (available in Analog mode only) Set the color temperature to cool white. Position V.
X193W Main Menu Icon Sub Menu Sub Menu Icon Item H. Set the color temperature to warm white. User /Blue N/A English N/A N/A Deutsch N/A Francais Multi-language selection. User /Red User /Green Adjusts Red/Green/Blue intensity. N/A Espanol N/A Italiano N/A N/A N/A Suomi N/A Nederlands EMEA version OSD only N/A Pyccknn EN-18 Position N/A Warm N/A Cool Description Adjust the horizontal position. (available in Analog mode only) Adjust the vertical position. (available in Analog mode only) Set the color temperature to cool white. Position V.
User Guide
Page 20
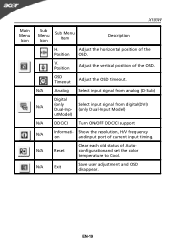
OSD Timeout Adjust the OSD timeout. N/A Reset Clear each old status of the OSD. X193W Main Menu Icon Sub Menu Icon Sub Menu Item Description H. V. EN-19 Position Adjust the horizontal position of Autoconfigurationand set the color temperature to Cool. N/A Analog Select input signal from analog (D-Sub) Digital N/A (only Select input signal ...
OSD Timeout Adjust the OSD timeout. N/A Reset Clear each old status of the OSD. X193W Main Menu Icon Sub Menu Icon Sub Menu Item Description H. V. EN-19 Position Adjust the horizontal position of Autoconfigurationand set the color temperature to Cool. N/A Analog Select input signal from analog (D-Sub) Digital N/A (only Select input signal ...
User Guide
Page 21
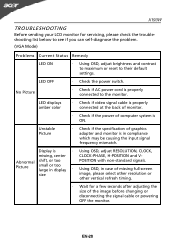
...183; Using OSD, adjust brightness and contrast to maximum or reset to the monitor. EN-20 LED displays amber color · Check if video signal cable is properly connected at the back of... monitor. · Check if the power of computer system is in compliance which may be causing..., center CLOCK-PHASE, H-POSITION and V- Display is properly connected to their default settings. X193W TROUBLESHOOTING Before sending your LCD monitor for a few seconds after adjusting the size of graphics adapter and...
...183; Using OSD, adjust brightness and contrast to maximum or reset to the monitor. EN-20 LED displays amber color · Check if video signal cable is properly connected at the back of... monitor. · Check if the power of computer system is in compliance which may be causing..., center CLOCK-PHASE, H-POSITION and V- Display is properly connected to their default settings. X193W TROUBLESHOOTING Before sending your LCD monitor for a few seconds after adjusting the size of graphics adapter and...
User Guide
Page 22
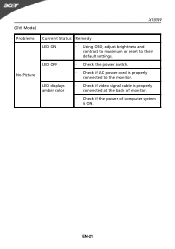
(DVI Mode) X193W Problems No Picture Current Status Remedy LED ON · Using OSD, adjust brightness and contrast to maximum or reset to the monitor. EN-21 LED displays amber color · Check if video signal cable is properly connected at the back of monitor. · Check if the power of computer system is properly connected to their default settings. LED OFF · Check the power switch. · Check if AC power cord is ON.
(DVI Mode) X193W Problems No Picture Current Status Remedy LED ON · Using OSD, adjust brightness and contrast to maximum or reset to the monitor. EN-21 LED displays amber color · Check if video signal cable is properly connected at the back of monitor. · Check if the power of computer system is properly connected to their default settings. LED OFF · Check the power switch. · Check if AC power cord is ON.


