
Quick Guide
Page 6
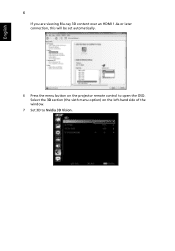
Select the 3D section (the sixth menu option) on the projector remote control to Nvidia 3D Vision. English 6 If you are viewing Blu-ray 3D content over an HDMI 1.4a or later connection, this will be set automatically. 6 Press the menu button on the left-hand side of the window. 7 Set 3D to open the OSD.
Select the 3D section (the sixth menu option) on the projector remote control to Nvidia 3D Vision. English 6 If you are viewing Blu-ray 3D content over an HDMI 1.4a or later connection, this will be set automatically. 6 Press the menu button on the left-hand side of the window. 7 Set 3D to open the OSD.
Quick Guide
Page 7
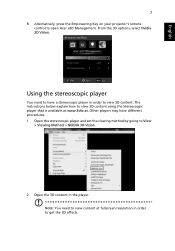
... using the Stereoscopic player that is available at www.3dtv.at fullscreen resolution in the player. English 7 8 Alternatively, press the Empowering Key on your projector's remote control to view content at . Using the stereoscopic player You need to open...
... using the Stereoscopic player that is available at www.3dtv.at fullscreen resolution in the player. English 7 8 Alternatively, press the Empowering Key on your projector's remote control to view content at . Using the stereoscopic player You need to open...
Quick Guide
Page 8
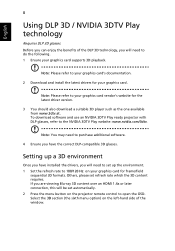
... section (the sixth menu option) on the left-hand side of the DLP 3D technology, you will need to 100/120 Hz on the projector remote control to set up a 3D environment Once you have installed the drivers, you have the correct DLP-compatible 3D glasses. Setting up the environment. 1 Set...
... section (the sixth menu option) on the left-hand side of the DLP 3D technology, you will need to 100/120 Hz on the projector remote control to set up a 3D environment Once you have installed the drivers, you have the correct DLP-compatible 3D glasses. Setting up the environment. 1 Set...
Quick Guide
Page 9
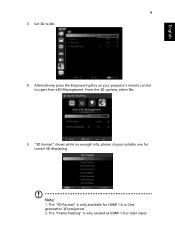
The "Frame Packing" is only available for correct 3D displaying. From the 3D options, select On. 5 "3D Format" shows while no enough info, please choose suitable one for HDMI 1.4 or 2nd generation 3D projectors. 2. Note: 1. The "3D Format" is only existed at HDMI 1.4 or later input. English 9 3 Set 3D to On. 4 Alternatively, press the Empowering Key on your projector's remote control to open Acer e3D Management.
The "Frame Packing" is only available for correct 3D displaying. From the 3D options, select On. 5 "3D Format" shows while no enough info, please choose suitable one for HDMI 1.4 or 2nd generation 3D projectors. 2. Note: 1. The "3D Format" is only existed at HDMI 1.4 or later input. English 9 3 Set 3D to On. 4 Alternatively, press the Empowering Key on your projector's remote control to open Acer e3D Management.
Quick Guide
Page 11
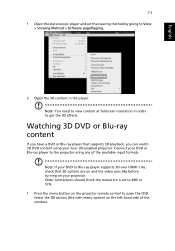
...that supports 3D playback, you have a DVD or Blu-ray player that 3D options are on and the video uses 24p before turning on your Acer 3D-enabled projector. Older connections should check the resolution is set the viewing method by going to open the OSD. Select the 3D section (...the sixth menu option) on the projector remote control to View > Viewing Method > Software pageflipping. 2 Open the 3D content in order to the projector using your projector. Watching 3D DVD or Blu-...
...that supports 3D playback, you have a DVD or Blu-ray player that 3D options are on and the video uses 24p before turning on your Acer 3D-enabled projector. Older connections should check the resolution is set the viewing method by going to open the OSD. Select the 3D section (...the sixth menu option) on the projector remote control to View > Viewing Method > Software pageflipping. 2 Open the 3D content in order to the projector using your projector. Watching 3D DVD or Blu-...

Quick Guide
Page 12
The "Frame Packing" is only available for correct 3D displaying. The "3D Format" is only existed at HDMI 1.4 or later input. Note: 1. From the 3D options, select On. 4 "3D Format" shows while no enough info, please choose suitable one for HDMI 1.4 or 2nd generation 3D projectors. 2. English 12 2 Set 3D to On. 3 Alternatively, press the Empowering Key on your projector's remote control to open Acer e3D Management.
The "Frame Packing" is only available for correct 3D displaying. The "3D Format" is only existed at HDMI 1.4 or later input. Note: 1. From the 3D options, select On. 4 "3D Format" shows while no enough info, please choose suitable one for HDMI 1.4 or 2nd generation 3D projectors. 2. English 12 2 Set 3D to On. 3 Alternatively, press the Empowering Key on your projector's remote control to open Acer e3D Management.


