

User Manual
Page 2
... expressed or implied, with respect to notify any means, electronically, mechanically, by any person of Acer Incorporated. Acer Projector User's Guide Original Issue: 03/2016 Changes may be incorporated in this manual or supplementary documents and publications. All Rights Reserved. Copyright © 2016. The serial number and model number are trademarks or registered trademarks of merchantability or fitness for a particular purpose.
... expressed or implied, with respect to notify any means, electronically, mechanically, by any person of Acer Incorporated. Acer Projector User's Guide Original Issue: 03/2016 Changes may be incorporated in this manual or supplementary documents and publications. All Rights Reserved. Copyright © 2016. The serial number and model number are trademarks or registered trademarks of merchantability or fitness for a particular purpose.
User Manual
Page 3
Keep this document for your safety and comfort Read these instructions carefully. Follow all power cords from the power supplies. These openings must not be placed near water. • Do not place this product from overheating. iii Information for future reference. Turning the product off before cleaning Unplug this product on an unstable cart, stand or table. Use a damp cloth for plug...
Keep this document for your safety and comfort Read these instructions carefully. Follow all power cords from the power supplies. These openings must not be placed near water. • Do not place this product from overheating. iii Information for future reference. Turning the product off before cleaning Unplug this product on an unstable cart, stand or table. Use a damp cloth for plug...
User Manual
Page 5
... operating instructions Note: Adjust only those controls that is something wrong with your eyes. • Turn on . v Product servicing Do not attempt to service this product from walls and free flow of air around the projector is necessary. • Locations where temperatures may become excessively high, such as opening or removing covers may contain small parts. For safety reasons, do not use non-compliant parts when adding or changing components. Keep...
... operating instructions Note: Adjust only those controls that is something wrong with your eyes. • Turn on . v Product servicing Do not attempt to service this product from walls and free flow of air around the projector is necessary. • Locations where temperatures may become excessively high, such as opening or removing covers may contain small parts. For safety reasons, do not use non-compliant parts when adding or changing components. Keep...
User Manual
Page 6
... only user serviceable part is showing warning message. • When changing the lamp, please allow unit to cool down, and follow all changing instructions. • Reset the "Lamp Hour Reset" function from the Onscreen display "Management" menu after replacing the lamp module. • Do not attempt to disassemble this case, unplug immediately and contact your dealer for inspection. • Do not face the projector lens to removing the lamp assembly for ceiling mount installation...
... only user serviceable part is showing warning message. • When changing the lamp, please allow unit to cool down, and follow all changing instructions. • Reset the "Lamp Hour Reset" function from the Onscreen display "Management" menu after replacing the lamp module. • Do not attempt to disassemble this case, unplug immediately and contact your dealer for inspection. • Do not face the projector lens to removing the lamp assembly for ceiling mount installation...
User Manual
Page 8
... do not open or disassemble the product as recommended in this user's guide to maximize the life of its life, it shows warning messages. • Reset the "Lamp Hour Reset" function from the Onscreen display "Management" menu after replacing the lamp module. • When switching the projector off the product before cleaning. • Use a soft cloth moistened with mild detergent to clean the display housing. • Disconnect the power plug from AC...
... do not open or disassemble the product as recommended in this user's guide to maximize the life of its life, it shows warning messages. • Reset the "Lamp Hour Reset" function from the Onscreen display "Management" menu after replacing the lamp module. • When switching the projector off the product before cleaning. • Use a soft cloth moistened with mild detergent to clean the display housing. • Disconnect the power plug from AC...
User Manual
Page 9
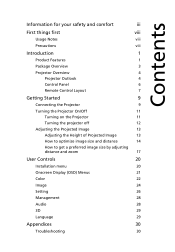
... 1 Package Overview 3 Projector Overview 4 Projector Outlook 4 Control Panel 6 Remote Control Layout 7 Getting Started 9 Connecting the Projector 9 Turning the Projector On/Off 11 Turning on the Projector 11 Turning the projector off 12 Adjusting the Projected Image 13 Adjusting the Height of Projected Image 13 How to optimize image size and distance 14 How to get a preferred image size by adjusting distance and zoom 17 User Controls 20 Installation menu 20 Onscreen Display (OSD) Menus 21 Color 22 Image 24 Setting 26 Management 28 Audio 28 3D 29...
... 1 Package Overview 3 Projector Overview 4 Projector Outlook 4 Control Panel 6 Remote Control Layout 7 Getting Started 9 Connecting the Projector 9 Turning the Projector On/Off 11 Turning on the Projector 11 Turning the projector off 12 Adjusting the Projected Image 13 Adjusting the Height of Projected Image 13 How to optimize image size and distance 14 How to get a preferred image size by adjusting distance and zoom 17 User Controls 20 Installation menu 20 Onscreen Display (OSD) Menus 21 Color 22 Image 24 Setting 26 Management 28 Audio 28 3D 29...

User Manual
Page 11
.../p) supported • Lower power consumption and economy (ECO) mode extends lamp life • Acer EcoProjeciton Technology delivers Intelligent power management approach and physical efficiency improvement • Advanced digital keystone correction optimizes presentations • Smart detection delivers quick, intelligent source detection • Multi-language onscreen display (OSD) menus • Manual focus projection lens zooms up to 1.1x • 2x digital zoom English 1 Introduction Product Features This product is a single-chip DLP...
.../p) supported • Lower power consumption and economy (ECO) mode extends lamp life • Acer EcoProjeciton Technology delivers Intelligent power management approach and physical efficiency improvement • Advanced digital keystone correction optimizes presentations • Smart detection delivers quick, intelligent source detection • Multi-language onscreen display (OSD) menus • Manual focus projection lens zooms up to 1.1x • 2x digital zoom English 1 Introduction Product Features This product is a single-chip DLP...

User Manual
Page 13
Contact your unit is missing. English Projector Power cord VGA cable Remote control 2 x Batteries (option) Security card (option) User's guide (option) Quick start guide Carrying case (option) Dust filters (option) HDMI cable (option) Check to make sure your dealer immediately if any thing is complete. 3 Package Overview This projector comes with all the items shown below.
Contact your unit is missing. English Projector Power cord VGA cable Remote control 2 x Batteries (option) Security card (option) User's guide (option) Quick start guide Carrying case (option) Dust filters (option) HDMI cable (option) Check to make sure your dealer immediately if any thing is complete. 3 Package Overview This projector comes with all the items shown below.
User Manual
Page 16
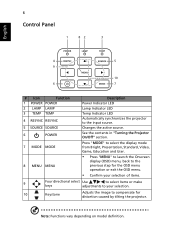
6 Control Panel 1 82 3 English 4 5 9 10 6 7 # Icon Function 1 POWER POWER 2 LAMP LAMP 3 TEMP TEMP 4 RESYNC RESYNC 5 SOURCE SOURCE 6 POWER Description Power Indicator LED Lamp Indicator LED Temp Indicator LED Automatically synchronizes the projector to compensate for the OSD menu operation or exit the OSD menu. • Confirm your selection of items. 9 Four directional select Use to select items or make keys adjustments to your selection. 10 Keystone Adjusts the image to the input source. Note: Functions vary depending on model definition. See the contents...
6 Control Panel 1 82 3 English 4 5 9 10 6 7 # Icon Function 1 POWER POWER 2 LAMP LAMP 3 TEMP TEMP 4 RESYNC RESYNC 5 SOURCE SOURCE 6 POWER Description Power Indicator LED Lamp Indicator LED Temp Indicator LED Automatically synchronizes the projector to compensate for the OSD menu operation or exit the OSD menu. • Confirm your selection of items. 9 Four directional select Use to select items or make keys adjustments to your selection. 10 Keystone Adjusts the image to the input source. Note: Functions vary depending on model definition. See the contents...

User Manual
Page 17
... desired aspect ratio. 9 ZOOM ZOOM Zooms the projector display in or out. 10 FREEZE FREEZE 11 MENU 12 KEYSTONE To pause the screen image. • Press "MENU" to launch the Onscreen display (OSD) menu, back to the previous step for distortion caused by tilting the projector. Momentarily turns off the video. English 7 Remote Control Layout 1 3 2 SOURCE 4 5 MEDIA 6 SETUP MODE HIDE 7 8 9 ZOOM RATIO FREEZE 10 11 12 13 Model No:E-26261 15 MC...
... desired aspect ratio. 9 ZOOM ZOOM Zooms the projector display in or out. 10 FREEZE FREEZE 11 MENU 12 KEYSTONE To pause the screen image. • Press "MENU" to launch the Onscreen display (OSD) menu, back to the previous step for distortion caused by tilting the projector. Momentarily turns off the video. English 7 Remote Control Layout 1 3 2 SOURCE 4 5 MEDIA 6 SETUP MODE HIDE 7 8 9 ZOOM RATIO FREEZE 10 11 12 13 Model No:E-26261 15 MC...

User Manual
Page 22
... projector will stop blinking and turn solid red to indicate standby mode. 5 It is turned off , press and hold the power button. This onscreen message indicates that the fan has failed. Note 1: Whenever the projector automatically shuts down , and the LED temp indicator will blink. Press the power button again. 2 The LED power indicator will turn RED and blink rapidly after the projector is now safe to unplug the power cord. Lamp will automatically turn off , the projector will automatically shut down and the LED lamp indicator turns...
... projector will stop blinking and turn solid red to indicate standby mode. 5 It is turned off , press and hold the power button. This onscreen message indicates that the fan has failed. Note 1: Whenever the projector automatically shuts down , and the LED temp indicator will blink. Press the power button again. 2 The LED power indicator will turn RED and blink rapidly after the projector is now safe to unplug the power cord. Lamp will automatically turn off , the projector will automatically shut down and the LED lamp indicator turns...
User Manual
Page 24
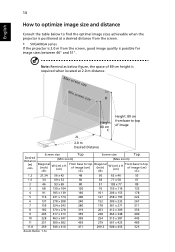
... of image A 2.0 m Desired Distance Screen size Top Screen size Top Desired Distance (Min zoom) (Max zoom) (m) Diagonal (inch) W (cm) x H (cm) From base to top of image (cm) Diagonal (inch) W (cm) x H (cm) From base to find the optimal image sizes achievable when the projector is positioned at a desired distance from the screen. • SVGA/XGA series If the projector is 2.0 m from the screen, good image quality is required when located at 2.0 m distance.
... of image A 2.0 m Desired Distance Screen size Top Screen size Top Desired Distance (Min zoom) (Max zoom) (m) Diagonal (inch) W (cm) x H (cm) From base to top of image (cm) Diagonal (inch) W (cm) x H (cm) From base to find the optimal image sizes achievable when the projector is positioned at a desired distance from the screen. • SVGA/XGA series If the projector is 2.0 m from the screen, good image quality is required when located at 2.0 m distance.

User Manual
Page 30
English 20 User Controls Installation menu The installation menu provides an onscreen display (OSD) for projector installation and maintenance. 3 The background pattern acts as a guide to adjusting the calibration and alignment settings, such as screen size and distance, focus and more. 4 The Installation menu includes the following options: •Projection Mode •Projection Location •Auto Keystone settings •Manual Keystone settings •Keystone settings •Language settings •Reset to factory default function Use the up and down arrow keys to select an ...
English 20 User Controls Installation menu The installation menu provides an onscreen display (OSD) for projector installation and maintenance. 3 The background pattern acts as a guide to adjusting the calibration and alignment settings, such as screen size and distance, focus and more. 4 The Installation menu includes the following options: •Projection Mode •Projection Location •Auto Keystone settings •Manual Keystone settings •Keystone settings •Language settings •Reset to factory default function Use the up and down arrow keys to select an ...

User Manual
Page 33
...%. (video sources only) Film Mode Sets the image optimized to be shown in incredible detail. Hue Adjusts the color balance of dark scenery. Gain Adjusts the selected color's contrast. English 23 Color Temperature Dynamic Black Gamma Advanced Mode Use this function to -life images. Brilliant Color Produces an expanded on model definition. Color Management Adjusts the red, green, blue, cyan, yellow and magenta colors. Ind. Saturation Adjusts the selected color to 24-frame True Film mode. R Gain Adjusts...
...%. (video sources only) Film Mode Sets the image optimized to be shown in incredible detail. Hue Adjusts the color balance of dark scenery. Gain Adjusts the selected color's contrast. English 23 Color Temperature Dynamic Black Gamma Advanced Mode Use this function to -life images. Brilliant Color Produces an expanded on model definition. Color Management Adjusts the red, green, blue, cyan, yellow and magenta colors. Ind. Saturation Adjusts the selected color to 24-frame True Film mode. R Gain Adjusts...

User Manual
Page 34
...: Keep original signal aspect ratio and zoom in by tilting projection. Automatically adjusts vertical image. Adjust image distortion caused by tilting projection. English 24 Image Projection • Front-Desktop: The factory default setting. • Rear-Desktop: When you select this function, the projector reverses the image so you can project from behind a translucent screen. • Auto: Automatically adjusts projection location of image. • Desktop Aspect Ratio Keystone Auto Keystone Manual Keystone • Ceiling: Turns the image upside down for ceiling-mounted...
...: Keep original signal aspect ratio and zoom in by tilting projection. Automatically adjusts vertical image. Adjust image distortion caused by tilting projection. English 24 Image Projection • Front-Desktop: The factory default setting. • Rear-Desktop: When you select this function, the projector reverses the image so you can project from behind a translucent screen. • Auto: Automatically adjusts projection location of image. • Desktop Aspect Ratio Keystone Auto Keystone Manual Keystone • Ceiling: Turns the image upside down for ceiling-mounted...
User Manual
Page 36
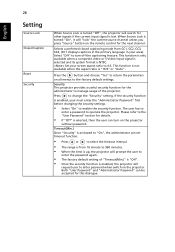
... password again. • The factory default setting of the projector. Please refer to the "User Password" section for details. • If "Off" is enabled, the projector will request user to turn on the projector . English 26 Setting Source Lock Closed Caption Reset Security When Source Lock is turned "Off", the projector will search for other signals if the current input signal is "16:9" or "Auto" . Select "Off" to enter password when switch on the projector without password...
... password again. • The factory default setting of the projector. Please refer to the "User Password" section for details. • If "Off" is enabled, the projector will request user to turn on the projector . English 26 Setting Source Lock Closed Caption Reset Security When Source Lock is turned "Off", the projector will search for other signals if the current input signal is "16:9" or "Auto" . Select "Off" to enter password when switch on the projector without password...

User Manual
Page 38
... the button and choose "Yes" to turn the lamp hour counter to dim the projector lamp which will automatically shutdown when there is no signal input after the allocated time. (default is 15 minutes) Choose the OSD menu display time. (Default is pressed again within 2 minutes. Note: Functions vary depending on model definition. English 28 Management ECO Mode High Altitude Turn Off Mode Auto Shutdown Menu Display Time (Seconds) AC Power On Lamp Hour Elapse Lamp Reminding Lamp Hour Reset Choose...
... the button and choose "Yes" to turn the lamp hour counter to dim the projector lamp which will automatically shutdown when there is no signal input after the allocated time. (default is 15 minutes) Choose the OSD menu display time. (Default is pressed again within 2 minutes. Note: Functions vary depending on model definition. English 28 Management ECO Mode High Altitude Turn Off Mode Auto Shutdown Menu Display Time (Seconds) AC Power On Lamp Hour Elapse Lamp Reminding Lamp Hour Reset Choose...

User Manual
Page 40
... (1920 x 1200). • Click the "Change" button under the "Models" box. • Verify that your Acer projector, refer to the following troubleshooting guide. 30 Appendices English Troubleshooting If you experience a problem with your display resolution setting is lower than or equal to WUXGA-RB (1920 x 1200). • Click the "Advanced Properties" button. Please refer to the "Replacing the Lamp" section. • Make sure you need...
... (1920 x 1200). • Click the "Change" button under the "Models" box. • Verify that your Acer projector, refer to the following troubleshooting guide. 30 Appendices English Troubleshooting If you experience a problem with your display resolution setting is lower than or equal to WUXGA-RB (1920 x 1200). • Click the "Advanced Properties" button. Please refer to the "Replacing the Lamp" section. • Make sure you need...

User Manual
Page 41
... the control panel. • For an incorrectly displayed image: • Follow the steps for more information. • Change the display color depth settings on your computer. 6 Image has vertical • Use "Frequency" to make it compatible with the projector. 7 Image is out of focus • Make sure the lens cap is removed. • Adjusts the focus ring on the projector lens. • Make sure the projection screen is unstable • Adjust the...
... the control panel. • For an incorrectly displayed image: • Follow the steps for more information. • Change the display color depth settings on your computer. 6 Image has vertical • Use "Frequency" to make it compatible with the projector. 7 Image is out of focus • Make sure the lens cap is removed. • Adjusts the focus ring on the projector lens. • Make sure the projection screen is unstable • Adjust the...
User Manual
Page 43
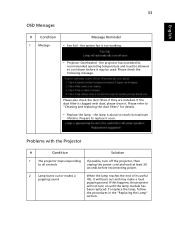
... installed. If the dust filter is about to all controls unplug the power cord and wait at least 30 seconds before it soon. the system fan is not working. • Projector Overheated - Prepare to "Cleaning and replacing the dust filters" for details. • Replace the lamp - Please refer to replace it may make a loud popping sound. English 33 OSD Messages # Condition 1 Message Message Reminder • Fan Fail - Please check the following message...
... installed. If the dust filter is about to all controls unplug the power cord and wait at least 30 seconds before it soon. the system fan is not working. • Projector Overheated - Prepare to "Cleaning and replacing the dust filters" for details. • Replace the lamp - Please refer to replace it may make a loud popping sound. English 33 OSD Messages # Condition 1 Message Message Reminder • Fan Fail - Please check the following message...


