
User Manual
Page 2
...made periodically to their respective companies. Record the model number, serial number, purchase date and place of Acer Incorporated. All correspondence concerning your projector. Acer Projector User's Guide Original Issue: 11/2013 Changes may be incorporated in new editions of this publication without the... to your unit should include the serial number, model number and purchase information. Acer Projector Model number Serial number Date of purchase Place of purchase Acer and the Acer logo are recorded on the label affixed to notify any person of such revisions or...
...made periodically to their respective companies. Record the model number, serial number, purchase date and place of Acer Incorporated. All correspondence concerning your projector. Acer Projector User's Guide Original Issue: 11/2013 Changes may be incorporated in new editions of this publication without the... to your unit should include the serial number, model number and purchase information. Acer Projector Model number Serial number Date of purchase Place of purchase Acer and the Acer logo are recorded on the label affixed to notify any person of such revisions or...

User Manual
Page 3
... power supply unit before connecting the power cord to unplug the power cord from the wall outlet before removing the power supply unit from the projector. • If the system has multiple sources of power, disconnect power from the system by placing the product on the product. When you plug the...
... power supply unit before connecting the power cord to unplug the power cord from the wall outlet before removing the power supply unit from the projector. • If the system has multiple sources of power, disconnect power from the system by placing the product on the product. When you plug the...

User Manual
Page 5
...for purchase options. Additional safety information • Do not look into the product • the product was spilled into the projector's lens when the lamp is poorly ventilated or confined. Consult your projector. v Product servicing Do not attempt to service this product from walls and free flow of air around the... projector are necessary. • Locations where temperatures may become excessively high, such as opening or removing covers may expose you to dangerous voltage ...
...for purchase options. Additional safety information • Do not look into the product • the product was spilled into the projector's lens when the lamp is poorly ventilated or confined. Consult your projector. v Product servicing Do not attempt to service this product from walls and free flow of air around the... projector are necessary. • Locations where temperatures may become excessively high, such as opening or removing covers may expose you to dangerous voltage ...
User Manual
Page 6
... dust. • Do not look into the air outlet grille when projector is on end vertically. Refer servicing only to disassemble this case contact your dealer. • Do not keep using this could cause it . Only use acer ceiling mount kit for replacement. • Do not operate lamps beyond... the rated lamp life. In this projector. It could cause the object to break on the remote control. • The lamp becomes ...
... dust. • Do not look into the air outlet grille when projector is on end vertically. Refer servicing only to disassemble this case contact your dealer. • Do not keep using this could cause it . Only use acer ceiling mount kit for replacement. • Do not operate lamps beyond... the rated lamp life. In this projector. It could cause the object to break on the remote control. • The lamp becomes ...

User Manual
Page 7
... into the trash when discarding. For more information on the Waste from Electrical and Electronics Equipment (WEEE) regulations, visit http://www.acer-group.com/public/ Sustainability/sustainability01.htm Mercury advisory For projectors or electronic products containing an LCD/CRT monitor or display: "Lamp(s) contain Mercury, Dispose Properly." For more information, contact the...
... into the trash when discarding. For more information on the Waste from Electrical and Electronics Equipment (WEEE) regulations, visit http://www.acer-group.com/public/ Sustainability/sustainability01.htm Mercury advisory For projectors or electronic products containing an LCD/CRT monitor or display: "Lamp(s) contain Mercury, Dispose Properly." For more information, contact the...
User Manual
Page 8
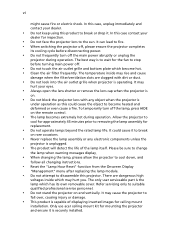
...Lamp Hour Reset" function from the Onscreen Display "Management" menu after replacing the lamp module. • When switching the projector off the product before disconnecting power. • Turn on the projector provided for a long period of the lamp itself. Please be sure to clean the unit. • Use under "...power plug from AC outlet if the product is on until the lamp module has been replaced. Warning: • Do not look into the projector's lens when the lamp is not being used for ventilation. • Use abrasive cleaners, waxes or solvents to change the lamp when it ...
...Lamp Hour Reset" function from the Onscreen Display "Management" menu after replacing the lamp module. • When switching the projector off the product before disconnecting power. • Turn on the projector provided for a long period of the lamp itself. Please be sure to clean the unit. • Use under "...power plug from AC outlet if the product is on until the lamp module has been replaced. Warning: • Do not look into the projector's lens when the lamp is not being used for ventilation. • Use abrasive cleaners, waxes or solvents to change the lamp when it ...
User Manual
Page 9
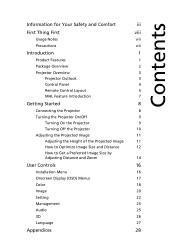
... Thing First viii Usage Notes viii Precautions viii Introduction 1 Product Features 1 Package Overview 2 Projector Overview 3 Projector Outlook 3 Control Panel 4 Remote Control Layout 5 MHL Feature Introduction 7 Getting Started 8 Connecting the Projector 8 Turning the Projector On/Off 9 Turning On the Projector 9 Turning Off the Projector 10 Adjusting the Projected Image 11 Adjusting the Height of the Projected Image...
... Thing First viii Usage Notes viii Precautions viii Introduction 1 Product Features 1 Package Overview 2 Projector Overview 3 Projector Outlook 3 Control Panel 4 Remote Control Layout 5 MHL Feature Introduction 7 Getting Started 8 Connecting the Projector 8 Turning the Projector On/Off 9 Turning On the Projector 9 Turning Off the Projector 10 Adjusting the Projected Image 11 Adjusting the Height of the Projected Image...
User Manual
Page 11
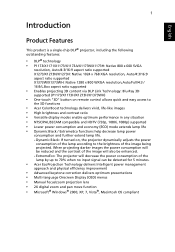
...enhanced. - English 1 Introduction Product Features This product is a single-chip DLP® projector, including the following outstanding features: • DLP® technology • P1173/X1171/.../X1173N/X1173H: Native 800 x 600 SVGA resolution, Auto/4:3/16:9 aspect ratio supported X1273/X1273N/X1273H: Native 1024 x 768 XGA resolution, Auto/4:3/16:9 aspect ratio supported X1373W/X1373WH:...images the power consumption will also be detected for 5 minutes. • Acer EcoProjection Technology delivers Intelligent power management approach and physical efficiency improvement • ...
...enhanced. - English 1 Introduction Product Features This product is a single-chip DLP® projector, including the following outstanding features: • DLP® technology • P1173/X1171/.../X1173N/X1173H: Native 800 x 600 SVGA resolution, Auto/4:3/16:9 aspect ratio supported X1273/X1273N/X1273H: Native 1024 x 768 XGA resolution, Auto/4:3/16:9 aspect ratio supported X1373W/X1373WH:...images the power consumption will also be detected for 5 minutes. • Acer EcoProjection Technology delivers Intelligent power management approach and physical efficiency improvement • ...
User Manual
Page 12
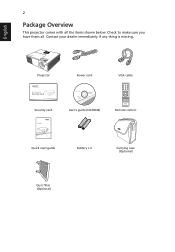
Contact your dealer immediately if any thing is missing. English Projector Power cord VGA cable Security card User's guide (CD-ROM) Remote control Quick start guide Battery x 2 Carrying case (Optional) Dust filter (Optional) Check to make sure you have them all the items shown below. 2 Package Overview This projector comes with all .
Contact your dealer immediately if any thing is missing. English Projector Power cord VGA cable Security card User's guide (CD-ROM) Remote control Quick start guide Battery x 2 Carrying case (Optional) Dust filter (Optional) Check to make sure you have them all the items shown below. 2 Package Overview This projector comes with all .
User Manual
Page 13
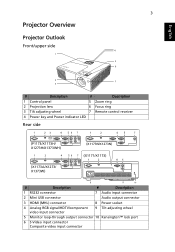
English Projector Overview Projector Outlook Front/upper side 1 3 4 5 6 2 7 3 # Description # Description 1 Control panel 5 Zoom ring 2 Projection lens 6 Focus ring 3 Tilt adjusting wheel 7 Remote control receiver 4 Power key and Power indicator LED Rear side (P1173/X1173H/ X1273H/X1373WH) (X1173A/X1273/ X1373W) -1 -2 (X1173N/X1273N) (X1171/X1173) -1 -2 # Description # Description 1 RS232 connector 7 Audio input connector 2 Mini USB connector Audio...
English Projector Overview Projector Outlook Front/upper side 1 3 4 5 6 2 7 3 # Description # Description 1 Control panel 5 Zoom ring 2 Projection lens 6 Focus ring 3 Tilt adjusting wheel 7 Remote control receiver 4 Power key and Power indicator LED Rear side (P1173/X1173H/ X1273H/X1373WH) (X1173A/X1273/ X1373W) -1 -2 (X1173N/X1273N) (X1171/X1173) -1 -2 # Description # Description 1 RS232 connector 7 Audio input connector 2 Mini USB connector Audio...

User Manual
Page 14
..., returns to the previous step for the OSD menu operation or exits the OSD menu. 6 Power key Refer to the "Turning the Projector On/Off" section. 7 TEMP Temp Indicator LED. 8 SOURCE Chooses RGB, component video, S-Video, composite video, HDMI or HDTV source.... 9 Four directional Selects items or makes adjustments to the "Turning the Projector On/Off" section. 4 Control Panel English 1 7 2 3 8 4 9 5 6 10 3 # Function Description 1 LAMP Lamp Indicator LED. 2 POWER indicator ...
..., returns to the previous step for the OSD menu operation or exits the OSD menu. 6 Power key Refer to the "Turning the Projector On/Off" section. 7 TEMP Temp Indicator LED. 8 SOURCE Chooses RGB, component video, S-Video, composite video, HDMI or HDTV source.... 9 Four directional Selects items or makes adjustments to the "Turning the Projector On/Off" section. 4 Control Panel English 1 7 2 3 8 4 9 5 6 10 3 # Function Description 1 LAMP Lamp Indicator LED. 2 POWER indicator ...
User Manual
Page 15
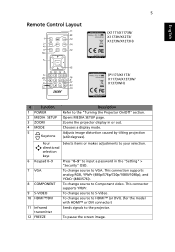
English 5 Remote Control Layout Model No:E-26171 (X1171/X1173N/ X1173H/X1273/ X1273N/X1273H) MC.JG811.009 (P1173/X1173/ X1173A/X1373W/ X1373WH) # Function 1 POWER 2 MEDIA SETUP 3 ZOOM 4 MODE 5 Keystone Description Refer to input a password in or out. ... 9 S-VIDEO To change source to S-Video. 10 HDMI™/DVI To change source to Component video. Zooms the projector display in the "Setting" > "Security" OSD. 7 VGA To change source to the projector. 12 FREEZE To pause the screen image. This connection supports analog RGB, YPbPr (480p/576p/720p/1080i/1080p), and...
English 5 Remote Control Layout Model No:E-26171 (X1171/X1173N/ X1173H/X1273/ X1273N/X1273H) MC.JG811.009 (P1173/X1173/ X1173A/X1373W/ X1373WH) # Function 1 POWER 2 MEDIA SETUP 3 ZOOM 4 MODE 5 Keystone Description Refer to input a password in or out. ... 9 S-VIDEO To change source to S-Video. 10 HDMI™/DVI To change source to Component video. Zooms the projector display in the "Setting" > "Security" OSD. 7 VGA To change source to the projector. 12 FREEZE To pause the screen image. This connection supports analog RGB, YPbPr (480p/576p/720p/1080i/1080p), and...
User Manual
Page 17
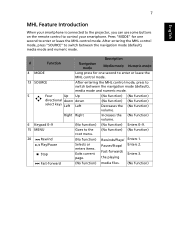
... mode. Play/Pause Stop Selects or enters items. Exits current page. Enters 3. Press "MODE" for one second to control your smartphone is connected to the projector, you can use some buttons on the remote control to enter or leave the MHL control mode.
... mode. Play/Pause Stop Selects or enters items. Exits current page. Enters 3. Press "MODE" for one second to control your smartphone is connected to the projector, you can use some buttons on the remote control to enter or leave the MHL control mode.
User Manual
Page 18
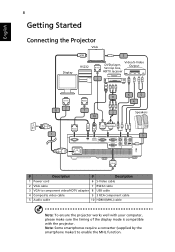
... video/HDTV adapter 8 USB cable 4 Composite video cable 9 3 RCA component cable 5 Audio cable 10 HDMI (MHL) cable Note: To ensure the projector works well with your computer, please make sure the timing of the display mode is compatible with the... projector. English 8 Getting Started Connecting the Projector VGA Display RS232 DVD player, Set-top box, Video/S-Video Output HDTV receiver RB G 9 RB G 3 Speakers D-Sub HDTV adapter -1 -2 # Description # Description 1 Power cord 6...
... video/HDTV adapter 8 USB cable 4 Composite video cable 9 3 RCA component cable 5 Audio cable 10 HDMI (MHL) cable Note: To ensure the projector works well with your computer, please make sure the timing of the display mode is compatible with the... projector. English 8 Getting Started Connecting the Projector VGA Display RS232 DVD player, Set-top box, Video/S-Video Output HDTV receiver RB G 9 RB G 3 Speakers D-Sub HDTV adapter -1 -2 # Description # Description 1 Power cord 6...

User Manual
Page 19
...POWER) on the control panel or remote control, and the Power indicator LED will detect your source (computer, notebook, video player, etc.). The projector will turn blue. 3 Turn on the remote control to multiple sources at the same time, use "SOURCE" on the control panel or remote ...is disabled). • If the screen displays "No Signal", please make sure the signal cables are securely connected. English 9 Turning the Projector On/Off Turning On the Projector 1 Ensure that the power cord and signal cable are securely connected. • If you connect to switch between inputs. 1 & 2
...POWER) on the control panel or remote control, and the Power indicator LED will detect your source (computer, notebook, video player, etc.). The projector will turn blue. 3 Turn on the remote control to multiple sources at the same time, use "SOURCE" on the control panel or remote ...is disabled). • If the screen displays "No Signal", please make sure the signal cables are securely connected. English 9 Turning the Projector On/Off Turning On the Projector 1 Ensure that the power cord and signal cable are securely connected. • If you connect to switch between inputs. 1 & 2

User Manual
Page 20
... ensure that the system cools properly. 2 As long as the power cord remains plugged in, you can press the power button to turn the projector immediately back on anytime during the 2-minute shutdown process. 3 Once the system has finished cooling, the LED Power indicator will stop blinking and turn... process" Press the power button again. 2 The LED Power indicator will turn solid red to indicate standby mode. 3 It is turned off , the projector will automatically shut down, and the LED Temp indicator will turn solid red. When Instant Resume is selected: 1 The LED Power indicator will turn RED...
... ensure that the system cools properly. 2 As long as the power cord remains plugged in, you can press the power button to turn the projector immediately back on anytime during the 2-minute shutdown process. 3 Once the system has finished cooling, the LED Power indicator will stop blinking and turn... process" Press the power button again. 2 The LED Power indicator will turn solid red to indicate standby mode. 3 It is turned off , the projector will automatically shut down, and the LED Temp indicator will turn solid red. When Instant Resume is selected: 1 The LED Power indicator will turn RED...

User Manual
Page 21
To lower the image: 1 Use the front Tilt adjusting wheel to lower the image to the desired height angle. 2 Use the rear Tilt adjusting wheel to fine-tune the display angle. To raise the image: 1 Use the front Tilt adjusting wheel to raise the image to the desired height and angle. 2 Use the rear Tilt adjusting wheel to fine-tune the display angle. 2 Tilt adjusting wheel 1 Tilt adjusting wheel English 11 Adjusting the Projected Image Adjusting the Height of the Projected Image The projector is equipped with two elevator feet for adjusting the image height.
To lower the image: 1 Use the front Tilt adjusting wheel to lower the image to the desired height angle. 2 Use the rear Tilt adjusting wheel to fine-tune the display angle. To raise the image: 1 Use the front Tilt adjusting wheel to raise the image to the desired height and angle. 2 Use the rear Tilt adjusting wheel to fine-tune the display angle. 2 Tilt adjusting wheel 1 Tilt adjusting wheel English 11 Adjusting the Projected Image Adjusting the Height of the Projected Image The projector is equipped with two elevator feet for adjusting the image height.
User Manual
Page 22
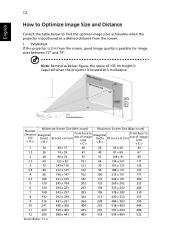
... Image Size and Distance Consult the table below figure, the space of 133 cm height is required when the projector is located at a desired distance from the screen. • SVGA/XGA If the projector is 3 m from the screen, good image quality is positioned at 3 m distance. Max screen size Min screen size 79... to top of image (cm) < C > Maximum Screen Size (Max zoom) Diagonal (inch) < B > W (cm) x H (cm) From base to find the optimal image sizes achievable when the projector is possible for image sizes between 72" and 79".
... Image Size and Distance Consult the table below figure, the space of 133 cm height is required when the projector is located at a desired distance from the screen. • SVGA/XGA If the projector is 3 m from the screen, good image quality is positioned at 3 m distance. Max screen size Min screen size 79... to top of image (cm) < C > Maximum Screen Size (Max zoom) Diagonal (inch) < B > W (cm) x H (cm) From base to find the optimal image sizes achievable when the projector is possible for image sizes between 72" and 79".
User Manual
Page 23
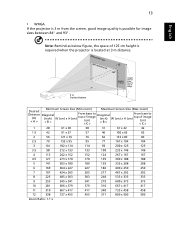
13 • WXGA If the projector is 3 m from the screen, good image quality is located at 3 m distance. Max screen size Min screen size 93" 84" Height: 114 cm Height: 125 cm ... top of image (cm) < C > Maximum Screen Size (Max zoom) Diagonal (inch) < B > W (cm) x H (cm) From base to top of 125 cm height is required when the projector is possible for image sizes between 84" and 93". English Note: Remind as below figure, the space of image (cm) < C > 1 28 61 x 38 38 31...
13 • WXGA If the projector is 3 m from the screen, good image quality is located at 3 m distance. Max screen size Min screen size 93" 84" Height: 114 cm Height: 125 cm ... top of image (cm) < C > Maximum Screen Size (Max zoom) Diagonal (inch) < B > W (cm) x H (cm) From base to top of 125 cm height is required when the projector is possible for image sizes between 84" and 93". English Note: Remind as below figure, the space of image (cm) < C > 1 28 61 x 38 38 31...
User Manual
Page 24
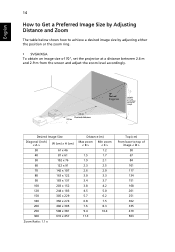
... achieve a desired image size by adjusting either the position or the zoom ring. • SVGA/XGA To obtain an image size of 70", set the projector at a distance between 2.6 m and 2.9 m from the screen and adjust the zoom level accordingly. 2.9 m 2.6 m Desired distance 70" Desired image size Height: 117 cm From base to...
... achieve a desired image size by adjusting either the position or the zoom ring. • SVGA/XGA To obtain an image size of 70", set the projector at a distance between 2.6 m and 2.9 m from the screen and adjust the zoom level accordingly. 2.9 m 2.6 m Desired distance 70" Desired image size Height: 117 cm From base to...


