
User Manual
Page 3
... is easily accessible and located as close to the equipment operator as disconnecting device Observe the following guidelines when connecting and disconnecting power to the external power supply unit: • Install the power supply unit before connecting the power cord to the AC power outlet. • Unplug the power cord before removing the power supply unit from the projector. • If the system has multiple sources of any kind onto...
... is easily accessible and located as close to the equipment operator as disconnecting device Observe the following guidelines when connecting and disconnecting power to the external power supply unit: • Install the power supply unit before connecting the power cord to the AC power outlet. • Unplug the power cord before removing the power supply unit from the projector. • If the system has multiple sources of any kind onto...

User Manual
Page 5
... to service this product from walls and free flow of air around the projector are necessary. • Locations where temperatures may become excessively high, such as opening or removing covers may contaminate optical components, shorten the life span and darken the image. • Locations near fire alarms. • Locations with an ambient temperature above 40 ºC/104 ºF. • Locations where the altitudes are covered by the operating instructions...
... to service this product from walls and free flow of air around the projector are necessary. • Locations where temperatures may become excessively high, such as opening or removing covers may contaminate optical components, shorten the life span and darken the image. • Locations near fire alarms. • Locations with an ambient temperature above 40 ºC/104 ºF. • Locations where the altitudes are covered by the operating instructions...
User Manual
Page 6
... to change the lamp when warning messages display. • When changing the lamp, please allow the projector to cool down, and follow all changing instructions. • Reset the "Lamp Hour Reset" function from the Onscreen Display "Management" menu after replacing the lamp module. • Do not attempt to fire. • When switching the projector off, please ensure the projector completes its own removable cover. It may rise and cause damage when the filter/ventilation...
... to change the lamp when warning messages display. • When changing the lamp, please allow the projector to cool down, and follow all changing instructions. • Reset the "Lamp Hour Reset" function from the Onscreen Display "Management" menu after replacing the lamp module. • Do not attempt to fire. • When switching the projector off, please ensure the projector completes its own removable cover. It may rise and cause damage when the filter/ventilation...
User Manual
Page 8
... from the Onscreen Display "Management" menu after replacing the lamp module. • When switching the projector off, please ensure the projector completes its cooling cycle before disconnecting power. • Turn on the projector first and then the signal sources. • Do not use lens cap when projector is in operation. • When the lamp reaches the end of its life, it shows warning messages. • Reset the "Lamp Hour Reset" function from AC outlet...
... from the Onscreen Display "Management" menu after replacing the lamp module. • When switching the projector off, please ensure the projector completes its cooling cycle before disconnecting power. • Turn on the projector first and then the signal sources. • Do not use lens cap when projector is in operation. • When the lamp reaches the end of its life, it shows warning messages. • Reset the "Lamp Hour Reset" function from AC outlet...
User Manual
Page 9
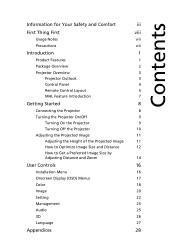
...2 Projector Overview 3 Projector Outlook 3 Control Panel 4 Remote Control Layout 5 MHL Feature Introduction 7 Getting Started 8 Connecting the Projector 8 Turning the Projector On/Off 9 Turning On the Projector 9 Turning Off the Projector 10 Adjusting the Projected Image 11 Adjusting the Height of the Projected Image 11 How to Optimize Image Size and Distance 12 How to Get a Preferred Image Size by Adjusting Distance and Zoom 14 User Controls 16 Installation Menu 16 Onscreen Display (OSD) Menus 17 Color 18 Image 20 Setting 22 Management 25 Audio 25...
...2 Projector Overview 3 Projector Outlook 3 Control Panel 4 Remote Control Layout 5 MHL Feature Introduction 7 Getting Started 8 Connecting the Projector 8 Turning the Projector On/Off 9 Turning On the Projector 9 Turning Off the Projector 10 Adjusting the Projected Image 11 Adjusting the Height of the Projected Image 11 How to Optimize Image Size and Distance 12 How to Get a Preferred Image Size by Adjusting Distance and Zoom 14 User Controls 16 Installation Menu 16 Onscreen Display (OSD) Menus 17 Color 18 Image 20 Setting 22 Management 25 Audio 25...
User Manual
Page 11
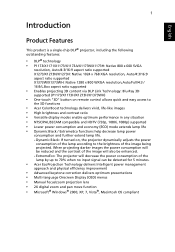
... WXGA resolution,Auto/Full/4:3 / 16:9/L.Box aspect ratio supported • Enables projecting 3D content via DLP Link Technology: Blu-Ray 3D supported (P1173/X1173H/X1273H/X1373WH) • One-touch "3D" button on , the projector dynamically adjusts the power consumption of the lamp according to the brightness of the lamp by up to the 3D functions • Acer ColorBoost technology delivers vivid, life-like images • High...
... WXGA resolution,Auto/Full/4:3 / 16:9/L.Box aspect ratio supported • Enables projecting 3D content via DLP Link Technology: Blu-Ray 3D supported (P1173/X1173H/X1273H/X1373WH) • One-touch "3D" button on , the projector dynamically adjusts the power consumption of the lamp according to the brightness of the lamp by up to the 3D functions • Acer ColorBoost technology delivers vivid, life-like images • High...
User Manual
Page 15
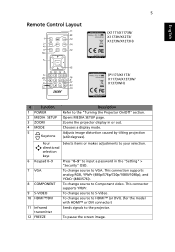
... HDMI™ or DVI connector) 11 Infrared transmitter Sends signals to the "Turning the Projector On/Off" section. Zooms the projector display in the "Setting" > "Security" OSD. 7 VGA To change source to VGA. English 5 Remote Control Layout Model No:E-26171 (X1171/X1173N/ X1173H/X1273/ X1273N/X1273H) MC.JG811.009 (P1173/X1173/ X1173A/X1373W/ X1373WH) # Function 1 POWER 2 MEDIA SETUP 3 ZOOM 4 MODE 5 Keystone Description Refer to the projector. 12 FREEZE To pause the screen image. Opens MEDIA SETUP...
... HDMI™ or DVI connector) 11 Infrared transmitter Sends signals to the "Turning the Projector On/Off" section. Zooms the projector display in the "Setting" > "Security" OSD. 7 VGA To change source to VGA. English 5 Remote Control Layout Model No:E-26171 (X1171/X1173N/ X1173H/X1273/ X1273N/X1273H) MC.JG811.009 (P1173/X1173/ X1173A/X1373W/ X1373WH) # Function 1 POWER 2 MEDIA SETUP 3 ZOOM 4 MODE 5 Keystone Description Refer to the projector. 12 FREEZE To pause the screen image. Opens MEDIA SETUP...

User Manual
Page 19
... power cord and signal cable are securely connected. • If you connect to multiple sources at the same time, use "SOURCE" on the control panel or remote control, or the direct source key on the control panel or remote control, and the Power indicator LED will detect your source (computer, notebook, video player, etc.). The projector will turn blue. 3 Turn on your source automatically (when the Source Lock function is disabled). • If the screen displays "No Signal", please make sure the signal cables are securely connected...
... power cord and signal cable are securely connected. • If you connect to multiple sources at the same time, use "SOURCE" on the control panel or remote control, or the direct source key on the control panel or remote control, and the Power indicator LED will detect your source (computer, notebook, video player, etc.). The projector will turn blue. 3 Turn on your source automatically (when the Source Lock function is disabled). • If the screen displays "No Signal", please make sure the signal cables are securely connected...

User Manual
Page 26
... remote control. (POWER) on the control panel or 2 Press "MENU" on the control panel or remote control to launch the OSD for reference only and may differ from the actual design. 4 The Installation menu includes several options. English 16 User Controls Installation Menu The Installation menu provides an Onscreen Display (OSD) for feature setting. Use the OSD only when the message "No signal" is for projector installation and maintenance. 3 The background pattern acts as screen size and distance, focus...
... remote control. (POWER) on the control panel or 2 Press "MENU" on the control panel or remote control to launch the OSD for reference only and may differ from the actual design. 4 The Installation menu includes several options. English 16 User Controls Installation Menu The Installation menu provides an Onscreen Display (OSD) for feature setting. Use the OSD only when the message "No signal" is for projector installation and maintenance. 3 The background pattern acts as screen size and distance, focus...
User Manual
Page 28
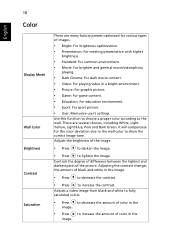
..., including White, Light Yellow, Light Blue, Pink and Dark Green. There are many factory presets optimized for the color deviation due to the wall color to show the correct image tone. Adjusting the contrast changes the amount of color in a bright environment. • Picture: For graphic picture. • Game: For game content. • Education: For education environment. • Sport: For sport picture. • User: Memorize user's settings. Controls the degree...
..., including White, Light Yellow, Light Blue, Pink and Dark Green. There are many factory presets optimized for the color deviation due to the wall color to show the correct image tone. Adjusting the contrast changes the amount of color in a bright environment. • Picture: For graphic picture. • Game: For game content. • Education: For education environment. • Sport: For sport picture. • User: Memorize user's settings. Controls the degree...

User Manual
Page 29
... not supported under computer mode. Effects the representation of red in the image. At higher color temperatures, the screen looks colder; Adjusts the color temperature. English 19 Tint Color Temperature Dynamic Black Gamma Adjusts the color balance of red and green. • Press to increase the amount of green in the image. • Press to the brightness of the image will look brighter. If turned on, the projector dynamically adjusts the power consumption...
... not supported under computer mode. Effects the representation of red in the image. At higher color temperatures, the screen looks colder; Adjusts the color temperature. English 19 Tint Color Temperature Dynamic Black Gamma Adjusts the color balance of red and green. • Press to increase the amount of green in the image. • Press to the brightness of the image will look brighter. If turned on, the projector dynamically adjusts the power consumption...
User Manual
Page 30
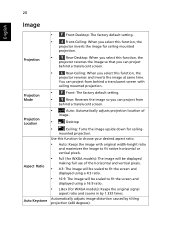
... can project behind a translucent screen. • Rear-Ceiling: When you select this function, the projector inverts the image for ceiling-mounted projection. Projection Location Aspect Ratio Auto Keystone • Auto: Automatically adjusts projection location of the horizontal and vertical pixels. • 4:3: The image will be scaled to fit the screen and displayed using a 4:3 ratio. • 16:9: The image will be displayed making full use of image. • Desktop • Ceiling: Turns the image upside down for WXGA models): Keeps the original signal...
... can project behind a translucent screen. • Rear-Ceiling: When you select this function, the projector inverts the image for ceiling-mounted projection. Projection Location Aspect Ratio Auto Keystone • Auto: Automatically adjusts projection location of the horizontal and vertical pixels. • 4:3: The image will be scaled to fit the screen and displayed using a 4:3 ratio. • 16:9: The image will be displayed making full use of image. • Desktop • Ceiling: Turns the image upside down for WXGA models): Keeps the original signal...
User Manual
Page 32
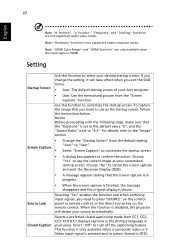
Setting Startup Screen Screen Capture Source Lock Closed Caption Use this function to select your desired startup screen. When this function is HDMI. Position", "Frequency" and "Tracking" functions are only available when the input signal is disabled, the projector will take effect when you change the setting, it will detect your Acer projector. • User: Use the memorized picture from CC1, CC2, CC3, CC4 (CC1 displays captions in the primary...
Setting Startup Screen Screen Capture Source Lock Closed Caption Use this function to select your desired startup screen. When this function is HDMI. Position", "Frequency" and "Tracking" functions are only available when the input signal is disabled, the projector will take effect when you change the setting, it will detect your Acer projector. • User: Use the memorized picture from CC1, CC2, CC3, CC4 (CC1 displays captions in the primary...
User Manual
Page 33
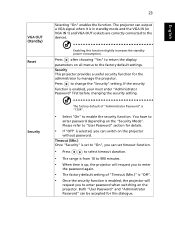
..." is set to enter password when switching on the projector. English The factory default of "Timeout (Min.)" is "Off". • Once the security function is selected, you can output a VGA signal when it is enabled, your must enter "Administrator Password" first before changing the security setting. Both "User Password" and "Administrator Password" can switch on the "Security Mode". Press after choosing "Yes" to return the display parameters...
..." is set to enter password when switching on the projector. English The factory default of "Timeout (Min.)" is "Off". • Once the security function is selected, you can output a VGA signal when it is enabled, your must enter "Administrator Password" first before changing the security setting. Both "User Password" and "Administrator Password" can switch on the "Security Mode". Press after choosing "Yes" to return the display parameters...
User Manual
Page 34
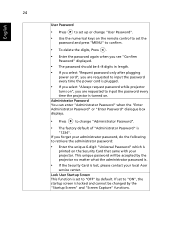
... screen is locked and cannot be changed by default. Administrator Password You can enter "Administrator Password" when the "Enter Administrator Password" or "Enter Password" dialogue box displays. • Press to input the password every time the projector is turned on the Security Card that came with your projector. 24 English User Password • Press to set up or change "User Password". • Use the numerical keys on the remote control to set the password and press "MENU...
... screen is locked and cannot be changed by default. Administrator Password You can enter "Administrator Password" when the "Enter Administrator Password" or "Enter Password" dialogue box displays. • Press to input the password every time the projector is turned on the Security Card that came with your projector. 24 English User Password • Press to set up or change "User Password". • Use the numerical keys on the remote control to set the password and press "MENU...
User Manual
Page 35
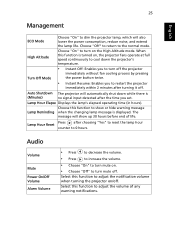
... power button twice. • Instant Resume: Enables you set. When this function to adjust the volume of life. Choose this function to adjust the notification volume when turning the projector on , the projector fans operate at full speed continuously to cool down while there is displayed. Lamp Hour Elapse Displays the lamp's elapsed operating time (in hours). Select this function to show up 30 hours before end of any warning notifications. Audio...
... power button twice. • Instant Resume: Enables you set. When this function to adjust the volume of life. Choose this function to adjust the notification volume when turning the projector on , the projector fans operate at full speed continuously to cool down while there is displayed. Lamp Hour Elapse Displays the lamp's elapsed operating time (in hours). Select this function to show up 30 hours before end of any warning notifications. Audio...
User Manual
Page 38
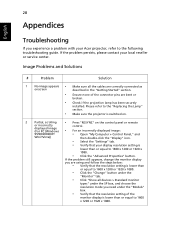
... under the SP box, and choose the resolution mode you experience a problem with your Acer projector, refer to the following troubleshooting guide. If the problem persists, please contact your local reseller or service center. Please refer to the "Replacing the Lamp" section. • Make sure the projector is switched on. 2 Partial, scrolling • Press "RESYNC" on the control panel or remote or incorrectly displayed image (For PC (Windows • control.
... under the SP box, and choose the resolution mode you experience a problem with your Acer projector, refer to the following troubleshooting guide. If the problem persists, please contact your local reseller or service center. Please refer to the "Replacing the Lamp" section. • Make sure the projector is switched on. 2 Partial, scrolling • Press "RESYNC" on the control panel or remote or incorrectly displayed image (For PC (Windows • control.
User Manual
Page 40
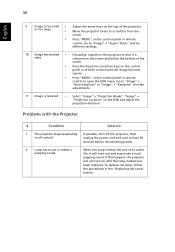
... of the projector. Problems with the Projector # Condition Solution 1 The projector stops responding If possible, turn off the projector, then to or further from the screen. • Press "MENU" on the control panel or remote control. If this happens, the projector will burn out and may make adjustments. 11 Image is reversed • Select "Image" > "Projection Mode", "Image" > "Projection Location" on the control panel or remote control to "Image" > "Aspect Ratio" and try different settings. 10 Image has...
... of the projector. Problems with the Projector # Condition Solution 1 The projector stops responding If possible, turn off the projector, then to or further from the screen. • Press "MENU" on the control panel or remote control. If this happens, the projector will burn out and may make adjustments. 11 Image is reversed • Select "Image" > "Projection Mode", "Image" > "Projection Location" on the control panel or remote control to "Image" > "Aspect Ratio" and try different settings. 10 Image has...

User Manual
Page 41
... check the dust filters if they are installed. Replacement suggested! If the dust filter is used. Projector Overheated. Projector Overheated - Prepare to replace it . Lamp will automatically turn off soon. the projector has exceeded its recommended operating temperature and must be allowed to reach its useful life in full power operation. Lamp is not working. the lamp is about to cool down before it is clogged with dust, please clean it soon. the system fan...
... check the dust filters if they are installed. Replacement suggested! If the dust filter is used. Projector Overheated. Projector Overheated - Prepare to replace it . Lamp will automatically turn off soon. the projector has exceeded its recommended operating temperature and must be allowed to reach its useful life in full power operation. Lamp is not working. the lamp is about to cool down before it is clogged with dust, please clean it soon. the system fan...

User Manual
Page 42
Error (Lamp breakdown) -- V Quick flashing --- V LAMP LED Red -- ---- -- --- Quick flashing V V Quick flashing -- -- -- 32 LED & Alarm Definition Listing LED Messages English Message Standby (Power cord plugged in) Power on Lamp retry Turning off (Cooling state) Turning off (Cooling completed) Error (Thermal failure) Error (Fan lock failure) Power LED Red Blue V -- --- V -- failure) V V V Quick flashing TEMP LED Red -- --- -- -- Error (Color wheel --
Error (Lamp breakdown) -- V Quick flashing --- V LAMP LED Red -- ---- -- --- Quick flashing V V Quick flashing -- -- -- 32 LED & Alarm Definition Listing LED Messages English Message Standby (Power cord plugged in) Power on Lamp retry Turning off (Cooling state) Turning off (Cooling completed) Error (Thermal failure) Error (Fan lock failure) Power LED Red Blue V -- --- V -- failure) V V V Quick flashing TEMP LED Red -- --- -- -- Error (Color wheel --


